


 本文详细介绍如何在SpringBoot项目中使用Freemarker模板引擎,包括pom文件配置、启动类创建、页面编写及接口层代码实现。通过具体示例展示如何搭建登录页面并处理登录逻辑。
一、导入pom文件
这里有个问题,当我父类版本为2.3.0最新版本时,index页面一直跳转不了,后来降低版本就可以了
<!-- 父类  -->
    <parent>
        <groupId>org.springframework.boot</groupId>
        <artifactId>spring-boot-starter-parent</artifactId>
        <version>2.0.5.RELEASE</version>
    </parent>

    <!-- springweb -->
    <dependencies>
        <dependency>
            <groupId>org.springframework.boot</groupId>
            <artifactId>spring-boot-starter-web</artifactId>
        </dependency>
    </dependencies>

    <!-- 可执行jar包 -->
    <build>
        <plugins>
            <plugin>
                <groupId>org.springframework.boot</groupId>
                <artifactId>spring-boot-maven-plugin</artifactId>
            </plugin>
        </plugins>
    </build>
二、创建启动类
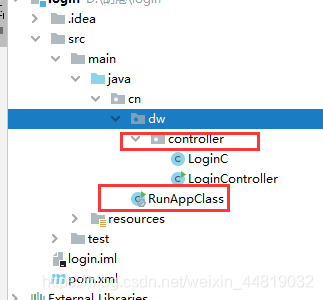
代码为官方文档,启动类名需要根据实际情况而定,例如我项目中类名为RunAppClass
@SpringBootApplication
public class Application {

    public static void main(String[] args) {
        SpringApplication.run(Application.class, args);
    }

}
注意启动类的所处位置需要能扫描到所有的接口类。
结构如下图所示:
三、springboot结合freemarker编写登录界面
pom添加依赖
        <!-- 对freemarker的支持 -->
        <dependency>
            <groupId>org.springframework.boot</groupId>
            <artifactId>spring-boot-starter-freemarker</artifactId>
        </dependency>
创建application.properties文件
# FreeeMarker 模板引擎配置
spring.freemarker.allow-request-override=false
spring.freemarker.cache=false
spring.freemarker.check-template-location=true
spring.freemarker.charset=UTF-8
spring.freemarker.content-type=text/html
spring.freemarker.expose-request-attributes=false
spring.freemarker.expose-session-attributes=false
spring.freemarker.expose-spring-macro-helpers=false
#spring.freemarker.prefix=
#spring.freemarker.request-context-attribute=
#spring.freemarker.settings.*=
#spring.freemarker.suffix=.ftl
#spring.freemarker.template-loader-path=classpath:/templates/ #comma-separated list
#spring.freemarker.view-names= # whitelist of view names that can be resolved
四、编写index简单登录页面
注意,需要在resource下创建一个templates文件夹,templates文件夹下存放ftl页面。
<!DOCTYPE html>
<html xmlns="http://www.w3.org/1999/xhtml" xmlns:th="http://www.thymeleaf.org"
      xmlns:sec="http://www.thymeleaf.org/thymeleaf-extras-springsecurity3">
<head>
    <title>Hello World!</title>
</head>
<body>
<form  action="/login/loginMain" method="post">
    <table align="center">
        <tr>
            <td>
                <input type="text" placeholder="用户名" name="username"/>
            </td>
            <td>
                <input type="text" placeholder="密码" name="password"/>
            </td>
            <td>
                <button type="submit">登录</button>
            </td>
        </tr>
    </table>
</form>
</body>
</html>
成功后跳转的页面
<!DOCTYPE html>
<html xmlns="http://www.w3.org/1999/xhtml" xmlns:th="http://www.thymeleaf.org"
      xmlns:sec="http://www.thymeleaf.org/thymeleaf-extras-springsecurity3">
<head>
    <title>Hello World!</title>
</head>
<body>
<h1>登录成功</h1>
</body>
</html>
错误页面
<!DOCTYPE html>
<html xmlns="http://www.w3.org/1999/xhtml" xmlns:th="http://www.thymeleaf.org"
      xmlns:sec="http://www.thymeleaf.org/thymeleaf-extras-springsecurity3">
<head>
    <title>Hello World!</title>
</head>
<body>
<h1>登录失败</h1>
</body>
</html>
五、接口层代码
这里只是制作一个简单登录页面,因此username跟password都是写死的
@Controller
@RequestMapping("/login")
public class Login {
    @RequestMapping("/loginMain")
    public  String login(String username,String password){
        if(username.equals("duan") && password.equals("123")){
            return "main";
        }else {
            return "error";
        }
    }
}


 9442
9442

 被折叠的 条评论
为什么被折叠?
被折叠的 条评论
为什么被折叠?
 到【灌水乐园】发言


