


一.shell
1.什么是shell ?
脚本中命令的解释器
2.shell脚本的意义
1.记录命令执行的过程和执行逻辑,以便以后重复执行
2.脚本可以批量处理主机
3.脚本可以定时处理主机
3.如何创建shell脚本
#!/bin/bash ##幻数
vim自动添加脚本首部:
vim ~/.vimrc

set nu ts=2 et ai

"map<F4> ms:call WESTOSSHELL()<cr>'s    ##按F4时出现, “ 表注释
autocmd BufNewFile *.sh,.script call WESTOSSHELL()  ##当建立以.sh或者.script结尾的新的文件时,自动调用WESTOSHELL
func WESTOSSHELL()
        call append(0,"############################")
        call append(1,"# Author:           ")
        call append(2,"# Version:          ")
        call append(3,"#Create_Time: ".strftime("%Y-%m-%d"))
        call append(4,"#Mail: ")
        call append(5,"#Info: ")
        call append(6,"# ")
        call append(7,"##############################")
        call append(8,"")
        call append(9,"#!/bin/bash")
endfunc
二.如何执行shell脚本
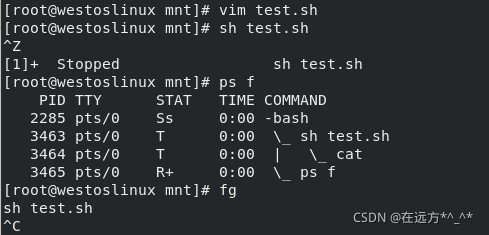
1.手动在环境中开启指定解释器
sh test.sh
2.直接在当前环境中运行shell中的指令不开启新的shell
source script.sh
. script.sh

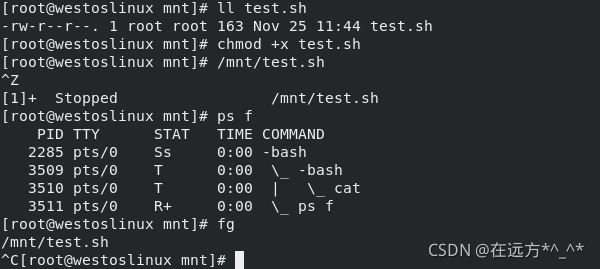
3.开启脚本中指定的shell并使用此shell环境运行脚本中的指令
chmod +x script.sh
/xxx/xxx/script.sh
./script.sh
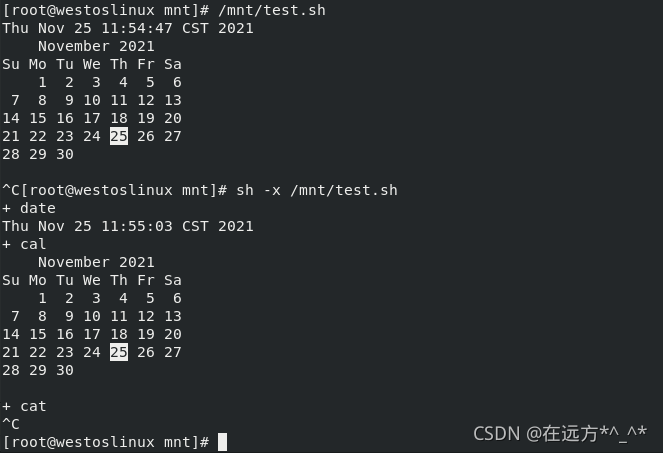
三.如何对脚本进行调试
sh -x /mnt/westos.sh
+ ##运行指令
不带+ ##命令运行的输出
##脚本练习
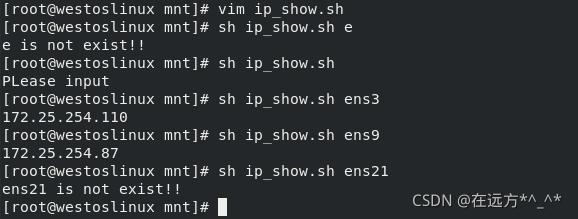
练习脚本1:
ip_show.sh 网卡 ##显示当前的IP
vim ip_show.sh

#!/bin/bash
[ -z "$1" ] &&{
   echo "PLease input "
   exit
}

DEV_MESSAGE=$(ifconfig "$1"  2> /dev/null ) &&{
    echo $DEV_MESSAGE | awk  '/inet\>/{print $6}'

} ||{
    echo "$1 is not exist!!"
}
练习脚本2:
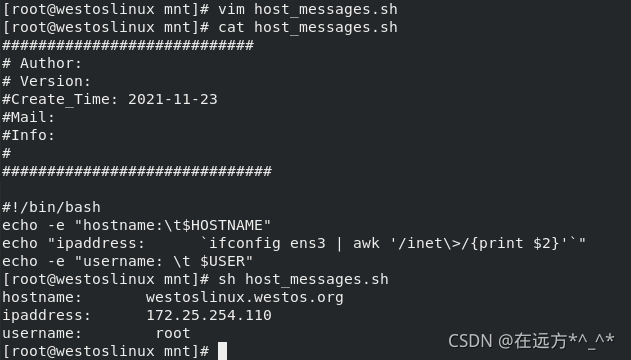
host_messages.sh 显示当前主机的名称,ip登陆当前主机的用户
hostname: xxxxx
ipaddress: xxxx.xxxx.xxx.xxx
username: root
#!/bin/bash
echo -e "hostname:\t$HOSTNAME"
echo "ipaddress:      `ifconfig ens3 | awk '/inet\>/{print $2}'`"
echo -e "username: \t $USER"
[root@westoslinux mnt]# sh host_messages.sh
hostname:	westoslinux.westos.org
ipaddress:      172.25.254.110
username: 	 root
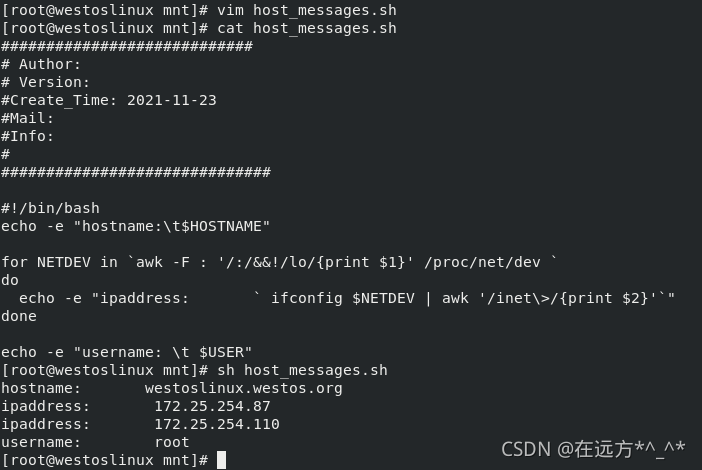
当网卡不止一个时:
vim host_messages.sh
#!/bin/bash
echo -e "hostname:\t$HOSTNAME"
for NETDEV in `awk -F : '/:/&&!/lo/{print $1}' /proc/net/dev `
do
  echo -e "ipaddress:       ` ifconfig $NETDEV | awk '/inet\>/{print $2}'`"
done
echo -e "username: \t $USER"
练习脚本3:
clear_log.sh ##执行此脚本后可以清空日志
sed -n $= /etc/rsyslog.conf  ##显示/etc/rsyslog.conf最后一行的行号
grep -A `sed -n $= /etc/rsyslog.conf` RULES /etc/rsyslog.conf ## 显示/etc/rsyslog.conf中RULES后的79行
awk '!/^#|^$|:/{print $2}'| sed 's/-//g'  ##除了以#开头和空行之外的显示第二列,将-替换为空

从配置文件中获取日志的具体存放路径:
grep -A `sed -n $= /etc/rsyslog.conf` RULES /etc/rsyslog.conf | awk '!/^#|^$|:/{print $2}'| sed 's/-//g'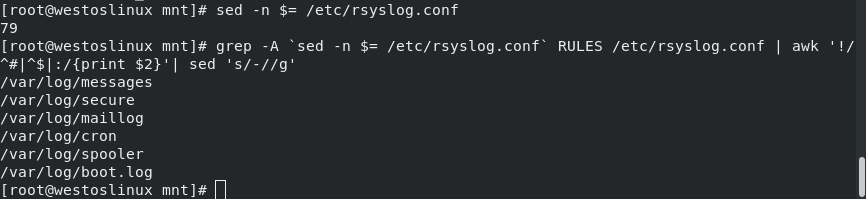
vim clear_log.sh

#!/bin/bash
[ "$USER" != "root" ] &&{
  echo "Please run $0 with root!!"   ##判断是否为超级用户身份运行此脚本
  exit
}
for MESSAGES_FILE in `grep -A $(sed -n $= /etc/rsyslog.conf) RULES /etc/rsyslog.conf | awk '!/^#|^$|:/{print $2}'| sed 's/-//g'`
do
>$MESSAGES_FILE
done 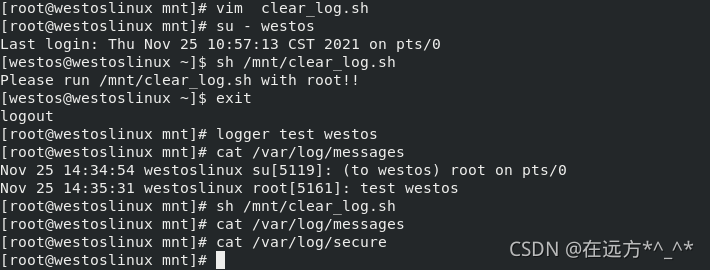


 1322
1322

 被折叠的 条评论
为什么被折叠?
被折叠的 条评论
为什么被折叠?
 到【灌水乐园】发言


