


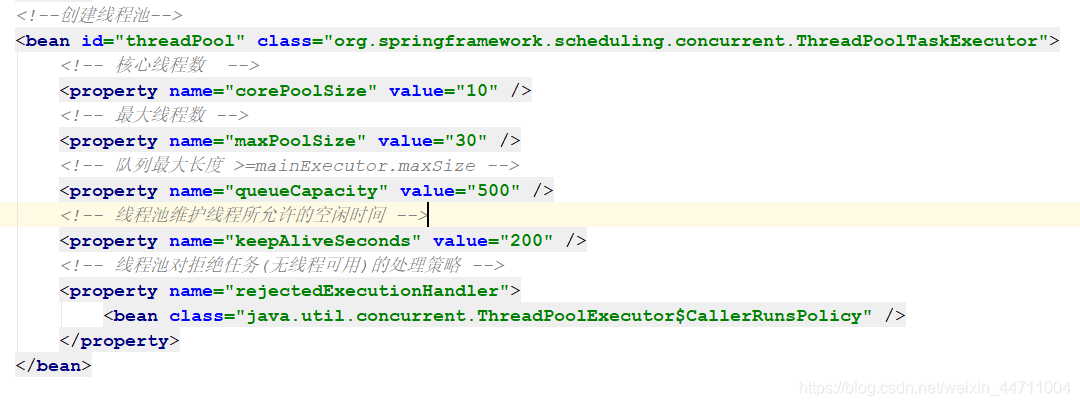
1。配置线程池
2.自定义一个线程类 当然也可以不用定义 看自己选择
public class MyThread implements Callable {
private TestService testService;
private String name;
public MyThread(TestService testService, String name) {
this.testService = testService;
this.name = name;
}
@Override
public Object call() throws Exception {
System.out.println(name+“线程开始----------------------”);
Thread.sleep(5000);
String a =testService.test(name);
System.out.println(name+“线程结束----------------------”);
return a;
}
}
这里我用的callable作为接口。因为想使用下返回值,如不需要用runnable也是一样的 ,尽量不要继承Thread
3.在类中调用
public String test() {
try {
System.out.println(“主线程开始”);
LinkedList< Future> result=new LinkedList<>();
for (int i=0;i<10;i++){
String a =i+“ff”;
MyThread myThread = new MyThread(testService,a);
Future one = threadpool.submit(myThread);//如果是实现的runnable的话 可用threadpool.execute();
result.add(one);
}
System.out.println(“主线程结束”);
return null;
} catch (Exception e) {
System.out.println(e);
}
return “错误”;
}
这样就实现了多线程。控制台打印结果,可以看到执行顺顺序是乱的 ,并且主线程子线程互不干扰。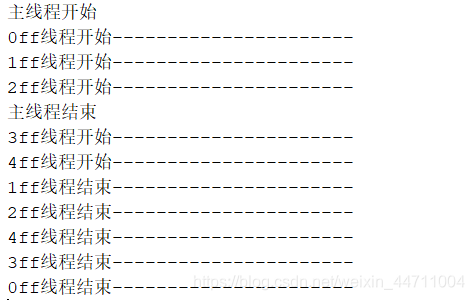


 被折叠的 条评论
为什么被折叠?
被折叠的 条评论
为什么被折叠?
 到【灌水乐园】发言


