


问一问ChatGpt
了解异步之前,先熟悉一下异步的概念,来自gpt:
异步和同步是两种不同的执行模式,用于描述任务的执行方式和调度方式。
-
同步执行(Synchronous Execution):在同步执行中,任务按照顺序依次执行,每个任务的执行必须等待前一个任务完成。在同步执行中,任务的执行是阻塞的,即一个任务的执行会阻塞当前线程,直到任务完成才能继续执行下一个任务。同步执行适用于任务之间有依赖关系,需要按照顺序执行的场景。
-
异步执行(Asynchronous Execution):在异步执行中,任务可以并发或并行地执行,不需要等待前一个任务完成。在异步执行中,任务的执行是非阻塞的,即一个任务的执行不会阻塞当前线程,可以立即返回并继续执行后续的任务。异步执行适用于任务之间相互独立,可以并发执行的场景。
区别:
-
阻塞 vs 非阻塞:同步执行是阻塞的,一个任务的执行会阻塞当前线程;异步执行是非阻塞的,一个任务的执行不会阻塞当前线程。
-
顺序 vs 并发/并行:同步执行按照顺序依次执行任务;异步执行可以并发或并行地执行任务。
-
等待 vs 不等待:同步执行需要等待前一个任务完成才能执行下一个任务;异步执行不需要等待前一个任务完成,可以立即执行后续的任务。
-
调度方式:同步执行由调用方主动触发任务的执行;异步执行可以通过回调、Future/Promise、事件驱动等方式来触发任务的执行。
在编程中,异步执行通常可以提高系统的并发性和响应性,避免阻塞和等待,提高任务的执行效率。然而,异步执行也需要考虑线程安全、并发控制和结果处理等问题。同步执行则更加直观和简单,适用于简单的顺序执行场景。选择使用异步还是同步执行取决于具体的需求和场景。
在读这篇文章原理之前,大家可以参考看一下 美团团队的图解分享,相信这样大家更容易读懂
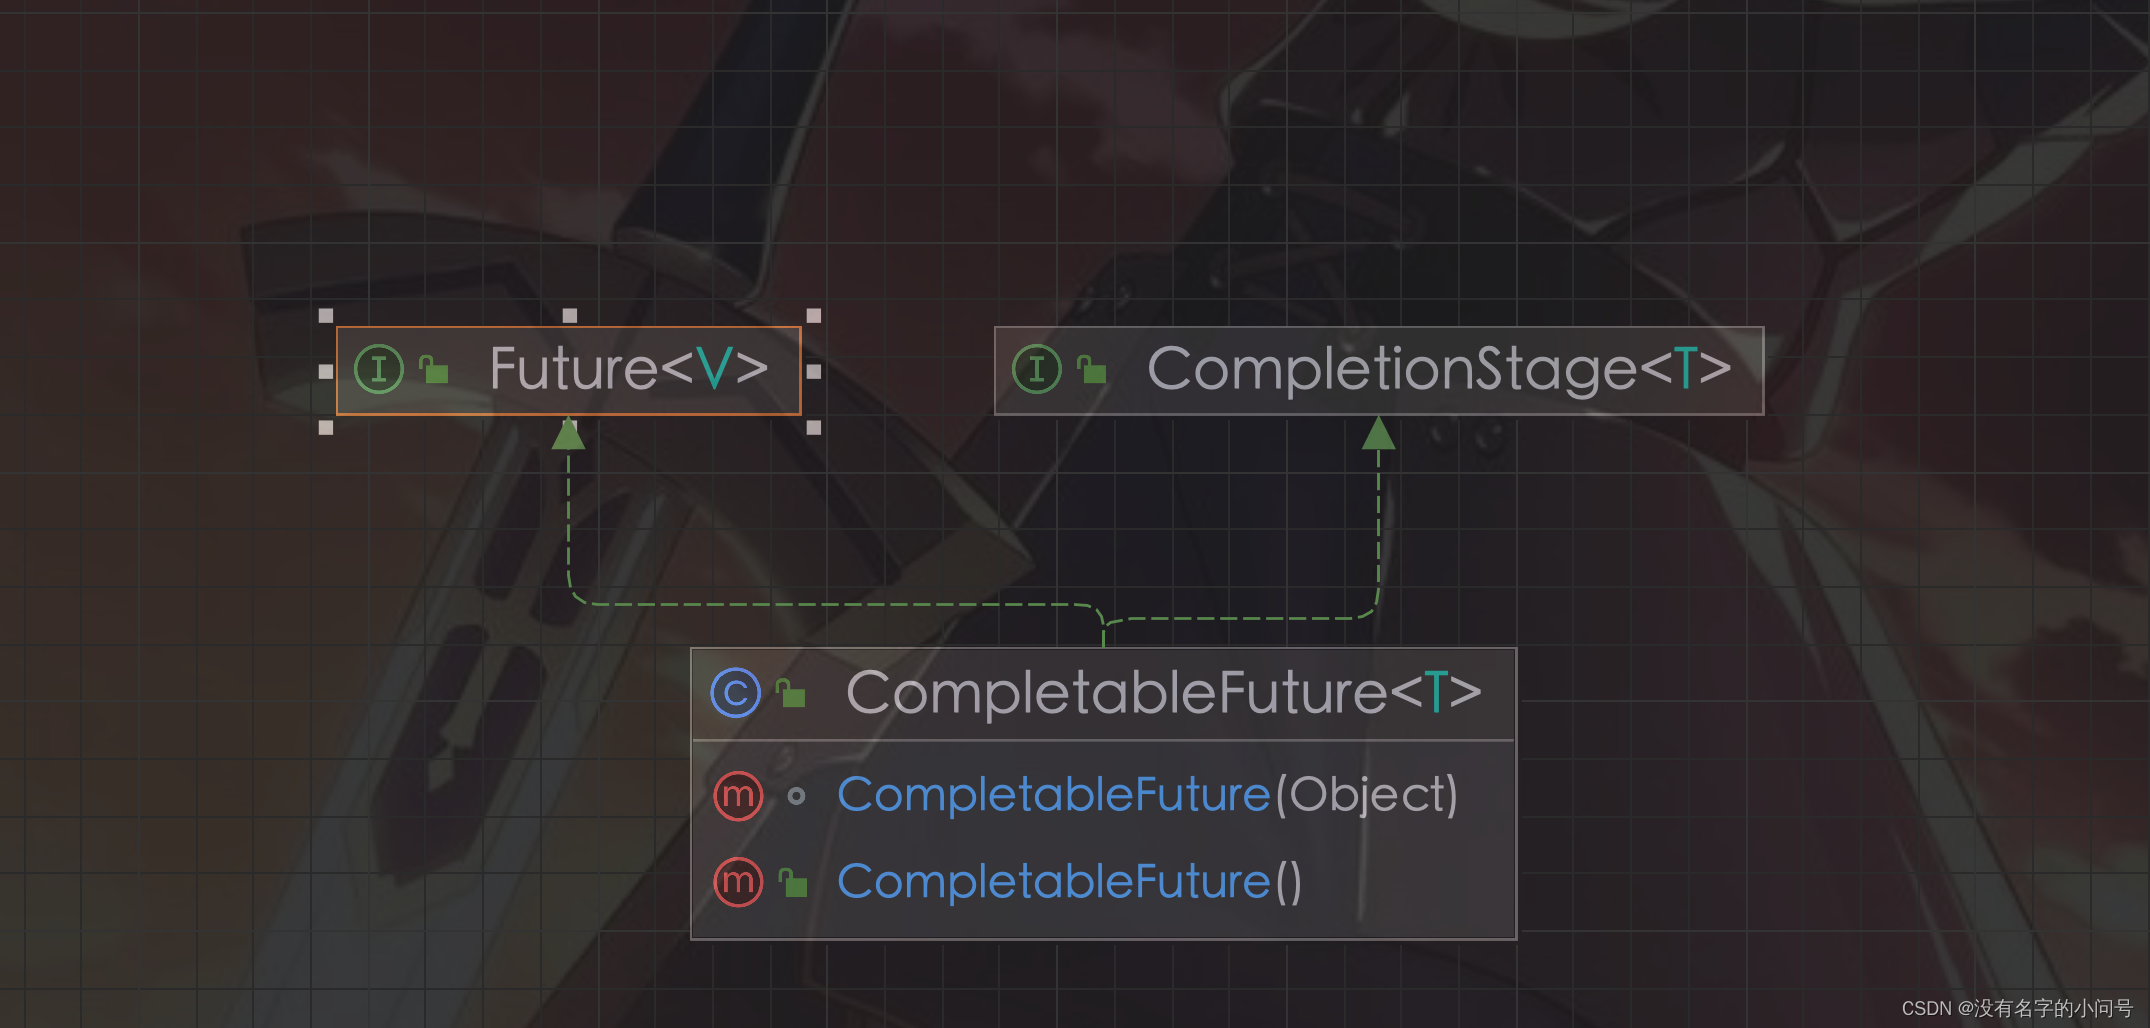
图1 CompletableFuture
CompletableFuture主要实现了Future 和CompletionStage 接口,其中Future提供异步计算结果,CompletionStage则提供thenApply、thenApplyAsync、thenAccept、thenCombine、thenCompose、whenComplete等等编排回调的方法,内部基于回调触发各个依赖的future,可以把CompletionStage理解为异步中的一个stage。而诸如supplyAsync和runAsync等定义异步任务的方法都是在CompletableFuture内部实现,主要作用是定义异步任务,任务接口实现可以是Supplier 代表有返回,也可以是Runnable 无返回值,如supplyAsync和runAsync
CompletableFuture原理浅析
下面以下面代码示例,简单介绍一下CompletableFuture的执行原理,如有错误,请各位大佬指出
// 创建一个CompletableFuture对象,并使用指定的线程池执行异步任务
CompletableFuture<Integer> future1 = CompletableFuture.supplyAsync(() -> {
        // 在后台线程中执行耗时操作
        try {
            Thread.sleep(2000);
        } catch (InterruptedException e) {
            e.printStackTrace();
        }
        return 42;
});
// future2 依赖future1的结果,并且返回hello,thenApply的操作可以认为是往future1中注册回调,很多刚开始上手的同学,上来就接触lambda表达式,而忽略了带有accept和apply方法其实是
// 实现了Consumer 和 Function函数,仅仅是应用场景不同,内部逻辑原理相似,同理supplyAsync方法其实是传入Supplier接口,实现其get()方法
CompletableFuture<String> future2 = future1.thenApply(new Function<Integer, String>() {
        @Override
        public String apply(Integer integer) {
            return integer + "hello";
        }
});
// 同理,往future2中注册回调
future2.thenAccept(new Consumer<String>() {
        @Override
        public void accept(String s) {
            System.out.println(s);
        }
});
AsyncSupply 和 AsyncRun
再了解上面的逻辑原理之前,先看一下这么几个类:AsyncSupply、AsyncRun
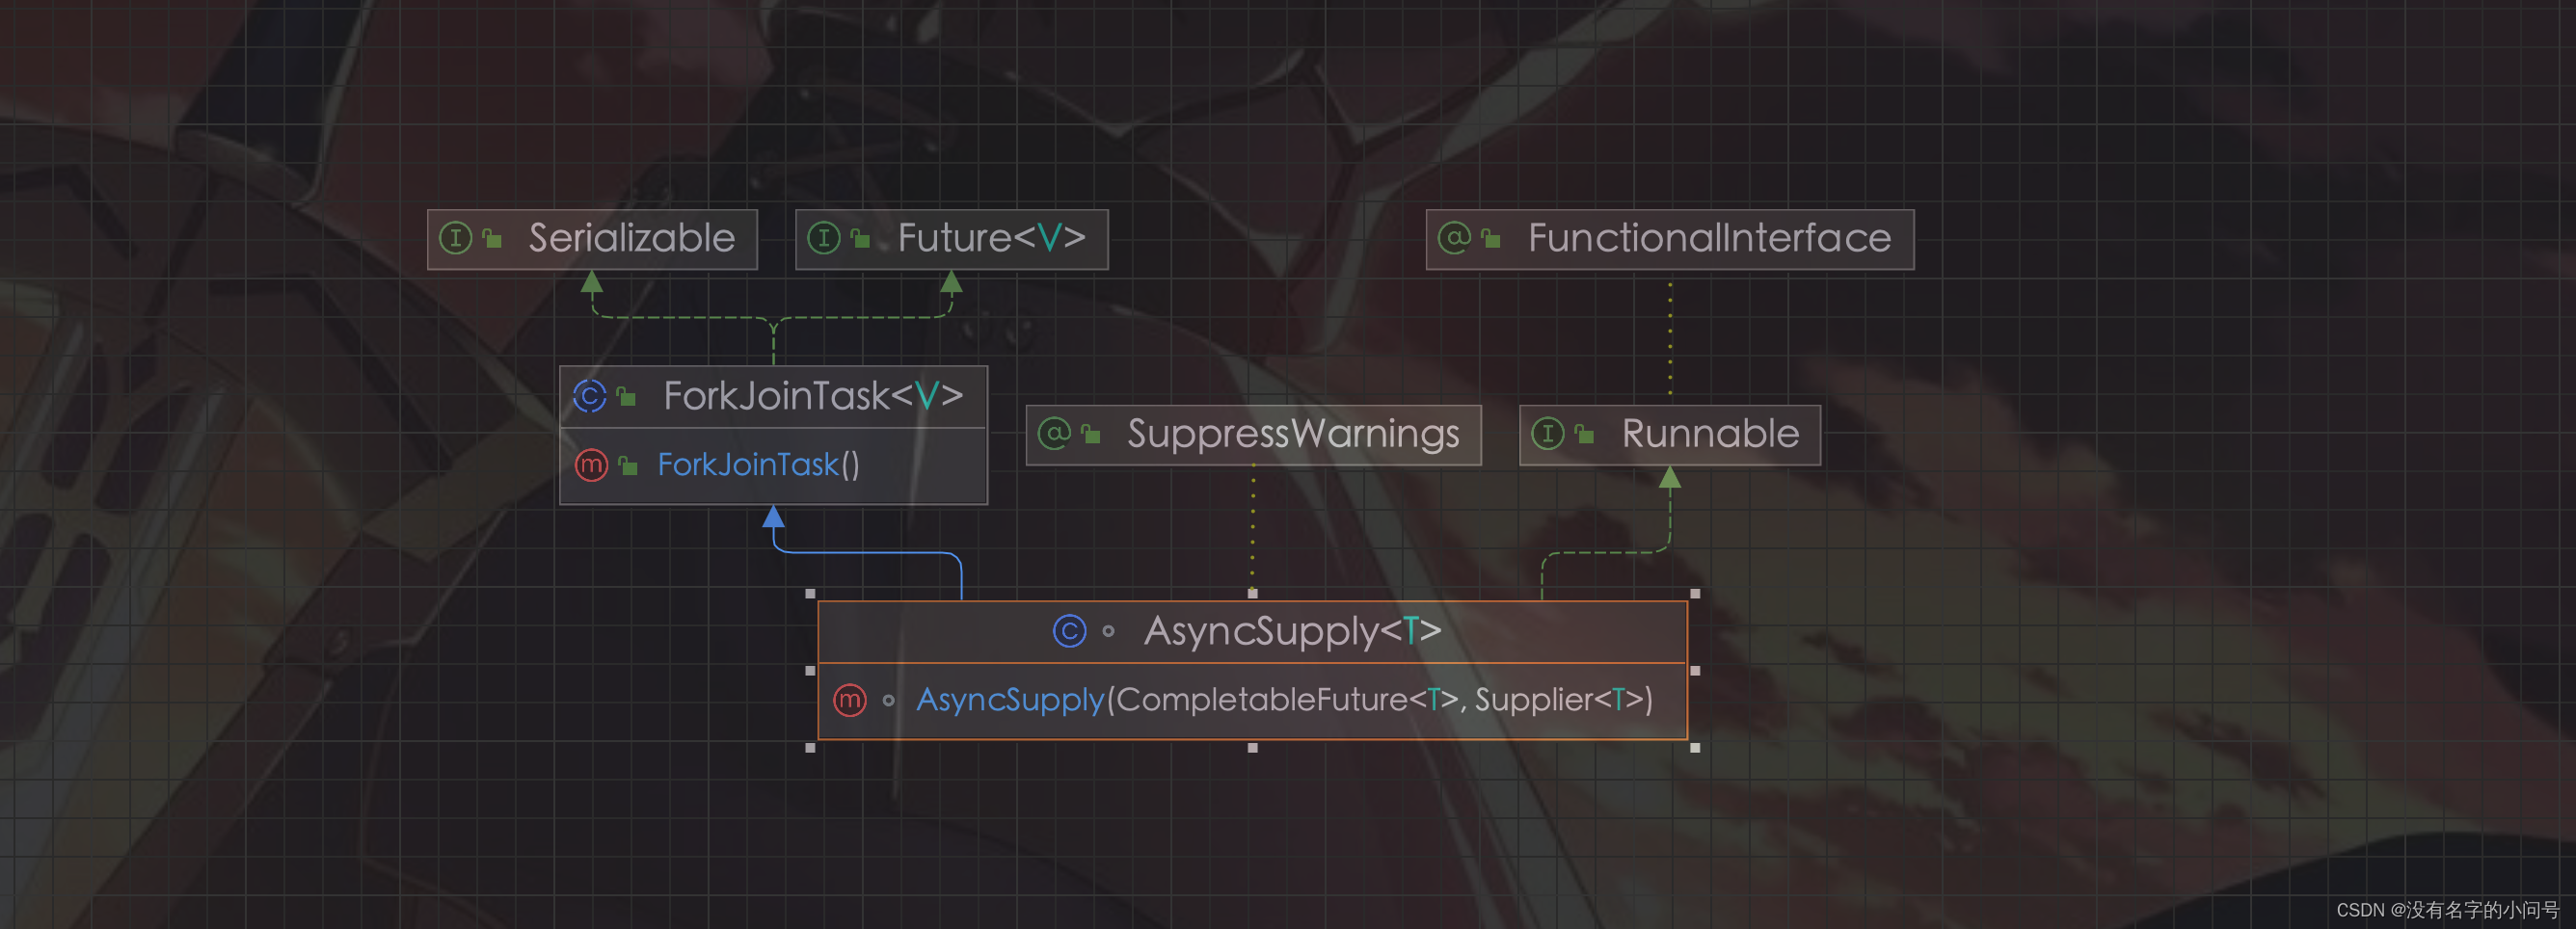
图2 AsyncSupply

图3 AsyncRun
结合源码看一下,可以看到,AsyncSupply 和 AsyncRun都有两个构造参数dep 和 fn,dep都是一个CompletableFuture对象,fn则分别是Supplier 和 Runnable,分别对应我们调用supplyAsync 和runAsync时传入的函数接口
// AsyncSupply
static final class AsyncSupply<T> extends ForkJoinTask<Void>
        implements Runnable, AsynchronousCompletionTask {
        CompletableFuture<T> dep; Supplier<? extends T> fn;
        AsyncSupply(CompletableFuture<T> dep, Supplier<? extends T> fn) {
            this.dep = dep; this.fn = fn;
        }

        public final Void getRawResult() { return null; }
        public final void setRawResult(Void v) {}
        public final boolean exec() { run(); return false; }

        public void run() {
            CompletableFuture<T> d; Supplier<? extends T> f;
            if ((d = dep) != null && (f = fn) != null) {
                dep = null; fn = null;
                if (d.result == null) {
                    try {
                        d.completeValue(f.get()); // 这里是获取fn的执行结果,并设置为dep的结果
                    } catch (Throwable ex) {
                        d.completeThrowable(ex);
                    }
                }
                d.postComplete(); // 这里是执行后续操作,包括触发回调逻辑都在这里实现
            }
        }
    }

// AsyncRun
static final class AsyncRun extends ForkJoinTask<Void>
        implements Runnable, AsynchronousCompletionTask {
        CompletableFuture<Void> dep; Runnable fn;
        AsyncRun(CompletableFuture<Void> dep, Runnable fn) {
            this.dep = dep; this.fn = fn;
        }

        public final Void getRawResult() { return null; }
        public final void setRawResult(Void v) {}
        public final boolean exec() { run(); return false; }

        public void run() {
            CompletableFuture<Void> d; Runnable f;
            if ((d = dep) != null && (f = fn) != null) {
                dep = null; fn = null;
                if (d.result == null) {
                    try {
                        f.run(); // 同理,因为runnalbe 无返回,所以直接调用f.run,执行线程中的任务,这里注意,谁调用f.run,那么谁的线程就会被阻塞,
                                 // 所以在单独使用线程的时候,我们都是使用start方法,而不至于阻塞主线程,这里f.run会阻塞,所以并不会拿不到执行结果就会去执行d.postComplete()
                        d.completeNull();
                    } catch (Throwable ex) {
                        d.completeThrowable(ex);
                    }
                }
                d.postComplete(); // 这里是执行后续操作,包括触发回调逻辑都在这里实现
            }
        }
    }
UniAccept 和 UniApply
我们再来看这两个类UniAccept 和 UniApply,这两个类都继承了UniCompletion extends Completion,这个不重要,只要知道它为其他子类提供了executor(线程池)、dep(CompletableFuture对象)、和src(自己this)三个构造函数即可,两个类也都有自己的fn,分别对应Consumer 和 Function函数,也即我们调用thenApply 和thenAccept方法传入的函数接口
// UniAccept
static final class UniAccept<T> extends UniCompletion<T,Void> {
        Consumer<? super T> fn;
        UniAccept(Executor executor, CompletableFuture<Void> dep,
                  CompletableFuture<T> src, Consumer<? super T> fn) {
            super(executor, dep, src); this.fn = fn; // 构造参数,着重了解dep src fn
        }
        final CompletableFuture<Void> tryFire(int mode) { //这里其实就是触发回调逻辑
            CompletableFuture<Void> d; CompletableFuture<T> a;
            Object r; Throwable x; Consumer<? super T> f;
            if ((d = dep) == null || (f = fn) == null
                || (a = src) == null || (r = a.result) == null)
                return null;
            tryComplete: if (d.result == null) {
                if (r instanceof AltResult) {
                    if ((x = ((AltResult)r).ex) != null) {
                        d.completeThrowable(x, r);
                        break tryComplete;
                    }
                    r = null;
                }
                try {
                    if (mode <= 0 && !claim())
                        return null;
                    else {
                        @SuppressWarnings("unchecked") T t = (T) r;
                        f.accept(t); // 在这里执行
                        d.completeNull();
                    }
                } catch (Throwable ex) {
                    d.completeThrowable(ex);
                }
            }
            dep = null; src = null; fn = null;
            return d.postFire(a, mode);
        }
    }
// UniApply
static final class UniApply<T,V> extends UniCompletion<T,V> {
        Function<? super T,? extends V> fn;
        UniApply(Executor executor, CompletableFuture<V> dep,
                 CompletableFuture<T> src,
                 Function<? super T,? extends V> fn) {
            super(executor, dep, src); this.fn = fn;
        }
        // 回调触发逻辑
        final CompletableFuture<V> tryFire(int mode) {
            CompletableFuture<V> d; CompletableFuture<T> a;
            Object r; Throwable x; Function<? super T,? extends V> f;
            if ((d = dep) == null || (f = fn) == null
                || (a = src) == null || (r = a.result) == null)
                return null;
            tryComplete: if (d.result == null) {
                if (r instanceof AltResult) {
                    if ((x = ((AltResult)r).ex) != null) {
                        d.completeThrowable(x, r);
                        break tryComplete;
                    }
                    r = null;
                }
                try {
                    if (mode <= 0 && !claim())
                        return null;
                    else {
                        @SuppressWarnings("unchecked") T t = (T) r;
                        d.completeValue(f.apply(t)); // 这里才真正执行funciton.apply
                    }
                } catch (Throwable ex) {
                    d.completeThrowable(ex);
                }
            }
            dep = null; src = null; fn = null;
            return d.postFire(a, mode);
        }
    }

// 父类 UniCompletion 提供的方法,使用定义的线程池来执行 dep的function,这也是thenApplyAsync等带有Async后缀的方法和普通方法的区别
final boolean claim() {
            Executor e = executor;
            if (compareAndSetForkJoinTaskTag((short)0, (short)1)) {
                if (e == null)
                    return true;
                executor = null; // disable
                e.execute(this);
            }
            return false;
        }
两个成员变量result & stack
为了接下来能理顺思路,我们再来看两个成员变量和一个方法
    volatile Object result;       // Either the result or boxed AltResult
    volatile Completion stack;    // Top of Treiber stack of dependent actions 注意,这里stack是Completion 也即上文的UniAccept/UniApply

		private static final VarHandle RESULT; // 关联CompletableFuture 的 result变量 存放自己的结果,例如future1.thenApply(fn2),
                                           // 那么这里result其实存放的是futrue1的结果,要触发的fn2 被放置在stack中,也就是UniApply或者UniAccept等继承了Completion的对象
    private static final VarHandle STACK;  // 关联CompletableFuture 的 stack 变量 存放要触发的后续stage future 也就是UniApply或者UniAccept等继承了Completion的对象
    private static final VarHandle NEXT;
    static {
        try {
            MethodHandles.Lookup l = MethodHandles.lookup();
            RESULT = l.findVarHandle(CompletableFuture.class, "result", Object.class);
            STACK = l.findVarHandle(CompletableFuture.class, "stack", Completion.class);
            NEXT = l.findVarHandle(Completion.class, "next", Completion.class);
        } catch (ReflectiveOperationException e) {
            throw new ExceptionInInitializerError(e);
        }

        // Reduce the risk of rare disastrous classloading in first call to
        // LockSupport.park: https://bugs.openjdk.java.net/browse/JDK-8074773
        Class<?> ensureLoaded = LockSupport.class;
    }
}
一个方法completeValue
// CAS设置result
final boolean completeValue(T t) {
       return RESULT.compareAndSet(this, null, (t == null) ? NIL : t);
}
执行原理
好了现在我们再来看示例代码,一步步来分析其执行原理
        // step1 创建一个CompletableFuture对象,并使用指定的线程池执行异步任务
        CompletableFuture<Integer> future1 = CompletableFuture.supplyAsync(() -> {
            // 在后台线程中执行耗时操作
            try {
                Thread.sleep(2000);
            } catch (InterruptedException e) {
                e.printStackTrace();
            }
            return 42;
        });
        // step2 future2 依赖future1的结果,并且返回hello,thenApply的操作可以认为是往future1中注册回调,很多刚开始上手的同学,上来就接触lambda表达式,而忽略了带有accept和apply方法其实是
        // 实现了Consumer 和 Function函数,仅仅是应用场景不同,内部逻辑原理相似,同理supplyAsync方法其实是传入Supplier接口,实现其get()方法
        CompletableFuture<String> future2 = future1.thenApply(new Function<Integer, String>() {
            @Override
            public String apply(Integer integer) {
                return integer + "hello";
            }
        });
        // step3 同理,往future2中注册回调
        future2.thenAccept(new Consumer<String>() {
            @Override
            public void accept(String s) {
                System.out.println(s);
            }
        });
step1
首先我们调用supplyAsync方法注册了一个异步任务,传参类型为Supplier函数匿名内部类实现,采用lambda表达式简化,我们把这个实现记为funciton1,即
CompletableFuture<Integer> future1 = CompletableFuture.supplyAsync(function1);接下来来看一下supplyAsync内部实现,future1 就是返回的d 也就是dep1
public static <U> CompletableFuture<U> supplyAsync(Supplier<U> supplier) {
      return asyncSupplyStage(ASYNC_POOL, supplier); // ->asyncSupplyStage, supplier -> function1
}
static <U> CompletableFuture<U> asyncSupplyStage(Executor e,
                                                 Supplier<U> f) {
        if (f == null) throw new NullPointerException();
        CompletableFuture<U> d = new CompletableFuture<U>(); // new 了一个CompletableFuture作为返回 记为dep1
        e.execute(new AsyncSupply<U>(d, f)); // 开启线程池执行,注意,这里就new了一个AsyncSupply对象,并且将 dep1 和 function1传入,将会直接执行AsyncSupply的run方法
        return d;
 }
// AsyncSupply RUN
public void run() {
  CompletableFuture<T> d; Supplier<? extends T> f;
  if ((d = dep) != null && (f = fn) != null) {
      dep = null; fn = null;
      if (d.result == null) {
        try {
          d.completeValue(f.get()); // 这里是获取fn的执行结果,并执行completeValue方法,CAS设置为dep1的结果,
        } catch (Throwable ex) {
          d.completeThrowable(ex);
        }
      }
      d.postComplete(); // 这里是执行后续操作,包括触发回调逻辑都在这里实现,先不着急看其中的实现
    }
}
step2
接着,执行future1的thenApply方法,并且向其中传入Function匿名内部类,实现apply方法,我们将这个函数记为function2
CompletableFuture<String> future2 = future1.thenApply(function2)下面一起看下thenApply的实现,可以看到thenApply 调用过程中要没直接设置已完成的值 -> uniApplyNow,要么new UniApply对象,将dep2即future2和function2封装,压入future1的stack中,一直等待future1的result不为空,因为thenApply方法没有线程池,所以,要么阻塞当前线程,要么阻塞回调线程,这也是为什么在一些调用异步IO场景中,尽量避免使用ThenApply的原因,因为诸如Netty等异步IO框架,其回调是在IO线程中做的,这样可能因后续处理有耗时逻辑,阻塞IO线程
public <U> CompletableFuture<U> thenApply(
    Function<? super T,? extends U> fn) {
    return uniApplyStage(null, fn); // 调用执行uniApplyStage,这里可以发现入参并没有线程池参数,这里注意一下,fn -> function2
}

private <V> CompletableFuture<V> uniApplyStage(
    Executor e, Function<? super T,? extends V> f) {
    if (f == null) throw new NullPointerException();
    Object r;
    if ((r = result) != null)  // 因为是future1调用 thenApply方法,而future1就是对应step1里面返回的dep1,所以这个result,就是dep1的结果,也就是当前future1的结果
    	return uniApplyNow(r, e, f); //如果future1的结果已经有值,证明已经完成,调用uniApplyNow
    CompletableFuture<V> d = newIncompleteFuture(); // 继续new 一个新的CompletableFuture对象,也就是dep2 -> future2
    unipush(new UniApply<T,V>(e, d, this, f)); // 如果future1 也就是dep1的结果result还未就绪,将dep2 和 funciton2传入UniApply
    return d; // 返回future2
}

// uniApplyNow方法
private <V> CompletableFuture<V> uniApplyNow(
        Object r, Executor e, Function<? super T,? extends V> f) {
        Throwable x;
        CompletableFuture<V> d = newIncompleteFuture();
        if (r instanceof AltResult) {
            if ((x = ((AltResult)r).ex) != null) {
                d.result = encodeThrowable(x, r);
                return d;
            }
            r = null;
        }
        try {
            if (e != null) {
                e.execute(new UniApply<T,V>(null, d, this, f)); //如果线程池不为null,会将任务丢到新线程池,但是thenApply方法的线程池为null
            } else {
                @SuppressWarnings("unchecked") T t = (T) r;
                d.result = d.encodeValue(f.apply(t)); // thenApply方法会执行当前逻辑,阻塞当前的线程,理解为,如果future1的结果已经有值,则该方法是在当前线程执行,会阻塞当前线程
            }
        } catch (Throwable ex) {
            d.result = encodeThrowable(ex);
        }
        return d;
}

// 看unipush方法
final void unipush(Completion c) {
        if (c != null) {
            while (!tryPushStack(c)) { // 这里将future2 也就是dep2 和 funciton2封装为c 放到this.stack中 也就是future1的stack中
                if (result != null) { // 因为当前的future还是future1,future2已经封装到c里面了,这里会一直等dep1的结果是否设置完成
                    NEXT.set(c, null);
                    break;
                }
            }
            if (result != null)
                c.tryFire(SYNC); //如果结果已经有值,触发c中的function2逻辑,并将结果封装到dep2 -> future2中,理论上这里仍旧会阻塞当前线程
                                 // 但这里建议结合最上面CompletableFuture.supplyAsync方法的回调逻辑来看,如果此时结果不为空,也有可能在future1的回调中就执行了,
                                 // 所以阻塞的是回调线程
                                 // -> d.postComplete()
        }
}

// supplyAsync -> AsyncSupply.run方法 回调 -> postComplete
final void postComplete() {
        /*
         * On each step, variable f holds current dependents to pop
         * and run.  It is extended along only one path at a time,
         * pushing others to avoid unbounded recursion.
         */
        CompletableFuture<?> f = this; Completion h;
        while ((h = f.stack) != null ||
               (f != this && (h = (f = this).stack) != null)) {
            CompletableFuture<?> d; Completion t;
            if (STACK.compareAndSet(f, h, t = h.next)) {
                if (t != null) {
                    if (f != this) {
                        pushStack(h);
                        continue;
                    }
                    NEXT.compareAndSet(h, t, null); // try to detach
                }
                f = (d = h.tryFire(NESTED)) == null ? this : d; // 实际上,回调时,已经会触发tryFire,但是不用担心回调这里会执行,上面c.tryFire会重复执行,
                																								// 内部逻辑保证每个任务仅会执行一次
            }
        }
 }

// UniApply类中的回调触发逻辑
final CompletableFuture<V> tryFire(int mode) {
            CompletableFuture<V> d; CompletableFuture<T> a;
            Object r; Throwable x; Function<? super T,? extends V> f; // 这里其实就是d -> dep2 和 f -> function2
            if ((d = dep) == null || (f = fn) == null
                || (a = src) == null || (r = a.result) == null)
                return null;  // 这里的a.result,a就是src,而src的入参是this也就是future1, 不要和future2 -> dep2的结果搞混
            tryComplete: if (d.result == null) { // 这里就保证dep2如果已经有结果(被回调执行完成),就不会继续执行,所以任务只能执行一次
                if (r instanceof AltResult) {
                    if ((x = ((AltResult)r).ex) != null) {
                        d.completeThrowable(x, r);
                        break tryComplete;
                    }
                    r = null;
                }
                try {
                    if (mode <= 0 && !claim())       // 如果线程池,不为null, claim中会将当前的this -> UniApply 丢到线程池执行,这也就是和Async后缀的方法区别的原因
                        return null;
                    else {
                        @SuppressWarnings("unchecked") T t = (T) r;
                        d.completeValue(f.apply(t)); // 真正的执行function2,所以可以看出,因为thenApply 线程池参数为null,所以这里是回调线程在执行,会阻塞回调线程
                    }
                } catch (Throwable ex) {
                    d.completeThrowable(ex);
                }
            }
            dep = null; src = null; fn = null;
            return d.postFire(a, mode);  // 继续触发后续依赖
        }
step3
step3和step2基本原理是一致的,只不过thenAccept方法调用时,入参为UniAccept,是为无参数返回
下面简单看下
future2.thenAccept(new Consumer<String>() {
            @Override
            public void accept(String s) {
                System.out.println(s);
            }
        })
// -> 我们设thenAccept内部入参为function3
// -> uniAcceptStage 线程池依然为null
public CompletableFuture<Void> thenAccept(Consumer<? super T> action) {
      return uniAcceptStage(null, action);
}

// 执行uniAcceptNow,或者new UniAccept压栈
private CompletableFuture<Void> uniAcceptStage(Executor e,
                                                   Consumer<? super T> f) {
        if (f == null) throw new NullPointerException();
        Object r;
        if ((r = result) != null)
            return uniAcceptNow(r, e, f);
        CompletableFuture<Void> d = newIncompleteFuture();
        unipush(new UniAccept<T>(e, d, this, f)); // 将dep3 和 function3压入future2的stack中,等待被触发
        return d;
}

// uniAcceptNow
private CompletableFuture<Void> uniAcceptNow(
        Object r, Executor e, Consumer<? super T> f) {
        Throwable x;
        CompletableFuture<Void> d = newIncompleteFuture();
        if (r instanceof AltResult) {
            if ((x = ((AltResult)r).ex) != null) {
                d.result = encodeThrowable(x, r);
                return d;
            }
            r = null;
        }
        try {
            if (e != null) {
                e.execute(new UniAccept<T>(null, d, this, f)); // 线程池为null
            } else {
                @SuppressWarnings("unchecked") T t = (T) r;
                f.accept(t);   // 执行function3
                d.result = NIL;
            }
        } catch (Throwable ex) {
            d.result = encodeThrowable(ex);
        }
        return d; // 返回
 }
UniAccept 这里就不分析了,因为原理和UniApply相同,只是没有返回值
最后贴一下thenApplyAsync的实现,区别仅仅在于线程池的使用
  public <U> CompletableFuture<U> thenApplyAsync(
        Function<? super T,? extends U> fn, Executor executor) {
        return uniApplyStage(screenExecutor(executor), fn); // 依旧调用uniApplyStage,只不过线程池不为null
  }
项目中的异步应该如何写
下面我以几个代码为例,看下项目中异步代码会有什么问题
首先我们声明一个IO接口类,它提供一个异步处理processAsync方法,接下来可以写两个实现类分别为AbstractIoAsyncImplV1和AbstractIoAsyncImplV2,他们都提供抽象的doProcess方法,用于底层数据处理。
public interface IoProcessor<T> {

    CompletableFuture<T> processAsync(Request request);
}
AbstractIoAsyncImplV1
AbstractIoAsyncImplV1示例如下代码:
@Slf4j
public abstract class AbstractIoAsyncImplV1<T> implements IoProcessor<T> {
    static ThreadFactory guavaThreadFactory = new ThreadFactoryBuilder().setNameFormat("self-pool-%d").build();

    public abstract CompletableFuture<T> doProcess(Request request);
    @Override
    public CompletableFuture<T> processAsync(Request request) {
        log.info("start processAsync"); //一直到这里,都是没有开启任何额外的线程池,也就是说它依赖外部线程池,在项目中可以是架构的调度线程池,也可以是IO线程池
        return doProcess(request);
    }
}
可以看出,AbstractIoAsyncImplV1要想实现异步,全都依赖doProcess方法的实现,至少到doProcess,其执行的线程都是依赖外部线程池,可以是调度线程池,也可以是IO线程池
下面我们看一个例子 UserBehaviorIoProcessor类,这里我底层模拟了一个异步RPC调用
@Slf4j
public class UserBehaviorIoProcessor extends AbstractIoAsyncImplV1<String> {
    @Override
    public CompletableFuture<String> doProcess(Request request) {
        log.info("ready to rpc...");
        CompletableFuture<String> rpcAsyncFuture = getRpcAsyncFuture(request);
        return rpcAsyncFuture.thenApply(r -> {
            log.info("after rpc start process result...");
            return r + "uuid";
        }).exceptionally(e -> null);
    }

    private static CompletableFuture<String> getRpcAsyncFuture(Request request) {
        // 模拟异步rpc
        return RpcUtils.asyncRpcGet(request);
    }
}
如果这个rpc是异步的,那将不会有任何问题,因为底层执行rpc和回调的线程池,应该是内部的线程池,如下,它不会阻塞执行doProcess方法的线程:
// 模拟异步rpc
public static CompletableFuture<String> asyncRpcGet(Request request) {
        // 这里使用ForkJoinPool 线程池模拟底层rpc调用等待的线程池
        return CompletableFuture.supplyAsync(() -> rpcGet(request))
                .orTimeout(5000, TimeUnit.MILLISECONDS);
    }

// 模拟同步rpc, 同步等待3s
public static String rpcGet(Request request) {
        try {
            log.info("rpcGet....");
            Thread.sleep(3000);
            log.info("rpcGet end!!!!");
        } catch (InterruptedException e) {
            throw new RuntimeException(e);
        }
        return "JIA Behavior...";
    }
再来看另一个类,这个可能也是我们开发过程中不注意的,调用了同步rpc接口,可以预见的是,在这里由于同步rpc没有开启任何额外的线程来处理结果,那么它会直接阻塞调用doProcess的线程,也就是外部的线程,那么对于一个项目来说,如果调度线程或者IO线程都这样被阻塞在这里,吞吐必定上不去
@Slf4j
public class UserBehaviorSyncIoProcessor extends AbstractIoAsyncImplV1<String> {
    @Override
    public CompletableFuture<String> doProcess(Request request) {
        // 模拟同步调用
        CompletableFuture<String> rpcFuture = getRpcFuture(request);
        return rpcFuture.thenApply(r -> {
            // 可以思考一下,如果这里有额外耗时的操作会怎么样?答:阻塞当前回调线程,那如果你执行的rpc是同步的,就会阻塞当前的线程
            log.info("After rpc process result start...");
            return r + "uuid";
        }).exceptionally(e -> null);
    }

    private static CompletableFuture<String> getRpcFuture(Request request) {
        CompletableFuture<String> rpcFuture = new CompletableFuture<>();
        // 调用rpc结果
        String result = RpcUtils.rpcGet(request); // 这里会同步等待3s
        try {
            rpcFuture.complete(result);
            log.info("rpc success!");
        } catch (Exception e) {
            log.error("error!", e);
            rpcFuture.completeExceptionally(e);
        }
        return rpcFuture;
    }
}
AbstractIoAsyncImplV2
接下来,看下AbstractIoAsyncImplV2的实现:
可以看到,v2与v1的区别在于,采用独立于外部的线程池,这样就不会阻塞调度线程,当外部调用processAsync 发送请求时,后续的逻辑都交由内部来处理,而内部线程数据就绪后只需要执行一下回调方法将结果返回即可
@Slf4j
public abstract class AbstractIoAsyncImplV2<T> implements IoProcessor<T> {
    static ThreadFactory guavaThreadFactory = new ThreadFactoryBuilder().setNameFormat("self-pool-%d").build();
    // 独立线程池用于处理任务
    private static final ExecutorService SON_EXECUTOR = new ThreadPoolExecutor(
            3,
            3,
            100L,
            TimeUnit.MILLISECONDS,
            new LinkedBlockingQueue<>(), guavaThreadFactory);
    // 带有回调函数,可以一路往下传
    public abstract void doProcessAsync(Request request, BiConsumer<T, Throwable> biConsumer);
    @Override
    public CompletableFuture<T> processAsync(Request request) {
        log.info("SON_EXECUTOR :" + SON_EXECUTOR);
        log.info("Thread name processAsync is: " + Thread.currentThread().getName());
        CompletableFuture<T> resultFuture = new CompletableFuture<>();
        SON_EXECUTOR.submit(() -> doProcessAsync(request, (t, ex) -> {
            // 自定义回调函数,结果会封装在t中,一直往下传,理论上每一步都可以继续往下传回调函数
            if (ex != null) {
                log.error("error!", ex);
                resultFuture.completeExceptionally(ex);
            }
            // 返回已经ready的结果,这一步由内部调用底层rpc的线程来完成,也就是回调线程
            resultFuture.complete(t);
            log.info("biConsumer accept result:" + t);
        }));
        return resultFuture;
    }
}
@Slf4j
public class UserInfoFetchProcessor extends AbstractIoAsyncImplV2<String> {
public void doProcess(Request request, ResultHandler<String> handler) {
// TODO
}
// 继承AbstractIoAsyncImplV2,定义结果处理的ResultHandler,将回调封装
@Override
public void doProcessAsync(Request request, BiConsumer<String, Throwable> biConsumer) {
ResultHandler<String> handler = new ResultHandler<>(biConsumer);
try {
doProcess(request, handler);
log.info("success!");
} catch (Exception e) {
handler.onFailure(e);
log.error("failed!");
}
}
}
// 具体的实现类,调用异步rpc,注册回调
@Slf4j
public class UserBehaviorAsyncIoProcessor extends UserInfoFetchProcessor {
@Override
public void doProcess(Request request, ResultHandler<String> handler) {
RpcUtils.asyncRpcGet(request).thenAccept(result -> {
log.info("rpc success! RESULT PROCESS...");
// 回调逻辑
handler.onSuccess(result + "uuid");
});
}
}
// 处理结果,回调函数封装的类
@Slf4j
public class ResultHandler<T> {
public ResultHandler() {
}
public ResultHandler(BiConsumer<T, Throwable> callback) {
this.callback = callback;
}
/**
* 用于设置回调函数的方法.
*/
private BiConsumer<T, Throwable> callback;
/**
* 成功的情况
* @param t 返回结果
*/
public void onSuccess(T t) {
if (t == null) {
log.info("result is null!!!");
}
log.info("Thread name ResultHandler is: " + Thread.currentThread().getName()); // 回调处理在这里下面一行代码,两边可以输出一些业务日志等
// callback
callback.accept(t, null);
// monitor
}
/**
* 处理失败情况.
* @param e 捕获的异常
*/
public void onFailure(Exception e) {
callback.accept(null, e);
log.error("Error occurred: " + e.getMessage(), e);
}
}
看上面调用异步RPC时,异步rpc内部是又开了一个ForkJoinPool线程的,所以理论上如果底层全部支持异步,那么执行doProcessAsync的线程也可以得到解放,可以继续转发其他的请求
这里我也同样定义了一个调用同步Rpc接口的类,用于最终的测试阶段
@Slf4j
public class UserBehaviorAsyncIoProcessorV2 extends UserInfoFetchProcessor {

    @Override
    public void doProcess(Request request, ResultHandler<String> handler) {
        try {
            log.info("sync rpc ready....");
            String str = RpcUtils.rpcGet(request); // 同步等待3s
            log.info("result processing....");
            handler.onSuccess(str + "uuid");       // 执行回调,这里阻塞的是执行doProcessAsync的线程,也不会阻塞最外边的调度线程
        } catch (Exception e) {
            handler.onFailure(e);
        }
    }
}
测试异步调用
看下最终的测试代码,首先是AbstractIoAsyncImplV1:
@Test
    public void testBehaviorSyncIoProcessor() throws ExecutionException, InterruptedException {
        Request request = new Request();
        request.setParam((JsonObject) JsonParser.parseString("{num:2}"));
        request.setUrl("http://www.baidu.com");
        long start = System.currentTimeMillis();
        // 模拟调度线程池
        ExecutorService executor = new ThreadPoolExecutor(
                2,
                2,
                100L,
                TimeUnit.MILLISECONDS,
                new LinkedBlockingQueue<>());

        // 提交两个调用同步rpc的任务
        // 同步任务1
        executor.submit(() -> {
            behaviorSyncIoProcessor.processAsync(request).thenAccept(r -> {
                log.info("sync1 test result is : " + r + "...sync");
                log.info("sync1 time is :" + (System.currentTimeMillis() - start) + "ms");
            });
        });
        // 同步任务2
        executor.submit(() -> {
            behaviorSyncIoProcessor.processAsync(request).thenAccept(r -> {
                log.info("sync2 test result is : " + r + "...sync");
                log.info("sync2 time is :" + (System.currentTimeMillis() - start) + "ms");
            });
        });

        // 异步任务
        executor.submit(() -> {
            behaviorIoProcessor
                    .processAsync(request).thenAccept(r -> {
                        log.info("final test result is : " + r);
                        log.info("take time:" + (System.currentTimeMillis() - start) + "ms");
                    });
        });

        log.info("do other things...");
        Thread.sleep(7000);
    }
最终控制台结果如下:
[pool-3-thread-2] INFO  c.j.f.b.UserBehaviorIoProcessorTest - sync2 time is :3020ms
[pool-3-thread-1] INFO  c.j.f.b.UserBehaviorIoProcessorTest - sync1 time is :3021ms
[pool-3-thread-1] INFO  c.j.f.b.UserBehaviorIoProcessor - ready to rpc...
[ForkJoinPool.commonPool-worker-19] INFO  c.j.f.b.UserBehaviorIoProcessorTest - take time:6031ms
再来测试AbstractIoAsyncImplV2:
@Test
public void testBehaviorAsyncIoProcessor() throws InterruptedException {
        Request request = new Request();
        request.setParam((JsonObject) JsonParser.parseString("{num:2}"));
        request.setUrl("http://www.baidu.com");
        long start = System.currentTimeMillis();
        // 模拟调度线程池
        ExecutorService executor = new ThreadPoolExecutor(
                2,
                2,
                100L,
                TimeUnit.MILLISECONDS,
                new LinkedBlockingQueue<>());
        // 同步任务1
        executor.submit(() -> {
            behaviorAsyncIoProcessorV2.processAsync(request).thenAccept(r -> {
                log.info("sync1 result is: " + r + "...v2");
                log.info("sync1 time is :" + (System.currentTimeMillis() - start) + "ms");
            });
        });
        // 同步任务2
        executor.submit(() -> {
            behaviorAsyncIoProcessorV2.processAsync(request).thenAccept(r -> {
                log.info("sync2 result is: " + r + "...v2");
                log.info("sync2 time is :" + (System.currentTimeMillis() - start) + "ms");
            });
        });
        // 异步任务1
        executor.submit(() -> {
            behaviorAsyncIoProcessor.processAsync(request).thenAccept(r -> {
                log.info("final test result is : " + r);
                log.info("take time:" + (System.currentTimeMillis() - start) + "ms");
            });
        });

        log.info("do other things...");
        Thread.sleep(5000);
    }
控制台输出如下:
[ForkJoinPool.commonPool-worker-19] INFO  c.j.f.b.UserBehaviorIoProcessorTest - take time:3023ms
[self-pool-0] INFO  c.j.f.b.UserBehaviorIoProcessorTest - sync1 time is :3027ms
[self-pool-1] INFO  c.j.f.b.UserBehaviorIoProcessorTest - sync2 time is :3027ms
参考:


 2138
2138

 被折叠的 条评论
为什么被折叠?
被折叠的 条评论
为什么被折叠?
 到【灌水乐园】发言


