


通过HttpsURLConnection模拟登录
今天,写一下基于方正教务系统的上海理工大学教务系统,项目放在了码云,有需要的可以直接翻到最后查看
首先还是登陆一下,看看我们在登陆的时候提交了什么
火狐浏览器为例,f12开发者模式,选择网络,然后登录,找到发送信息的post选项

可以看到除了账号密码和几项固定内容外,还包含了2个随机数据(不确定哪些是会变化的话可以多次登录对比数据)
那么首先我们就要先寻找这些数据的来源,回到登陆界面右键查看网页源代码。
然后搜索这两个数据的id,这里比较好获取,不同学校可能在不同地方。
 那么我们模拟登录前首先就需要获取到这两个数据,cookie管理依然是采用自带CookieManager自动管理。
先准备个工具类,构造函数中准备好CookieManager,至于为什么需要cookie可以看我的上一篇博客。
public class Login_download {
    Context context;

    Login_download(Context context) {
        this.context = context;
        CookieManager cookieManager = new CookieManager();
        CookieHandler.setDefault(cookieManager);
        //接受所有cookie
        cookieManager.setCookiePolicy(CookiePolicy.ACCEPT_ALL);
    }
//其他函数
}
首先我们是需要获取内容的,由于https的安全特性,我们是不能直接使用HttpsURLConnection进行登录,一般有两种解决方法,这里我们使用比较暴力简单的信任所有证书。
直接放代码(放入工具类)
private static final class DefaultTrustManager implements X509TrustManager {

        @Override
        public void checkClientTrusted(X509Certificate[] chain, String authType) throws CertificateException {

        }

        @Override
        public void checkServerTrusted(X509Certificate[] chain, String authType) throws CertificateException {

        }

        @Override
        public X509Certificate[] getAcceptedIssuers() {
            return null;
        }
    }
//MOOD为GET或POST URL就是网址
    private static HttpsURLConnection getHttpsURLConnection(String uri, String method) throws IOException {
        SSLContext ctx = null;
        try {
            ctx = SSLContext.getInstance("TLS");
            ctx.init(new KeyManager[0], new TrustManager[] { new DefaultTrustManager() }, new SecureRandom());
        } catch (KeyManagementException e) {
            e.printStackTrace();
        } catch (NoSuchAlgorithmException e) {
            e.printStackTrace();
        }
        SSLSocketFactory ssf = ctx.getSocketFactory();
        URL url = new URL(uri);
        HttpsURLConnection httpsConn = (HttpsURLConnection) url.openConnection();
        httpsConn.setSSLSocketFactory(ssf);
        //设置一下头,这里根据学校不同需要更改
        httpsConn.setRequestProperty("Accept",":text/html,application/xhtml+xml,application/xml;q=0.9,image/webp,*/*;q=0.8");
        httpsConn.setRequestProperty("Content-Type","application/x-www-form-urlencoded");
        httpsConn.setRequestProperty("User-Agent", "Mozilla/5.0 (Windows NT 10.0; Win64; x64; rv:71.0) Gecko/20100101 Firefox/71.0");

        httpsConn.setHostnameVerifier(new HostnameVerifier() {
            @Override
            public boolean verify(String arg0, SSLSession arg1) {
                return true;
            }
        });
        httpsConn.setRequestMethod(method);
        //这里其实是需要细分的,但是我偷懒了
        httpsConn.setDoInput(true);
        httpsConn.setDoOutput(true);
        httpsConn.setAllowUserInteraction(true);
        return httpsConn;
    }
通过这两个函数,我们就可以得到一个信任所有证书的HttpsURLConnection,随后的登录操作都使用这样获取的HttpsURLConnection。
HttpsURLConnection的用法和HttpURLConnection一样,这里节约版面,就不提,不太会的可以去上一篇,然后把HttpURLConnection直接替换一下就可以( ̄y▽, ̄)╭
下面按步骤放代码,尽量少讲
获取两个数据
这里推荐使用正则方法,我这里偷懒,直接subString。
 String a=dct.getinf("https://ids6-443.webvpn.usst.edu.cn/authserver/login?service=https%3A%2F%2Fwebvpn.usst.edu.cn%2Fusers%2Fauth%2Fcas%2Fcallback%3Furl%3Dhttp%253A%252F%252Fwww.usst.edu.cn%252Fxywww%252Flist.htm","UTF-8");
               int yy=a.indexOf("name=\"lt\" value=\"");
               int yyy=a.indexOf("name=\"execution\" value=\"");
               String ln=a.substring(yy+17,a.indexOf("\"/>",yy));
               String execution=a.substring(yyy+24,a.indexOf("\"/>",yyy));
               String body11="username="+user;
               String body12="password="+password;
               String body13="lt="+ln;
               String body14="dllt=userNamePasswordLogin&execution="+execution+"&_eventId=submit&rmShown=1";
               body = body11 + "&" + body12 + "&" + body13 + "&" + body14;
body就是我们根据网页里获取的信息,拼接出来的。
随后发送该信息
String a=dct.postinf(URL,body,"UTF-8");
这里我们要去本科教务系统
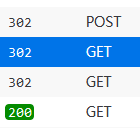
继续观察可以看到点击后经过多次重定向后才进入本科教务系统,这里只需要做一次第一步。

String temp1=dct.getinf("https://jwgl.webvpn.usst.edu.cn/sso/jziotlogin","UTF-8");
学生课表查询
这里点击后我们可以看到进行了很多信息,但是GET的操作里并没有看到我们要的课表,这时候继续向下翻,能看到3个post,这里面就有我们需要的课表信息
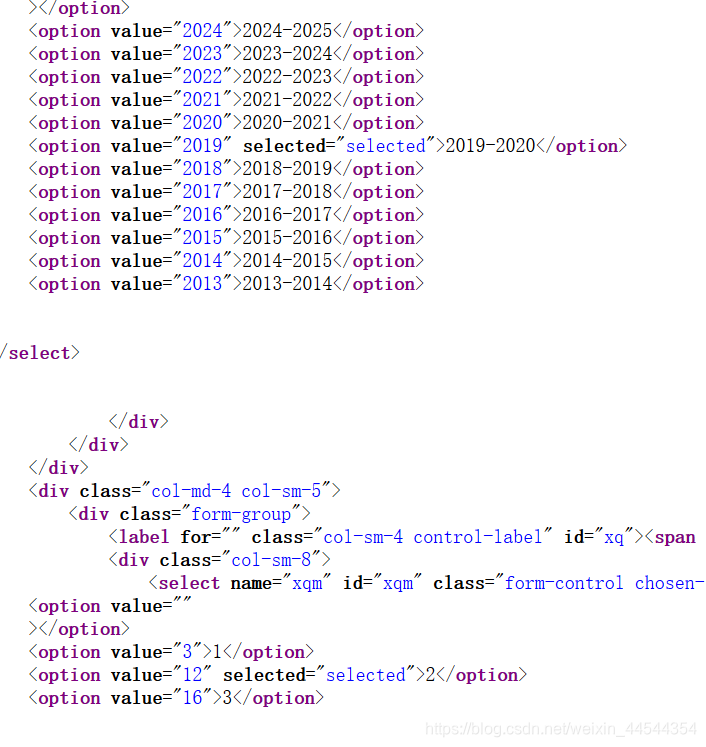
 post包含的信息也很简单,只包含了年份和学期数。这个数字我们可以直接从这个界面获取,查看源代码我们可以看到当前学期作为默认选项已经被选择
直接获取,然后jsoup解析
  String temp2=dct.getinf("  https://jwgl.webvpn.usst.edu.cn/kbcx/xskbcx_cxXskbcxIndex.html?gnmkdm=N253508&layout=default&su="+username.getText().toString(),sc.get_class_code());
                            Document doc = Jsoup.parse(temp2);
                            Elements inf=doc.getElementsByClass("row");
                            List<Element> HYSOptionList=inf.select("option");
                            String poinf=null;
                            for (Element Option:HYSOptionList) {
                                if (0 != Option.getElementsByAttribute("selected").size()) {
                                    if(poinf==null){
                                        poinf="xnm="+Option.val()+"&xqm=";
                                    }else
                                        poinf+=Option.val();
                                }
                            }
poinf就是我们获取课表所需要提交的信息了:xnm=2019&xqm=12
最后一步就很明确了
myclass = dct.postinf(URL, poinf,"UTF-8");
这里的返回值是一个json字符串,解析方法这里就先不写了(饿死我了)
直接放代码,大家可以参考一下
  try {
        JSONObject jsonObject = new JSONObject(myclass);
        JSONObject info = jsonObject.getJSONObject("xsxx");
        String id = info.getString("XH_ID");
        id+= info.getString("XM");
        id+="的课表";
        headname=id;
        //课表标题
        System.out.println(id);
        JSONArray Class_inf = new JSONArray(jsonObject.getString("kbList"));
		myclass=Class_inf.toString();
        for (int i = 0; i < Class_inf.length(); i++) {
            JSONObject jsonOb = Class_inf.getJSONObject(i);
            String classtime1 = jsonOb.getString("xqj");
            String classtime2 = jsonOb.getString("jcor");
            String name = jsonOb.getString("kcmc");
            String classroom1 = jsonOb.getString("xqmc");
            String classroom2 = jsonOb.getString("cdmc");
            String weeks = jsonOb.getString("zcd");
            String teacher = jsonOb.getString("xm");
            Log.d("上课时间::", "星期"+classtime1+" : "+classtime2+"   "+weeks);
            Log.d("课程名称::", name);
            Log.d("上课地址::", classroom1+"-"+classroom2);
            Log.d("老师::", teacher+"\n");
          }
        } catch (JSONException e) {
             Log.e("jsonArray: ", e.toString());
        }
至此,上海理工大学的模拟登录和课表爬取已经结束啦(撒花),时间仓促写的比较粗。至于整个课表的项目,我已经上传了码云,有需求的同学可以去那里看看,包含所有代码
https://gitee.com/teddydesign/t_timetable?_from=gitee_search
回复:
我这个其实就是用的webvpn,见图一。具体代码写的不细,你可以看看我的码云的项目
               String a=dct.getinf("https://ids6-443.webvpn.usst.edu.cn/authserver/login?service=https%3A%2F%2Fwebvpn.usst.edu.cn%2Fusers%2Fauth%2Fcas%2Fcallback%3Furl%3Dhttp%253A%252F%252Fwww.usst.edu.cn%252Fxywww%252Flist.htm","UTF-8");
               int yy=a.indexOf("name=\"lt\" value=\"");
               int yyy=a.indexOf("name=\"execution\" value=\"");
               String ln=a.substring(yy+17,a.indexOf("\"/>",yy));
               String execution=a.substring(yyy+24,a.indexOf("\"/>",yyy));
               String body11="username="+user;
               String body12=        "password="+password;
               String body13=       "lt="+ln;
               String body14=    "dllt=userNamePasswordLogin&execution="+execution+"&_eventId=submit&rmShown=1";
               body = body11 + "&" + body12 + "&" + body13 + "&" + body14;
               System.out.println(body);


 被折叠的 条评论
为什么被折叠?
被折叠的 条评论
为什么被折叠?
 到【灌水乐园】发言


