


 本文深入探讨Qt环境下UDP通信的实现,包括客户端与服务端的交互、广播和组播功能。通过具体代码示例,讲解如何在Qt应用程序中设置和使用UDP套接字,实现数据的发送与接收。
47黑马QT笔记之Qt下Udp通信过程例子及实现广播与组播
1 客户端:
客户端需要注意一点,客户端没有绑定端口的话,服务端无法发送信息给客户端。Linux下可以是因为他们在同一端口。所以Qt下你也在同一端口内通信,即窗口内自己连自己的Ip和端口。
所以我为了能互相通信,客户端也绑定端口。不绑定是为了符合前面那篇的通信过程图。
所以可以说Qt下UDP通信,客户端和服务端是一样的。
1)头文件:
#ifndef CLIENT_H
#define CLIENT_H

#include <QWidget>
#include<QUdpSocket>

namespace Ui {
class client;
}

class client : public QWidget
{
    Q_OBJECT

public:
    explicit client(QWidget *parent = 0);
    ~client();

private slots:
    void on_buttonSend_clicked();

    void on_buttonClose_clicked();

private:
    Ui::client *ui;

    QUdpSocket *udpSocket;
};

#endif // CLIENT_H
2)实现文件:
#include "client.h"
#include "ui_client.h"
#include<QHostAddress>
#include<QDebug>

client::client(QWidget *parent) :
    QWidget(parent),
    ui(new Ui::client)
{
    ui->setupUi(this);

    //1
    udpSocket=NULL;
    udpSocket=new QUdpSocket(this);

    //客户端没有绑定端口的话  服务端无法发送信息给客户端 Linux下可以是因为他们在同一端口
    //所以Qt下你也在同一端口内通信
    //所以我为了能互相通信也绑定 不绑定是为了符合前面的过程图
    //udpSocket->bind(QHostAddress::AnyIPv4,7777);
    //setWindowTitle("UDP3:端口7777");

    //2
    connect(udpSocket,&QUdpSocket::readyRead,
            [=]()
    {
        char buf[1024]={0};
        QHostAddress server;
        quint16 port;
        qint64 len = udpSocket->readDatagram(buf,sizeof(buf),&server,&port);
        if(len<0)
        {
           qDebug()<<"readDatagram 读取数据失败";
        }

        QString str=QString("[%1:%2] %3").arg(server.toString()).arg(port).arg(buf); //4 arg参数不熟练 它可以是QString,int,char
        ui->textEdit->append(str);  //5  不熟练 读取显示的内容 顺便显发送者                   //不能为QHostAddress
    });


}

client::~client()
{
    delete ui;
}

//发送数据
void client::on_buttonSend_clicked()
{
    QString str=ui->textEdit->toPlainText();
    QString ip=ui->lineEditIp->text();
    quint16  port=ui->lineEditPort->text().toInt();
    udpSocket->writeDatagram(str.toUtf8(),QHostAddress(ip),port);
}

//关闭 这里作用不大
void client::on_buttonClose_clicked()
{
    //6 UDP的close不需要做什么事情(因为没有连接) 最好写
    udpSocket->disconnectFromHost();
    udpSocket->close();
    this->close();
}
2 服务端:
1)头文件:
#ifndef SERVER_H
#define SERVER_H

#include <QWidget>
#include<QUdpSocket>

namespace Ui {
class server;
}

class server : public QWidget
{
    Q_OBJECT

public:
    explicit server(QWidget *parent = 0);
    ~server();

    void dealSolt();  //读取数据槽函数

private slots:
    void on_buttonSend_clicked();

    void on_buttonClose_clicked();

private:
    Ui::server *ui;
    QUdpSocket *udpSocket;
};

#endif // SERVER_H
2)实现文件:
#include "server.h"
#include "ui_server.h"
#include<QHostAddress>
#include<QDebug>

server::server(QWidget *parent) :
    QWidget(parent),
    ui(new Ui::server)
{
    ui->setupUi(this);

    udpSocket=NULL;
    udpSocket=new QUdpSocket(this);

    //udpSocket->bind(6666);                                    // 1   加入组播时 要求为AnyIPv4格式,不能省略,省略为任意
    udpSocket->bind(QHostAddress::AnyIPv4,5555);


    setWindowTitle("UDP3:端口5555");


    //udpSocket->joinMulticastGroup(QHostAddress("224.0.0.2"));   //2    又错了一次参数ip


    connect(udpSocket,&QUdpSocket::readyRead,this,&server::dealSolt);

}

server::~server()
{
    delete ui;
}


//读取数据槽函数
 void server::dealSolt()
 {

     char buf[1024]={0};
     QHostAddress client;
     quint16 port;
     qint64 len = udpSocket->readDatagram(buf,sizeof(buf),&client,&port);
     if(len<0)
     {
        qDebug()<<"readDatagram 读取数据失败";
     }

     QString str=QString("[%1:%2] %3").arg(client.toString()).arg(port).arg(buf); //4 arg参数不熟练 它可以是QString,int,char?
     ui->textEdit->append(str);  //5  不熟练 读取显示的内容 顺便显发送者                   //不能为QHostAddress


 }

void server::on_buttonSend_clicked()
{
    QString str=ui->textEdit->toPlainText();
    QString ip=ui->lineEditIp->text();
    quint16  port=ui->lineEditPort->text().toInt();
    udpSocket->writeDatagram(str.toUtf8(),QHostAddress(ip),port);
}

void server::on_buttonClose_clicked()
{
    //6 UDP的close不需要做什么事情(因为没有连接) 最好写
    udpSocket->disconnectFromHost();
    udpSocket->close();
    this->close();
}
3 广播:
其实上一篇理论也给到广播和组播的例子了。这里用这里的代码演示一遍。
可以看到,我们在上面的代码能互相通信的情况下,只需要输入广播Ip地址255.255.255.255对方即可接收到。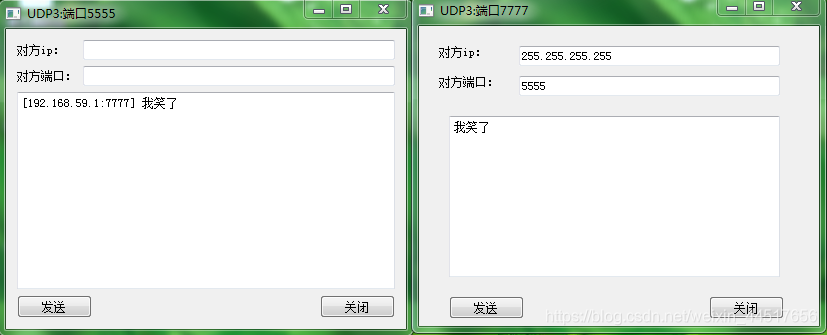
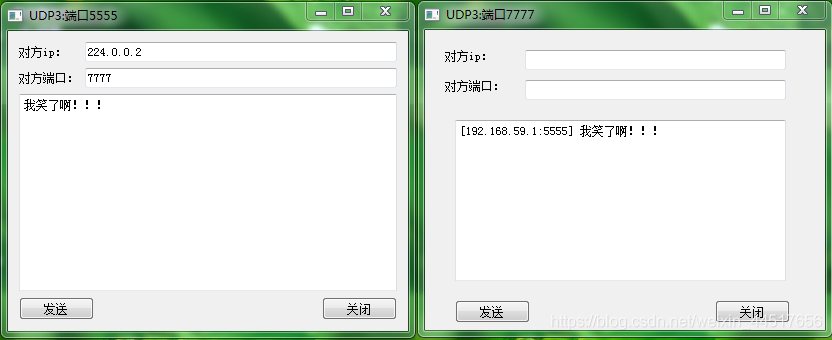
4 组播:
实现组播,我们只需要在客户端和服务端增加一个语句,使他们进入某个组播地址,组播地址必须是D类Ip地址。
//加入组播
udpSocket->joinMulticastGroup(QHostAddress("224.0.0.2"));
我们在双方各加入224.0.0.2这个组播地址后,就可以利用该组播地址进行通信了。
看下图:只要往该组播地址发送消息,加入了该组播地址的主机都能收到消息。但与广播一样,能不能显示仍要看你的端口,毕竟完整收到并显示某个消息需要Ip加端口号。


 被折叠的 条评论
为什么被折叠?
被折叠的 条评论
为什么被折叠?
 到【灌水乐园】发言


