


1. cobbler简介
Cobbler是一个Linux服务器安装的服务,可以通过网络启动(PXE)的方式来快速安装、重装物理服务器和虚拟机,同时还可以管理DHCP,DNS等。
Cobbler可以使用命令行方式管理,也提供了基于Web的界面管理工具(cobbler-web),还提供了API接口,可以方便二次开发使用。
Cobbler是较早前的kickstart的升级版,优点是比较容易配置,还自带web界面比较易于管理。
Cobbler内置了一个轻量级配置管理系统,但它也支持和其它配置管理系统集成,如Puppet,暂时不支持SaltStack。
2. cobbler服务端部署
[root@localhost ~]# sed -i 's/\$releasever/7/g' /etc/yum.repos.d/CentOS7-Base-163.repo
[root@localhost ~]# sed -i 's/^enabled=.*/enabled=1/g' /etc/yum.repos.d/CentOS7-Base-163.repo
[root@localhost ~]# yum -y install epel-release
[root@localhost ~]# yum -y install httpd dhcp tftp python-ctypes cobbler  xinetd cobbler-web pykickstart
[root@localhost ~]# sed -i 's/^server: 127.0.0.1/server: 192.168.56.128/' /etc/cobbler/settings
[root@localhost ~]# sed -i 's/^next_server: 127.0.0.1/next_server: 192.168.56.128/' /etc/cobbler/settings
[root@localhost ~]# sed -i '/disable/s/yes/no/g' /etc/xinetd.d/tftp   //开启tftp
[root@localhost ~]# cobbler get-loaders
...
*** TASK COMPLETE ***
[root@localhost ~]# systemctl start rsyncd
[root@localhost ~]# systemctl enable rsyncd
Created symlink from /etc/systemd/system/multi-user.target.wants/rsyncd.service to /usr/lib/systemd/system/rsyncd.service.
[root@localhost ~]# openssl passwd -1 -salt "$RANDOM" 'pengsuran123!'
$1$28947$9cvsAysFvqQSUQd1ORshw.
[root@localhost ~]# vim /etc/cobbler/settings
default_password_crypted: "$1$28947$9cvsAysFvqQSUQd1ORshw."
[root@localhost ~]# systemctl restart cobblerd
[root@localhost ~]# ss -antl
State       Recv-Q Send-Q      Local Address:Port                     Peer Address:Port
LISTEN      0      128                     *:22                                  *:*
LISTEN      0      100             127.0.0.1:25                                  *:*
LISTEN      0      5               127.0.0.1:25151                               *:*
LISTEN      0      5                       *:873                                 *:*
LISTEN      0      128                    :::80                                 :::*
LISTEN      0      128                    :::22                                 :::*
LISTEN      0      100                   ::1:25                                 :::*
LISTEN      0      128                    :::443                                :::*
LISTEN      0      5                      :::873                                :::*
[root@localhost ~]# cobbler check
1 : debmirror package is not installed, it will be required to manage debian deployments and repositories
2 : fencing tools were not found, and are required to use the (optional) power management features. install cman or fence-agents to use them
//这两行是关于debian系统的错误,请忽略
[root@localhost ~]# sed -i '/^manage_dhcp/s/0/1/g' /etc/cobbler/settings
[root@localhost ~]# sed -n '/^manage_dhcp/p' /etc/cobbler/settings
manage_dhcp: 1
[root@localhost ~]# vim /etc/cobbler/dhcp.template //配置dhcp
subnet 192.168.56.0 netmask 255.255.255.0 {
     option routers             192.168.56.128;
     option domain-name-servers 192.168.56.2;
     option subnet-mask         255.255.255.0;
     range dynamic-bootp        192.168.56.100 192.168.56.254;
     default-lease-time         21600;
     max-lease-time             43200;
     next-server                $next_server;
[root@localhost ~]# systemctl restart cobblerd
[root@localhost ~]# cobbler sync
...
*** TASK COMPLETE ***
[root@localhost ~]# netstat -anulp|grep dhcp
udp        0      0 0.0.0.0:67              0.0.0.0:*                           1470/dhcpd
[root@localhost ~]# mount /dev/cdrom /mnt
mount: /dev/sr0 写保护,将以只读方式挂载
[root@localhost ~]# df -h
文件系统               容量  已用  可用 已用% 挂载点
/dev/mapper/rhel-root   18G  1.3G   17G    8% /
devtmpfs               901M     0  901M    0% /dev
tmpfs                  912M     0  912M    0% /dev/shm
tmpfs                  912M  8.7M  904M    1% /run
tmpfs                  912M     0  912M    0% /sys/fs/cgroup
/dev/sda1              497M  136M  362M   28% /boot
tmpfs                  183M     0  183M    0% /run/user/0
/dev/sr0               3.8G  3.8G     0  100% /mnt
[root@localhost ~]# cobbler import --path=/mnt --name=rhel-7 --arch=x86_64
...
*** TASK COMPLETE ***
[root@localhost ~]# cat > /var/lib/cobbler/kickstarts/rhel-7-x86_64.ks <<'EOF'
auth --enableshadow --passalgo=sha512
bootloader --location=mbr
clearpart --all --initlabel
part /boot --asprimary --fstype="ext4" --size=500
part swap --fstype="swap" --size=4096
part / --fstype="ext4" --grow --size=15000
text
firewall --disabled
firstboot --disable
keyboard us
lang en_US
url --url=http://192.168.56.128/cobbler/ks_mirror/rhel-7-x86_64
$yum_repo_stanza
reboot

rootpw --iscrypted $6$tT3jtt5eIo58IFt8$nFwF.4HZulhh..bZcSiQekXMOAiVAej9zG6NOlNFgYBYXJz.9eAiu05vl89Lq7nuze5Z0plxugAnhfakBcXSl1
// 上面的是在母机上的密码,在anaconda-ks.cfg里面的rootpw一行
selinux --disabled
skipx
timezone Asia/Shanghai --isUtc --nontp
install
zerombr

%packages
@^minimal
@core
kexec-tools

%end

%addon com_redhat_kdump --enable --reserve-mb='auto'

%end

%anaconda
pwpolicy root --minlen=6 --minquality=1 --notstrict --nochanges --notempty
pwpolicy user --minlen=6 --minquality=1 --notstrict --nochanges --emptyok
pwpolicy luks --minlen=6 --minquality=1 --notstrict --nochanges --notempty
%end
EOF
[root@localhost ~]# cobbler validateks
task started: 2019-03-05_203330_validateks
task started (id=Kickstart Validation, time=Tue Mar  5 20:33:30 2019)
----------------------------
osversion: rhel7
checking url: http://192.168.56.128/cblr/svc/op/ks/profile/rhel-7-x86_64
running: /usr/bin/ksvalidator -v "rhel7" "http://192.168.56.128/cblr/svc/op/ks/profile/rhel-7-x86_64"
received on stdout:
received on stderr:
*** all kickstarts seem to be ok ***
*** TASK COMPLETE ***
[root@localhost ~]# cobbler profile list
   rhel-7-x86_64
[root@localhost ~]# cobbler profile edit --name rhel-7-x86_64 --kickstart=/var/lib/cobbler/kickstarts/rhel-7-x86_64.ks
[root@localhost ~]# cobbler profile edit --name rhel-7-x86_64 --kopts='net.ifnames=0 biosdevname=0'
[root@localhost ~]# cobbler profile report
Name                           : rhel-7-x86_64
TFTP Boot Files                : {}
Comment                        :
DHCP Tag                       : default
Distribution                   : rhel-7-x86_64
Enable gPXE?                   : 0
Enable PXE Menu?               : 1
Fetchable Files                : {}
Kernel Options                 : {'biosdevname': '0', 'net.ifnames': '0'}
Kernel Options (Post Install)  : {}
Kickstart                      : /var/lib/cobbler/kickstarts/rhel-7-x86_64.ks
Kickstart Metadata             : {}
Management Classes             : []
Management Parameters          : <<inherit>>
Name Servers                   : []
Name Servers Search Path       : []
Owners                         : ['admin']
Parent Profile                 :
Internal proxy                 :
Red Hat Management Key         : <<inherit>>
Red Hat Management Server      : <<inherit>>
Repos                          : []
Server Override                : <<inherit>>
Template Files                 : {}
Virt Auto Boot                 : 1
Virt Bridge                    : xenbr0
Virt CPUs                      : 1
Virt Disk Driver Type          : raw
Virt File Size(GB)             : 5
Virt Path                      :
Virt RAM (MB)                  : 512
Virt Type                      : kvm
[root@localhost ~]# cobbler sync
...
*** TASK COMPLETE ***
[root@localhost ~]# systemctl restart xinetd
[root@localhost ~]# systemctl restart cobblerd
[root@localhost ~]# systemctl restart httpd
[root@localhost ~]# ss -antl
State       Recv-Q Send-Q                  Local Address:Port                                 Peer Address:Port
LISTEN      0      128                                 *:111                                             *:*
LISTEN      0      128                                 *:20048                                           *:*
LISTEN      0      128                                 *:22                                              *:*
LISTEN      0      100                         127.0.0.1:25                                              *:*
LISTEN      0      64                                  *:33274                                           *:*
LISTEN      0      128                                 *:50652                                           *:*
LISTEN      0      5                           127.0.0.1:25151                                           *:*
LISTEN      0      64                                  *:2049                                            *:*
LISTEN      0      5                                   *:873                                             *:*
LISTEN      0      128                                :::111                                            :::*
LISTEN      0      128                                :::80                                             :::*
LISTEN      0      128                                :::20048                                          :::*
LISTEN      0      128                                :::22                                             :::*
LISTEN      0      100                               ::1:25                                             :::*
LISTEN      0      128                                :::443                                            :::*
LISTEN      0      128                                :::56347                                          :::*
LISTEN      0      64                                 :::44801                                          :::*
LISTEN      0      64                                 :::2049                                           :::*
LISTEN      0      5                                  :::873                                            :::*
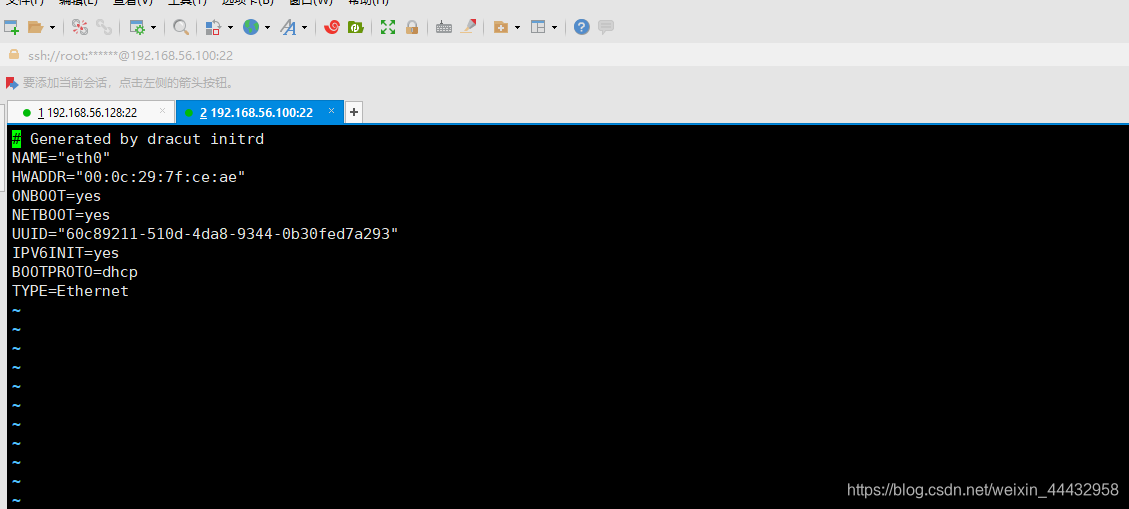
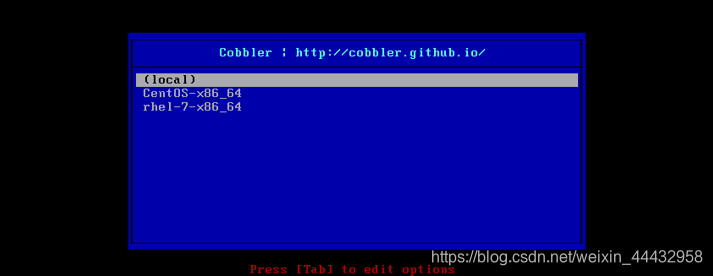
3.客户端安装
安装成功后查看网卡
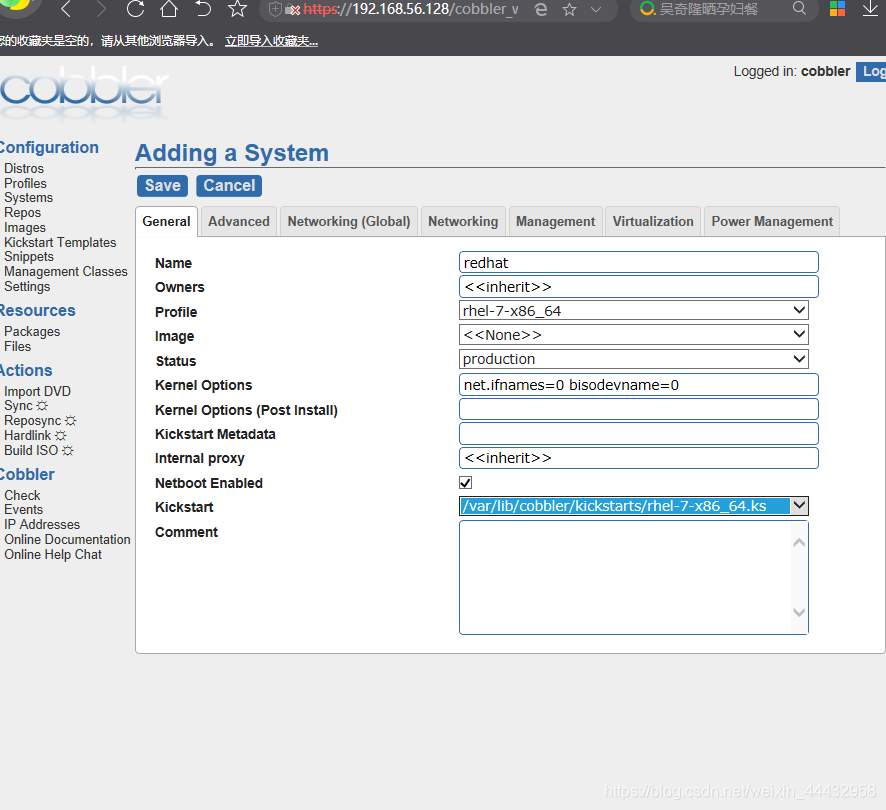
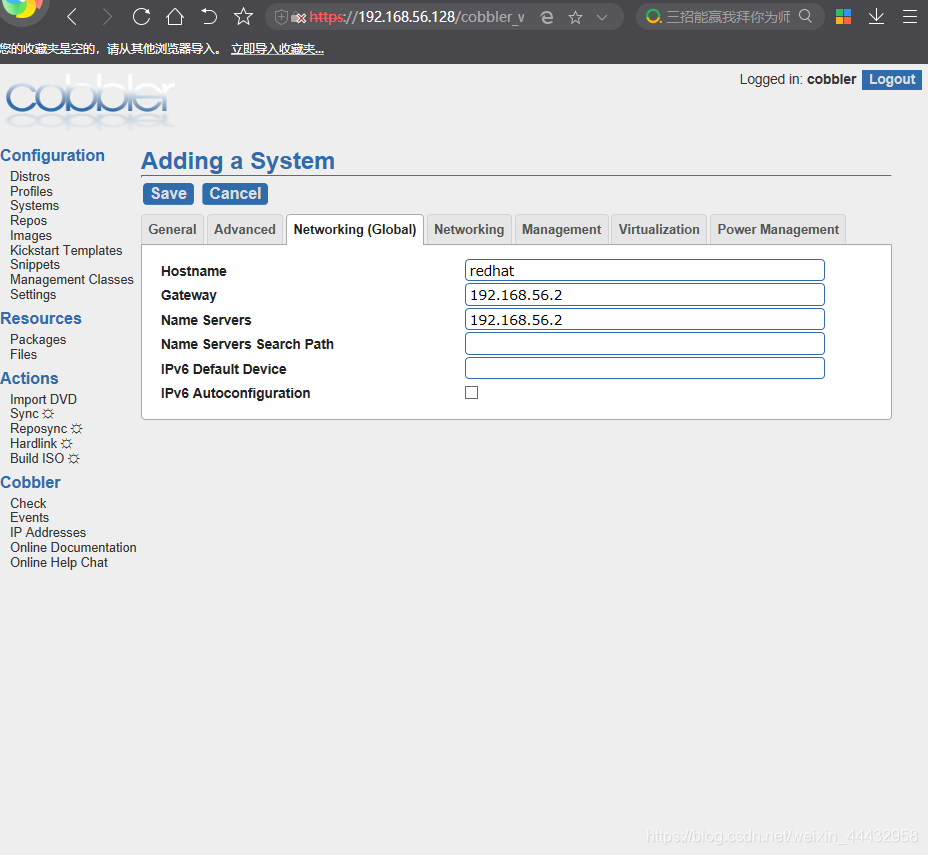
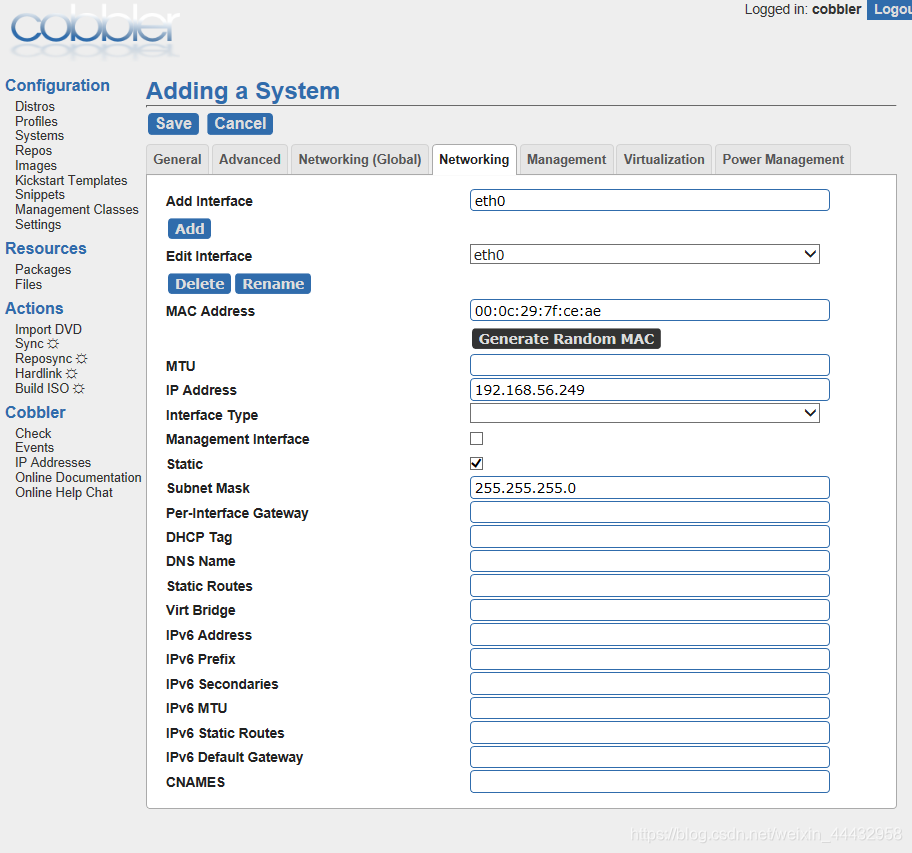
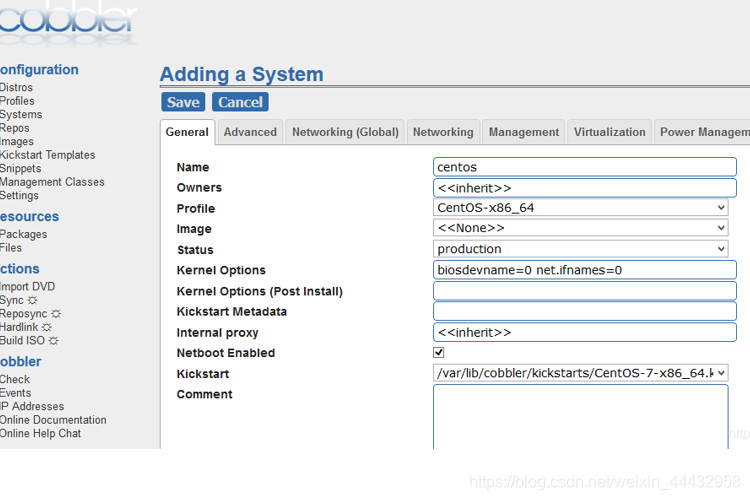
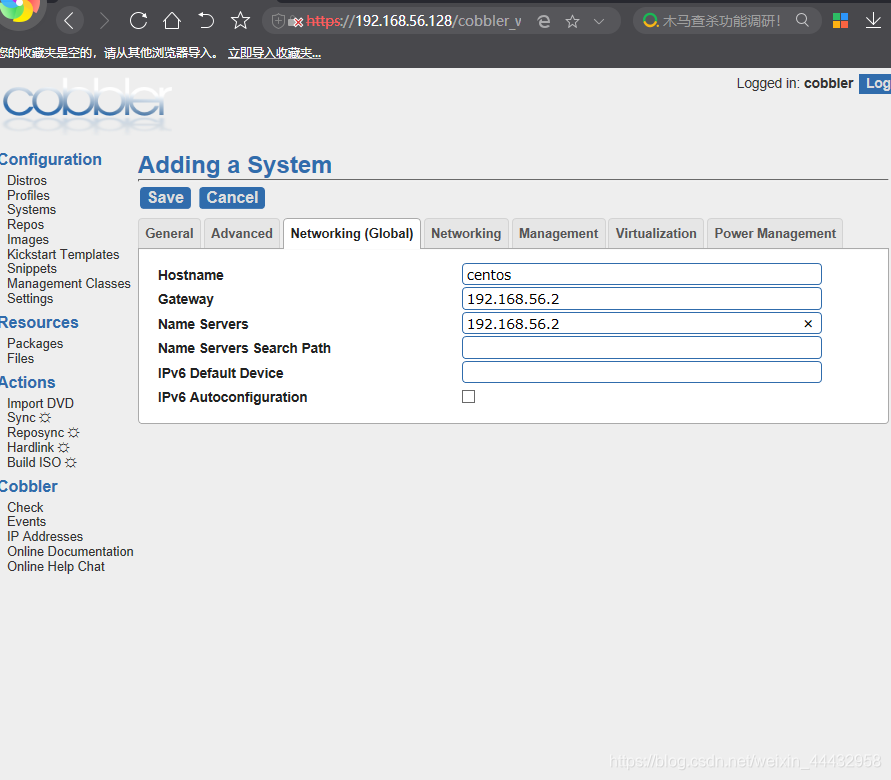
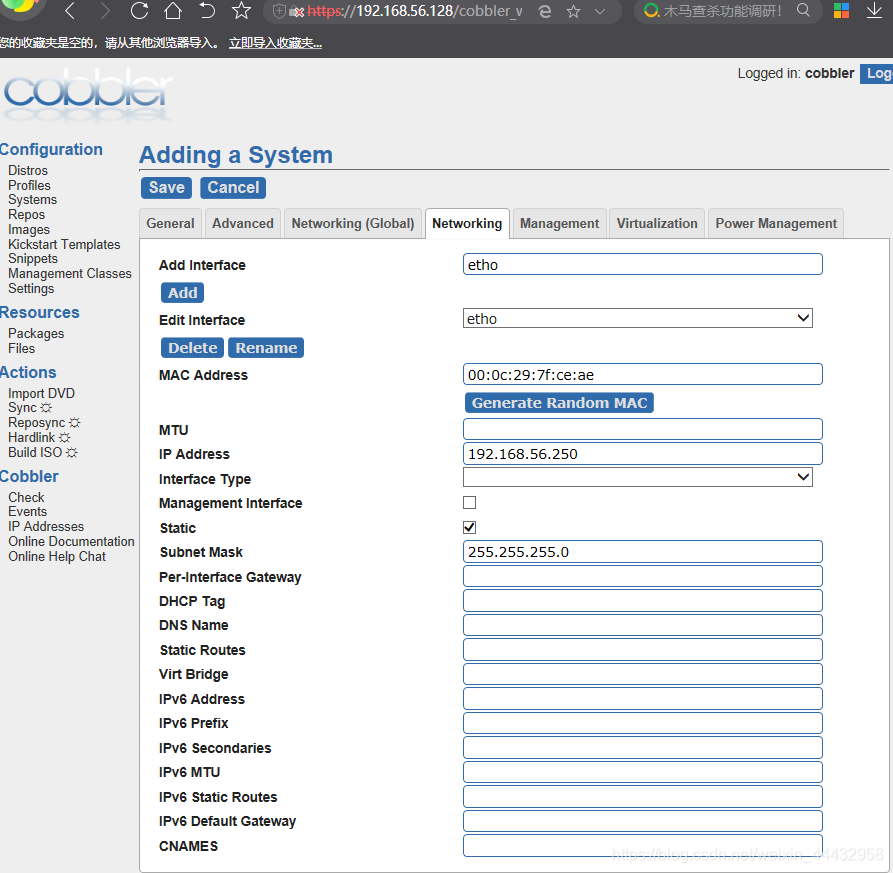
4.定制安装
自己本机的IP是192.168.56.128
定制安装步骤:
统计服务器mac地址
配置cobbler
安装
关于安装时遇到的问题:
1.首先检查防火墙和selinux是否关闭,seliux一定是disable
2.给 /usr/share/cobbler/web/cobbler.wsgi 执行权限,然后改变整个目录的属主
3.django的版本过高,要卸载然后安装低版本的,
[root@localhost ~]# rpm -e python2-django-1.11.18-1.el7.noarch --nodeps
[root@localhost ~]# yum -y install python2-django16
然后重启httpd
如果再登陆不上去,要将http改为https

然后同步并重启服务
[root@localhost ~]# cobbler sync
task started: 2019-03-05_230815_sync
...
*** TASK COMPLETE ***
[root@localhost ~]# systemctl restart httpd.service
[root@localhost ~]# systemctl restart cobblerd.service
[root@localhost ~]# systemctl restart xinetd
CentOS:
前面步骤相同,就是将脚本名字改为CentOS就可以了,其他步骤相同


 1265
1265

 被折叠的 条评论
为什么被折叠?
被折叠的 条评论
为什么被折叠?
 到【灌水乐园】发言


