


 本文详细介绍了基于SSM项目的权限功能设计与实现过程。首先定义了Admin和User两种权限,Admin能管理用户,而User无此权限。实现步骤包括:导包、配置spring-security.xml、设置过滤器、配置不拦截和拦截资源规则,以及在各层代码中进行相应修改。完成后的系统能够根据权限显示不同功能。
关于SSM项目权限功能的设计与实现
此次权限功能的设计与实现是基于上一次博客中的项目,也就是说这一次的博客是对上一次项目功能的完善。下面是大致的步骤:
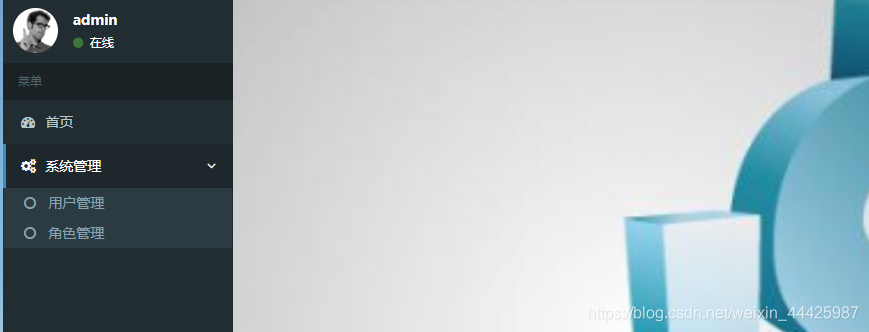
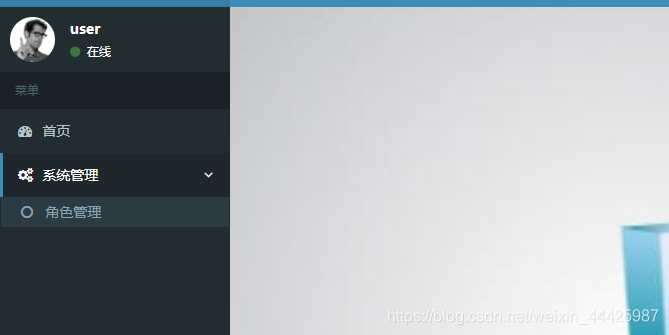
首先是功能的设计:首先,我们需要明确两种权限:Admin和User。Admin权限用户可以使用用户管理页面来浏览用户信息并进行管理;User权限的用户则没有这种功能。
然后是实现权限功能的大致步骤:
首先依旧是导包。我们需要把老师发给我们的文件中的头文件代码拷入pom.xml文件中,然后把多出来的代码段放入相应的位置,这样就可以成功导包。
然后导入spring-security.xml文件,并在web.xml文件中添加spring-secutity的过滤器,具体代码段如下所示:
 <filter>
    <filter-name>springSecurityFilterChain</filter-name>
    <filter-class>org.springframework.web.filter.DelegatingFilterProxy</filter-class>
  </filter>
  <filter-mapping>
    <filter-name>springSecurityFilterChain</filter-name>
    <url-pattern>/*</url-pattern>
  </filter-mapping>
然后,是在spring-security.xml文件中配置不拦截的资源和需要拦截的规则:
<!-- 配置不拦截的资源 -->
    <security:http pattern="/login.jsp" security="none"/>
    <security:http pattern="/failer.jsp" security="none"/>
    <security:http pattern="/css/**" security="none"/>
    <security:http pattern="/img/**" security="none"/>
    <security:http pattern="/plugins/**" security="none"/>

    <security:http auto-config="true" use-expressions="true">
        <!-- 配置具体的拦截的规则 pattern="请求路径的规则" access="访问系统的人,必须有ROLE_USER的角色" -->
        <security:intercept-url pattern="/**" access="hasAnyRole('ROLE_USER','ROLE_ADMIN')"/>

        <security:form-login login-page="/login.jsp"
                             login-processing-url="/login.do"
                            default-target-url="/index.jsp"
                            authentication-failure-url="/failer.jsp"
                            authentication-success-forward-url="/pages/main.jsp"/>
一定要记得在web.xml文件中把spring-security.xml添加进去,
<param-value>classpath*:applicationContext.xml,classpath*:spring-security.xml</param-value>
然后再IUserService接口中改写代码,让这个接口继承userDetialsService,并在实现类中实现loadUserByUsername函数以及getAuthority函数:
@Override
    public UserDetails loadUserByUsername(String username) throws UsernameNotFoundException {
        UserInformation userInformation = userDao.findUser(username);
        User user = null;
        if(userInformation!=null){
            List<Role> role = roleDao.findUser(userInformation.getId());
            userInformation.setRole(role);
            user =new User(userInformation.getUsername(),"{noop}"+userInformation.getPassword(), (Collection<? extends GrantedAuthority>) getAuthority(role));
        }
        return user;
    }

    private Collection<? extends GrantedAuthority> getAuthority(List<Role> roles) {

        List<SimpleGrantedAuthority>list = new ArrayList<>();
        for(Role role:roles){
            list.add(new SimpleGrantedAuthority("ROLE_"+role.getRoleName()));
        }
        return list;
    }
同时一定要记得在bean层、dao层和service层做出相应的修改。
在修改了这些内容以后,我们就可以试着运行程序。在正确的结果中,admin权限拥有用户管理功能;user权限则没有这个功能。
以上就是这次权限功能的设计与实现的大致内容。虽然是大致的步骤,却依旧可以看出这个功能是最近几个项目中代码段较多的一个项目,比较考验我们的能力。相信以后的项目也会更加困难,也更有意思。


 216
216

 被折叠的 条评论
为什么被折叠?
被折叠的 条评论
为什么被折叠?
 到【灌水乐园】发言


