


文章目录
臭名昭著的goto
- continue inner,终止inner标签内层循环进入下次循环;
- continue outer,终止outer标签外层循环进入下次循环;
- break inner,终止inner标签内存循环;
- continue outer,终止outer标签外层循环;
带标签的break/continue在for中使用:
package com.onjava8.demo2;

/**
 * @Author: dj
 * @Date: 2021/6/3 9:30
 */
public class LabelFor{
    public static void main(String[] args) {
        int i = 0;
        outer:      // 此处不允许存在执行语句
        for(; true ;) { // 无限循环
            inner: // 此处不允许存在执行语句
            for(; i < 10; i++) {
                System.out.println("i = " + i);
                if(i == 2) {
                    System.out.println("continue");
                    continue; }
                if(i == 3) {
                    System.out.println("break");
                    i++; // 否则 i 永远无法获得自增
                  // 获得自增
                    break; }
                if(i == 7) {
                    System.out.println("continue outer");
                    i++; // 否则 i 永远无法获得自增
                    // 获得自增
                    continue outer;
                }
                if(i == 8) {
                    System.out.println("break outer");
                    break outer;
                }
                for(int k = 0; k < 5; k++) {
                    if(k == 3) {
                        System.out.println("continue inner");
                        continue inner;
                    } } } }
                // 在此处无法 break 或 continue 标签
    } }
运行结果:
i = 0
continue inner
i = 1
continue inner
i = 2
continue
i = 3
break
i = 4
continue inner
i = 5
continue inner
i = 6
continue inner
i = 7
continue outer
i = 8
break outer
带标签的break/continue在while中使用:
package com.onjava8.demo2;

/**
 * @Author: dongjie
 * @Date: 2021/6/3 10:04
 */
public class LabeledWhile {
    public static void main(String[] args) {
        int i = 0;
        outer:
        while(true) {
            System.out.println("Outer while loop");
            while(true) {
                i++;
                System.out.println("i = " + i);
                if(i == 1) {
                    System.out.println("continue");
                    continue; }
                if(i == 3) {
                    System.out.println("continue outer");
                    continue outer;
                }
                if(i == 5) {
                    System.out.println("break");
                    break; }
                if(i == 7) {
                    System.out.println("break outer");
                    break outer;
                } } } } }
运行结果:
Outer while loop
i = 1
continue
i = 2
i = 3
continue outer
Outer while loop
i = 4
i = 5
break
Outer while loop
i = 6
i = 7
break outer
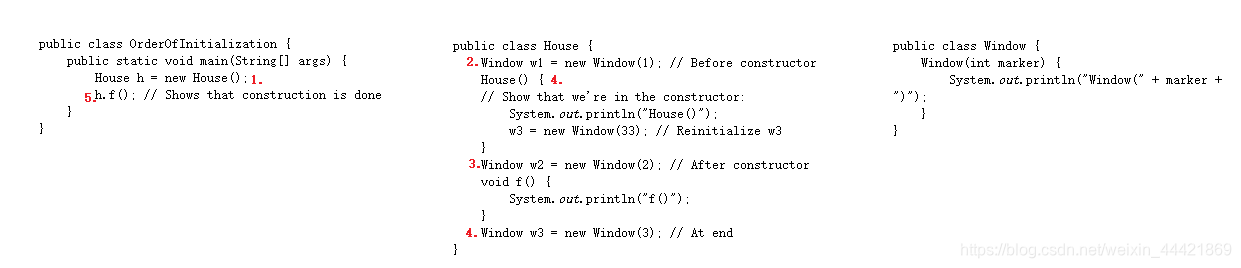
构造器初始化
初始化顺序
package com.onjava8.demo4;

/**
 * @Author: dongjie
 * @Date: 2021/6/3 16:02
 */
public class House {
    Window w1 = new Window(1); // Before constructor
    House() {
    // Show that we're in the constructor:
        System.out.println("House()");
        w3 = new Window(33); // Reinitialize w3
    }
    Window w2 = new Window(2); // After constructor
    void f() {
        System.out.println("f()");
    }
    Window w3 = new Window(3); // At end
}
package com.onjava8.demo4;

/**
 * @Author: dongjie
 * @Date: 2021/6/3 16:01
 */
public class Window {
    Window(int marker) {
        System.out.println("Window(" + marker + ")");
    }
}
package com.onjava8.demo4;

/**
 * @Author: dongjie
 * @Date: 2021/6/3 16:01
 */
public class OrderOfInitialization {
    public static void main(String[] args) {
        House h = new House();
        h.f(); // Shows that construction is done
    }
}
运行结果:
Window(1)
Window(2)
Window(3)
House()
Window(33)
f()
执行顺序:
静态数据的初始化
无论创建多少个对象,静态数据都只占用一份存储区域。
为什么static关键字不能应用于局部变量?
static 关键字修饰的变量是属于类的,局部变量的生命周期从{…}开始和结束;
package com.onjava8.demo5;

/**
 * @Author: dongjie
 * @Date: 2021/6/3 16:43
 */
public class StaticInitialization {
    public static void main(String[] args) {
        System.out.println("main creating new Cupboard()");
        new Cupboard();
        System.out.println("main creating new Cupboard()");
        new Cupboard();
        table.f2(1);
        cupboard.f3(1);
    }
    static Table table = new Table();
    static Cupboard cupboard = new Cupboard();
}
package com.onjava8.demo5;

/**
 * @Author: dongjie
 * @Date: 2021/6/3 16:42
 */
public class Cupboard {
    Bowl bowl3 = new Bowl(3);
    static Bowl bowl4 = new Bowl(4);
    Cupboard() {
        System.out.println("Cupboard()");
        bowl4.f1(2);
    }
    void f3(int marker) {
        System.out.println("f3(" + marker + ")");
    }

    static Bowl bowl5 = new Bowl(5);
}
package com.onjava8.demo5;

/**
 * @Author: dongjie
 * @Date: 2021/6/3 16:42
 */
public class Table {
    static Bowl bowl1 = new Bowl(1);
    Table() {
        System.out.println("Table()");
        bowl2.f1(1);
    }
    void f2(int marker) {
        System.out.println("f2(" + marker + ")");
    }
    static Bowl bowl2 = new Bowl(2);
}
package com.onjava8.demo5;

/**
 * @Author: dongjie
 * @Date: 2021/6/3 16:42
 */
public class Bowl {
    Bowl(int marker) {
        System.out.println("Bowl(" + marker + ")");
    }
    void f1(int marker) {
        System.out.println("f1(" + marker + ")");
    }
}
运行结果:
Bowl(1)
Bowl(2)
Table()
f1(1)
Bowl(4)
Bowl(5)
Bowl(3)
Cupboard()
f1(2)
main creating new Cupboard()
Bowl(3)
Cupboard()
f1(2)
main creating new Cupboard()
Bowl(3)
Cupboard()
f1(2)
f2(1)
f3(1)
执行流程:
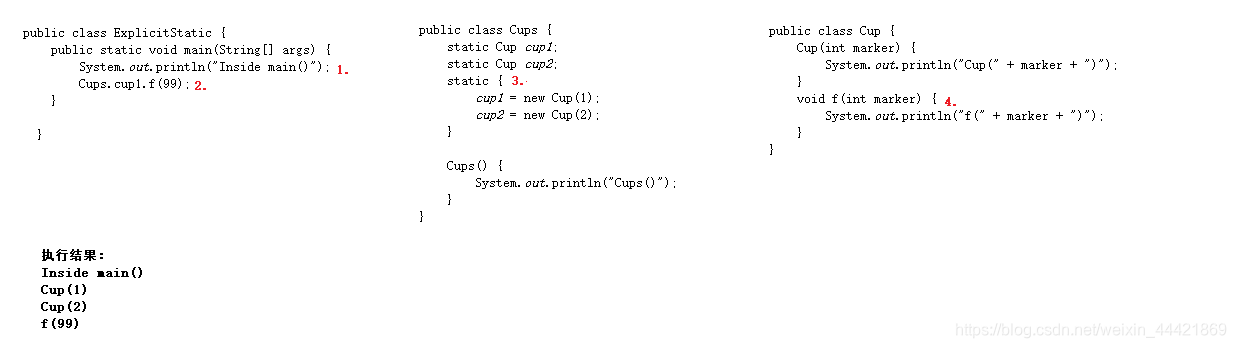
显式的静态初始化
当首次访问这个类的静态成员或者首次创建这个类的对象,静态代码块只执行一次
package com.onjava8.demo6;

/**
 * @Author: dongjie
 * @Date: 2021/6/3 17:19
 */
public class ExplicitStatic {
    public static void main(String[] args) {
        System.out.println("Inside main()");


    }

    static Cups cups1 = new Cups(); // [2]
    static Cups cups2 = new Cups(); // [2]
}
package com.onjava8.demo6;

/**
 * @Author: dongjie
 * @Date: 2021/6/3 17:18
 */
public class Cups {
    static Cup cup1;
    static Cup cup2;
    static {
        cup1 = new Cup(1);
        cup2 = new Cup(2);
    }

    Cups() {
        System.out.println("Cups()");
    }
}
package com.onjava8.demo6;

/**
 * @Author: dongjie
 * @Date: 2021/6/3 17:18
 */
public class Cup {
    Cup(int marker) {
        System.out.println("Cup(" + marker + ")");
    }
    void f(int marker) {
        System.out.println("f(" + marker + ")");
    }
}
运行结果:
Cup(1)
Cup(2)
Cups()
Cups()
Inside main()
运行顺序:
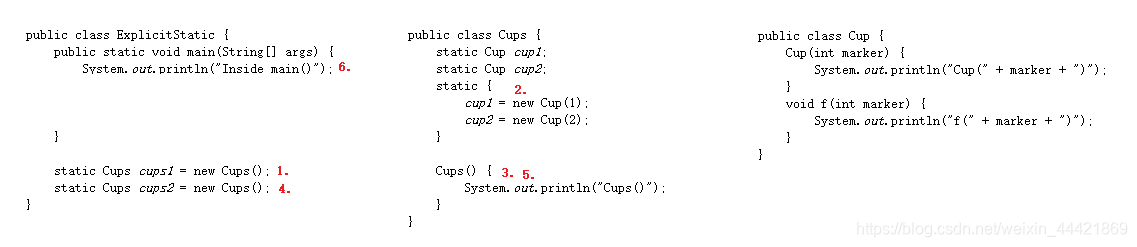 当首次访问这个类的静态成员时,执行顺序:
非静态实例初始化
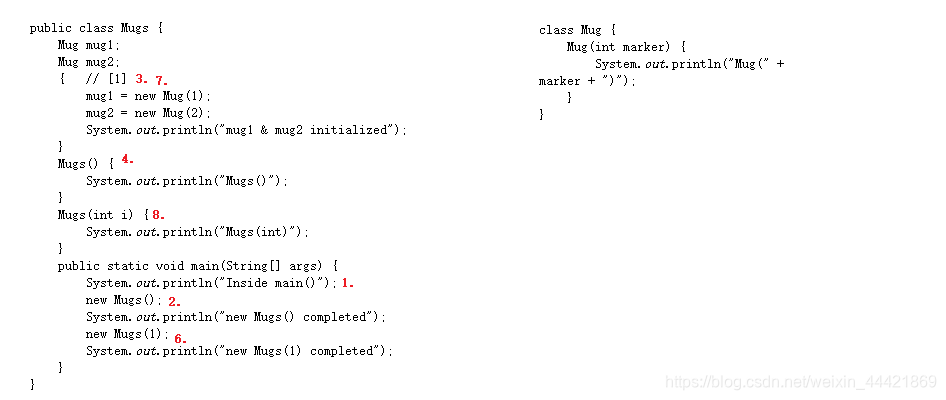
package com.onjava8.demo7;

/**
 * @Author: dongjie
 * @Date: 2021/6/4 9:45
 */
public class Mugs {
    Mug mug1;
    Mug mug2;
    {   // [1]
        mug1 = new Mug(1);
        mug2 = new Mug(2);
        System.out.println("mug1 & mug2 initialized");
    }
    Mugs() {
        System.out.println("Mugs()");
    }
    Mugs(int i) {
        System.out.println("Mugs(int)");
    }
    public static void main(String[] args) {
        System.out.println("Inside main()");
        new Mugs();
        System.out.println("new Mugs() completed");
        new Mugs(1);
        System.out.println("new Mugs(1) completed");
    }
}
package com.onjava8.demo7;

/**
 * @Author: dongjie
 * @Date: 2021/6/4 9:43
 */
class Mug {
    Mug(int marker) {
        System.out.println("Mug(" + marker + ")");
    }
}
输出:
Inside main()
Mug(1)
Mug(2)
mug1 & mug2 initialized
Mugs()
new Mugs() completed
Mug(1)
Mug(2)
mug1 & mug2 initialized
Mugs(int)
执行顺序:
关于Random r = new Random(47)中47的意思
/**
 *      想要获取一个范围内的随机数(例如26,随机数可能是0-25),首先需要一个种子(其实就是一个数值)。
 *     每个种子会对应这个范围内(0-26)的唯一的一个随机数。
 *     47这个种子在26这个范围内,所对应的随机数为24,所以每次随机得出的结果都为24.
 *     (注意:47在26这个范围内对应的是24,这个是死的,固定的,无论你执行多少次,它还是24)
 *     至于为什么种子47会对应24,这个涉及到java封装的算法,有兴趣可以深入了解。
 *
 * @Author: dongjie
 * @Date: 2021/6/4 10:34
 */
public class ArrayNew {
    public static void main(String[] args) {
        int[] a;
        Random rand = new Random(47);
        a = new int[rand.nextInt(26)];
        System.out.println("length of a = " + a.length);
        System.out.println(Arrays.toString(a));
    }
}
运行结果:
length of a = 24
[0, 0, 0, 0, 0, 0, 0, 0, 0, 0, 0, 0, 0, 0, 0, 0, 0, 0, 0, 0, 0, 0, 0, 0]
枚举类型
public enum Spiciness {
    NOT, MILD, MEDIUM, HOT, FLAMING
}

class SimpleEnumUse {
    public static void main(String[] args) {
        Spiciness howHot = Spiciness.MEDIUM;
        System.out.println(howHot);
    } }
运行结果:
MEDIUM
在你创建 enum 时,编译器会自动添加一些有用的特性。例如,它会创建toString() 方法,以便你方便地显示某个 enum 实例的名称,这从上面例子中的输出可以看出。编译器还会创建 ordinal() 方法表示某个特定 enum 常量的声明顺序
- ordinal():表示enum常量的声明顺序;
class EnumOrder {
    public static void main(String[] args) {
        for (Spiciness s: Spiciness.values()) {
            System.out.println(s + ", ordinal " + s.ordinal());
        } } }
运行结果:
NOT, ordinal 0
MILD, ordinal 1
MEDIUM, ordinal 2
HOT, ordinal 3
FLAMING, ordinal 4
由于 switch 是在有限的可能值集合中选择,因此它与 enum 是绝佳的组合。注意,enum 的名称是如何能够倍加清楚地表明程序的目的。
public enum Spiciness {
    NOT, MILD, MEDIUM, HOT, FLAMING
}
package com.onjava8.demo9;

import com.onjava8.demo8.Spiciness;

/**
 * @Author: dongjie
 * @Date: 2021/6/4 11:28
 */
public class Burrito {
    Spiciness degree;

    public Burrito(Spiciness degree) {
        this.degree = degree;
    }

    public void describe() {
        System.out.print("This burrito is ");
        switch (degree) {
            case NOT:
                System.out.println("not spicy at all.");
                break;
            case MILD:
            case MEDIUM:
                System.out.println("a little hot.");
                break;
            case HOT:
            case FLAMING:
            default:
                System.out.println("maybe too hot");
        }
    }

    public static void main(String[] args) {
            Burrito plain = new Burrito(Spiciness.NOT),
            greenChile = new Burrito(Spiciness.MEDIUM),
            jalapeno = new Burrito(Spiciness.HOT);
            plain.describe();
            greenChile.describe();
            jalapeno.describe();

    }
}
运行结果:
This burrito is not spicy at all.
This burrito is a little hot.
This burrito is maybe too hot
访问权限
- public:对所有类可见;
- private:对本类可见;
- protected:对同一包类可见及子类可见;
- default:不要修饰符,对同一包类可见;
继承
初始化基类
java自动在派生类构造函数中插入对基类构造函数的调用。
public class Art {
    Art() {
        System.out.println("Art constructor");
    }
}
public class Drawing extends Art{
    Drawing() {
        System.out.println("Drawing constructor");
    }
}
public class Cartoon extends Drawing{
    public Cartoon() {
        System.out.println("Cartoon constructor");
    }
    public static void main(String[] args) {
        Cartoon x = new Cartoon();
    }
}
运行结果:
Art constructor
Drawing constructor
Cartoon constructor
执行顺序:

带参数的构造函数
如果必须调用具有参数的基类构造函数,则必须使用 super 关键字和适当的参数列表显式地编写对基类构造函数的调用;
public class Game {
    Game(int i) {
        System.out.println("Game constructor");
    }
}
public class BoardGame extends Game{
    BoardGame(int i) {
        super(i);
        System.out.println("BoardGame constructor");
    }
}
public class Chess extends BoardGame{
    Chess() {
        super(11);
        System.out.println("Chess constructor");
    }
    public static void main(String[] args) {
        Chess x = new Chess();
    }
}
运行结果:
Game constructor
BoardGame constructor
Chess constructor
执行顺序:
 此外,对基类构造函数的调用必须是派生类构造函数中第一个操作。(如果你写错了,编译器会提醒你。)
保证适当的清理
执行顺序:
组合和继承的选择
组合:当想在一个新类中包含已有类的功能时就是用组合。
car是交通工具,这种是一个”的关系是用继承来表达的,而 “有一个 “的关系则用组合来表达
class Engine {
public void start() {}
public void rev() {}
public void stop() {}
}
class Wheel {
public void inflate(int psi) {}
}
class Window {
public void rollup() {}
public void rolldown() {}
}
class Door {
public Window window = new Window();
public void open() {}
public void close() {}
}
public class Car {
public Engine engine = new Engine();
public Wheel[] wheel = new Wheel[4];
public Door left = new Door(), right = new Door(); // 2-door
public Car() {
for (int i = 0; i < 4; i++) {
wheel[i] = new Wheel();
} }

public static void main(String[] args) {
Car car = new Car();
car.left.window.rollup();
car.wheel[0].inflate(72);
} }
类初始化和加载
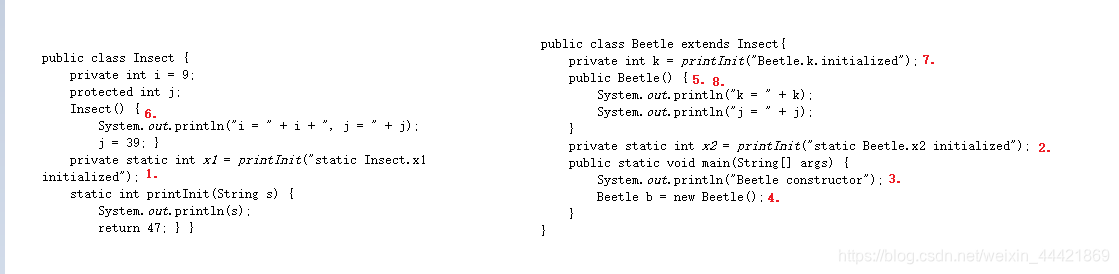
public class Insect {
    private int i = 9;
    protected int j;
    Insect() {
        System.out.println("i = " + i + ", j = " + j);
        j = 39; }
    private static int x1 = printInit("static Insect.x1 initialized");
    static int printInit(String s) {
        System.out.println(s);
        return 47; } }
public class Beetle extends Insect{
    private int k = printInit("Beetle.k.initialized");
    public Beetle() {
        System.out.println("k = " + k);
        System.out.println("j = " + j);
    }
    private static int x2 = printInit("static Beetle.x2 initialized");
    public static void main(String[] args) {
        System.out.println("Beetle constructor");
        Beetle b = new Beetle();
    }
}
运行结果:
static Insect.x1 initialized
static Beetle.x2 initialized
Beetle constructor
i = 9, j = 0
Beetle.k.initialized
k = 47
j = 39
执行顺序:
进制转换
10进制转2进制/8进制/16进制
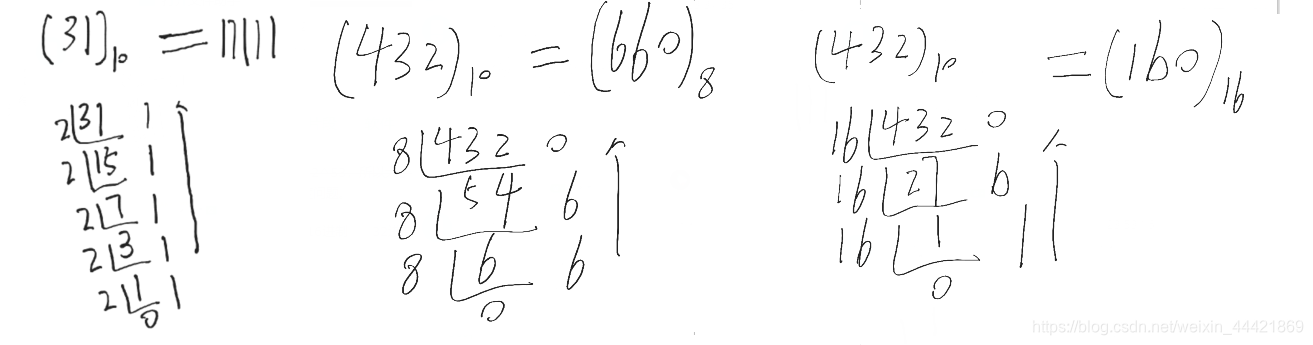
2进制/8进制/16进制转10进制
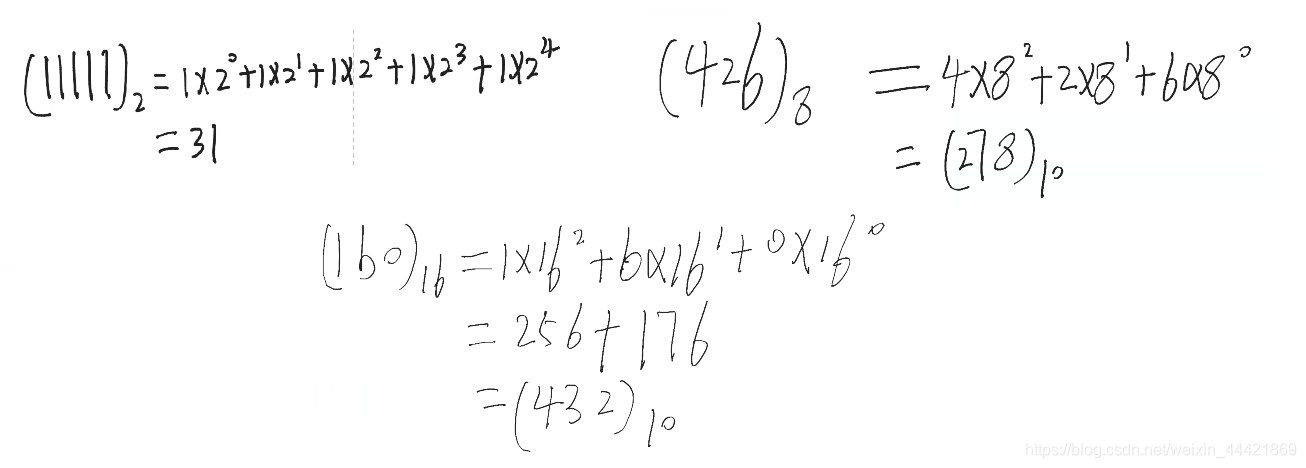
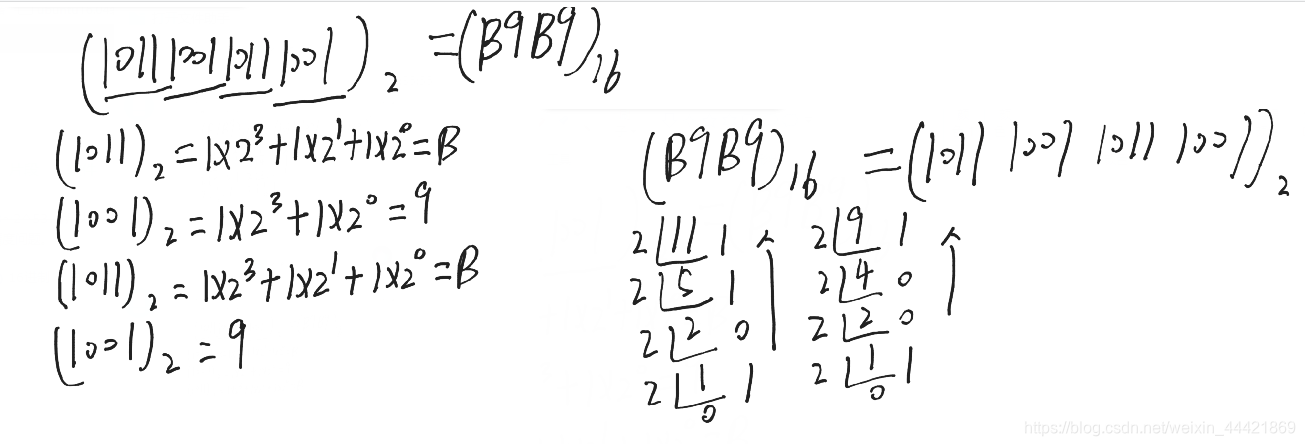
8进制转2进制以及2进制转8进制
16进制转2进制以及2进制转16进制
位移
<<无符号左移运算符
左移1位,低位补1个0,乘以2的1次方;左移n位,低位补n个0,乘以2的n次方
2:
10
10<<3:
10000:
16

3:
11
11<<3:
11000:
24

-3
原码:10000000 00000000 00000000 00000011
反码:11111111 11111111 11111111 11111100
补码:11111111 11111111 11111111 11111101
-3<<3:
     11111111 11111111 11111111 11101000
右移运算符>>
右移1位,高位补1个0,除以2的1次方;右移n位,高位补n个0,除以2的n次方;
16:
10000
>>3:2
00010

注意:负数在高位补上符号位
-16:
原码:100000000 00000000 00000000 00010000
反码:111111111 11111111 11111111 11101111
补码:111111111 11111111 11111111 11110000
>>3:-2
     111111111 11111111 11111111 11111110


-10:
源码:10000000 00000000 00000000 00001010
反码:11111111 11111111 11111111 11110101
补码:11111111 11111111 11111111 11110110
>>3:
     11111111 11111111 11111111 111111110


int a=-31;
补码:11111111111111111111111111100001
>>3:-4
     11111111111111111111111111111100
在上面的代码中-31/8是-3.875,右移运算向下取整所以为-4
>>>无符号右移
注意:无符号右移几位,就去掉几位

16:
10000
>>>3:2
10

12:
1100
>>>2:3
10


-16:
原码:100000000 00000000 00000000 00010000
反码:111111111 11111111 11111111 11101111
补码:111111111 11111111 11111111 11110000
>>>3:536870910
     111111111 11111111 11111111 11110

-10:
源码:10000000 00000000 00000000 00001010
反码:11111111 11111111 11111111 11110101
补码:11111111 11111111 11111111 11110110
>>>3:536870910
     11111111 11111111 11111111 11110

补码到原码计算过程:等于再求一次补码
补码:1111 1100
反码:1000 0011
原码:1000 0100
泛型
泛型方法
要定义泛型方法,请将泛型参数列表放置在返回值之前,如下所示:
public <T> void f(T x) {
System.out.println(x.getClass().getName());
}
泛型擦除
异常
异常丢失
一种更加简单的丢失异常的方式是从 finally 子句中返回:
package com.onjava8.demo32;

/**
 * @Author: dongjie
 * @Date: 2021/6/11 10:42
 */
public class ExceptionSilencer {
    public static void main(String[] args) {
        try {
            throw new RuntimeException();
        } finally {
        // Using 'return' inside the finally block
        // will silence any thrown exception.
            return; } }
}
异常处理方式
编译型异常
- 方式一:a方法上面声明异常并手动抛出异常,b方法调用a方法可以捕获处理
- 方式二:a方法上面声明异常并手动抛出异常,c方法调用a方法可以继续向上声明该异常,别的方法调用c方法,它也可以继续向上声明该异常,以此类推,一直向上声明…
package com.onjava8.demo34;

import java.io.IOException;

/**
 * @Author: dongjie
 * @Date: 2021/6/11 12:55
 */
public class MyException {
    public static void a() throws IOException {
        throw new IOException();
    }

    public static void b(){
        try{
            a();
        }catch (IOException e){
            e.printStackTrace();
        }
    }

    public static void c() throws IOException{
        a();
    }

    public static void main (String[] args) throws IOException {
        b();
        c();
    }

}
运行时异常
a方法上面声明异常并手动抛出异常,b方法调用a方法可以处理异常也可以不处理异常
package com.onjava8.demo34;

import java.io.IOException;

/**
 * @Author: dongjie
 * @Date: 2021/6/11 12:55
 */
public class MyException2 {
    public static void a() throws NullPointerException {
        throw new NullPointerException();
    }

    public static void b(){
        try{
            a();
        }catch (NullPointerException e){
            e.printStackTrace();
        }
    }

    public static void c() throws NullPointerException{
        a();
    }

    public static void d() {
        a();
    }

    public static void main (String[] args){
        b();
        c();
        d();
    }

}
Try-with-resources用法
需要资源清理:
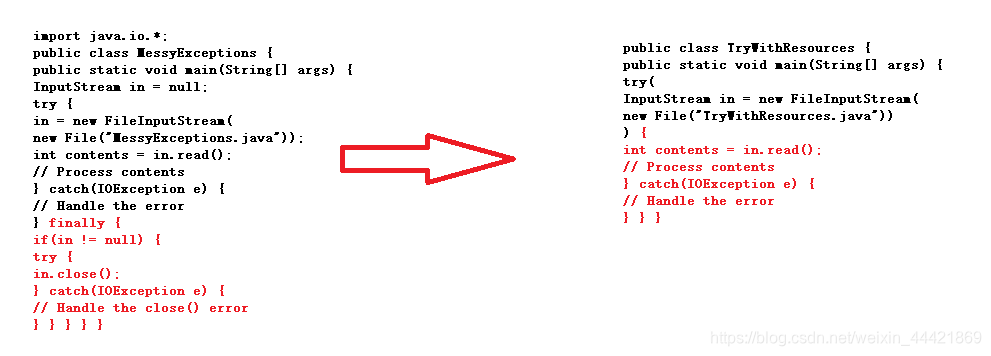
括号内部分成为资源规范头,try-with-resoutces 定义子句中创建的对象(括号内)必须实现AutoCloseable接口,接口里面有个方法close();
规范头中定义的每个对象都会在try语句块运行结束之后调用close()方法。
package com.onjava8.demo34;

/**
 * @Author: dongjie
 * @Date: 2021/6/11 13:54
 */
public class Reporter implements AutoCloseable{
    String name=this.getClass().getSimpleName();

    public Reporter() {
        System.out.println("creating:"+name);
    }

    @Override
    public void close()  {
        System.out.println("creating:"+name);
    }
}

class First extends Reporter{}
class Second extends Reporter{}

class AutoCloseableDetails{
    public static void main(String[] args) {
        try(
                final First first = new First();
                 final Second second = new Second()
        ){
			//关闭second
			//关闭first
        }
    }
}
退出 try 块会调用两个对象的 close() 方法,并以与创建顺序相反的顺序关闭它们。顺序很重要,因为在这种情况下,Second 对象可能依赖于 First 对象,因此如果 First在第 Second 关闭时已经关闭。Second 的 close() 方法可能会尝试访问 First 中不再可用的某些功能。
package com.onjava8.demo35;


/**
 * @Author: dongjie
 * @Date: 2021/6/11 15:17
 */
public class CloseException extends Exception{
}

class Reporter2 implements AutoCloseable {
    String name = getClass().getSimpleName();
    Reporter2() {
        System.out.println("Creating " + name);
    }

    @Override
    public void close() throws CloseException {
        System.out.println("Closing " + name);
    } }

class Closer extends Reporter2 {
    @Override
    public void close() throws CloseException {
        super.close();
        throw new CloseException();
    } }

class CloseExceptions {
    public static void main(String[] args) {
        try(
                First f = new First();
                Closer c = new Closer();
                Second s = new Second()
        ) {
            System.out.println("In body");
        } catch(CloseException e) {
            System.out.println("Caught: " + e);
        } } }
public class First extends Reporter {
}
public class Second extends Reporter {
}
public class Reporter implements AutoCloseable{
    String name=this.getClass().getSimpleName();

    public Reporter() {
        System.out.println("creating:"+name);
    }

    @Override
    public void close()  {
        System.out.println("closeing:"+name);
    }
}
运行结果:
creating:First
Creating Closer
creating:Second
In body
closeing:Second
Closing Closer
closeing:First
Caught: com.onjava8.demo35.CloseException


 被折叠的 条评论
为什么被折叠?
被折叠的 条评论
为什么被折叠?
 到【灌水乐园】发言


