


目前的深度学习框架真正去实现卷积的时候,使用的是矩阵乘法的方式,使用im2col操作将输入数据与权重展开成二维矩阵,然后直接做矩阵乘法, 缺点是占用许多内存。具体原理看下面这张图就能明白:
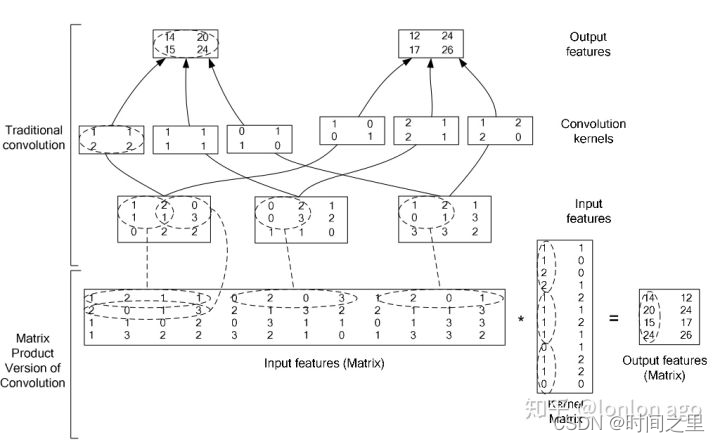
图片的上面三行是传统的卷积实现,也就是我文章下面代码的实现过程。
最下面的一行是目前框架中普遍使用的实现方式,可以看到它通过把输入特征转换为一个大矩阵,把卷积核也转换为一个大矩阵,数据量经过复制后确实增加了很多,但是计算操作却简单了很多。
卷积代码实现:
# date 2022-01-11
# 说明:比较手动实现卷积与TF实现卷积(有无GPU加速、有无cudnn加速的区别)

import time
import matplotlib.pyplot as plt
import pylab
import numpy as np

def convolve(SourceImg, Kernel):
    """
    :param SourceImg:
    :param Kernel:
    :return:
    # 分成三个通道
    # 1.三通道数据分离
    # 2.三通道数据单独卷积操作
    # 3.卷积结果合并
    """

    h = fil.shape[0] // 2   # = 1
    w = fil.shape[1] // 2   # = 2
    img = np.pad(SourceImg, ((h, h), (w, w), (0, 0)), 'constant')
    conv_b = ConvolveOperation(img[:, :, 0], Kernel)
    conv_g = ConvolveOperation(img[:, :, 1], Kernel)
    conv_r = ConvolveOperation(img[:, :, 2], Kernel)

    composite_channel = np.dstack([conv_b, conv_g, conv_r])  # 卷积后的通道合并
    return composite_channel


def ConvolveOperation(source_img, kernel):

    """
    :param source_img:
    :param kernel:
    :return:
    """
    kernel_h = kernel.shape[0]
    kernel_w = kernel.shape[1]

    conver_result_h = source_img.shape[0] - kernel_h + 1    # mute step is 1
    conver_result_w = source_img.shape[1] - kernel_w + 1
    conver_result = np.zeros((conver_result_h,conver_result_w), dtype='uint8')
    for i in range(conver_result_h):
        for j in range(conver_result_w):
            conver_result[i][j] = Caculate(source_img[i:i+kernel_h, j:j+kernel_w],kernel)   # 逐点相乘求和得到每一个点
    return conver_result


def Caculate(img0, kernel):
    """
    :param img0:
    :param kernel:
    :return:
    """
    res0 = (img0 * kernel).sum()
    if res0 < 0:
        res0 = 0
    elif res0 > 255:
        res0 = 255
    return res0


img = plt.imread("001.jpg")
plt.imshow(img)
pylab.show()

fil = np.array([[-1, -1, -1, 0, 1],
                [-1, -1, 0, 1, 1],
                [-1, 0, 1, 1, 1]])

start = time.localtime()
print(time.strftime("%Y-%m-%d %H:%M:%S", time.localtime()))

res = convolve(img, fil)

end = time.localtime()
print(time.strftime("%Y-%m-%d %H:%M:%S", time.localtime()))

plt.imshow(res)
pylab.show()


 8676
8676

 被折叠的 条评论
为什么被折叠?
被折叠的 条评论
为什么被折叠?
 到【灌水乐园】发言


