


 本文详细介绍Nginx的日志管理、压缩配置、访问限速、请求频率设置及图像管理等高级配置技巧,涵盖shell脚本实现日志备份、设置压缩文件大小与类型、nginx systemctl启动脚本编写、访问限速与请求频率控制,以及图像尺寸调整方法。
一、日志管理
1.备份日志
[root@server1 ~]# cd /usr/local/nginx/logs/
[root@server1 logs]# ls
access.log  error.log
[root@server1 logs]# mv /usr/local/nginx/logs/access.log /usr/local/nginx/logs/`date +%F -d -1day`_access.log
[root@server1 logs]# ls
2019-05-09_access.log  error.log
[root@server1 logs]# /usr/local/nginx/sbin/nginx -s reopen #重新开启nginx
2.shell脚本实现日志备份
编写shall脚本:
[root@server1 logs]# mkdir /usr/local/nginx/logs/oldlogs
[root@server1 logs]# vim logs_back.sh

#!/bin/bash

LOG_PATH=/usr/local/nginx/logs/oldlogs
CUR_LOG_PATH=/usr/local/nginx/logs
YESTERDAY=$(date +%F -d -1day)

mv $CUR_LOG_PATH/access.log $LOG_PATH/${YESTERDAY}_access.log
mv $CUR_LOG_PATH/error.log $LOG_PATH/${YESTERDAY}_error.log

kill -USR1 $(cat /usr/local/nginx/logs/nginx.pid)

[root@server1 logs]# chmod +x logs_back.sh  #加执行权限
设置延时任务:
[root@server1 logs]# crontab -e

0 0 * * * /bin/bash /usr/local/nginx/logs/logs_back.sh

#查看是否设置成功
[root@server1 logs]# cat /var/spool/cron/root  #每天的0点0分执行备份脚本
0 0 * * * /bin/bash /usr/local/nginx/logs/logs_back.sh
[root@server1 logs]# systemctl enable crond
二、设置压缩文件大小和类型
[root@server1 logs]# vim /usr/local/nginx/conf/nginx.conf

 33     gzip  on;
 34     gzip_min_length 1;  ##最小压缩大小1kb
 35     gzip_comp_level 2;
 36     gzip_types text/plain application/x-javascript text/css application/xml text/javascript application/x-httpd/php image/jpeg image/gif image/png;  ##压缩文件类型
三、nginx的systemctl启动脚本
#如果没有httpd服务,需要先安装:yum install httpd -y
[root@server1 ~]# cd /usr/lib/systemd/system
[root@server1 system]# cp httpd.service /etc/systemd/system/nginx.service

[Unit]
Description=The nginx HTTP Server
After=network.target remote-fs.target nss-lookup.target

[Service]
Type=forking
ExecStart=/usr/local/nginx/sbin/nginx
ExecReload=/usr/local/nginx/sbin/nginx -s reload
ExecStop=/usr/local/nginx/sbin/nginx -s stop
PrivateTmp=true

[Install]
WantedBy=multi-user.target
[Unit]:服务的说明
Description:描述服务
After:描述服务类别

[Service]服务运行参数的设置
Type=forking是后台运行的形式
ExecStart为服务的具体运行命令
ExecReload为重启命令
ExecStop为停止命令
PrivateTmp=True表示给服务分配独立的临时空间
注意:启动、重启、停止命令全部要求使用绝对路径

[Install]服务安装的相关设置,可设置为多用户 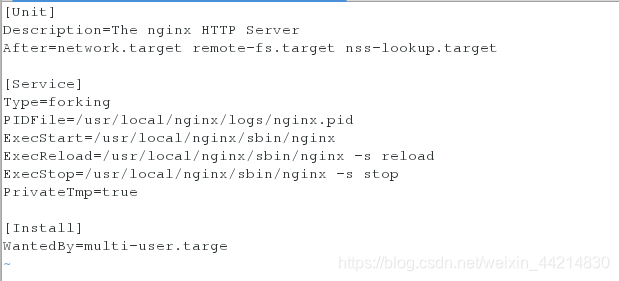
 文件设为755权限并使文件生效
[root@server1 logs]# chmod 755 /etc/systemd/system/nginx.service
[root@server1 logs]# systemctl daemon-reload

[root@server1 logs]# systemctl start nginx
[root@server1 logs]# ps ax

四、访问限速
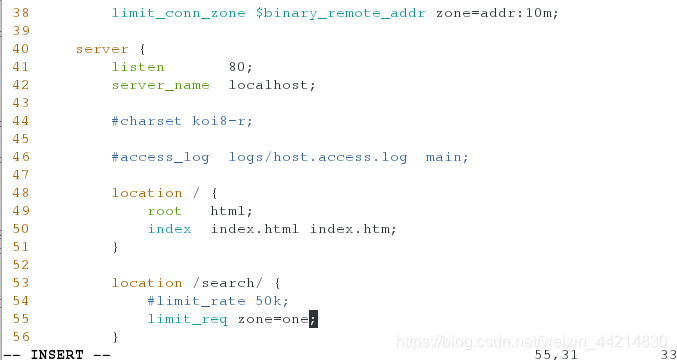
[root@server1 ~]# vim /usr/local/nginx/conf/nginx.conf
 38         limit_conn_zone $binary_remote_addr zone=addr:10m;

 51         location /search/ {

 53             limit_req zone=one;
 54         }
[root@server1 ~]# cd /usr/local/nginx/html/
[root@server1 html]# mkdir search
[root@server1 html]# cd search/
[root@server1 search]# ls
xmyrz.jpg

[root@server1 search]# /usr/local/nginx/sbin/nginx -s reload
测试:
[kiosk@foundation60 ~]$ ab -c 1 -n 10 http://172.25.60.1/search/xmyrz.jpg
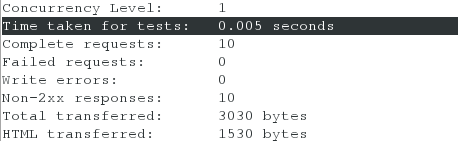
仅需要0.005s
限制速度:
[root@server1 nginx]# vim /usr/local/nginx/conf/nginx.conf
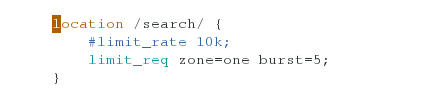
53 location /search/ {
54 limit_rate 10k;
55 limit_req zone=one;
56 }
[root@server1 nginx]# /usr/local/nginx/sbin/nginx -s reload

测试:
[kiosk@foundation60 ~]$ ab -c 1 -n 10 http://172.25.60.1/search/xmyrz.jpg
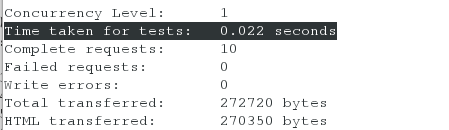
需要0.022s
五、设置请求频率
[root@server1 nginx]# vim /usr/local/nginx/conf/nginx.conf
39 limit_req_zone $binary_remote_addr zone=one:10m rate=1r/s;
54 location /search/ {
55 #limit_rate 10k;
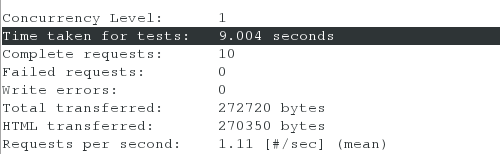
56 limit_req zone=one burst=5;
57 }
[root@server1 nginx]# /usr/local/nginx/sbin/nginx -s reload

测试:请求有10次,间隔9秒

六、图像管理
1.重新编译nginx
安装gd
[root@server1 ~]# ls
gd-devel-2.0.35-26.el7.x86_64.rpm
[root@server1 ~]# yum install -y gd-devel-2.0.35-26.el7.x86_64.rpm
重新编译nginx
[root@server1 ~]# ls
gd-devel-2.0.35-26.el7.x86_64.rpm  nginx-1.15.8.tar.gz  nginx-1.16.0.tar.gz
nginx-1.15.8                       nginx-1.16.0         xmyrz.jpg
[root@server1 ~]# cd nginx-1.15.8/
[root@server1 nginx-1.15.8]# ./configure --prefix=/usr/local/nginx/ --with-http_realip_module --with-http_image_filter_module=dynamic
[root@server1 nginx-1.15.8]# make
2.建立图像过滤模块
[root@server1 nginx-1.15.8]# cd objs/
[root@server1 objs]# cp -f nginx /usr/local/nginx/sbin/
cp: overwrite ‘/usr/local/nginx/sbin/nginx’? y
[root@server1 objs]# mkdir /usr/local/nginx/modules
[root@server1 objs]# cp ngx_http_image_filter_module.so /usr/local/nginx/modules/
3.编辑nginx配置文件,修改图片的尺寸
[root@server1 conf]# cd /usr/local/nginx/conf
[root@server1 conf]# vim nginx.conf
46 location / {
47 root html;
48 index index.html index.htm;
49 }
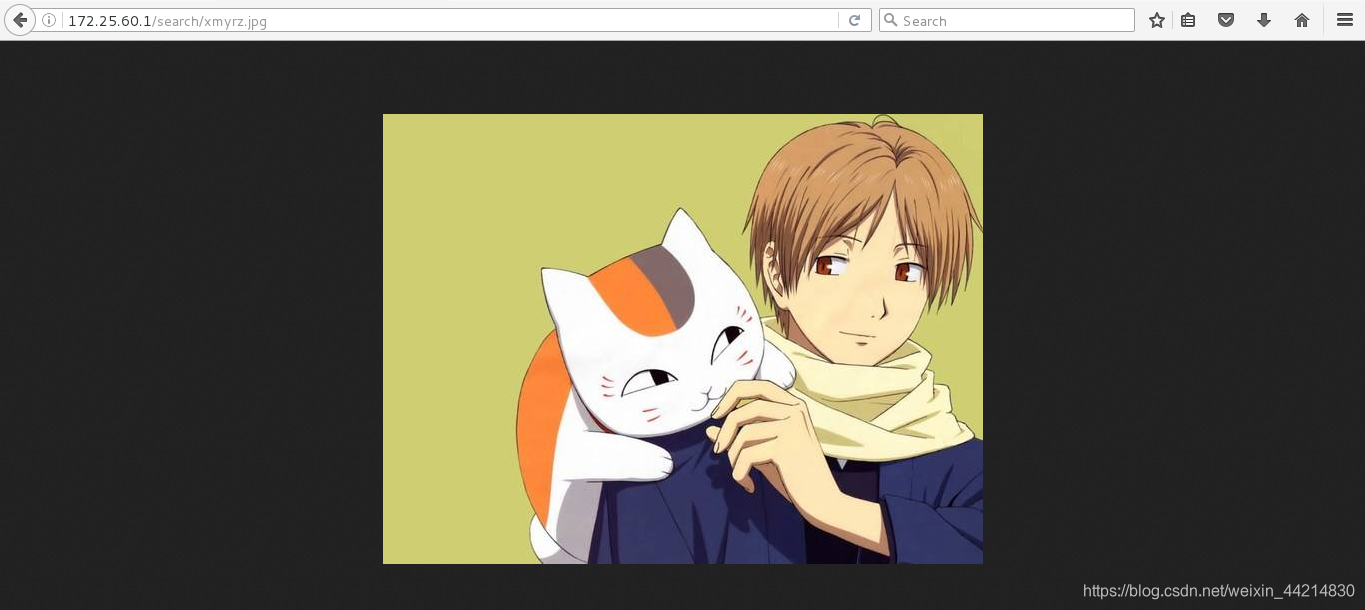
50 location /search/ {
51 image_filter resize 600 450;
52 }
53
54 #error_page 404 /404.html;

4.浏览器访问http://172.25.60.1/search/xmyrz.jpg,图片大小改变


 被折叠的 条评论
为什么被折叠?
被折叠的 条评论
为什么被折叠?
 到【灌水乐园】发言


