


 本文详细介绍了数据容器在Python中的重要角色,包括列表(list)的灵活操作、元组(tuple)的特性及查找,字符串(str)的索引与替换,集合(set)的去重功能,以及字典(dict)的键值对管理。涵盖了遍历、修改、计数和基本操作等内容。
1. 数据容器入门
2. 数据容器: list(列表)
3. 数据容器: tuple(元组)
4. 数据容器: str(字符串)
5. 数据容器的切片
6. 数据容器: set (集合)
7. 数据容器: dict(字典、映射)
8. 数据容器的通用操作
文章目录
1. 数据容器入门
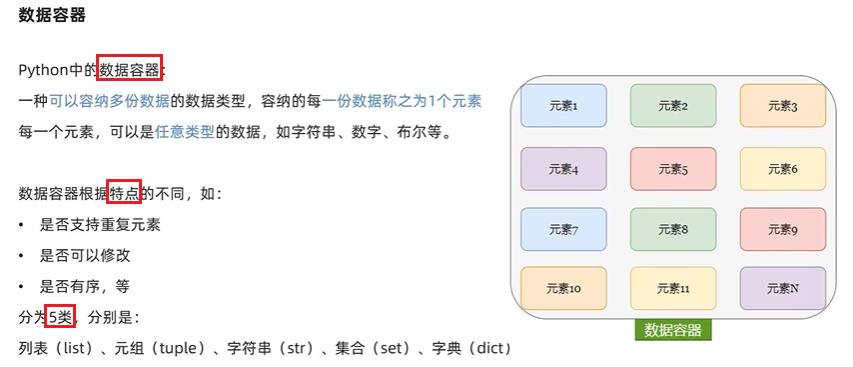
数据容器分类:
- list(列表)
- tuple(元组)
- str(字符串)
- set (集合)
- dict(字典、映射)
2. 数据容器: list(列表)
2.1 为什么需要容器?
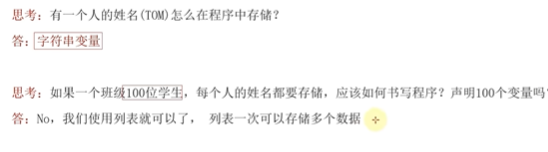
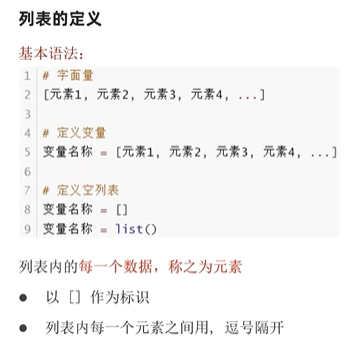
2.2 列表的定义
- 列表可以一次存储多个数据,且可以为不同的数据类型,支持嵌套。
- 列表的元素可以是任意类型的数据。
# 例1
zx_list1=["hello","world","你好啊"]
print(zx_list1) # ['hello', 'world', '你好啊']
print(type(zx_list1)) # <class 'list'>

# 例2
zx_list2=list("hi" "you are a beautifual girl")
print(zx_list2) # ['h', 'i', 'y', 'o', 'u', ' ', 'a', 'r', 'e', ' ', 'a', ' ', 'b', 'e', 'a', 'u', 't', 'i', 'f', 'u', 'a', 'l', ' ', 'g', 'i', 'r', 'l']
print(type(zx_list2))
错误示例:
# 例3
zx_list3 = list("hi", "you are a beautifual girl") # error报错
print(zx_list3)
print(type(zx_list3))
注意: 列表可以一次存储多个数据,且可以为不同的数据类型,支持嵌套
# 例4
zx_list=["Jencyco",123,True]
print(zx_list) # ['Jencyco', 123, True]
print(type(zx_list)) # <class 'list'>
2.3 列表的嵌套
zx_list5=[["你好",123,True],[12,65,78,999,"hello"]]
print(zx_list5) # [['你好', 123, True], [12, 65, 78, 999, 'hello']]
print(type(zx_list5)) # <class 'list'>
2.4 list (列表)的遍历
2.4.1. 正向索引遍历:

# 例1
list1=["hello","hi","你好"]
print(list1[0]) # hello
print(list1[1]) # hi
print(list1[2]) # 你好

print(list1[0][0]) # h
print(list1[0][1])  # e
print(list1[0][2]) # l
print(list1[0][3])  # l
print(list1[0][4])  # o

print(list1[2][0]) # 你
print(list1[2][1]) #好
2.4.2 反向索引遍历:
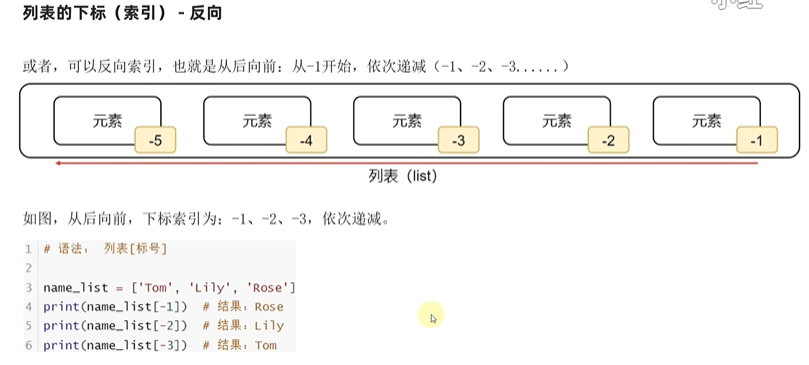
# 例2
list2=["hello","hi","你好"]
print(list1[-1]) # 你好
print(list1[-2]) # hi
print(list1[-3]) # hello
2.2.3 嵌套列表索引遍历:
# 嵌套遍历
list3=[["you","are","beautifual"],["i","am","great"]]
# 正向遍历
print(list3[0][0]) # you
print(list3[0][1]) # are
print(list3[0][2]) # beautifual

# 反向遍历
print(list3[0][-1]) # beautifual
print(list3[0][-2]) # are
print(list3[0][-3]) # you

# 访问单个元素
print(list3[0][0][0])
print(list3[1][2][0])
2.2.4 while循环遍历

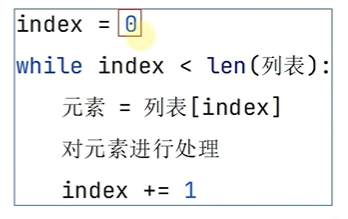
# 函数定义
def list_while_func():
    index=0
    my_list=["hello","world","你好",123,True]
    while index<len(my_list):
        print(my_list[index],end=" ")  True
        index+=1

# 函数调用
list_while_func() # hello world 你好 123
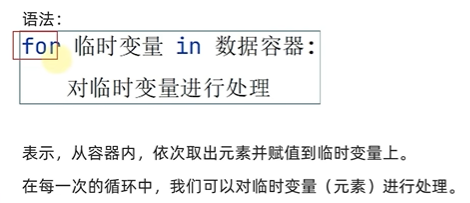
2.4.5 for循环遍历
# 函数定义
def list_for_func():
    index=0
    my_list=["hello","world","你好",123,True]
    for i in my_list: # 把容器my_list中的元素一个一个取出来并赋值给i
        print(i,end=" ") # hello world 你好 123 True

# 函数调用
list_for_func() # hello world 你好 123 True
2.4.6 index(元素)查指定元素的下标,如果找不到,报错ValueError

【注意】不能查询列表元素内的某个字母(不能嵌套查询)
my_list=["hello","你好",123,458]
print(my_list.index(123)) # 2
print(my_list.index(1)) # ValueError: 1 is not in list
2.4.7.根据下标访问元素

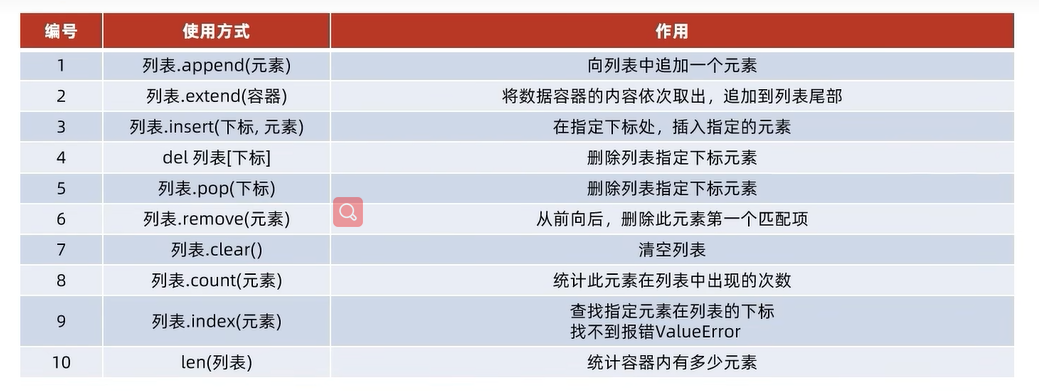
2.5 插入元素——insert()


【代码演示】:
# insert()
my_list=["hello","你好",123,458]
my_list.insert(1,111)
print(my_list) # ['hello', 111, '你好', 123, 458]

# append()
my_list=["hello","你好",123,458]
my_list.append("beautifual")
print(my_list) # ['hello', '你好', 123, 458, 'beautifual']

# extend()
my_list=["hello","你好",123,458]
my_list1=[1,2,3,4,5]
my_list.extend(my_list1)
print(my_list) # ['hello', '你好', 123, 458, 1, 2, 3, 4, 5]
2.6 删除元素
2.6.1 根据下标删除
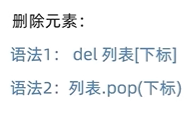
pop(下标)方法的返回值是: 指定要删除下标的元素(即,要去除的元素)
# del
my_list=["hello","你好",123,458]
del my_list[1]
print(my_list) # ['hello', 123, 458]

# pop()
my_list=["hello","你好",123,458]
ele = my_list.pop(1)
print(my_list) # ['hello', 123, 458]
print(ele)  # 你好
2.6.2 根据元素内容删除
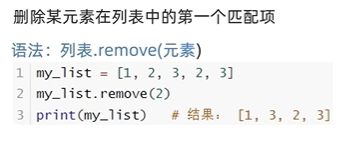
my_list=["hello","你好",123,458]
my_list.remove(123)
print(my_list)  # ['hello', '你好', 458
2.6.3 清空列表

my_list=["hello","你好",123,458]
my_list.clear()
print(my_list) # []
2.8 修改元素
通过下标访问,直接修改某下标所指元素的值
my_list=["hello","你好",123,458]
my_list[0]="hi"
print(my_list) # ['hi', '你好', 123, 458]
2.9 统计元素个数
2.9.1 统计某个元素的个数
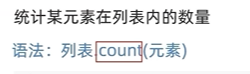
my_list=["hello","你好",123,"hello",458,"hello"]
print(my_list.count("hello")) # 3
print(my_list.count(111)) # 0
2.9.2 统计整个列表元素的总个数
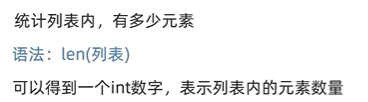
my_list=["hello","你好",123,"hello",458,"hello"]
print(len(my_list)) # 6
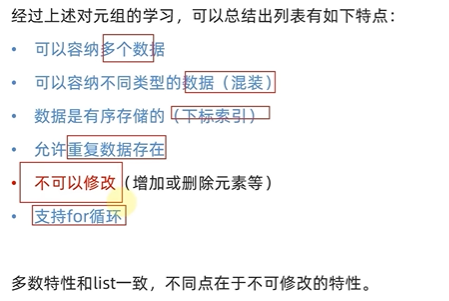
3. 数据容器: tuple(元组)
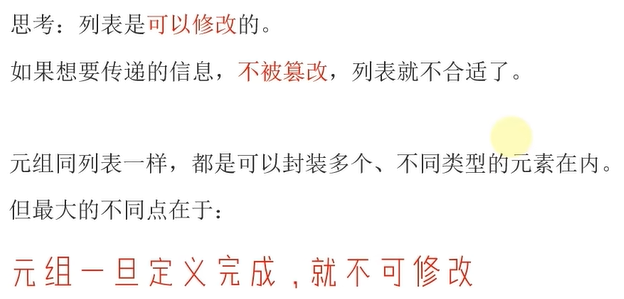
【特例】
元组内部嵌套一个list,则该嵌套的list里面的内容是可以被修改的。
例如:
# 修改元组元素
my_tuple=(1,2,3)
my_tuple1=((11,22,33),(44,55,66,77))
my_tuple[1]=0
my_tuple1[1][1]=0
print(my_tuple[1]) # TypeError: 'tuple' object does not support item assignment
print(my_tuple1[1][1]) # TypeError: 'tuple' object does not support item assignment

# 嵌套list后,修改list中的元素
my_tuple=(1,2,"hello",["hi",3,4,True])
print(my_tuple) # (1, 2, 'hello', ['hi', 3, 4, True])
my_tuple[3][0]="你好"
my_tuple[3][3]=False
print(my_tuple) # (1, 2, 'hello', ['你好', 3, 4, False])


# 对嵌套的list进行相关操作
my_tuple=("周杰伦",11,["football","music"])
print(my_tuple.index(11))
print(my_tuple[0])
my_tuple[2].pop(0) # 对元组中的list操作,首先应该通过下标,访问到该列表
print(my_tuple)
my_tuple[2].append("coding") # 对元组中的list操作,首先应该通过下标,访问到该列表
print(my_tuple)
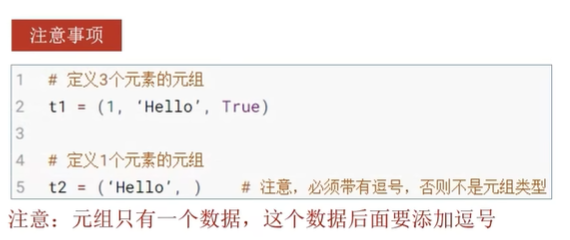
3.1 定义元组
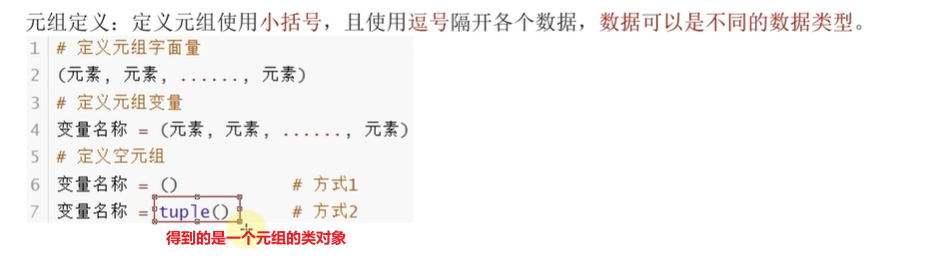
my_tuple=(1,2,3)
print(type(my_tuple),my_tuple) # <class 'tuple'> (1, 2, 3)
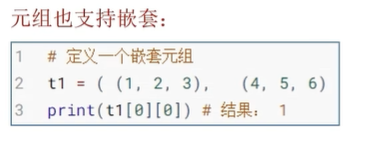
my_tuple1=((11,22,33),(44,55,66,77))
print(type(my_tuple1),my_tuple1) # <class 'tuple'> ((11, 22, 33), (44, 55, 66, 77))
# 下标访问元组元素
print(my_tuple[1]) # 2
print(my_tuple1[1][1]) # 55


# 下标修改元组元素
my_tuple=(1,2,3)
my_tuple1=((11,22,33),(44,55,66,77))
my_tuple[1]=0
my_tuple1[1][1]=0
print(my_tuple[1]) # TypeError: 'tuple' object does not support item assignment
print(my_tuple1[1][1]) # TypeError: 'tuple' object does not support item assignment


# 嵌套list后,修改list中的元素
my_tuple=(1,2,"hello",["hi",3,4,True])
print(my_tuple) # (1, 2, 'hello', ['hi', 3, 4, True])
my_tuple[3][0]="你好"
my_tuple[3][3]=False
print(my_tuple) # (1, 2, 'hello', ['你好', 3, 4, False])


# 对嵌套的list进行相关操作
my_tuple=("周杰伦",11,["football","music"])
print(my_tuple.index(11))
print(my_tuple[0])
my_tuple[2].pop(0) # 对元组中的list操作,首先应该通过下标,访问到该列表
print(my_tuple)
my_tuple[2].append("coding") # 对元组中的list操作,首先应该通过下标,访问到该列表
print(my_tuple)
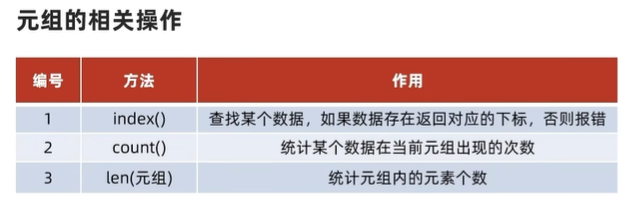
3.2 index()——查指定元素下标
# index()
my_tuple=(1,"你好","hello",True)
my_tuple1=((11,True,33),(44,"hello",66,"你好"))
print(my_tuple.index("你好")) # 1
# index()不能嵌套查询
print(my_tuple1.index(33)) # ValueError: tuple.index(x): x not in tuple
3.3 统计
3.3.1 统计某一个元素在元组中的出现的次数
# count()
my_tuple=(13,"你好","hello",True,13,"hello","hello",13,13)
print("统计1的个数是:%d"% my_tuple.count(13))  # 统计的个数是:4
【未解决】count()输出错误的情况
# 输出错误情况:
my_tuple2=(1,"你好","hello",True,1,"hello","hello",1,1)
print("统计1的个数是:%d"% my_tuple2.count(1)) # × 统计1的个数是:5

my_tuple1=((11,True,33,"hello"),(11,"hello",11,"你好"))
print("统计11的个数是:%d"% my_tuple1.count("hello")) # ×   统计的个数是:0
3.3.2 统计整个元组的长度(元素总个数)
# len()
my_tuple=(13,"你好","hello",True,13,"hello","hello",13,13)
my_tuple1=((11,True,33),(44,"hello",66,"你好"))
print(len(my_tuple)) # 9
print(len(my_tuple1)) # 2
3.4 循环遍历
3.4.1 while 循环遍历
# 定义while循环遍历函数
def tuple_while_func():
    index=0
    my_tuple = (13, "你好", "hello", True, 13, "hello", "hello", 13, 13)
    while index<len(my_tuple):
        print(my_tuple[index],end=" ")
        index+=1
# 调用
tuple_while_func() # 13 你好 hello True 13 hello hello 13 13
3.4.1 for 循环遍历
# 定义
def tuple_for_func():
    for i in my_tuple:
        print(i,end=" ")
# 调用
tuple_for_func() # 13 你好 hello True 13 hello hello 13 13
4. 数据容器: str(字符串)
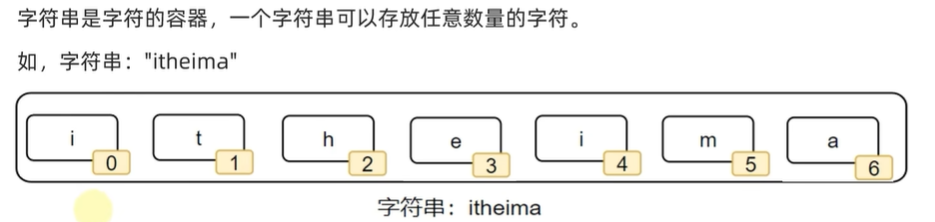
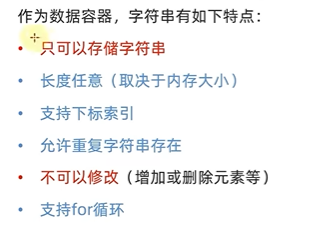
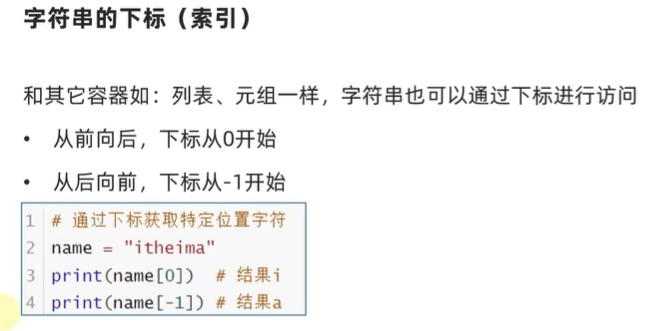
4.1 索引

如果必须要修改,只能重新定义一个新的字符串。
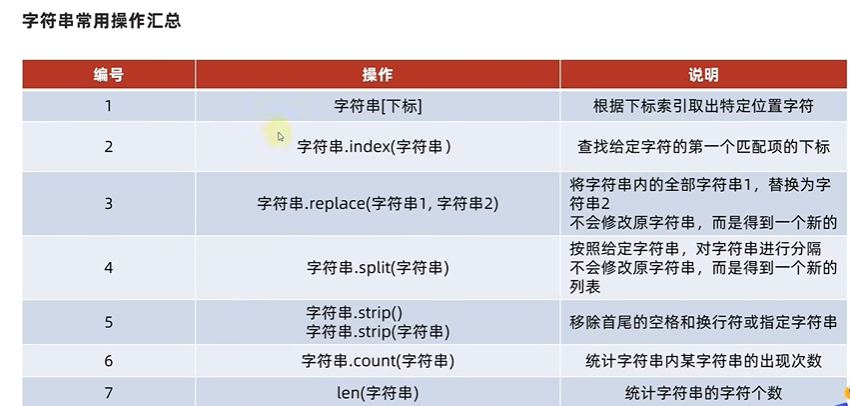
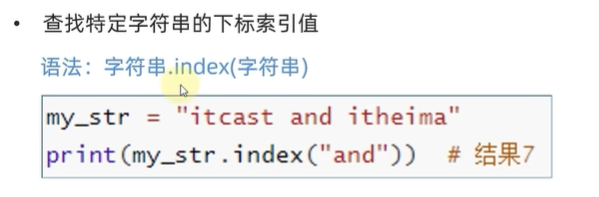
4.2 index()查字符串起始下标
4.3 replace()字符串替换
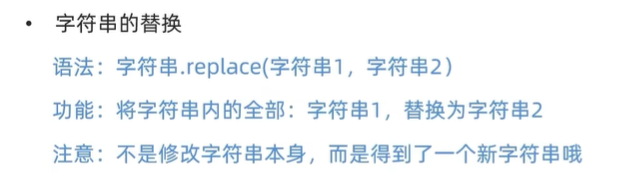
my_str="Hello world,today is sunny"
my_new_str=my_str.replace("Hello","你好")
print(my_str) # Hello world,today is sunny
print(my_new_str) # 你好 world,today is sunny
4.4 split()字符串分割
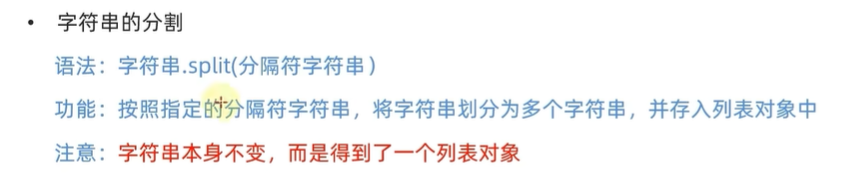
my_str="Hello world today is sunny"
new_my_str=my_str.split(" ")
print(new_my_str) # ['Hello', 'world', 'today', 'is', 'sunny']
4.5 字符串的规整操作(仅对字符串首尾部进行处理)
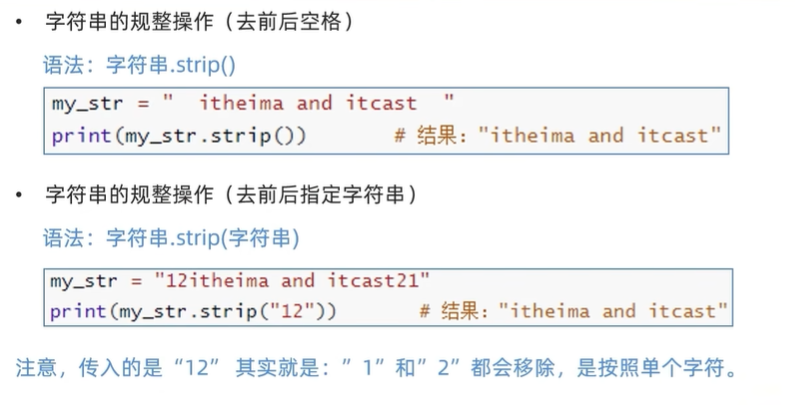
# 去除字符串前后的空格
my_str="    123 111 512 11 22 Hello world today is sunny    "
print(my_str.strip()) # 123 111 512 11 22 Hello world today is sunny
print(type(my_str.strip())) # <class 'str'>

# 去除字符串前后的指定字符
my_str="123 111 512 11 122 Hello world today is sunny21"
print(my_str.strip("12")) # 3 111 512 11 122 Hello world today is sunny
print(type(my_str.strip())) # <class 'str'>
4.6 count()统计某子串在某个字符串中的次数
# 方法 count()
my_str="123 111 512 11 122 Hello world today is sunny21"
print(my_str.count("12")) # 3
4.7 len()统计字符串长度(包含空格)
# 函数len()
my_str="Hello world"
print(len(my_str)) # 11
4.8 字符串的遍历
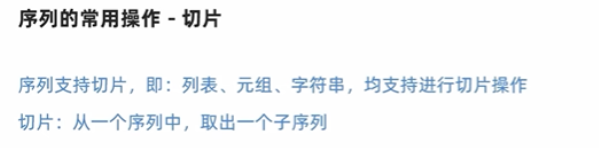
5. 数据容器(序列)的切片
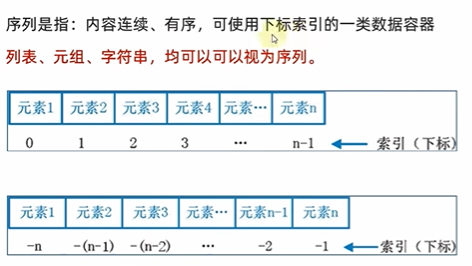
5.1 什么是序列?什么是切片?
什么是序列?
什么是切片?
5.2 切片相关语法
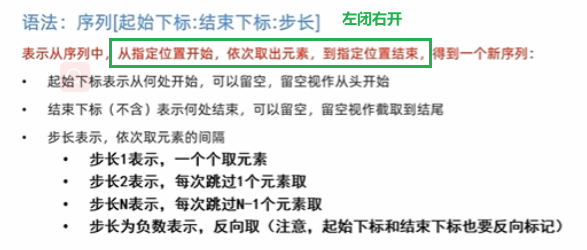
步长默认为1,也可以省略不写,例如:
# 对list进行切片,从1开始,4结束,步长为1
my_list=[1,2,3,4,5,6,7,8,9,"hello"]
my_new_list=my_list[1:4:1]
print(my_new_list) # [2, 3, 4]
# 或
my_new_list=my_list[1:4:]
print(my_new_list) # [2, 3, 4]  步长默认为1,可以省略不写
5.3 代码练习:
# 1、对list进行切片,从1开始,4结束,步长为1
my_list=[1,2,3,4,5,6,7,8,9,"hello"]
my_new_list=my_list[1:4:1]
print(my_new_list) # [2, 3, 4]
# 或
my_new_list=my_list[1:4:] # 步长默认为1,可以省略不写
print(my_new_list) # [2, 3, 4]


# 2、对 tuple进行切片,从头开始,到尾结束,步长为1
my_tuple=(1,2,3,4,5,6,7,8,9,"hello")
my_new_tuple=my_tuple[::] # 起始位置默认为0,默认尾部结束步长默认为1,可以省略不写
print(my_new_tuple) # (1, 2, 3, 4, 5, 6, 7, 8, 9, 'hello')
# 或者
my_new_tuple=my_tuple[:]
print(my_new_tuple) # (1, 2, 3, 4, 5, 6, 7, 8, 9, 'hello')


# 3、对str进行切片,从头开始,到最后结束,步长为2
my_str="you are beautiful"
my_new_str=my_str[::2]
print(my_new_str) # yuaebatfl


# 4、对str进行切片,从头开始,到最后结束,步长为-1
my_str="you are beautiful"
my_new_str=my_str[::-1]
print(my_new_str)  # lufituaeb era uoy
# 5、对列表进行切片,从3开始,到1结束,步长为-1
my_list=[1,2,3,4,5,6,7,8,9,"hello"]
my_new_list=my_list[4:1:-1] # 输出为:7 8 9 还是4 3 2
print(my_new_list) # [5, 4, 3]
5.4 相关习题:
从 “万过薪月,员序程马黑来,nohtyp学” 中提取出“黑马程序员”?
my_str="万过薪月,员序程马黑来,nohtyp学"

# 方法一
my_new_str=my_str[5:10:]
my_new_str=my_new_str[::-1]
print(my_new_str) # 黑马程序员
print(type(my_new_str)) # <class 'str'>

# 方法2
my_new_str = my_str.split(",")[1].replace("来","")[::-1]
print(my_new_str) # 黑马程序员
print(type(my_new_str)) # <class 'str'>
6. 数据容器: set (集合——自带去重功能)

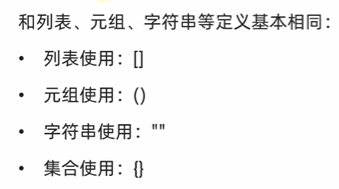
6.1 集合的定义
集合的定义语法:

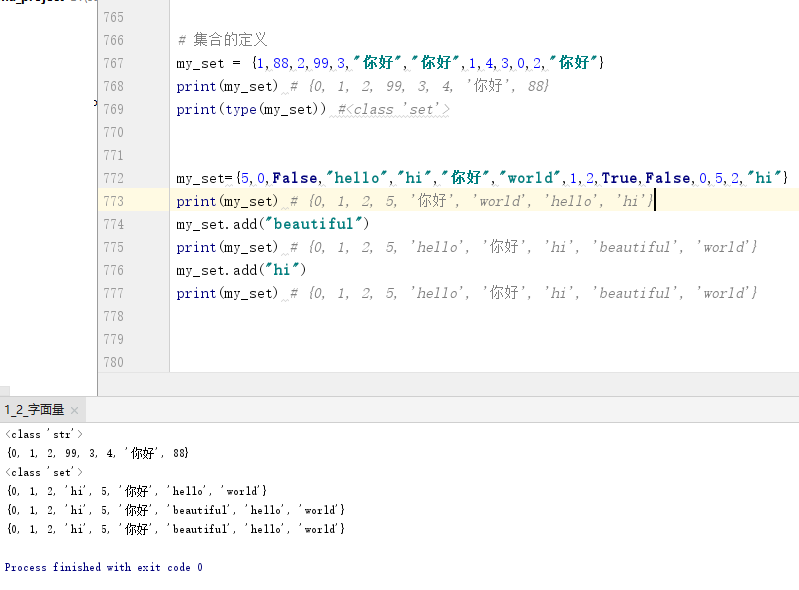
# 集合的定义
my_set = {1,88,2,99,3,"你好","你好",1,4,3,0,2,"你好"}
print(my_set) # {0, 1, 2, 99, 3, 4, '你好', 88}
print(type(my_set)) #<class 'set'>
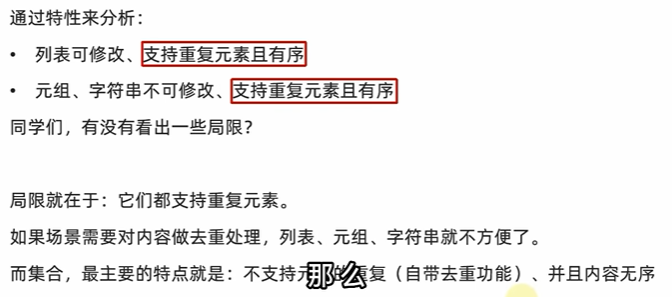
6.2 集合的特点
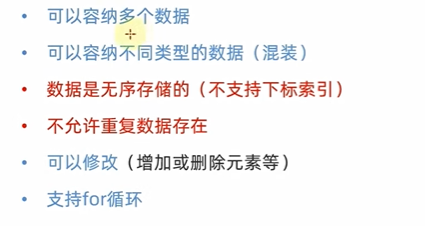
- 集合是无序的,所以集合不支持下标索引
- 集合和列表一样,允许修改。
- 自带去重功能。
- 集合内元素输出顺序每次都不一样,是无序排放的。
(1)

(2)
6.3 集合的修改(增删改查)
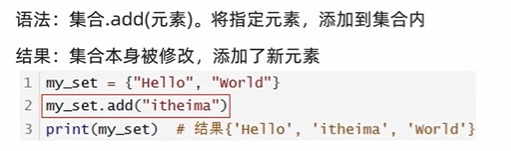
6.3.1 add()添加元素
6.3.2 移除元素
6.3.2.1 remove()移除某个元素

my_set={5,0,False,"hello","hi","你好","world",1,2,True,False,0,5,2,"hi"}
print(my_set)
my_new_set=my_set.remove("hello") # {0, 1, 2, 5, 'hi', '你好', 'world', 'hello'}
print(my_new_set) # None
print(my_set) # {0, 1, 2, 5, 'hi', '你好', 'world'}
注意:
remove()方法的返回值为空,是对原来的集合进行修改,会改变原集合的元素。
my_new_set=my_set.remove("hello")
print(my_new_set)  # None
6.3.2.1 clear()清空集合
my_set={5,0,False,"hello","hi","你好","world",1,2,True,False,0,5,2,"hi"}
print(my_set) # {0, 1, 'hi', '你好', 2, 5, 'hello', 'world'}
my_set.clear()
print(my_set) # set()
6.3.3 查
6.3.3.1随机取出一个元素

注意:
pop()方法是从集合中随机取出来一个元素,返回值为随机取出的某个元素,该操作会改变原集合。
即:从某集合中取出一个元素,那么原集合就会相应的缺少(移除)该元素。
my_set={5,0,False,"hello","hi","你好","world",1,2,True,False,0,5,2,"hi"}
print(my_set) # {0, 1, 'hi', '你好', 2, 5, 'hello', 'world'}
element = my_set.pop()
print(element) # 0
print(my_set) # {1, 'hi', '你好', 2, 5, 'hello', 'world'}
6.3.3.1 集合的遍历——for循环
- 集合是无序的,所以不支持下标索引,所以不能使用while循环遍历。
- 可以使用for循环遍历。
my_set1={1,2,3,"world","hi"} # {'world', 1, 2, 3, 'hi'}
print(my_set1)
for i in my_set1:
    print(i,end=' ') # world 1 2 3 hi
6.3.4 集合的差集
6.3.4.1 difference()取2个集合的差集
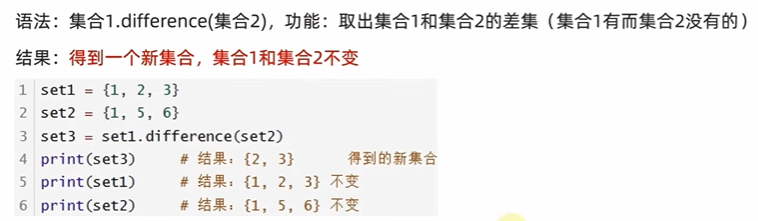
注意:
♥ difference()方法有返回值,返回值是一个新的集合(集合1有而集合2没有的元素构成的集合)
♥ difference_update()方法没有返回值,返回值为None。
my_set1={5,0,False,"hello","hi","你好","world",1,2,True,False,0,5,2,"hi"}
my_set2={"hi","你好","world",1,2}
print(my_set1) # {0, 1, 2, 'hi', 5, 'world', 'hello', '你好'}
print(my_set2) # {1, 2, 'hi', 'world', '你好'}

my_new_set1=my_set1.difference(my_set2)
print(my_new_set1) # {0, 5, 'hello'}
my_new_set2=my_set2.difference(my_set1)
print(my_new_set2) # set() 【空】

print(my_set1) # {0, 1, 2, 'hi', 5, 'world', 'hello', '你好'} 【不变】
print(my_set2) # 1, 2, 'hi', 'world', '你好'} 【不变】
6.3.4.2 消除2个集合的差集
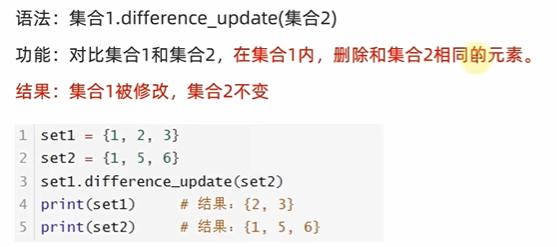
注意:
♥ difference()方法有返回值,返回值是一个新的集合(集合1有而集合2没有的元素构成的集合)
♥ difference_update()方法没有返回值,返回值为None。
my_set1={1,2,3,"world","hi"}
my_set2={1,2,3,4,5,6}

print(my_set1) # {'world', 1, 2, 3, 'hi'}
print(my_set2) # {1, 2, 3, 4, 5, 6}

my_new_set1=my_set1.difference_update(my_set2)
print(my_new_set1) #  None
my_new_set2=my_set2.difference_update(my_set1)
print(my_new_set2) # None

print(my_set1) # {'hi', 'world'} 【已经改变】
print(my_set2) # {1, 2, 3, 4, 5, 6} 【不变】
6.3.5 集合的合并

my_set1={1,2,3,"world","hi"}
my_set2={1,2,3,4,5,6}

my_new_str1 = my_set1.union(my_set2)
print(my_new_str1) # {'hi', 1, 2, 3, 'world', 4, 5, 6}
print(type(my_new_str1)) # <class 'set'>

my_new_str2 = my_set2.union(my_set1)
print(my_new_str2) # {'hi', 1, 2, 3, 'world', 4, 5, 6}
6.4 len()函数 统计集合的元素个数
注意:
len()是函数,不是方法。
my_set1={1,2,3,"world","hi"}
print(len(my_set1)) # 5

my_set2={1,1,1,1,1,1,2}
print(len(my_set2)) # 2
7. 数据容器: dict(字典、映射)
7.1 字典的定义
7.1.1 字典的引入
- 什么是字典?
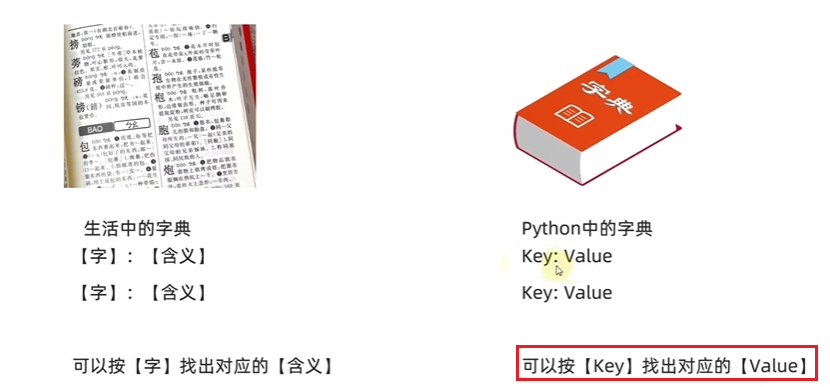
- 为什么要使用字典?
可以使用字典,实现通过 Key检索出Value值。
7.1.2 字典的定义语法
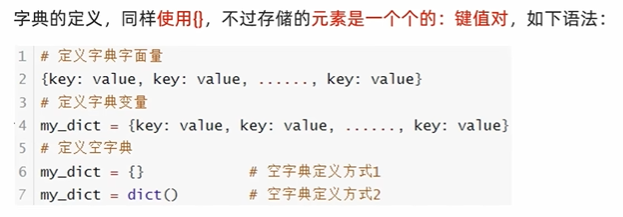
# 1、定义一个字典字面量
my_dict = {"张三":99,"李四":85,"王五":76}   # 类似与定义一个集合:my_set={1,2,3}
print(my_dict)
print(type(my_dict))

# 2、定义一个空字典变量
my_dict1 = {}
my_dict2 = dict()   # 类似与定义一个空集合:set()

print(my_dict1) # {}
print(type(my_dict1)) # <class 'dict'>

print(my_dict2) # {}
print(type(my_dict2)) # <class 'dict'>


# 3、定义重复Key的字典
my_dict3 = {"张三":99,"李四":85,"王五":76}
print(my_dict3) # {'李四': 85, '王五': 76, '张三': 100}
注意:
字典的Key不允许重复,新的Value会把旧的Value覆盖掉,因此一个Key只会保留最后面的那个最新的Value值。
7.1.3 嵌套字典的定义和索引

my_dict = {
    "王力宏":{"语文":77,"数学":66,"英语":33},
    "周杰伦":{"语文":88,"数学":86,"英语":98},
    "林俊杰":{"语文":95,"数学":77,"英语":88}
}
print(my_dict["周杰伦"]) # {'数学': 86, '语文': 88, '英语': 98}
print(type(my_dict["周杰伦"])) # <class 'dict'>

print(my_dict["周杰伦"]["数学"]) # 86
7.2 字典的特点
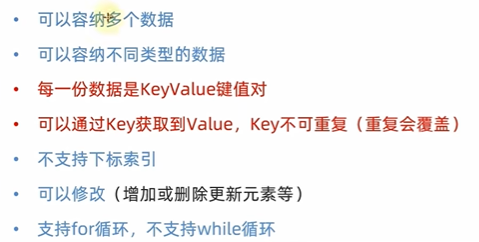
- 支持嵌套,字典的Key和Value可以是任意数据类型(Key不可以为字典)
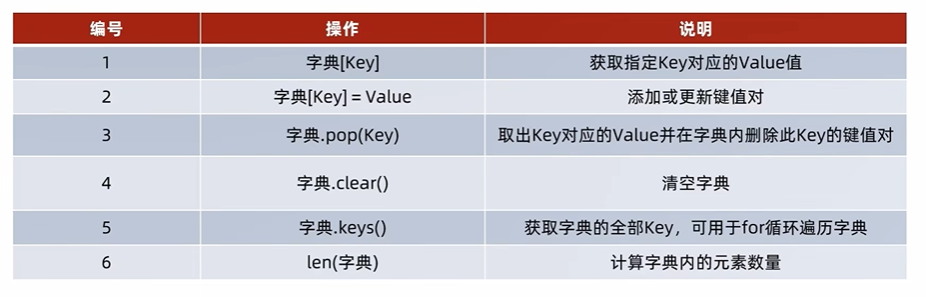
7.3 字典的相关操作
【注意】字典中的Key不能重复,那么:
- 如果新增的Key在原来字典中存在,那么会修改对应Value值;
- 如果新增的Key在原来字典中不存在,那么就会新增一个Key:Value键值对。
7.3.1 增

my_dict = {"张三":99,"李四":85,"王五":76}
print(my_dict) # {'张三': 99, '李四': 85, '王五': 76}

my_dict["周杰伦"]=100
my_dict["coco"]=120
print(my_dict) # {'张三': 99, 'coco': 120, '周杰伦': 100, '王五': 76, '李四': 85} 【每次输出结果顺序不一样】
7.3.2 改

my_dict = {"张三":99,"李四":85,"王五":76}
print(my_dict) # {'李四': 85, '张三': 99, '王五': 76}

my_dict["张三"]=100
my_dict["李四"]=120
print(my_dict) # {'李四': 120, '张三': 100, '王五': 76}
7.3.3 删
7.3.3.1 删除字典元素

my_dict = {"张三":99,"李四":85,"王五":76}
print(my_dict) # {'李四': 85, '张三': 99, '王五': 76}

value = my_dict.pop("李四")
print(value) # 85
print(my_dict) # {'王五': 76, '张三': 99}
7.3.3.2 清空字典元素

my_dict = {"张三":99,"李四":85,"王五":76}
print(my_dict) # {'李四': 85, '张三': 99, '王五': 76}

my_dict.clear()
print(my_dict) # {}
7.3.4 查
7.3.4.1 (普通字典)基于Key获取对应的Value值
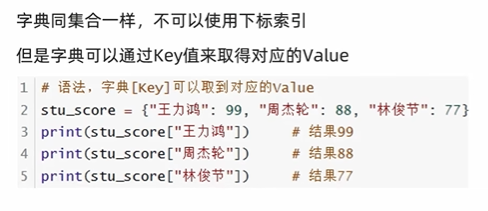
my_dict = {"张三":99,"李四":85,"王五":76}
print(my_dict["张三"]) # 99
print(my_dict["王五"]) # 76
print(type(my_dict["王五"])) # <class 'int'>
7.3.4.2 (嵌套字典)获取某Key的Value值
my_dict = {
    "王力宏":{"语文":77,"数学":66,"英语":33},
    "周杰伦":{"语文":88,"数学":86,"英语":98},
    "林俊杰":{"语文":95,"数学":77,"英语":88}
}
print(my_dict["周杰伦"]) # {'数学': 86, '语文': 88, '英语': 98}
print(type(my_dict["周杰伦"])) # <class 'dict'>

print(my_dict["周杰伦"]["数学"]) # 86
7.3.4.3 keys()获取全部的Key

my_dict = {"张三":99,"李四":85,"王五":76}
print(my_dict) # {'李四': 85, '张三': 99, '王五': 76}

my_new_dict = my_dict.keys()
print(my_new_dict) # dict_keys(['王五', '李四', '张三'])
print(type(my_new_dict)) # <class 'dict_keys'>
7.3.5 字典的遍历——for循环
字典是无序的,不支持下标索引,因此不支持while循环遍历,但可以使用for循环遍历。
# 方法1
my_dict = {"张三":99,"李四":85,"王五":76}
print(my_dict) # {'李四': 85, '张三': 99, '王五': 76}
# 注意:每次print输出字典的顺序不一样,所以for循环遍历的输出顺序每次也都不一样
for i in my_dict:
    print(my_dict[i],end="  ") # 85  99  76


# 方法2
for i in my_dict.keys():
    print(my_dict[i],end="  ") # 85  99  76
7.3.6 len()函数 统计字典内的元素的数量
my_dict = {"张三":99,"李四":85,"王五":76}
print(len(my_dict)) # 3
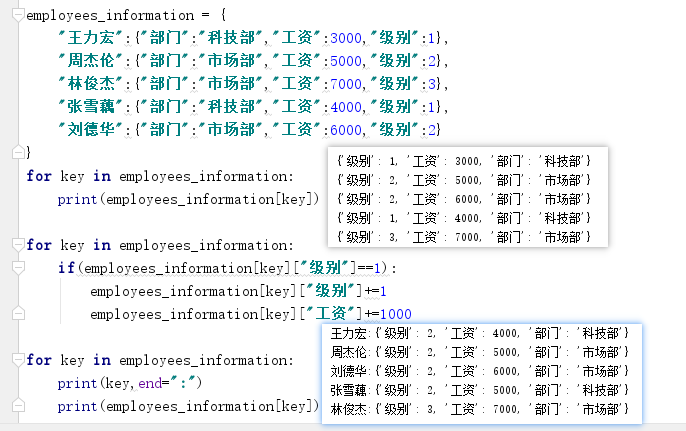
7.4 字典相关习题
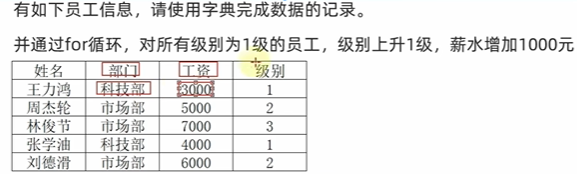
代码部分:
8. 数据容器的总结
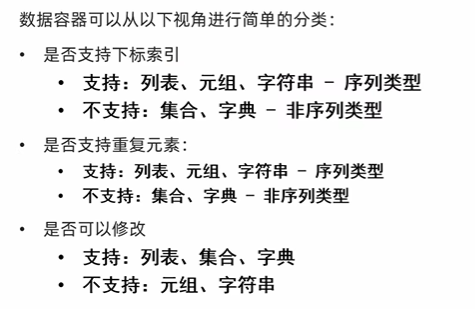
8.1 数据容器的分类
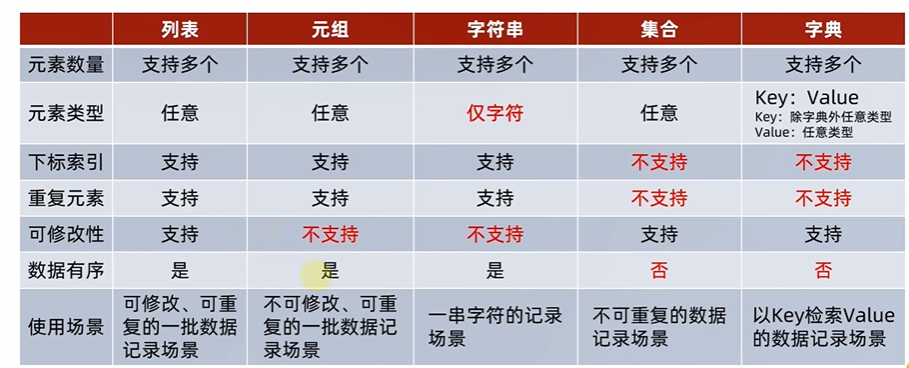
8.2 数据容器特点躲对比
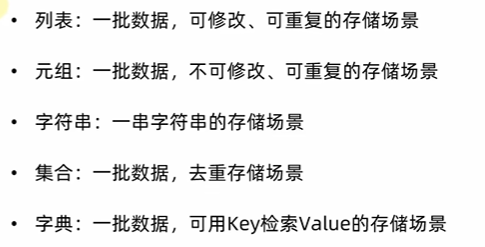
8.3 各类容器的使用场景
8.4 数据容器的通用操作
8.4.1 都支持for循环遍历

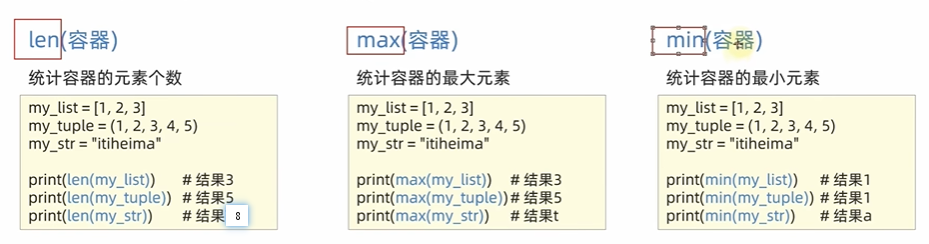
8.4.2 都支持len()、max()、min()函数
# 定义各个数据容器
my_list = [1,2,"hello","你好",False]
my_tuple = (1,2,"hello","你好",False)
my_str = "abcdefgha"
my_set = {1,2,"hello","你好",False}
my_dict = {"key1":1,"key2":2,"key3":"hello","key4":"你好","key5":False}

print(my_list) # [1, 2, 'hello', '你好', False]
print(my_tuple) # (1, 2, 'hello', '你好', False)
print(my_str ) # abcdefgha
print(my_set ) # {False, 1, 2, 'hello', '你好'}
print(my_dict) # {'key1': 1, 'key5': False, 'key3': 'hello', 'key4': '你好', 'key2': 2}
- len()函数:
# len() 函数
print(len(my_list)) # 5
print(len(my_tuple)) # 5
print(len(my_str ) )# 9
print(len(my_set )) # 5
print(len(my_dict)) # 5
注意:
max()和min()函数要求元素类型一致才可以进行比较
- max()函数:
# max()函数
# 要求元素类型一致才可以进行比较
my_list = [1,2,3,4,5]
my_tuple=(1,2,3,4,5)
my_str = "abcdefgha"
my_set = {1,2,3,4,5}
my_dict ={'key1':1,'key2':2,'key3':3,'key4':4,'key5':5}

print(max(my_list)) # 5
print(max(my_tuple)) # 5
print(max(my_str ) )# h
print(max(my_set )) # 5
print(max(my_dict)) # key5
- min()函数:
print(min(my_list)) # 1
print(min(my_tuple)) # 1
print(min(my_str ) )# a
print(min(my_set )) # 1
print(min(my_dict)) # key1
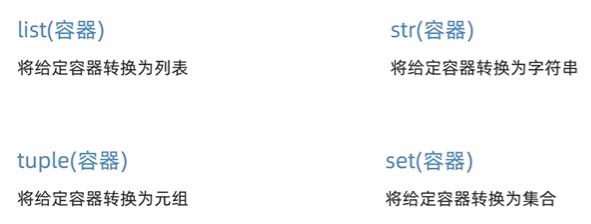
8.4.3 都可以通用类型转换
my_list = [1,2,"hello","你好",False]
my_tuple = (1,2,"hello","你好",False)
my_str = "abcdefgha"
my_set = {1,2,"hello","你好",False}
my_dict = {"key1":1,"key2":2,"key3":"hello","key4":"你好","key5":False}

# 1. list()将给定容器转换为列表
print(list(my_list)) # [1, 2, 'hello', '你好', False]
print(list(my_tuple)) # [1, 2, 'hello', '你好', False]
print(list(my_str ) ) # ['a', 'b', 'c', 'd', 'e', 'f', 'g', 'h', 'a']
print(list(my_set )) # [False, 1, 2, 'hello', '你好']
print(list(my_dict))  # ['key2', 'key3', 'key5', 'key4', 'key1']

# 2. tuple()将给定容器转换为元组
print(tuple(my_list)) # (1, 2, 'hello', '你好', False)
print(tuple(my_tuple)) # (1, 2, 'hello', '你好', False)
print(tuple(my_str ) ) # ('a', 'b', 'c', 'd', 'e', 'f', 'g', 'h', 'a')
print(tuple(my_set )) # (False, 1, 2, 'hello', '你好')
print(tuple(my_dict)) # ('key2', 'key3', 'key4', 'key1', 'key5')

# 3. set()将给定容器转换为字符串集合
print(set(my_list)) # {False, 1, 2, '你好', 'hello'}
print(set(my_tuple)) # {False, 1, 2, '你好', 'hello'}
print(set(my_str)) # {'c', 'b', 'f', 'g', 'e', 'd', 'h', 'a'}
print(set(my_set)) # {False, 1, 2, '你好', 'hello'}
print(set(my_dict)) # {'key1', 'key4', 'key2', 'key5', 'key3'}


 被折叠的 条评论
为什么被折叠?
被折叠的 条评论
为什么被折叠?
 到【灌水乐园】发言


