


组件通信
1 什么是组件通信
组件通信,就是指组件与组件之间的数据传递
- 组件的数据是独立的,无法直接访问其他组件的数据。
- 想使用其他组件的数据,就需要组件通信
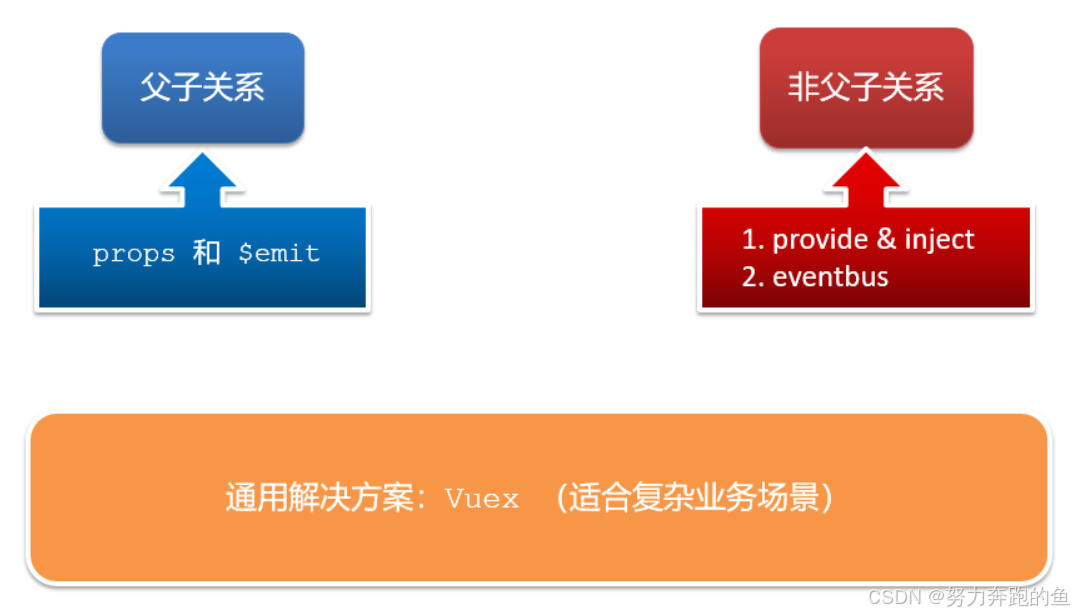
2 组件关系分类
- 父子关系
- 非父子关系

3 通信解决方案
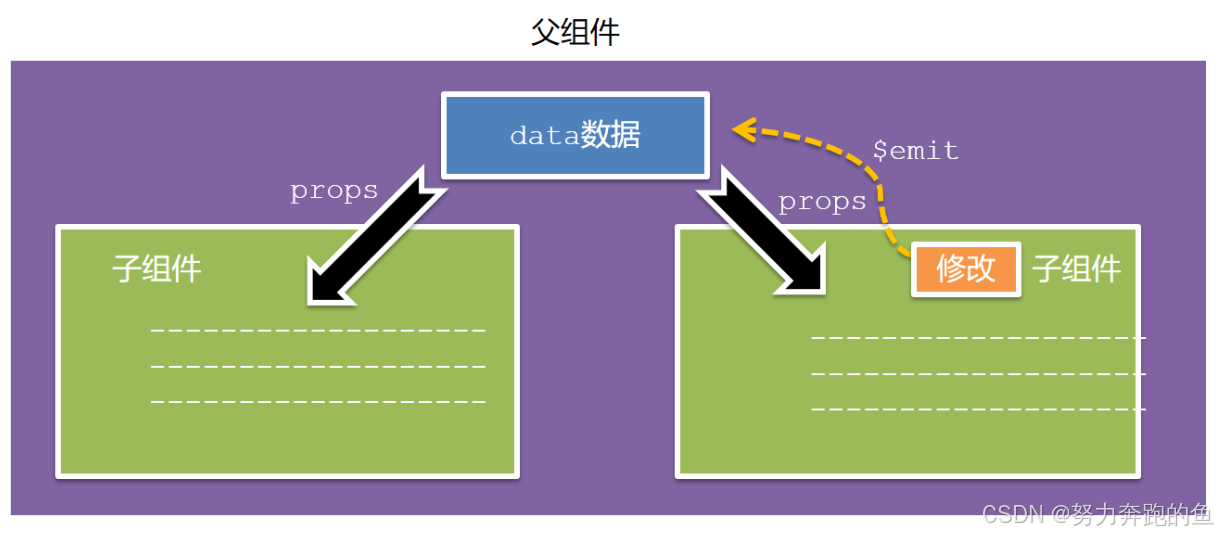
4 父组件向子组件传值
- 父组件通过 props 将数据传递给子组件
- 子组件利用 $emit 通知父组件修改更新
4.1 父向子传值步骤
- 给子组件以添加属性的方式传值
- 子组件内部通过props接收
- 模板中直接使用 props接收的值
4.2 语法
子组件
<template>
    <div >
      子组件 {{ title }} <!-- 插值语法 -->
    </div>
  </template>

  <script>
  export default {
    props:['title'] //接收值
  }
  </script>
父组件
<Son :title="值"></Son>
4.3 案例
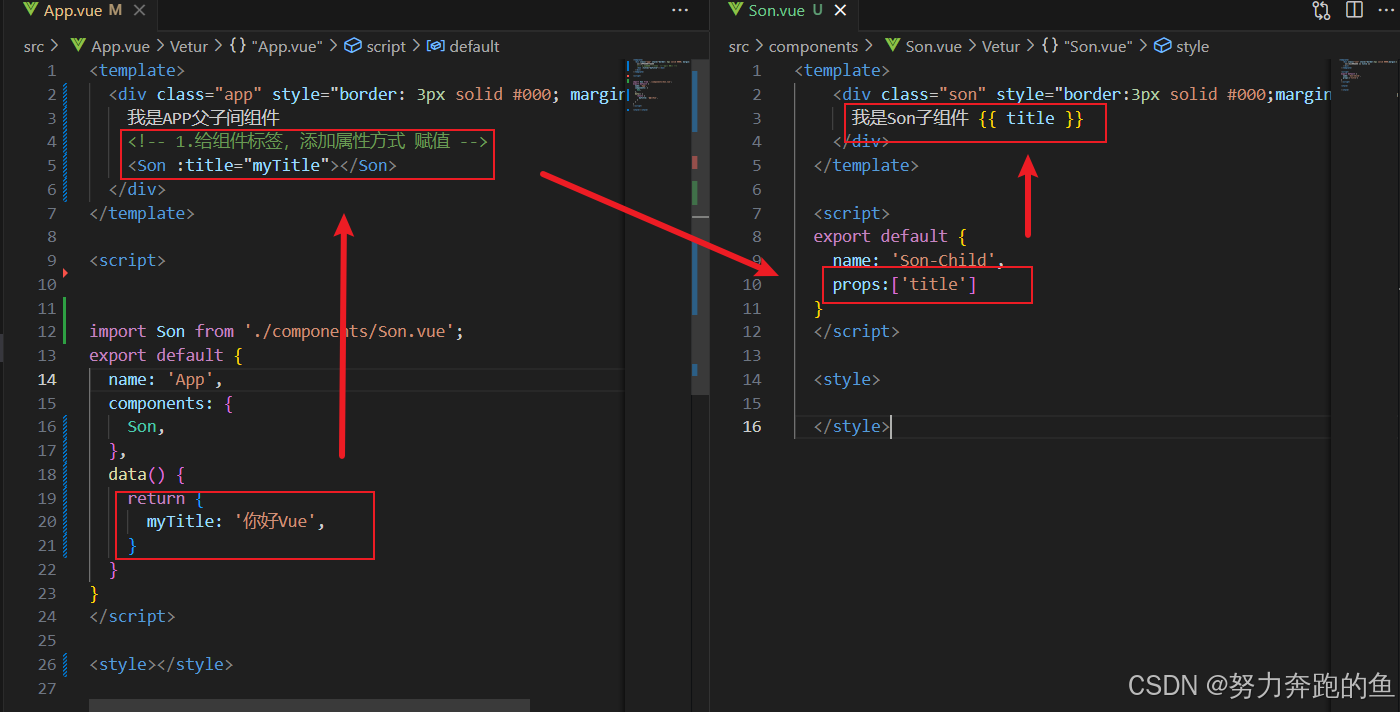
子组件:Son.vue
<template>
    <div class="son" style="border:3px solid #000;margin:10px">
      我是Son子组件 {{ title }}
    </div>
  </template>

  <script>
  export default {
    name: 'Son-Child',
    props:['title']
  }
  </script>

  <style>

  </style>
父组件:App.vue
<template>
  <div class="app" style="border: 3px solid #000; margin: 10px">
    我是APP父子间组件
    <!-- 1.给组件标签,添加属性方式 赋值 -->
    <Son :title="myTitle"></Son>
  </div>
</template>

<script>


import Son from './components/Son.vue';
export default {
  name: 'App',
  components: {
    Son,
  },
  data() {
    return {
      myTitle: '你好Vue',
    }
  }
}
</script>

<style></style>
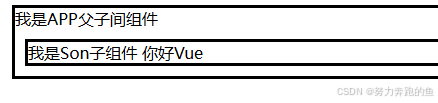
运行流程
运行效果
5 子组件向父组件传值
- 父组件通过 props 将数据传递给子组件
- 子组件利用 $emit 通知父组件修改更新
5.1 子向父传值步骤
- $emit触发事件,给父组件发送消息通知
- 父组件监听$emit触发的事件
- 提供处理函数,在函数的性参中获取传过来的参数
5.2 语法
子组件
this.$emit('key','头秃秃')
父组件
<Son  @key="fn"></Son>


fn(newValue) {
  // 提供处理函数,提供逻辑
},
5.3 案例
子组件:Son.vue
<template>
  <div class="son" style="border: 3px solid #000; margin: 10px">
    子组件 {{ title }}
    <button @click="changeFn">修改title</button>
  </div>
</template>

<script>
export default {
  name: 'Son-Child',
  props: ['title'],
  methods: {
    changeFn() {
      // 通过this.$emit() 向父组件发送通知
      this.$emit('changTitle','头秃秃')
    },
  },
}
</script>

<style>
</style>
父组件:App.vue
<template>
  <div class="app" style="border: 3px solid #000; margin: 10px">
    父组件
    <!-- 2.父组件对子组件的消息进行监听 -->
    <Son :title="myTitle" @changTitle="handleChange"></Son>
  </div>
</template>

<script>
import Son from './components/Son.vue'
export default {
  name: 'App',
  data() {
    return {
      myTitle: '你好,Vue',
    }
  },
  components: {
    Son,
  },
  methods: {
    // 3.提供处理函数,提供逻辑
    handleChange(newTitle) {
      this.myTitle = newTitle
    },
  },
}
</script>

<style>
</style>
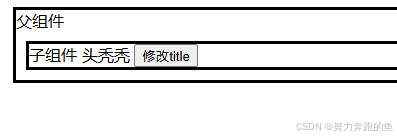
运行流程
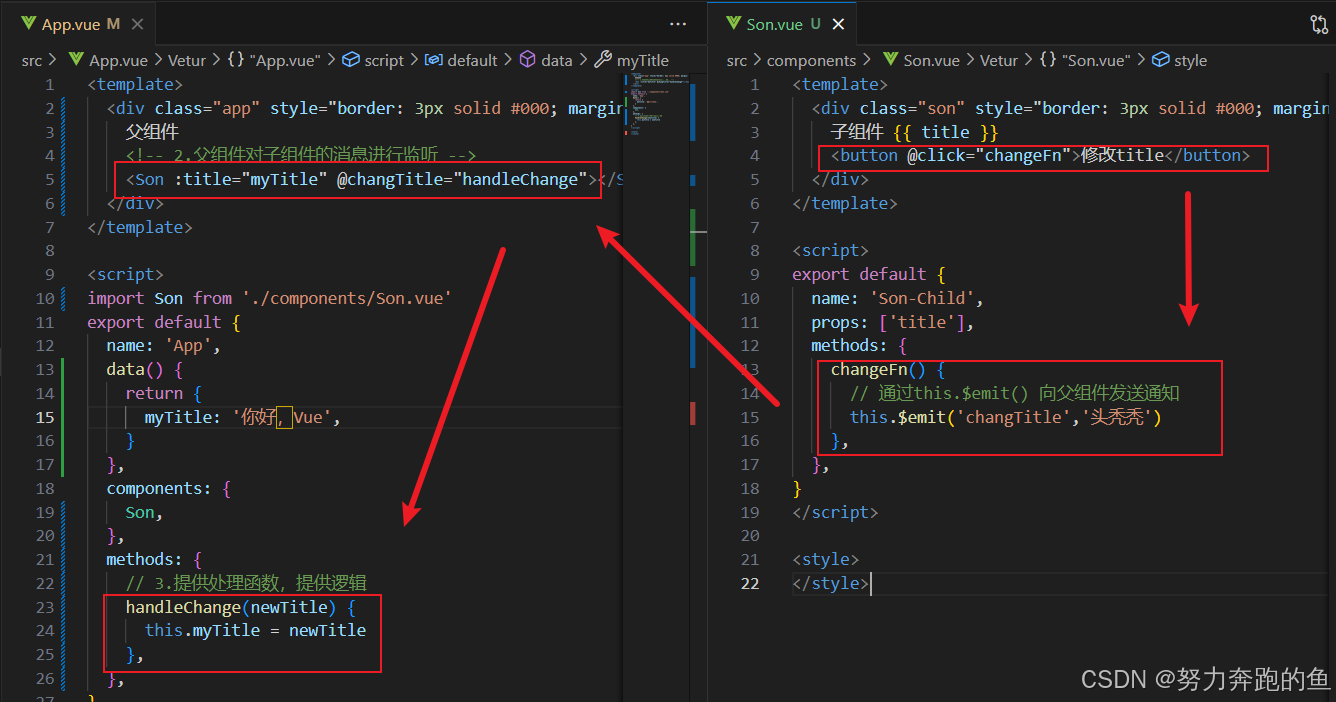
运行效果
6 什么是props
6.1 Props 定义
组件上 注册的一些 自定义属性
6.2 Props 作用
向子组件传递数据
6.3 特点
- 可以 传递 任意数量 的prop
- 可以 传递 任意类型 的prop
6.4 案例
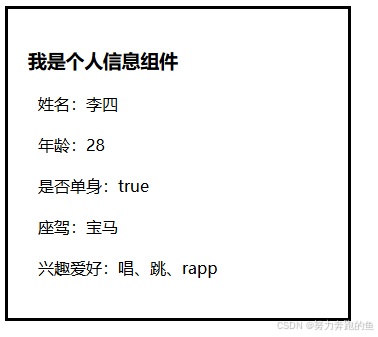
UserInfo.vue
<template>
    <div class="userinfo">
      <h3>我是个人信息组件</h3>
      <div>姓名:{{userName}}</div>
      <div>年龄:{{age}}</div>
      <div>是否单身:{{isSingle}}</div>
      <div>座驾:{{car.brand}}</div>
    <div>兴趣爱好:{{hobby.join('、')}}</div>
    </div>
  </template>

  <script>
  export default {
    props:['userName','age','isSingle','car','hobby']
  }
  </script>

  <style>
  .userinfo {
    width: 300px;
    border: 3px solid #000;
    padding: 20px;
  }
  .userinfo > div {
    margin: 20px 10px;
  }
  </style>
App.vue
<template>
  <div class="app">
    <UserInfo :userName="username" :age="age" :isSingle="isSingle" :car="car" :hobby="hobby"></UserInfo>
  </div>
</template>

<script>
import UserInfo from './components/UserInfo.vue'
export default {
  components:{
    UserInfo,
  },
  data() {
    return {
      username: '李四',
      age: 28,
      isSingle: true,
      car: {
        brand: '宝马',
      },
      hobby: ['唱', '跳', 'rapp'],
    }
  },
}
</script>

<style>
</style>
运行效果
7 props校验
为组件的 prop 指定验证要求,不符合要求,控制台就会有错误提示 → 帮助开发者,快速发现错误
7.2 语法
7.2.1 简单写法
<script>
export default {
  // 完整写法(类型、默认值、非空、自定义校验)
  props: {
	校验的属性名: 类型
  },
}
</script>
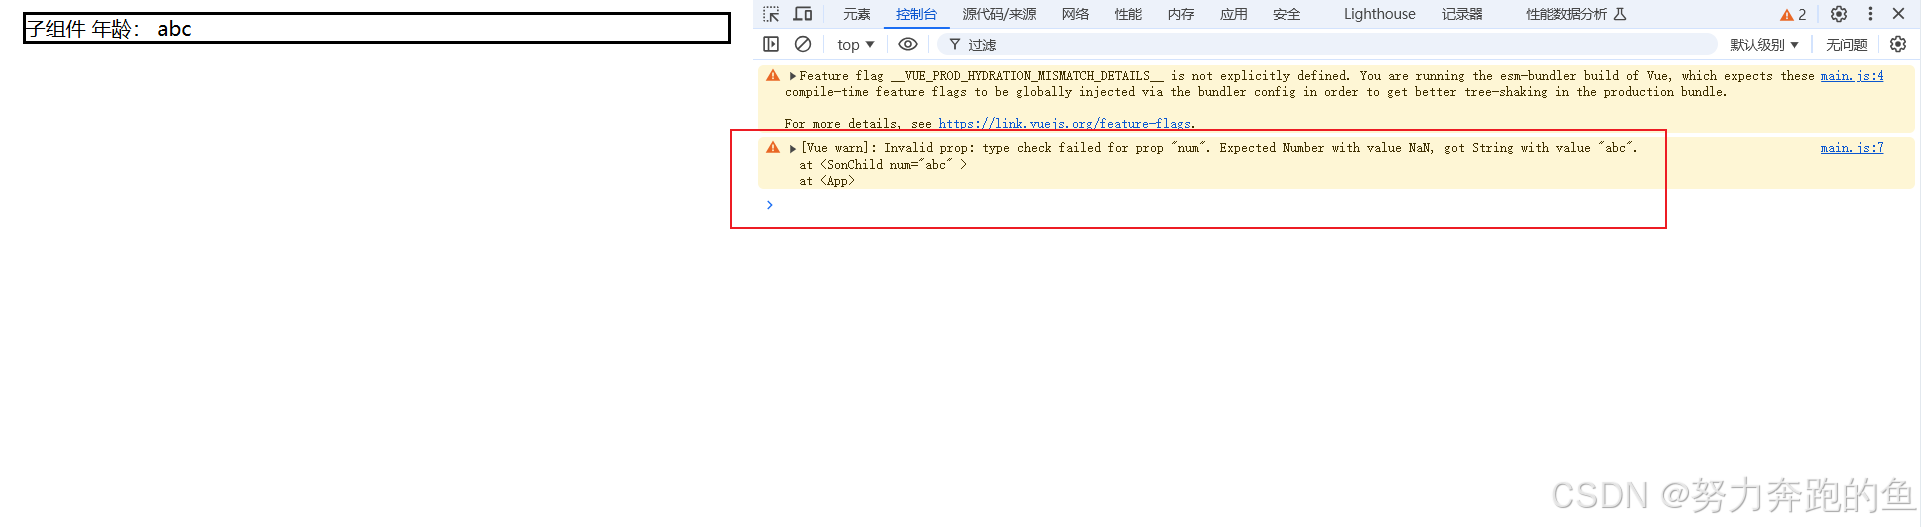
7.2.2 案例
Son.vue
<template>
  <div class="son" style="border: 3px solid #000; margin: 10px">
    子组件 年龄: {{ num }}
  </div>
</template>

<script>

export default {
  name: 'Son-Child',
  props: {
    num: Number
  },
}
</script>

<style></style>
App.vue
<template>
  <div class="app">
    <Son :num="num"></Son>
  </div>
</template>

<script>
import Son from './components/Son.vue';
export default {
  components:{
    Son,
  },
  data() {
    return {
      num: "abc"
    }
  },
}
</script>

<style>
</style>
运行效果
7.2.3 完整写法
<script>
export default {
  // 完整写法(类型、默认值、非空、自定义校验)
  props: {
    校验的属性名: {
      type: 类型, //判断类型
      required: true, //是否必填
      default: 默认值, //默认值
      validator(val) {
        // 自定义校验逻辑
        return 是否通过校验
      },
    },
  },
}
</script>
7.2.4 案例
Son.vue
<template>
  <div class="son" style="border: 3px solid #000; margin: 10px">
    子组件 年龄: {{ num }}
  </div>
</template>

<script>

export default {
  name: 'Son-Child',
  props: {
    num: {
      type: Number,
      validator (val){
        if(val >= 18){
          return true
        }else {
          return false
        }
      }
    }
  }
}
</script>

<style></style>
App.vue
<template>
  <div class="app">
    <Son :num="num"></Son>
  </div>
</template>

<script>
import Son from './components/Son.vue';
export default {
  components:{
    Son,
  },
  data() {
    return {
      num: 10
    }
  },
}
</script>

<style>
</style>
运行效果

7.2.5 注意
1.default和required一般不同时写(因为当时必填项时,肯定是有值的)
2.default后面如果是简单类型的值,可以直接写默认。如果是复杂类型的值,则需要以函数的形式return一个默认值
8 props和data的异同
8.1 共同点
都可以给组件提供数据
8.2 区别
- data 的数据是自己的 → 随便改
- prop 的数据是外部的 → 不能直接改,要遵循 单向数据流
单向数据流
父级props 的数据更新,会向下流动,影响子组件。这个数据流动是单向的
8.3 案例
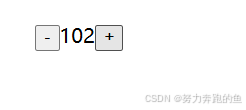
BaseCount.vue
<template>
  <div class="base-count">
    <button @click="handleSub">-</button>
    <span>{{ count }}</span>
    <button @click="handleAdd">+</button>
  </div>
</template>

<script>
export default {
  // 1.自己的数据随便修改  (谁的数据 谁负责)
  // data () {
  //   return {
  //     count: 100,
  //   }
  // },
  // 2.外部传过来的数据 不能随便修改
  props: {
    count: {
      type: Number,
    },
  },
  methods: {
    handleSub() {
      // this.count = this.count - 1 错误代码
      this.$emit('changeCount', this.count - 1) //交给父组件
    },
    handleAdd() {
      this.$emit('changeCount', this.count + 1)
    },
  },
}
</script>

<style>
.base-count {
  margin: 20px;
}
</style>
App.vue
<template>
  <div class="app">
    <BaseCount :count="count" @changeCount="handleChange"></BaseCount>
  </div>
</template>

<script>
import BaseCount from './components/BaseCount.vue'
export default {
  components:{
    BaseCount
  },
  data(){
    return {
      count:100
    }
  },
  methods:{
    handleChange(newVal){
      // 从子组件拿到新值重新赋值
      this.count = newVal
    }
  }
}
</script>

<style>

</style>
运行效果


 1874
1874

 被折叠的 条评论
为什么被折叠?
被折叠的 条评论
为什么被折叠?
 到【灌水乐园】发言


