


 本文介绍了JavaWeb中状态管理的重要性,详细讲解了Cookie、Session的概念、工作原理、优缺点以及应用场景。通过实例展示了如何创建、设置和管理Cookie,探讨了Session在会话跟踪中的作用,包括获取、删除Session对象以及Session超时的机制。同时,文章提到了ServletContext对象的作用、获取方法及其在应用中的价值。通过对这些域对象的理解,有助于深入掌握JavaWeb开发中的会话管理技术。
一、状态管理介绍
1.1 什么是状态管理
WEB应用中的会话是指一个客户端浏览器与WEB服务器之间连续发生的一系列请求和响应过程。
WEB应用的会话状态是指WEB服务器与浏览器在会话过程中产生的状态信息,借助会话状态,WEB服务器能够把属于同一会话中的一系列的请求和响应过程关联起来并达成数据共享
1.2 为什么需要状态管理
HTTP协议是无状态的,不能保存每次提交的信息,即当服务器返回与请求相对应的应答之后,这次事务的所有信息就丢掉了。 如果用户发来一个新的请求,服务器无法知道它是否与上次的请求有联系。 对于那些需要多次提交数据才能完成的Web操作,比如登录来说,就成问题了。通俗一点的例子就是,我们登录了在Github页面登录了,关闭页面之后,再次打开页面是不是发现你的Github还是保持你的账号登录的状态呢?这就是状态管理的作用!
1.3 状态管理的两种常见模式
客户端状态管理技术:将状态保存在客户端。代表性的是Cookie技术。
服务器状态管理技术:将状态保存在服务器端。代表性的是Session技术(服务器传递SessionID时需要使用Cookie的方式)。
二、状态管理之Cookie应用
2.1 什么是Cookie
Cookie是在浏览器访问WEB服务器的某个资源时,由WEB服务器在HTTP响应消息头中附带传送给浏览器的一小段数据,WEB服务器传送给各个客户端浏览器的数据是可以各不相同的。
一旦WEB浏览器保存了某个Cookie,那么它在以后每次访问该WEB服务器时,都应在HTTP请求头中将这个Cookie回传给WEB服务器。
WEB服务器通过在HTTP响应消息中增加Set-Cookie响应头字段将Cookie信息发送给浏览器,浏览器则通过在HTTP请求消息中增加Cookie请求头字段将Cookie回传给WEB服务器。
一个Cookie只能标识一种信息,它至少含有一个标识该信息的名称(NAME)和设置值(VALUE)。
一个WEB站点可以给一个WEB浏览器发送多个Cookie,一个WEB浏览器也可以存储多个WEB站点提供的Cookie。
浏览器一般只允许存放300个Cookie,每个站点最多存放20个Cookie,每个Cookie的大小限制为4KB。但是要知道现在的技术可以传输数据的方式有很多,而且浏览器也可以对Cookie存放的最大数量做扩容机制,所以改限制不是一成不变的!
2.2 创建Cookie对象
		/**
         * 创建一个Cookie对象
         * 默认生命周期为:浏览器关闭
         */
        Cookie cookie = new Cookie("username", "ziph");
        /**
         * 更新Cookie的生命周期:负数->浏览器内存里  0->失效   正数->过期时间
         * </p>
         * 过期时间以秒为单位,如下表示:
         * 浏览器请求后Cookie存活60秒,60秒过后就会过期
         */
        cookie.setMaxAge(60);
        /**
         * 设置Cookie的共享范围: 默认同一项目下   /->当前服务器下
         */
        cookie.setPath("/");
        /**
         * 将Cookie对象响应给浏览器
         */
        response.addCookie(cookie);
2.2.1 关于Cookie生命周期的设置
设置Cookie生命周期时间核心代码:cookie.setMaxAge(); (设置生命周期为60秒)
- 设置时间值说明:
- 正数:有效期(单位:秒)
- 0:失效
- 负数:内存存储
		/**
         * 更新Cookie的生命周期:负数->浏览器内存里  0->失效   正数->过期时间
         * </p>
         * 过期时间以秒为单位,如下表示:
         * 浏览器请求后Cookie存活60秒,60秒过后就会过期
         */
        cookie.setMaxAge(60);
2.2.2 关于Cookie共享范围的设置
cookie 一般都是由于用户访问页面而被创建的,可是并不是只有在创建 cookie 的页面才可以访问这个cookie。在默认情况下,出于安全方面的考虑,只有与创建 cookie 的页面处于同一个目录或在创建cookie页面的子目录下的网页才可以访问。那么此时如果希望其父级或者整个网页都能够使用cookie,就需要进行路径的设置。
关于Cookie的共享范围,默认是同一项目下。而设置"/"可以在同意服务器下共享
		/**
         * 设置Cookie的共享范围: 默认同一项目下   /->当前服务器下
         */
        cookie.setPath("/");
2.2.3 遍历查询Cookie
        /**
         * 1.获取所有Cookie
         * 2.非空判断
         * 3.遍历Cookies数组
         * 4.检查遍历Cookie并获取name值是否为username
         * 5.检查遍历Cookie并获取value值是否为ziph
         * 6.两步检查都没有问题,则打印提示信息
         */
        Cookie[] cookies = request.getCookies();
        if (cookies != null && cookies.length != 0) {
            for (Cookie cookie : cookies) {
                if (cookie.getName().equals("username")) {
                    if (cookie.getValue().equals("ziph")) {
                        System.out.println("您已登录!不用重新登录!");
                    }
                }
            }
        }
2.3 Cookie的编码与解码问题
中文和英文字符不同,中文属于Unicode字符,在内存中占用4个字符,而英文属于ASCII字符,内存中只占2个字节。Cookie中使用Unicode字符时需要对Unicode字符进行编码,否则会出现乱码。编码可以使用java.net.URLEncoder类的encode(String str,String encoding)方法,解码使用java.net.URLDecoder类的decode(String str,String encoding)方法
		/**
         * Cookie的编码
         * URLEncoder.encode("username", "utf-8")
         */
        Cookie cookie = new Cookie(URLEncoder.encode("username", "utf-8"), URLEncoder.encode("ziph", "utf-8"));
        /**
         * Cookie的解码
         * URLDecoder.decode(cookie.getName(), "utf-8")
         */
        if (cookies.length != 0) {
            for (Cookie cookie : cookies) {
                if (URLDecoder.decode(cookie.getName(), "utf-8").equals("username")) {
                    if (URLDecoder.decode(cookie.getValue(), "utf-8").equals("ziph")) {
                        System.out.println("您已登录!不用重新登录!");
                    }
                }
            }
        }
2.4 发送Cookie的条件
浏览器在发送请求之前,首先会根据请求url中的域名在cookie列表中找所有与当前域名一样的cookie,然后再根据指定的路径进行匹配,如果当前请求在域匹配的基础上还与路径匹配那么就会将所有匹配的cookie发送给服务器。
2.5 设置Cookie路径
通过Cookie的setPath方法设置路径
2.5 Cookie的优缺点
2.5.1 Cookie的优点
可配置到期规则: Cookie 可以在浏览器会话结束时到期,或者可以在客户端计算机上无限期存在,这取决于客户端的到期规则,不需要任何服务器资源,Cookie 存储在客户端并在发送后由服务器读取。
简单性: Cookie 是一种基于文本的轻量结构,包含简单的键值对。
数据持久性: 虽然客户端计算机上 Cookie 的持续时间取决于客户端上的 Cookie 过期处理和用户干预,Cookie 通常是客户端上持续时间最长的数据保留形式
2.5.2 Cookie的缺点
大小受到限制: 大多数浏览器对 Cookie 的大小有 4096 字节的限制,尽管在当今新的浏览器和客户端设备版本中,支持 8192 字节的 Cookie 大小已愈发常见。
用户配置为禁用: 有些用户禁用了浏览器或客户端设备接收 Cookie 的能力,因此限制了这一功能。
潜在的安全风险: Cookie 可能会被篡改。用户可能会操纵其计算机上的 Cookie,这意味着会对安全性造成潜在风险或者导致依赖于Cookie 的应用程序失败。
2.6 Cookie综合案例之站点获取上一次访问时间
关于访问站点,每一次访问都可以使用Cookie来记录时间,功能实现为本次访问获取上一次访问的系统时间。(注意:第一次访问时是没有上一次访问时间的,我们记录并打印第一次访问时间即可!)
代码展示在下面,注释中记载着详细步骤:
package com.mylifes1110.java.demo.cookievisit;

import javax.servlet.ServletException;
import javax.servlet.annotation.WebServlet;
import javax.servlet.http.Cookie;
import javax.servlet.http.HttpServlet;
import javax.servlet.http.HttpServletRequest;
import javax.servlet.http.HttpServletResponse;
import java.io.IOException;
import java.text.SimpleDateFormat;
import java.util.Date;

/**
 * 获取上一次访问的时间案例
 */
@WebServlet(name = "CookieVisitServlet", value = "/cv")
public class CookieVisitServlet extends HttpServlet {
    protected void doPost(HttpServletRequest request, HttpServletResponse response) throws ServletException, IOException {
        doGet(request, response);
    }

    protected void doGet(HttpServletRequest request, HttpServletResponse response) throws ServletException, IOException {
        /**
         * 1.获取Cookie对象的数组
         * 2.非空判断
         * 3.遍历Cookie对象数组
         * 4.寻找lastTime相同名字的Cookie对象
         * 5.保存到临时cookie_avl中
         */
        Cookie[] cookies = request.getCookies();
        Cookie cookie_avl = null;
        if (cookies != null && cookies.length != 0) {
            for (Cookie cookie : cookies) {
                if ("lastTime".equals(cookie.getName())) {
                    cookie_avl = cookie;
                }
            }
        }
        /**
         * 1.创建时间格式化对象并指定格式
         * 2.判断临时cookie_avl对象是否为空
         * 3.cookie_avl对象为空,证明该站点是被第一次访问
         * 4.获取当前时间对象
         * 5.打印第一次访问时间(第一次访问肯定没有上一次访问时间啊)
         * 6.获取当前时间毫秒值(因为Cookie是需要传入字符串,我们这里用空字符串做拼接,转换为字符串传入参数)存入cookie_avl对象
         * 7.操作cookie_avl对象并发出响应
         */
        SimpleDateFormat format = new SimpleDateFormat("yyyy年MM月dd日 hh:mm:ss");
        if (cookie_avl == null) {
            Date currentDate = new Date();
            System.out.println("第一次访问时的时间为:" + format.format(currentDate));
            cookie_avl = new Cookie("lastTime", currentDate.getTime() + "");
        } else {
            /**
             * 1.获取上一次cookie_avl对象中的时间字符串,并将字符串转换为毫秒值
             * 2.把毫秒值转换为该时间格式化的时间对象
             * 3.打印上一次访问的时间对象
             * 4.获取当前时间对象的毫秒值,并传入cookie_avl对象中保存
             * 5.操作cookie_avl对象并发出响应
             */
            long currentTimeMills = Long.parseLong(cookie_avl.getValue());
            Date lastDate = new Date(currentTimeMills);
            String lastDateStr = format.format(lastDate);
            System.out.println("上一次访问时间为:" + lastDateStr);
            Date currentDate = new Date();
            cookie_avl.setValue(currentDate.getTime() + "");
        }
        response.addCookie(cookie_avl);
    }
}
2.7 Cookie综合案例之显示浏览记录
页面显示商品,加入浏览记录放到Cookie中,通过显示浏览记录响应浏览器
HTML页面
<!DOCTYPE html>
<html lang="en">
<head>
    <meta charset="UTF-8">
    <title>图书商城</title>
</head>
<body>
<h1>商品列表</h1>
<a href="/reqweb/history?id=0">《Java编程思想》</a><br>
<a href="/reqweb/history?id=1">《Java核心卷》</a><br>
<a href="/reqweb/history?id=2">《算法》</a><br>
<a href="/reqweb/history?id=3">《Ziph的博客》</a><br>
</body>
</html>
商品记录的Servlet
package com.mylifes1110.java.books.servlet;

import com.mylifes1110.java.books.utils.CookieUtils;

import javax.servlet.ServletException;
import javax.servlet.annotation.WebServlet;
import javax.servlet.http.Cookie;
import javax.servlet.http.HttpServlet;
import javax.servlet.http.HttpServletRequest;
import javax.servlet.http.HttpServletResponse;
import java.io.IOException;

/**
 * 商品浏览记录
 * 注意:我们将浏览记录存储在cookie_val对象中,以便后续展示页面取出加工后响应展示给浏览器
 */
@WebServlet(name = "HistoryBooksServlet", value = "/history")
public class HistoryBooksServlet extends HttpServlet {
    protected void doPost(HttpServletRequest request, HttpServletResponse response) throws ServletException, IOException {
        doGet(request, response);
    }

    protected void doGet(HttpServletRequest request, HttpServletResponse response) throws ServletException, IOException {
        /**
         * 封装工具类的使用
         */
        Cookie cookie_val = CookieUtils.getCookie(request.getCookies(), "history");

        /**
         * 1.获得一个Cookie数组对象
         * 2.非空判断
         * 3.遍历Cookie数组
         * 4.查询cookie的名字为history的Cookie对象
         * 5.把查询到的该Cookie对象赋值给临时cookie_val中,以便后续使用
         * <p>
         * 注意:该方法被注释掉,是因为我们使用了封装好的工具类来实现复用性
         */
//        Cookie cookie_val = null;
//        Cookie[] cookies = request.getCookies();
//        if (cookies != null && cookies.length != 0) {
//            for (Cookie cookie : cookies) {
//                if ("history".equals(cookie.getName())) {
//                    cookie_val = cookie;
//                }
//            }
//        }

        /**
         * 第一次浏览,没有任何浏览记录
         * <p>
         * 1.获取请求参数对应的值(字符串)
         * 2.如果cookie_val中为空,那就证明站点的该内容目前没有访问记录,也就是说这是该内容的第一次访问
         * 3.第一次访问作为该内容的浏览记录存储到Cookie对象中,以便后续有浏览记录的条件下从Cookie数组对象中取出
         * 4.操作cookie_val对象并发起响应
         * 5.转发至显示浏览记录的页面(展示页面来做提示没有浏览记录的操作)
         */
        String id = request.getParameter("id");
        if (cookie_val == null) {
            cookie_val = new Cookie("history", id);
        } else {
            /**
             * 已经有了一些记录,但是不包含当前浏览内容的记录
             * <p>
             * 1.获取cookie_val书名对应的值,也就是说获取记录中的id
             * 2.判断记录中的id是否包含目前浏览的id,没有包含的话,执行以下操作
             * 3.没有执行的话,将新id拼接到原记录id后(注意:使用“-”是为了后续拆分)
             * 4.将拼接好的记录字符串继续存储到cookie_val中
             * 5.操作cookie_val对象并发起响应
             * 6.转发至显示浏览记录的页面(展示页面来展示浏览记录信息操作)
             */
            String historyStr = cookie_val.getValue();
            if (!historyStr.contains(id)) {
                historyStr += "-" + id;
                cookie_val.setValue(historyStr);
            } else {
                /**
                 * 已经有了一些记录,但是包含当前浏览器浏览的内容记录
                 * <p>
                 * 不做任何操作!
                 */
            }
        }
        /**
         * 1.操作cookie_val对象并发起响应
         * 2.转发至显示浏览记录的页面
         */
        response.addCookie(cookie_val);
        request.getRequestDispatcher("/show").forward(request, response);
    }
}
显示商品的Servlet
package com.mylifes1110.java.books.servlet;

import com.mylifes1110.java.books.utils.CookieUtils;

import javax.servlet.ServletException;
import javax.servlet.annotation.WebServlet;
import javax.servlet.http.Cookie;
import javax.servlet.http.HttpServlet;
import javax.servlet.http.HttpServletRequest;
import javax.servlet.http.HttpServletResponse;
import java.io.IOException;

/**
 * 显示浏览记录
 * 注意:访问记录是从我们之前存储的浏览记录的cookie_val对象中取出并做加工处理响应浏览器
 */
@WebServlet(name = "ShowHistoryServlet", value = "/show")
public class ShowHistoryServlet extends HttpServlet {
    protected void doPost(HttpServletRequest request, HttpServletResponse response) throws ServletException, IOException {
        doGet(request, response);
    }

    protected void doGet(HttpServletRequest request, HttpServletResponse response) throws ServletException, IOException {
        /**
         * 封装工具类的使用
         */
        Cookie cookie_val = CookieUtils.getCookie(request.getCookies(), "history");

        /**
         * 1.获得一个Cookie数组对象
         * 2.非空判断
         * 3.遍历Cookie数组
         * 4.查询cookie的名字为history的Cookie对象
         * 5.把查询到的该Cookie对象赋值给临时cookie_val中,以便后续使用
         * <p>
         * 注意:该方法被注释掉,是因为我们使用了封装好的工具类来实现复用性
         */
//        Cookie cookie_val = null;
//        Cookie[] cookies = request.getCookies();
//        if (cookies != null && cookies.length != 0) {
//            for (Cookie cookie : cookies) {
//                if ("history".equals(cookie.getName())) {
//                    cookie_val = cookie;
//                }
//            }
//        }

        /**
         * 1.创建可变长字符串以便后续将cookie_val中的字符串拆分使用
         * 2.判断cookie_val为空,提示没有浏览记录,并跳转书城主页进行浏览
         * 3.将最后拼接的可变长字符串调用toString方法响应给浏览器
         */
        StringBuffer buffer = new StringBuffer();
        if (cookie_val == null) {
            buffer.append("<font color='red'>您没有浏览记录</font><br>");
            buffer.append("<a href='books.html'>书城主页</a><br>");
        } else {
            /**
             * 1.cookie_val不为空,意为有了浏览记录字符串,需要加工处理返回每个id对应的书名并响应给客户端
             * 2.得到cookie_val中的字符串值
             * 3.把字符串值以“-”做拆分,拆分成单个id数字字符串(id数字字符串是以数组的形式存储的)
             * 4.可变长字符串拼接浏览记录提示语
             * 5.创建一个对应id的书名数组,以便后续我们通过拆分后的id来获取对应的书名
             * 5.遍历拆分后的数组将id字符串转换为数值(int)作为下标并取出该下标在书名数组中对应的书名
             * 6.可变长字符串拼接书名
             * 7.将最后拼接的可变长字符串调用toString方法响应给浏览器
             */
            String[] books = {"《Java编程思想》", "《Java核心卷》", "《算法》", "《Ziph的博客》"};
            String historyStr = cookie_val.getValue();
            String[] history = historyStr.split("-");
            buffer.append("您的浏览记录如下:<br>");
            for (String s : history) {
                String book = books[Integer.parseInt(s)];
                buffer.append(book + "<br>");
            }
        }
        /**
         * 解决响应给浏览器的中文乱码问题
         */
        response.setContentType("text/html;charset=utf-8");
        response.getWriter().println(buffer.toString());
    }
}
封装工具类
package com.mylifes1110.java.books.utils;

import javax.servlet.http.Cookie;

/**
 * 封装工具类
 * 将重复代码获取Cookie对象并判断是否为该名的cookie对象做了封装,实现了复用
 */
public class CookieUtils {
    public static Cookie getCookie(Cookie[] cookies, String cookieName) {
        if (cookies != null && cookies.length != 0) {
            for (Cookie cookie : cookies) {
                if (cookieName.equals(cookie.getName())) {
                    return cookie;
                }
            }
        }
        return null;
    }
}
三、认识域对象
3.1 什么是域对象
可以存储数据的对象,从而实现从对象中存储和取出
3.2 常见的域对象有什么?
- Session (Session域)
- Request (Request域)
- ServletContext (ServletContext域)
四、状态管理之Sesstion应用
4.1 什么是Session
Session用于跟踪客户端的状态。Session指的是在一段时间内,单个客户与Web服务器的一连串相关的交互过程。
在一个Session中,客户可能会多次请求访问同一个网页,也有可能请求访问各种不同的服务器资源。
4.2 Session的工作原理
session被用于表示一个持续的连接状态,在网站访问中一般指代客户端浏览器的进程从开启到结束的过程。session其实就是网站分析的访问(visits)度量,表示一个访问的过程。
session的常见实现形式是cookie(session cookie),即未设置过期时间的cookie,这个cookie的默认生命周期为浏览器会话期间,只要关闭浏览器窗口,cookie就消失了。实现机制是当用户发起一个请求的时候,服务器会检查该请求中是否包含sessionid,如果未包含,则Tomcat会创造一个名为JSESSIONID的输出 cookie返回给浏览器(只放入内存,并不存在硬盘中),并将其以HashTable(键值对)的形式写到服务器的内存里面;当已经包含sessionid时,服务端会检查找到与该session相匹配的信息,如果存在则直接使用该sessionid,若不存在则重新生成新的 session。这里需要注意的是session始终是由服务端创建的,并非浏览器自己生成的。
4.3 如何获取Session
        /**
         * 获取Session对象中的id(唯一标记)
         * A827D88EE704FE070A912BE908E64954
         */
        HttpSession session = request.getSession();
        System.out.println("SessionID为:"+session.getId());

        /**
         * 获取Session对象的空闲时间(单位:秒)
         * 默认Session失效时间为1800(30分钟)
         * 1800
         */
        System.out.println("此Session对象"+session.getMaxInactiveInterval()+"秒后失效!");

        /**
         * 获取Session对象的创建时间(单位:毫秒)
         */
        System.out.println("Session的创建时间:" + session.getCreationTime());

        /**
         * 获取Session对象的最后一次访问时间(单位:毫秒)
         */
        System.out.println("Session的最后一次访问时间:"+session.getLastAccessedTime());
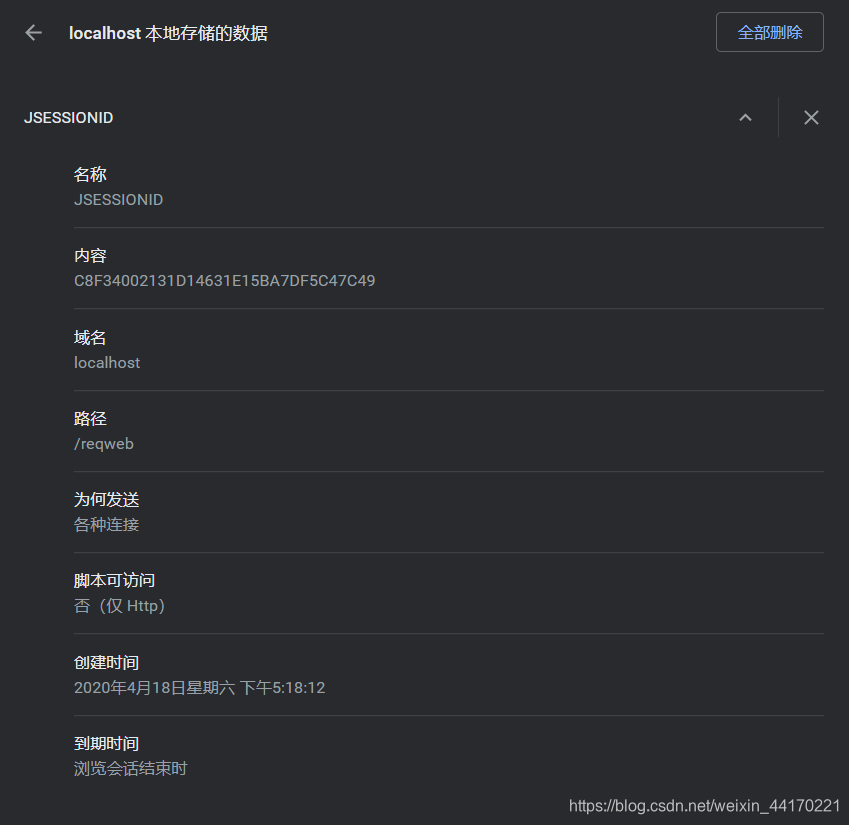
如下是我获取的Session的内容:
SessionID为:C8F34002131D14631E15BA7DF5C47C49
此Session对象1800秒后失效!
Session的创建时间:1587201492030
Session的最后一次访问时间:1587201557924
SessionID为:C8F34002131D14631E15BA7DF5C47C49
此Session对象1800秒后失效!
Session的创建时间:1587201492030
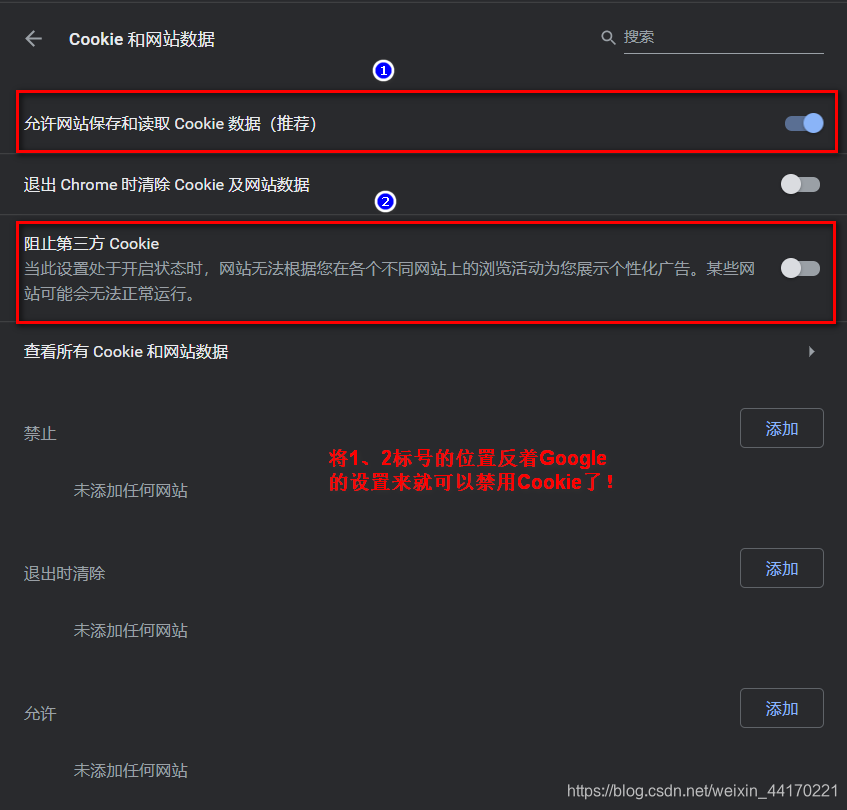
Session的最后一次访问时间:1587201620359注意:如下图片找到了打开Google的SessionID,并确定它仍然生效!(如何打开Google查询Cookie,下一章节,我介绍给大家!)
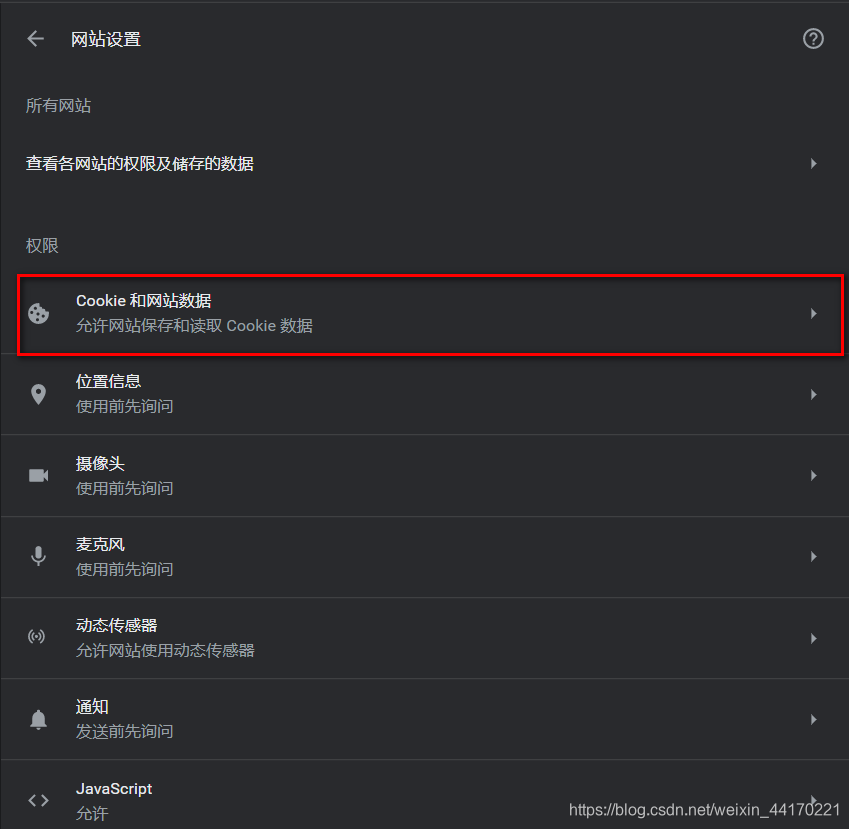
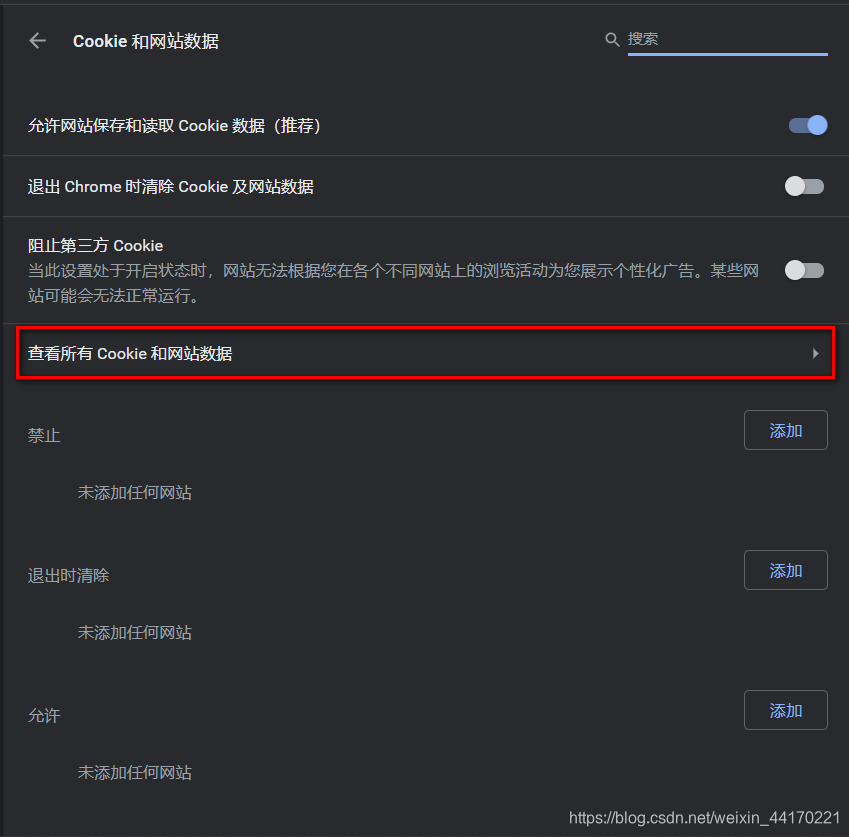
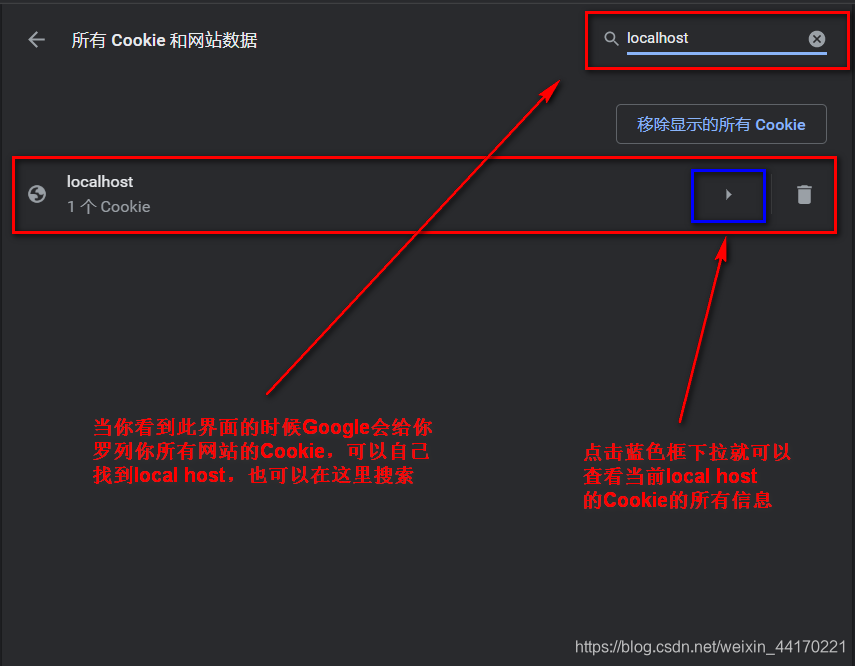
4.4 关于Google怎么查看Cookie
查看步骤: 以前步骤可以查看Google的Cookie(我已用图解的方法展示给大家了!)
网址栏直接跳转访问查看Cookie: chrome://settings/content/cookies

4.5 使用Session绑定对象
使用HttpSession的setAttribute(属性名,Object)方法实现绑定对象
		//第一个Servlet代码
		HttpSession session = request.getSession();
        System.out.println("SessionID为:" + session.getId());
		/**
         * 使用Session来绑定对象
         */
        Test test = new Test();
        test.name = "Ziph";
        test.age = 18;
        session.setAttribute("name", test);

//第一个Servlet代码中的测试类
/**
 * 使用Session来绑定对象的测试类
 */
class Test {
    String name;
    int age;

    @Override
    public String toString() {
        return "Test{" +
                "name='" + name + '\'' +
                ", age=" + age +
                '}';
    }
}

		//第二个Servlet代码
		HttpSession session = request.getSession();
        System.out.println("SessionID为:" + session.getId());
        Object name = session.getAttribute("name");
        System.out.println(name);
SessionID为:804218657264AD72C75196B4C0121C38
SessionID为:804218657264AD72C75196B4C0121C38
Test{name=‘Ziph’, age=18}
4.6 删除Session对象
使用HttpSession的invalidate方法
		//第一个Servlet代码
		HttpSession session = request.getSession();
        System.out.println("SessionID为:" + session.getId());
		/**
         * 删除Session对象
         */
        session.invalidate();

		//第二个Servlet代码
		HttpSession session = request.getSession();
        System.out.println("SessionID为:" + session.getId());
控制台获取SessionID如下: (注意:所获取的SessionID不一样了,证明第一个Session对象被删除了!)
SessionID为:42F4DC652DD812772DA8B591A5CA4C2E
SessionID为:7C7BBEC30188C4D1744D0A41EE9D9AEB
4.7 Session超时
4.7.1 什么是Session超时
HttpSession的最后一次访问时间和当前时间的差距大于了指定的最大空闲时间,这时服务器就会销毁Session对象。默认的空闲时间为30分钟。(生命周期结束)
4.7.2 如何修改Session的缺省时间限制
- 使用HttpSession的session.setMaxInactiveInterval(60);设置,(单位:秒)
- 修改xml配置信息(单位:分钟)
注意:两者设置不冲突,xml配置是在服务器初始化的时候配置起到了作用,而如果再在代码中设置时间限制的话,该时间限制则覆盖xml配置的时间限制。
  <session-config>
  	<session-timeout>10</session-timeout>
  </session-config>
4.7.3 Session失效的几种情况
- 超过了设置的超时时间
- 主动调用了删除Session的方法invalidate()
- 服务器主动或异常关闭
注意:浏览器关闭并不会让Session失效!(在4.7.4中特别讲解了这句话!)
4.7.4 解释浏览器关闭不会让Session失效
如果有小伙伴试过的话,这个注意也许会对你们产生一种困惑!
当我们在测试的时候,获取并查看当前SessionID。关闭浏览器后,重新发起请求,则看到再一次获取的SessionID变了!到看到发生的这一幕的时候,你们是不是会质疑这个结论呢?怎么浏览器关闭并不会让Session失效呢?它不是已经变了吗?那就让我来回答这个问题,我感觉这个问题还是有必要去说一下的!
我们第一次在浏览器发起请求,获取一个SessionID,我们在这里用①表示。这时候关闭浏览器,重新打开浏览器重新发起请求,在获取当前SessionID,我们在这里获取的是②。大家有没有发现①并不是和我们的②是同一个对象呢?Sesssion对象是存储再服务器中的,第一次发起请求获得①,关闭后重新发起请求获得②,这时候就有聪明的小伙伴发现了我两次加重标记了重新发起请求这几个字,你是不是找出其中的端倪了呢?(找不出也没事,我来给你答案!)
答案: 浏览器关闭并不会让Session失效,这里所指的Session对象是服务器端的Session对象没有失效!你想我们第一次发起请求获得一个Session对象,而当我们关闭浏览器重新发起请求时,这就是一个新的请求(Request),它会创建一个新的Session对象,所以我们看到的表面现象是改变的。而我们看不到的服务器内的Session对象是没有发生改变的!
4.8 关于浏览器禁用Cookie的解决方案【了解】
4.8.1 怎么主动禁用浏览器Cookie
在我们查看浏览器Cookie的页面里,会有禁用Cookie的按钮,我们可以自行添加禁用某个站点的Cookie!
4.8.2 浏览器禁用Cookie的后果
如果浏览器禁用Cookie,session还能用吗?
答:不能,但有其他的解决方案
服务器在默认情况下,会使用Cookie的方式将sessionID发送给浏览器,如果用户禁止Cookie,则sessionID不会被浏览器保存。此时,服务器可以使用如URL重写这样的方式来发送sessionID。
4.8.3 使用Session区分每个用户的方式
- 使用Cookie
- 作为隐藏域嵌入HTML表单中,附加在主体的URL中,通常作为指向其他应用程序页面的链接,即URL重写。
4.8.3 什么是URL重写
浏览器在访问服务器上的某个地址时,不再使用原来的那个地址,而是使用经过改写的地址(即:在原来的地址后面加上了sessionID)
4.8.4 如何实现URL重写
如果是链接地址和表单提交,使用response.encodeURL(String url)生成重写后的URL
如果是重定向,使用response.encodeRedirectURL(String url)生成重写的URL
PrintWriter writer = response.getWriter();
HttpSession session = request.getSession();
/**
 * 重定向方式(地址不能为空!)
 */
String s1 = response.encodeRedirectURL("/项目名称/index.html");
response.sendRedirect(s1);

/**
 * 链接地址方式(地址可以为空!)
 * 注意:下面的是打印手写a超链接标签并附跳转链接
 */
String s2 = response.encodeURL("/项目名称/index.html");
writer.println("<a href='"+ s2 +"'>" + "跳转" + "</a>");
4.9 Session综合案例值登录(验证码)
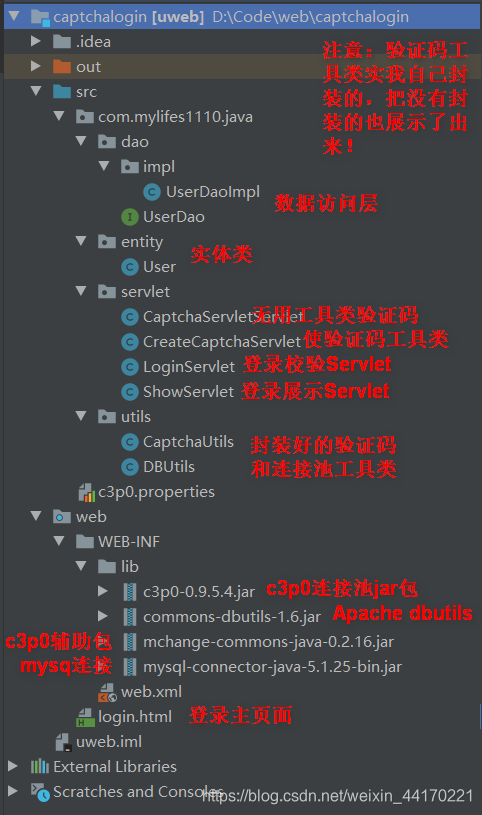
JDBC连接数据库,数据库中创建用户名、密码等信息。利用Session来获取浏览器请求参数,并存储参数及验证码参数,用以验证是否登录成功!成功和失败给予适当处理!(比如:重定向、转发等)
本案例使用了c3p0连接池,大体框架结构如图所示: (注意:验证码工具类和非工具类选其一即可)
c3p0连接池配置文件
    c3p0.driverClass=com.mysql.jdbc.Driver
    c3p0.jdbcUrl=jdbc:mysql://localhost:3306/temp?useUnicode=true&characterEncoding=utf-8
    c3p0.user=root
    c3p0.password=Mylifes1110
库表操作
    create table user
    (
        id       int primary key auto_increment,
        username varchar(30),
        password varchar(30)
    ) charset = utf8;

    insert into user
        (id, username, password)
    values (1, 'ziph', '123456');

    insert into user (id, username, password)
    VALUES (2, 'join', '123456');
login登录页面
<!DOCTYPE html>
<html lang="en">
<head>
<meta charset="UTF-8">
<title>登录页面</title>
</head>
<body>
<form action="/uweb/login" method="post">
账户:<input type="text" name="username"><br>
密码:<input type="password" name="password"><br>
验证码 <input type="text" name="validateCode"><img src="/uweb/create">
<button type="submit">登录</button>
</form>
</body>
</html>
User实体类
    package com.mylifes1110.java.entity;

    /**
     * 用户实体类
     */
    public class User {
        private Integer id;
        private String username;
        private String password;

        public User() {
        }

        public User(Integer id, String username, String password) {
            this.id = id;
            this.username = username;
            this.password = password;
        }

        public Integer getId() {
            return id;
        }

        public void setId(Integer id) {
            this.id = id;
        }

        public String getUsername() {
            return username;
        }

        public void setUsername(String username) {
            this.username = username;
        }

        public String getPassword() {
            return password;
        }

        public void setPassword(String password) {
            this.password = password;
        }

        @Override
        public String toString() {
            return "User{" +
                    "id=" + id +
                    ", username='" + username + '\'' +
                    ", password='" + password + '\'' +
                    '}';
        }
    }
DBUtils连接池工具类
    package com.mylifes1110.java.utils;

    import com.mchange.v2.c3p0.ComboPooledDataSource;

    /**
     * 获取连接池工具类
     */
    public class DBUtils {
        private static ComboPooledDataSource dataSource;

        static {
            dataSource = new ComboPooledDataSource();
        }

        public static ComboPooledDataSource getDataSource() {
            return dataSource;
        }
    }
验证码工具类
    package com.mylifes1110.java.utils;

    import java.awt.*;
    import java.awt.image.BufferedImage;
    import java.util.Random;

    /**
     * 获取验证码工具类
     */
    public class CaptchaUtils {
        public static BufferedImage createCaptcha(int width, int height, int numbers, int interferenceLines, boolean flag) {
            int widths = width;//定义图片宽度
            int heights = height;//定义图片高度
            //创建图片对象
            BufferedImage image = new BufferedImage(width, height, BufferedImage.TYPE_INT_RGB);
            //创建画笔对象(swing组件)
            Graphics graphics = image.getGraphics();
            //设置背景颜色
            graphics.setColor(new Color(0xDCDCDC));
            //设置填充背景为实心矩形
            graphics.fillRect(0, 0, width, height);
            //设置边框颜色
            graphics.setColor(Color.black);
            //画一个空心矩形边框
            graphics.drawRect(0, 0, width - 1, height - 1);
            //创建随即对象
            Random random = new Random();
            //画干扰线(准确来说是干扰椭圆)
            for (int i = 0; i < interferenceLines; i++) {
                int x = random.nextInt(width);
                int y = random.nextInt(height);
                graphics.drawOval(x, y, 0, 0);
            }
            //产生随机数并把随机数转换为十六进制字符串
            String s = Integer.toHexString(random.nextInt());
            //生成四位随机验证码
            String captcha = s.substring(0, numbers);

            if (flag) {
                //控制台打印验证码查看
                System.out.println(captcha);
            }

            //为画笔设置颜色
            graphics.setColor(new Color(0, 100, 0));
            //为画笔设置字体格式
            graphics.setFont(new Font("Candara", Font.BOLD, 24));
            //画四位随机数
            graphics.drawString(captcha, 8, 24);
            graphics.dispose();
            return image;
        }
    }
UserDao数据访问层接口
    package com.mylifes1110.java.dao;

    import com.mylifes1110.java.entity.User;

    import java.sql.SQLException;

    /**
     * 数据访问层接口
     */
    public interface UserDao {
        User login(User user) throws SQLException;
    }
UserDaoImpl数据访问层实现类
    package com.mylifes1110.java.dao.impl;

    import com.mylifes1110.java.dao.UserDao;
    import com.mylifes1110.java.entity.User;
    import com.mylifes1110.java.utils.DBUtils;
    import org.apache.commons.dbutils.QueryRunner;
    import org.apache.commons.dbutils.handlers.BeanHandler;

    import java.sql.SQLException;

    /**
     * 数据访问层实现类
     */
    public class UserDaoImpl implements UserDao {
        @Override
        public User login(User user)  {
            QueryRunner queryRunner = new QueryRunner(DBUtils.getDataSource());
            User loginUser = null;
            try {
                loginUser = queryRunner.query("select id, username, password from user where username = ? and password = ?",
                        new BeanHandler<User>(User.class),
                        user.getUsername(),
                        user.getPassword());
            } catch (SQLException throwables) {
                throwables.printStackTrace();
            }
            return loginUser;
        }
    }
登录校验Servlet
    package com.mylifes1110.java.servlet;

    import com.mylifes1110.java.dao.UserDao;
    import com.mylifes1110.java.dao.impl.UserDaoImpl;
    import com.mylifes1110.java.entity.User;

    import javax.servlet.ServletException;
    import javax.servlet.annotation.WebServlet;
    import javax.servlet.http.HttpServlet;
    import javax.servlet.http.HttpServletRequest;
    import javax.servlet.http.HttpServletResponse;
    import java.io.IOException;
    import java.sql.SQLException;

    /**
     * 登录校验过程
     */
    @WebServlet(name = "LoginServlet", value = "/login")
    public class LoginServlet extends HttpServlet {
        private UserDao userDao = new UserDaoImpl();

        @Override
        protected void doPost(HttpServletRequest request, HttpServletResponse response) throws ServletException, IOException {
            /**
             * 获取浏览器请求参数:username和password
             */
            String username = request.getParameter("username");
            String password = request.getParameter("password");
            /**
             * 创建User对象,并将获取到的传入对象中封装,以便后登录校验传入
             */
            User user = new User();
            user.setUsername(username);
            user.setPassword(password);
            User loginUser = null;
            try {
                /**
                 * 进行登录校验
                 */
                loginUser = userDao.login(user);
            } catch (SQLException throwables) {
                throwables.printStackTrace();
            }
            /**
             * 类似服务器端做记录(控制台打印)
             */
            System.out.println(loginUser);
            /**
             * 与登录校验后返回的结果判断是否为空
             * 1.校验后为空,则意为登录失败(该用户名或密码在数据库中不匹配或不存在)
             * 2.校验后不为空,即登录成功
             */
            if (loginUser == null) {
                /**
                 * 登录失败,请求转发到登陆页面
                 */
                request.getRequestDispatcher("/login.html").forward(request, response);
            } else {
                /**
                 * 把即将登录成功的用户信息存储到Session中
                 * 登录成功,重定向并显示用户信息(Servlet)
                 */
                request.getSession().setAttribute("user", user);
                response.sendRedirect("/uweb/show");
            }
        }

        @Override
        protected void doGet(HttpServletRequest request, HttpServletResponse response) throws ServletException, IOException {
            doPost(request, response);
        }
    }
使用工具来获取验证码
    package com.mylifes1110.java.servlet;

    import com.mylifes1110.java.utils.CaptchaUtils;

    import javax.imageio.ImageIO;
    import javax.servlet.ServletException;
    import javax.servlet.ServletOutputStream;
    import javax.servlet.annotation.WebServlet;
    import javax.servlet.http.HttpServlet;
    import javax.servlet.http.HttpServletRequest;
    import javax.servlet.http.HttpServletResponse;
    import java.awt.*;
    import java.awt.image.BufferedImage;
    import java.io.IOException;
    import java.util.Random;

    /**
     * 获取验证码,并把验证码写入浏览器中显示
     * <p>
     * int width = 60;//默认定义图片宽度
     * int height = 32;//默认定义图片高度
     * numbers = 4;//默认验证码个数
     * interferenceLines = 50;//默认干扰线条数
     * flag = true/false;是否在控制台打印验证码查看
     */
    @WebServlet(name = "CreateCaptchaServlet", value = "/create")
    public class CreateCaptchaServlet extends HttpServlet {
        protected void doPost(HttpServletRequest request, HttpServletResponse response) throws ServletException, IOException {
            BufferedImage image = CaptchaUtils.createCaptcha(60, 32, 4, 200, true);
            response.setContentType("image/jpeg");
            //使用字节流把图片写出到浏览器
            ServletOutputStream stream = response.getOutputStream();
            ImageIO.write(image, "jpeg", stream);
            //关闭字节流
            stream.close();

        }

        protected void doGet(HttpServletRequest request, HttpServletResponse response) throws ServletException, IOException {
            doPost(request, response);
        }
    }
非工具类获取验证码
    package com.mylifes1110.java.servlet;

    import javax.imageio.ImageIO;
    import javax.servlet.ServletException;
    import javax.servlet.ServletOutputStream;
    import javax.servlet.annotation.WebServlet;
    import javax.servlet.http.HttpServlet;
    import javax.servlet.http.HttpServletRequest;
    import javax.servlet.http.HttpServletResponse;
    import java.awt.*;
    import java.awt.image.BufferedImage;
    import java.io.IOException;
    import java.util.Random;

    /**
     * 验证码
     */
    @WebServlet(name = "CaptchaServlet", value = "/create1")
    public class CaptchaServlet extends HttpServlet {
        protected void doPost(HttpServletRequest request, HttpServletResponse response) throws ServletException, IOException {
            int width = 60;//定义图片宽度
            int height = 32;//定义图片高度
            //创建图片对象
            BufferedImage image = new BufferedImage(width, height, BufferedImage.TYPE_INT_RGB);
            //创建画笔对象(swing组件)
            Graphics graphics = image.getGraphics();
            //设置背景颜色
            graphics.setColor(new Color(0xDCDCDC));
            //设置填充背景为实心矩形
            graphics.fillRect(0, 0, width, height);
            //设置边框颜色
            graphics.setColor(Color.black);
            //画一个空心矩形边框
            graphics.drawRect(0, 0, width - 1, height - 1);
            //创建随即对象
            Random random = new Random();
            //画干扰线(准确来说是干扰椭圆)
            for (int i = 0; i < 50; i++) {
                int x = random.nextInt(width);
                int y = random.nextInt(height);
                graphics.drawOval(x, y, 0, 0);
            }
            //产生随机数并把随机数转换为十六进制字符串
            String s = Integer.toHexString(random.nextInt());
            //生成四位随机验证码
            String captcha = s.substring(0, 4);
            //将产生的验证码存储到Session中,方便以后进行验证码校验从Session中取出
            request.getSession().setAttribute("existCode", captcha);
            //控制台打印验证码查看
            System.out.println(captcha);
            //为画笔设置颜色
            graphics.setColor(new Color(0, 100, 0));
            //为画笔设置字体格式
            graphics.setFont(new Font("Candara", Font.BOLD, 24));
            //画四位随机数
            graphics.drawString(captcha, 8, 24);
            graphics.dispose();
            //将图片响应到浏览器(多媒体图片类型-mimeType)
            response.setContentType("image/jpeg");
            //使用字节流把图片写出到浏览器
            ServletOutputStream stream = response.getOutputStream();
            ImageIO.write(image, "jpeg", stream);
            //关闭字节流
            stream.close();
        }

        protected void doGet(HttpServletRequest request, HttpServletResponse response) throws ServletException, IOException {
            doPost(request, response);
        }
    }
登录展示
    package com.mylifes1110.java.servlet;

    import com.mylifes1110.java.entity.User;

    import javax.servlet.ServletException;
    import javax.servlet.annotation.WebServlet;
    import javax.servlet.http.*;
    import java.io.IOException;

    /**
     * 登录结构展示
     */
    @WebServlet(name = "ShowServlet", value = "/show")
    public class ShowServlet extends HttpServlet {
        protected void doPost(HttpServletRequest request, HttpServletResponse response) throws ServletException, IOException {
            /**
             * 1.解决乱码问题
             * 2.获取Session对象中的user对象参数
             * 3.判断user对象是否为空
             * 4.不为空则展示登录成功页面(欢迎页面)
             * 5.为空则提示登录或直接跳转到登录页面
             */
            response.setContentType("text/html;charset=utf-8");
            User user = (User) request.getSession().getAttribute("user");
            if (user != null) {
                response.getWriter().println("<h1>欢迎" + user.getUsername() + "回家!</h1>");
            } else {
                response.getWriter().println("不好意思您还没有登录!还请您<a href='/uweb/login.html'>登录</a>");
            }
        }

        protected void doGet(HttpServletRequest request, HttpServletResponse response) throws ServletException, IOException {
            doPost(request, response);
        }
    }
五、Request作为域对象
5.1 Request域对象的生命周期
Request的作用范围是一次访问的过程,生命周期随着访问开始而开始,随着服务器的响应完毕而结束。所以更多的数据会添加到这个域对象
5.2 再次理解重定向和转发的区别
- 转发会携带这第一次的ServletRequest的信息传递到下一个文件,而重定向是重新开启了一次访问(发起请求),所以并不会携带
- 转发上面的地址栏不会发生改变就访问了别的内容,重定向会发生改变
- 转发只能存在于服务器内部,重定向可以访问任何其他网页
- 因为转发只创建了一次客户端和服务器的链接,所以相对而言转发会比较节省网络资源
5.3 Request域对象作用在重定向和转发中的区别
鉴于重定向是重新开启访问,这个访问即是重新发起了一次请求。再来看我们Request域对象的生命周期是一次访问的过程。所以我们的数据存在Request域对象中,是不能应用再重定向中的。假如我们应用在重定向中,取出来的即是null。(域对象生命周期已经结束!)
鉴于转发是服务器内部操作,我们用的时候即是当前的这一次请求。再想到Request域对象的声明周期的时候,正是符合转发操作。所以我们应用在转发中,可以正常存取数据。
protected void doGet(HttpServletRequest request, HttpServletResponse response) throws ServletException, IOException {
        /**
         * Reuqest域对象应用于转发
         */
        String message = "Ziph is Very Good!";
        request.setAttribute("message", message);
        request.getRequestDispatcher("/test5").forward(request, response);
        /**
         * Request域对象应用于重定向(不能正常存取)
         * request.getContextPath():获取根路径
         * 根路径拼接Servlet中的urlPatterns即是需要重定向过去的路径
         */
        response.sendRedirect(request.getContextPath() + "/test5");
    }
六、ServletContext对象
6.1 什么是ServletContext对象
ServletContext对象泛指Servlet上下文,代表当前整个应用程序。(jsp中application)
- 当WEB服务器启动时,会为每一个WEB应用程序(webapps下的每个目录就是一个应用程序)创建一块共享的存储区域
- ServletContext也叫做“公共区域”,也就是同一个WEB应用程序中,所有的Servlet和JSP都可以共享同一个区域
- ServletContext在WEB服务器启动时创建,服务器关闭时销毁
6.2 如何获取ServletContext对象
- ServletConfig提供了getServletContext()方法。
- ServletContext servletContext1 = this.getServletConfig().getServletContext();
- GenericServlet提供了getServletContext()方法。(推荐)
- ServletContext servletContext2 = this.getServletContext();
- HttpServletRequest提供了getServletContext()方法。(推荐)
- ServletContext servletContext3 = request.getServletContext();
- HttpSession提供了getServletContext()方法。
- ServletContext servletContext4 = request.getSession().getServletContext();
- 注意的点,我写在了代码的注释中!
		/**
         * 通过ServletConfig获取
         * 注意:ServletConfig是生命在GenericServlet类中
         */
        ServletContext servletContext1 = this.getServletConfig().getServletContext();
        /**
         * 通过GenericServlet获取(推荐使用)
         * 注意:GenericServlet是HttpServlet的父类
         */
        ServletContext servletContext2 = this.getServletContext();
        /**
         * 通过HttpServletRequest对象获取(推荐使用)
         * 注意:ServletRequest是HTTPServlet的父类
         */
        ServletContext servletContext3 = request.getServletContext();
        /**
         * 通过HttpSession对象获取
         */
        ServletContext servletContext4 = request.getSession().getServletContext();
        /**
         * 打印四个对象并查看是否获取的是同一对象(答案在下方)
         * <p>
         * org.apache.catalina.core.ApplicationContextFacade@74fd7a4f
         * org.apache.catalina.core.ApplicationContextFacade@74fd7a4f
         * org.apache.catalina.core.ApplicationContextFacade@74fd7a4f
         * org.apache.catalina.core.ApplicationContextFacade@74fd7a4f
         */
        System.out.println(servletContext1);
        System.out.println(servletContext2);
        System.out.println(servletContext3);
        System.out.println(servletContext4);
6.3 Servlet上下文的作用及特点
6.3.1 Servlet上下文的作用
- 获取当前项目的发起路径
- request.getServletContext().getRealPath("/");
- 获取容器的附加信息
- 获取Servlet信息
- request.getServletContext().getServerInfo()
- 获取上下文路径
- request.getServletContext().getContextPath()
- 获取请求路径
- request.getContextPath()
- 全局容器
- 将数据存储在ServletContext域中
- request.getServletContext().setAttribute(“username”, “Ziph”);
- 获取ServletContext域中的数据
- request.getServletContext().getAttribute(“username”)
- 把ServletContext域中的数据移除掉
- request.getServletContext().removeAttribute(“username”);
- 代码如下:
		//第一个Servlet代码
		/**
		 * 获取ServletContext对象
         */
		ServletContext servletContext = request.getServletContext();
        /**
         * 获取当前项目的发布路径(这是我IDEA中的war包存放路径)
         * D:\Code\web\testrequest\out\artifacts\reqweb_war_exploded\
         */
        System.out.println(servletContext.getRealPath("/"));
        /**
         * 获取容器的附加信息
         * 1.获取Servlet信息 : Apache Tomcat/8.5.45
         * 2.获取上下文路径 : /reqweb
         * 3.获取请求路径 : /reqweb
         */
        System.out.println(servletContext.getServerInfo());
        System.out.println(servletContext.getContextPath());
        System.out.println(request.getContextPath());
        /**
         * 1.将数据存储到ServletContext域中
         * 2.从域中获取数据并查看
         * 3.从域中移除该数据并查看
         */
        servletContext.setAttribute("username", "ziph");
        /**
         * 移除ServletContext域中的数据
         */
        servletContext.removeAttribute("username");

		//第二个Servlet代码
		/**
         * 获取ServletContext域中的数据
         */
        System.out.println(request.getServletContext().getAttribute("username"));
6.3.2 Servlet上下文的特点
唯一性: 一个应用对应一个servlet上下文。
一直存在: 只要服务器不关闭或者应用不卸载,Servlet上下文就一直存在。
6.3.3 xml文件配置ServletContext参数
xml配置文件信息: (可以写多对参数)
  <context-param>
  	<param-name>username</param-name>
  	<param-value>Ziph</param-value>
  </context-param>

  <context-param>
  	<param-name>password</param-name>
  	<param-value>123456</param-value>
  </context-param>
Java代码:
	/**
	 * 获取Servlet上下文参数
	 */
	String appname=application.getInitParameter("username");
	String appversion=application.getInitParameter("password");
注意:配置文件是随着项目初始化而初始化的,我们是不可以人工干预该Servlet上下文参数的,这里指定的不可以干预是不可以移除该参数!
6.4 使用ServletContext域来完成站点访问次数案例
- 获取一个ServletContext对象
- 利用对象获取域中的一个count(计数器)
- 使用if判空,为空初始化count为次数1,并将访问次数存储到域中的count
- 如果不为空,那就开始计数,并将访问次数更新到域中的count
- 显示访问次数(响应给浏览器或控制台打印)
package com.mylifes1110.java.contextservlet;

import javax.servlet.ServletContext;
import javax.servlet.ServletException;
import javax.servlet.annotation.WebServlet;
import javax.servlet.http.HttpServlet;
import javax.servlet.http.HttpServletRequest;
import javax.servlet.http.HttpServletResponse;
import java.io.IOException;

@WebServlet(name = "VisitsServlet", value = "/visits")
public class VisitsServlet extends HttpServlet {
    protected void doPost(HttpServletRequest request, HttpServletResponse response) throws ServletException, IOException {
        doGet(request, response);
    }

    protected void doGet(HttpServletRequest request, HttpServletResponse response) throws ServletException, IOException {
        request.setCharacterEncoding("utf-8");
        response.setContentType("text/html;charset=utf-8");
        ServletContext servletContext = request.getServletContext();
        Integer count = (Integer) servletContext.getAttribute("count");
        if (count == null) {
            count = 1;
            servletContext.setAttribute("count", count);
        } else {
            count++;
            servletContext.setAttribute("count", count);
        }
        /**
         * 浏览器显示访问站点次数
         * 控制台显示访问站点次数
         */
        response.getWriter().println("该站点访问次数为:" + count);
        System.out.println("该站点访问次数为:" + count);
    }
}
下一篇教科书系列【Servlet之Filter过滤器】,期待你的到来!谢谢大家!我将持续分享…


 被折叠的 条评论
为什么被折叠?
被折叠的 条评论
为什么被折叠?
 到【灌水乐园】发言


