


 本文介绍SpringBoot中的自动配置原理及如何扩展,包括静态资源处理、模板引擎Thymeleaf的配置与使用、拦截器实现登录验证等关键内容。
jar:webapp!
springboot核心:自动装配
springboot到底帮我们配置了什么?能改吗?能拓展吗?
- xxxxAutoConfiguraion… 向容器中自动配置组件
- xxxxProperties:自动配置类,装配文件中自定义的一些内容
要解决的问题:
-
导入静态资源
-
首页
-
jsp,模板引擎 Thymeleaf
-
装配和拓展springmvc
-
增删改查
-
拦截器
-
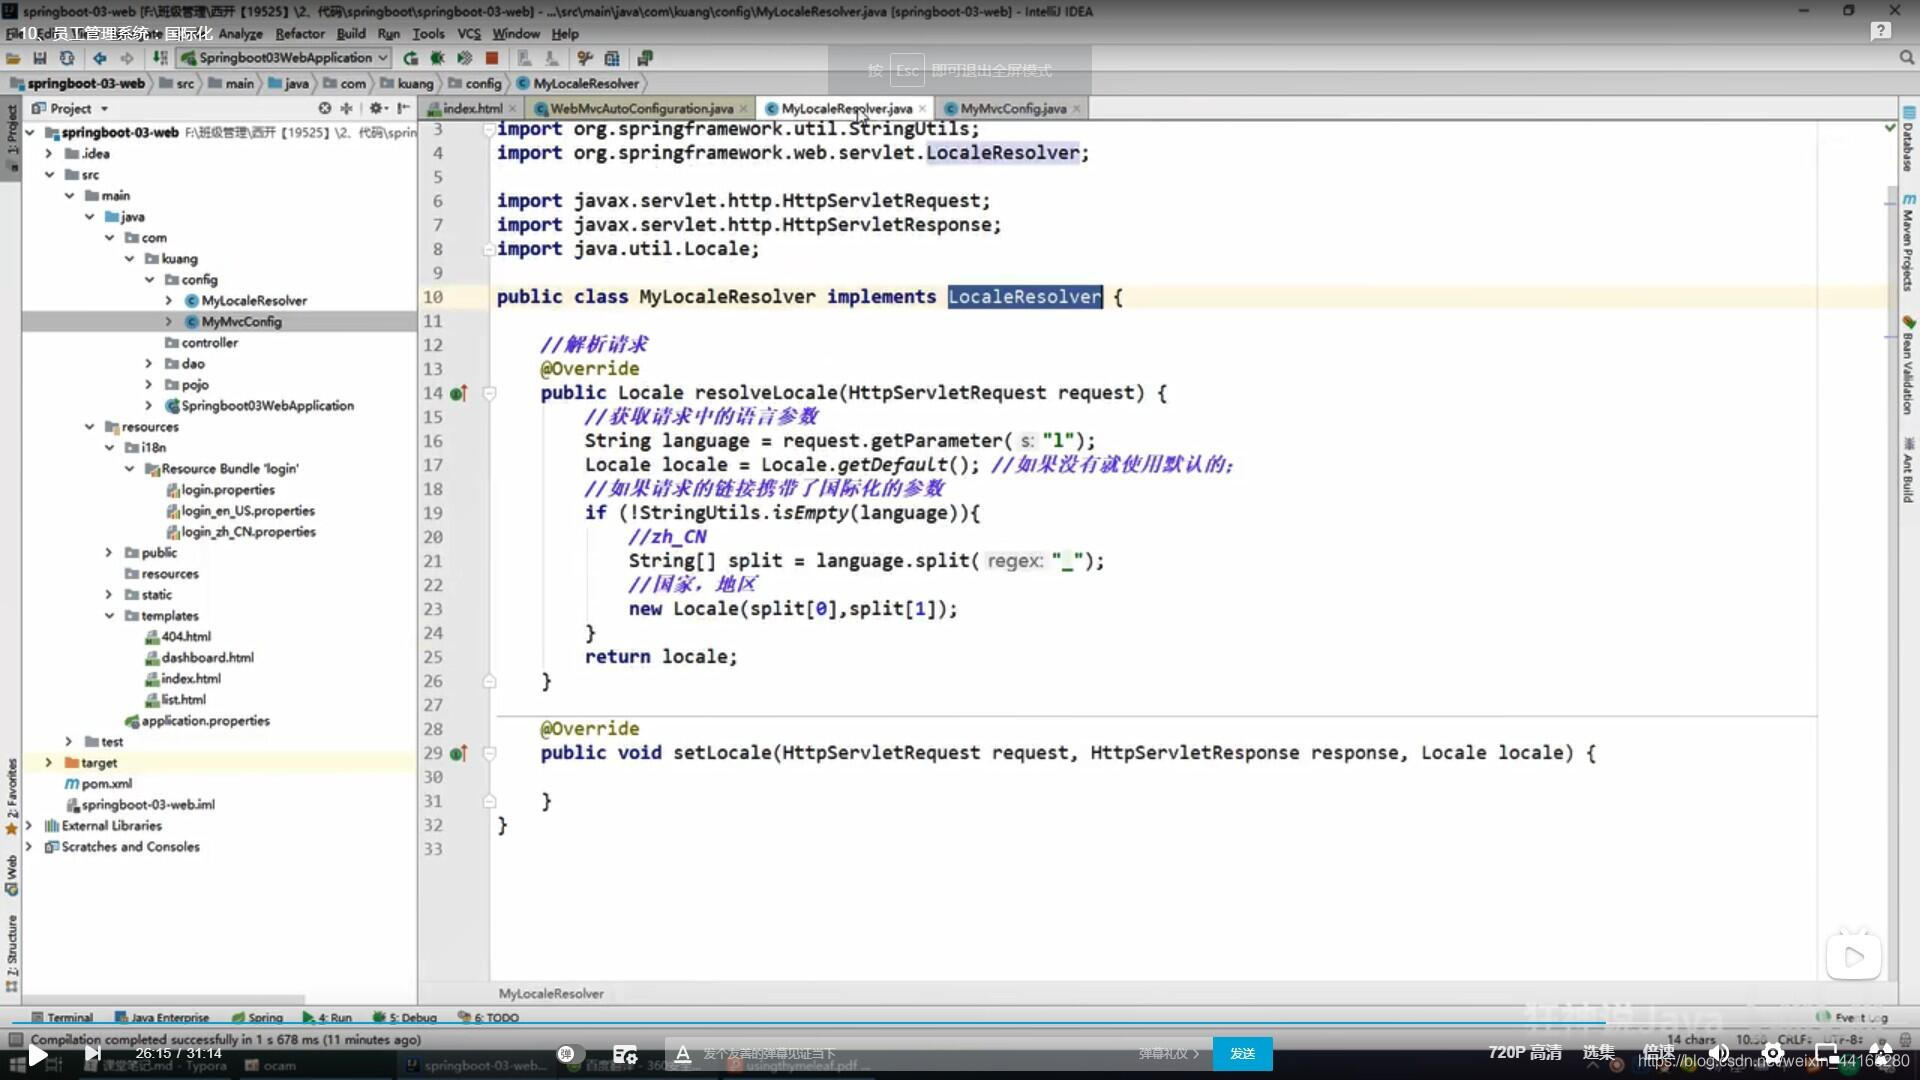
国际化!
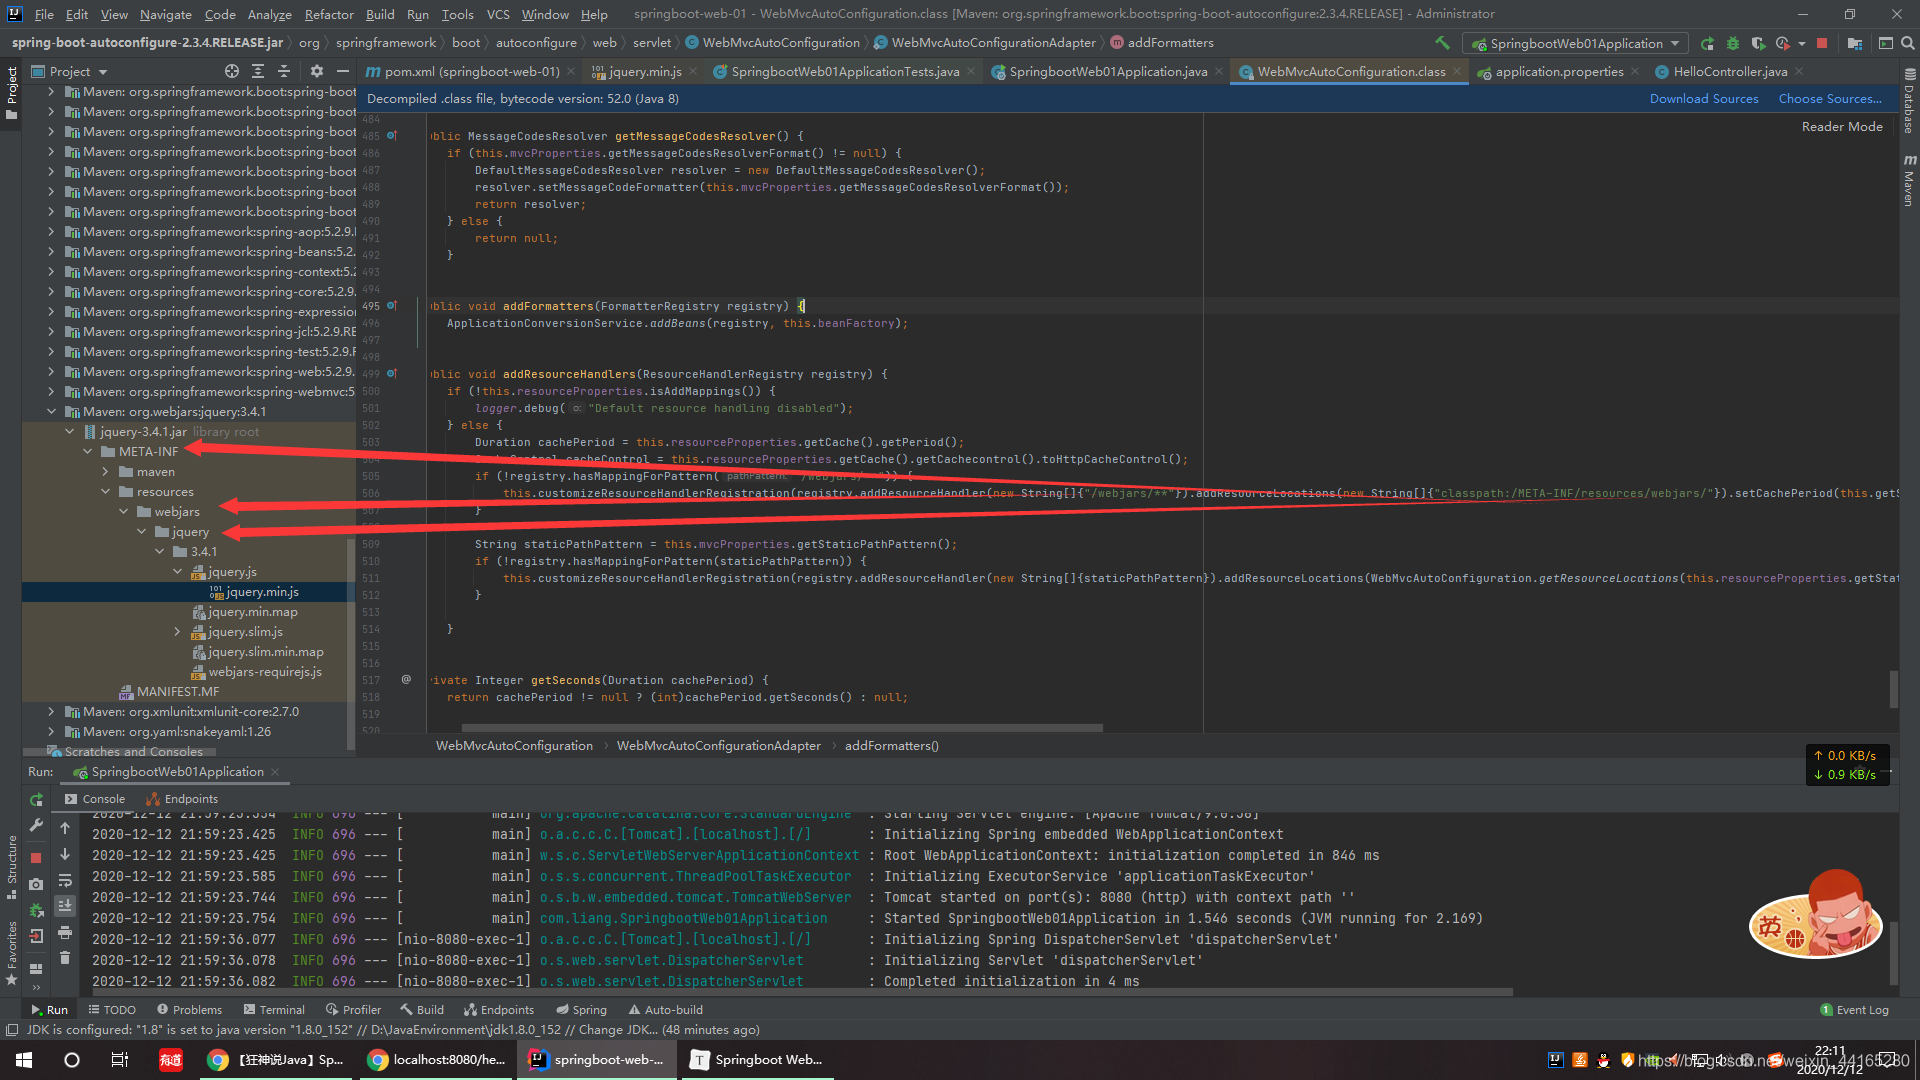
静态资源
 public void addResourceHandlers(ResourceHandlerRegistry registry) {
            if (!this.resourceProperties.isAddMappings()) {
                logger.debug("Default resource handling disabled");
            } else {
                Duration cachePeriod = this.resourceProperties.getCache().getPeriod();
                CacheControl cacheControl = this.resourceProperties.getCache().getCachecontrol().toHttpCacheControl();
                if (!registry.hasMappingForPattern("/webjars/**")) {
                    this.customizeResourceHandlerRegistration(registry.addResourceHandler(new String[]{"/webjars/**"}).addResourceLocations(new String[]{"classpath:/META-INF/resources/webjars/"}).setCachePeriod(this.getSeconds(cachePeriod)).setCacheControl(cacheControl));
                }

                String staticPathPattern = this.mvcProperties.getStaticPathPattern();
                if (!registry.hasMappingForPattern(staticPathPattern)) {
                    this.customizeResourceHandlerRegistration(registry.addResourceHandler(new String[]{staticPathPattern}).addResourceLocations(WebMvcAutoConfiguration.getResourceLocations(this.resourceProperties.getStaticLocations())).setCachePeriod(this.getSeconds(cachePeriod)).setCacheControl(cacheControl));
                }

            }
        }
什么是webjsrs?
导入相对应的依赖,获得对应得jar包
 <dependency>
            <groupId>org.webjars</groupId>
            <artifactId>jquery</artifactId>
            <version>3.4.1</version>
        </dependency>
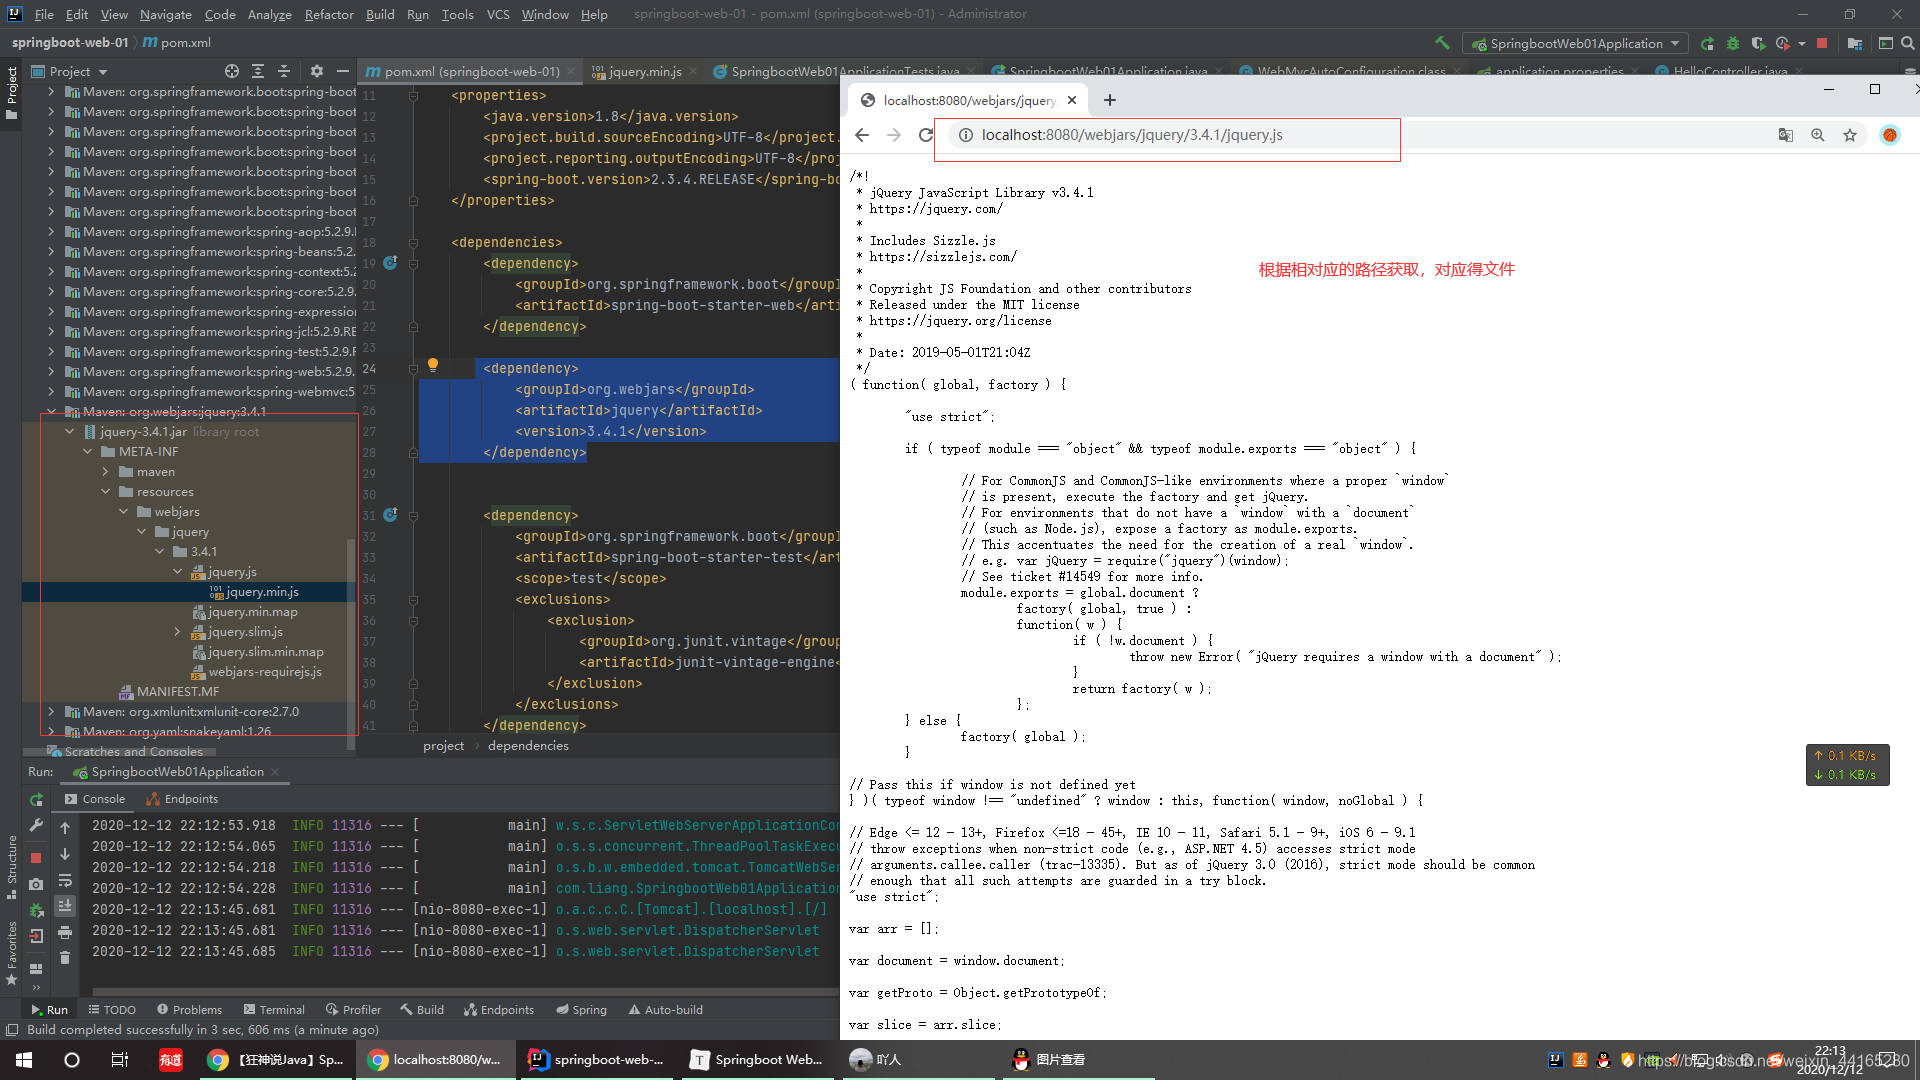
static:静态资源,图片 resources:upload上传的文件 public:公共资源,js
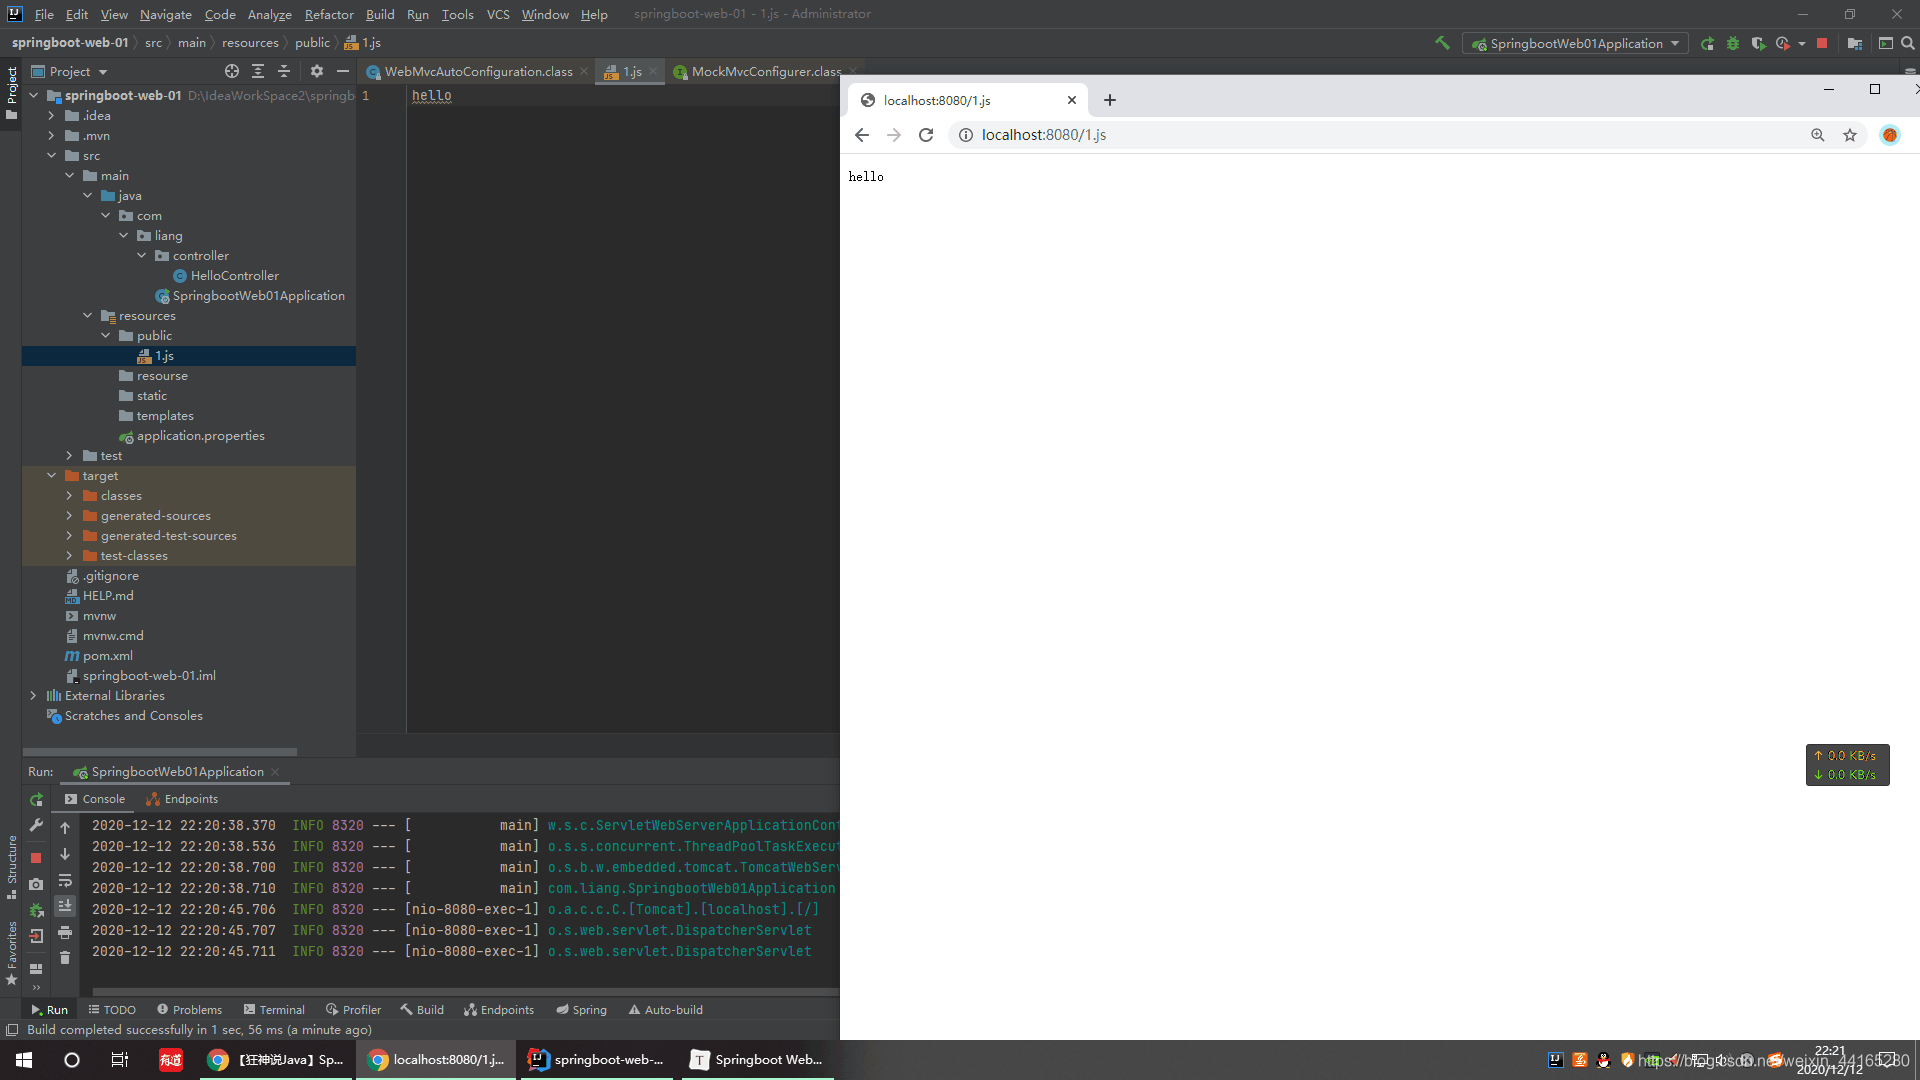

总结:在springboot中,我们是可以使用以下的方式处理静态资源
- webjars localhost:8080/webjars/
- public、static、/**(根目录)、resources localhost:8080/
- 优先级: resources>static(默认)>public
2.模板引擎
模板引擎(这里特指用于[Web开发](的模板引擎)是为了使用户界面与业务数据(内容)分离而产生的,它可以生成特定格式的文档,用于网站的模板引擎就会生成一个标准的HTML文档。模板引擎不属于特定技术领域,它是跨领域跨平台的概念。在Asp下有模板引擎,在PHP下也有模板引擎,在.Net下也有,甚至JavaScript、WinForm开发都会用到模板引擎技术。
-
Thymeleaf官网:https://www.thymeleaf.org/
-
Thymeleaf在GitHub的主页:https://github.com/thymeleaf/thymeleaf
-
spring官方文档:https://docs.spring.io/spring-boot/docs/2.1.6.RELEASE/reference/htmlsingle/#using-boot-starter
-
导入thymeleaf引擎依赖
<!--Thymeleaf,我们都是基于3.x开发-->
        <dependency>
            <groupId>org.thymeleaf</groupId>
            <artifactId>thymeleaf-spring5</artifactId>
        </dependency>
        <dependency>
            <groupId>org.thymeleaf.extras</groupId>
            <artifactId>thymeleaf-extras-java8time</artifactId>
        </dependency>
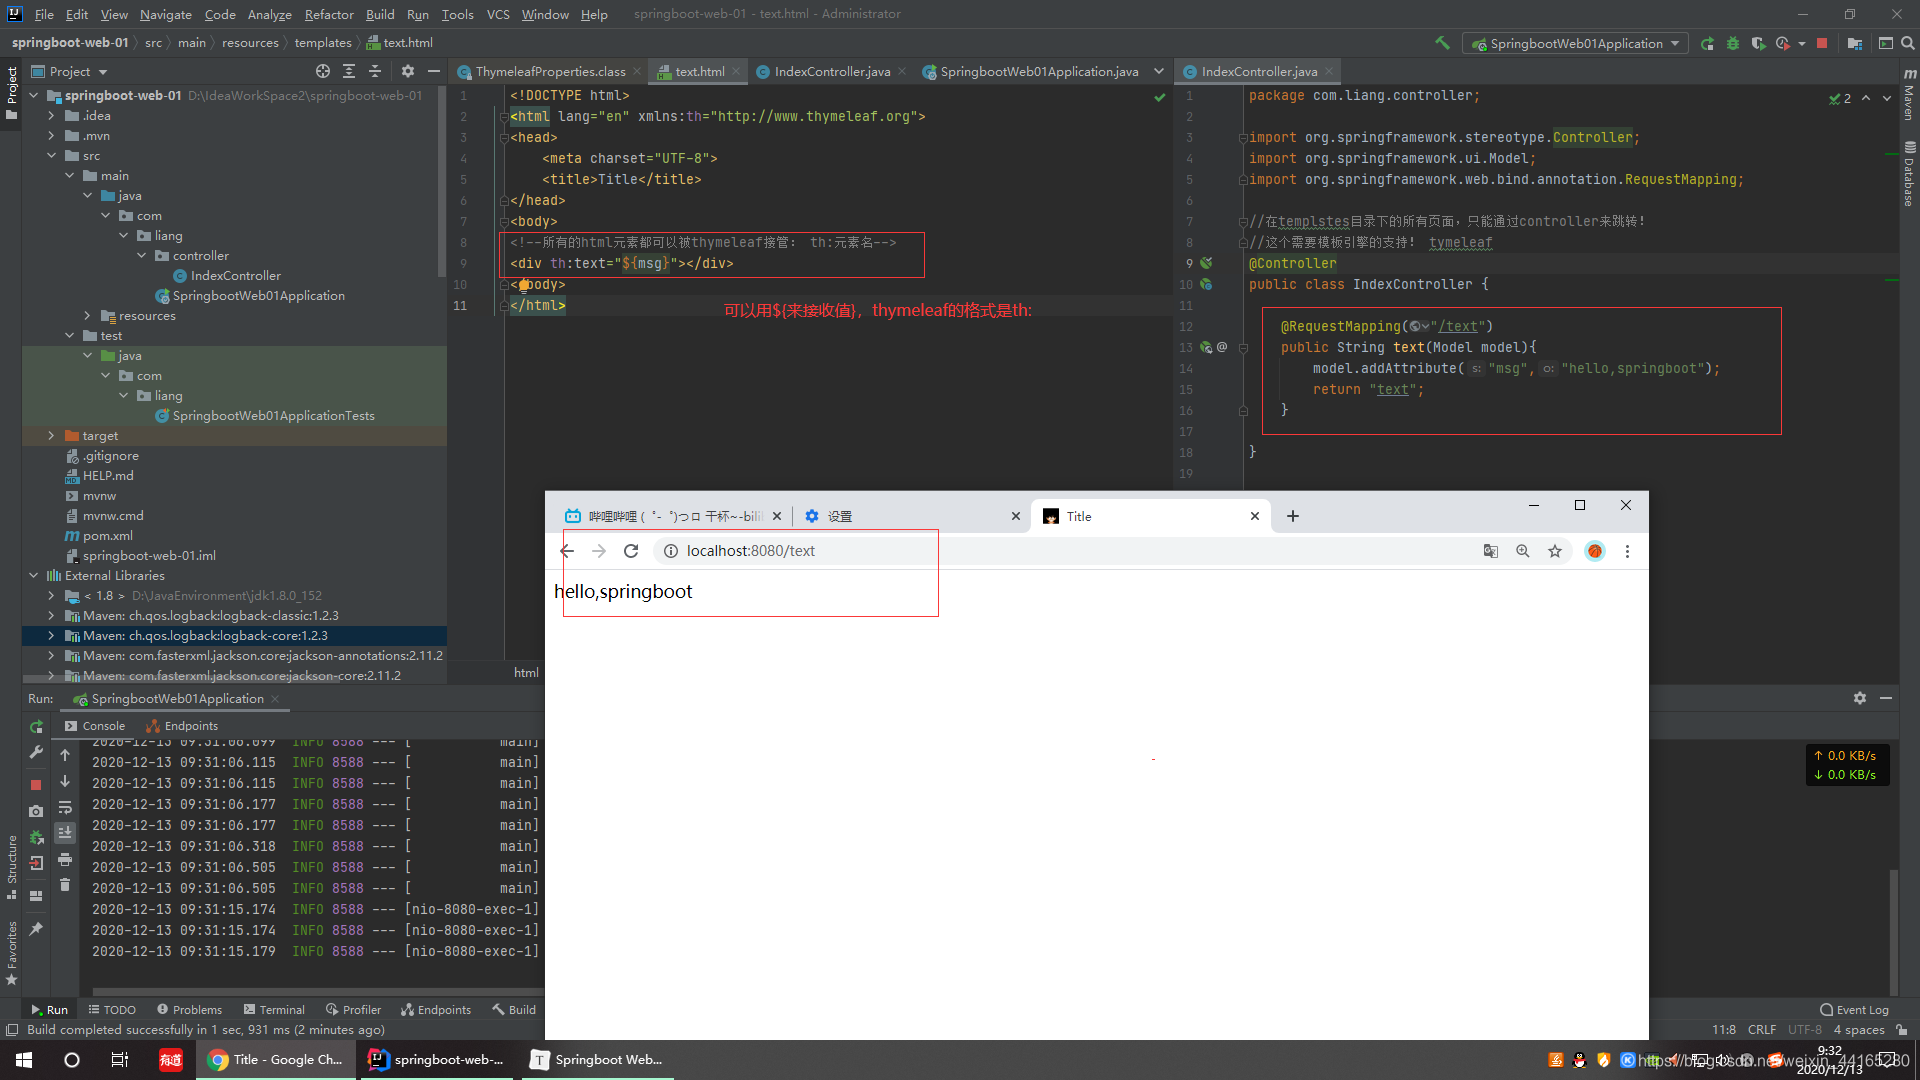
5.使用模板引擎后,可以直接从后端跳转到前段页面
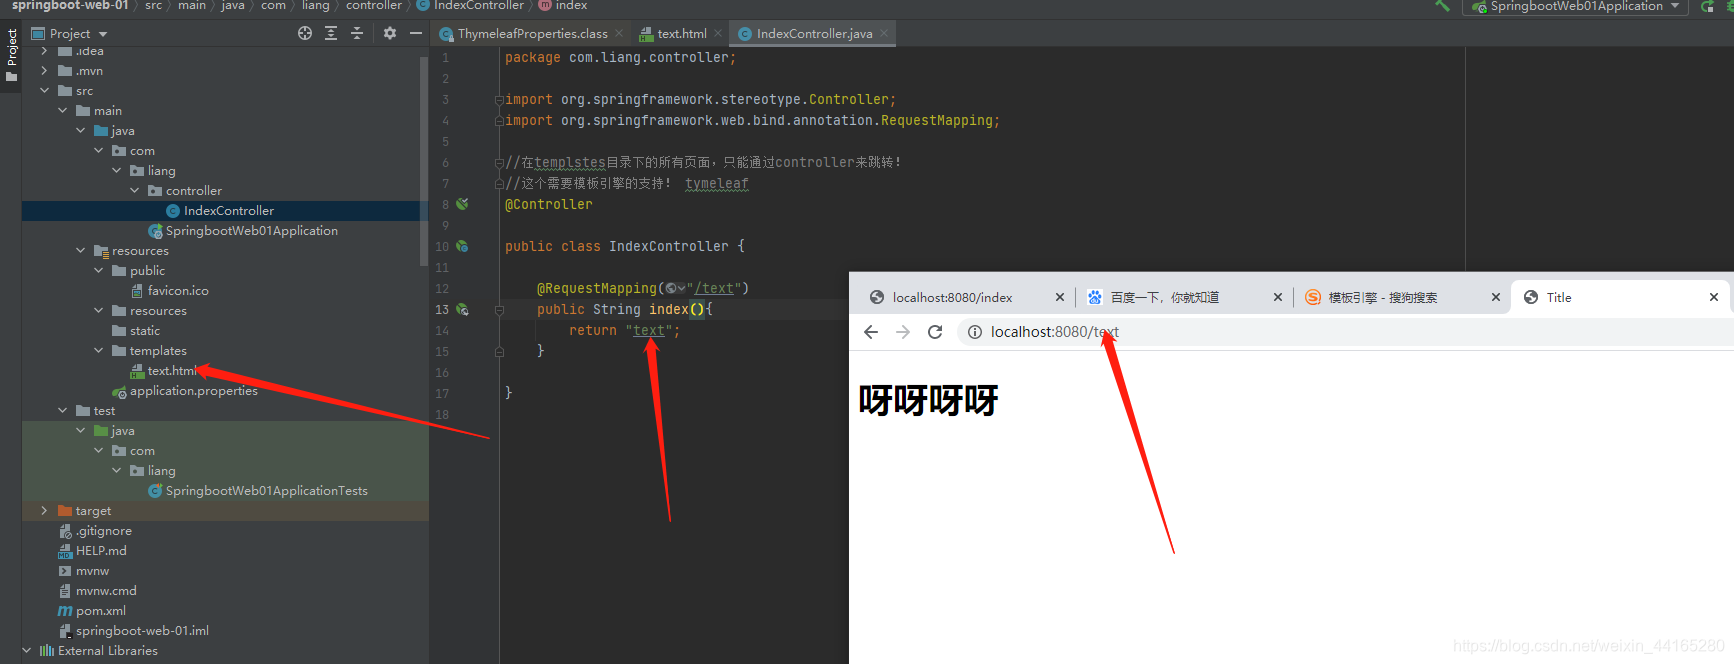
结论:只要需要使用thymeleaf,只需要导入对应得依赖就可以了!版本一定要对 我现在是30.11
导入后我们将html放在templates目录下即可!
  public static final String DEFAULT_PREFIX = "classpath:/templates/";
    public static final String DEFAULT_SUFFIX = ".html";
扩展springmvc
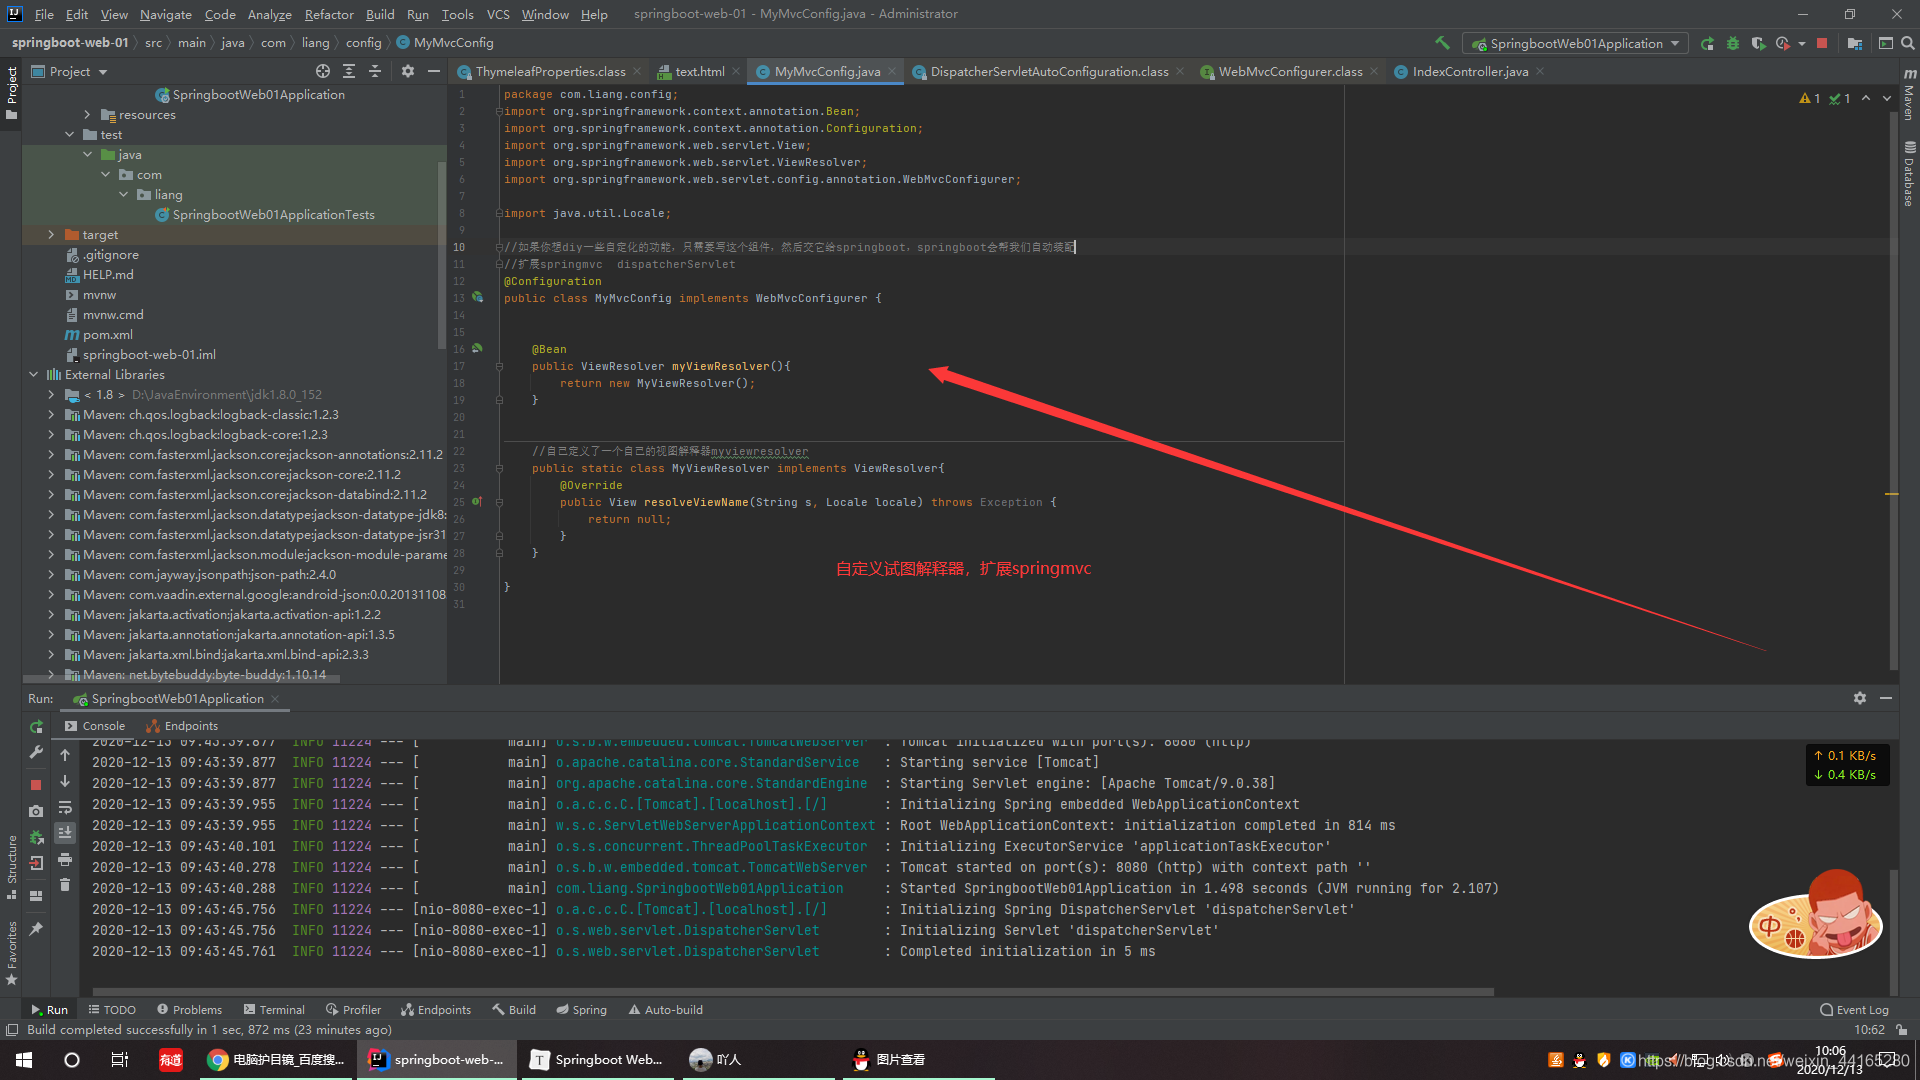
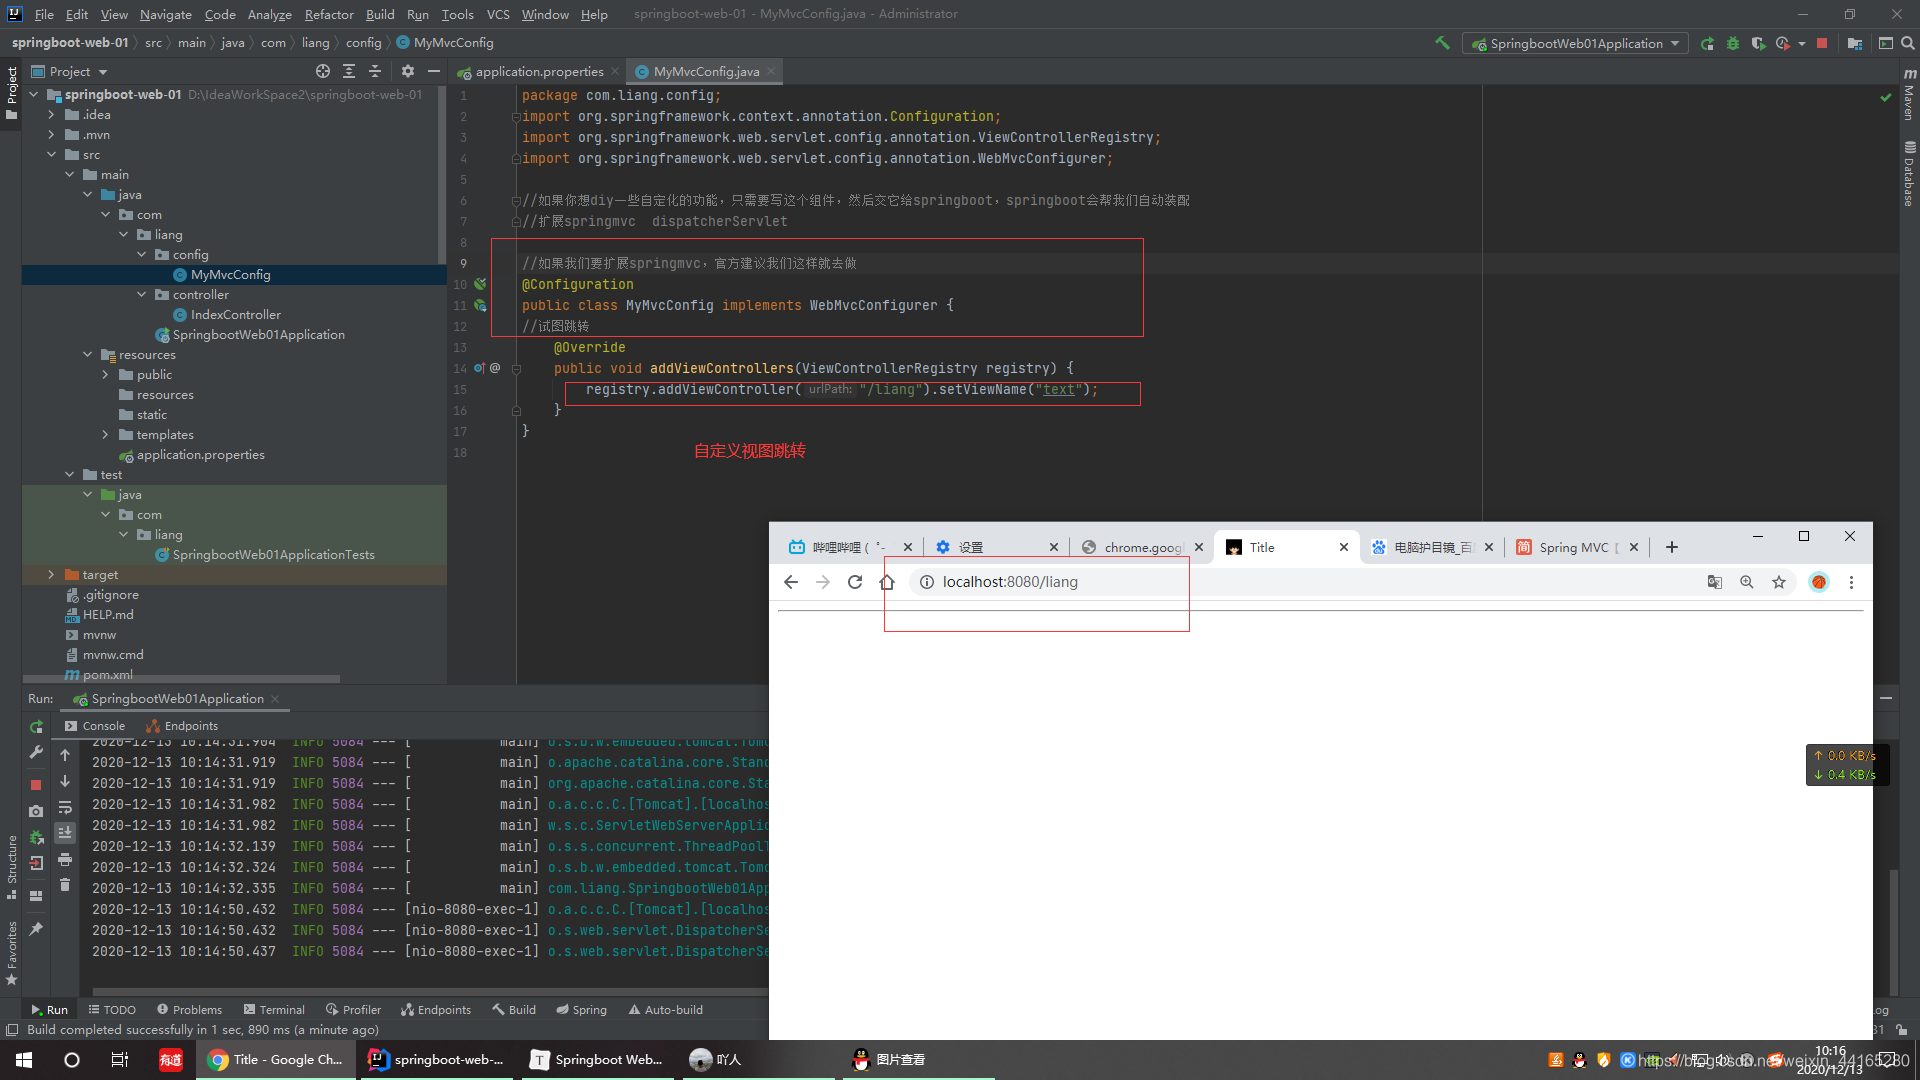
自定义springmvc视图跳转,扩展springmvc
总结:在springboot中,有非常多的xxxx configuration 帮助我们进行扩展配置,只要看到这个,就要注意了!!
1.要使用thymeleaf模板
首先第一步引入xmlns:th=“http://www.thymeleaf.org”
第二步把所有链接href前面加上 th: 然后用@{}接收值 :type=“text/css” th:href="@{/css/bootstrap.min.css}
所有页面都要改哦
导入命名空间使其thymeleaf语法生效

@{}只包含到css就好
#关闭模板引擎的缓存
spring.thymeleaf.cache=false
清除浏览器缓存
3.登录+拦截器
1.登录,定义一个LoginController
package com.liang.controller;

import org.springframework.stereotype.Controller;
import org.springframework.ui.Model;
import org.springframework.web.bind.annotation.RequestMapping;
import org.springframework.web.bind.annotation.RequestParam;
import org.thymeleaf.util.StringUtils;

import javax.servlet.http.HttpSession;

@Controller
//controller的登录页面
public class LoginController {

    @RequestMapping("/user/login")
    public String login(
            @RequestParam("username") String username,
            @RequestParam("password") String password,
            Model model, HttpSession session){ //model是返回视图
        //具体的业务
        if (StringUtils.isEmpty(username) && "123456".equals(password)){
            session.setAttribute("loginUser", username);
            return "redirect:main.html";//返回一个主页面
        }else {
            //告诉用户,你登录失败了!
            model.addAttribute("msg","用户名错误或者密码错误!");
        return "index";
        }
    }
}
2.首先在config定义一个拦截器
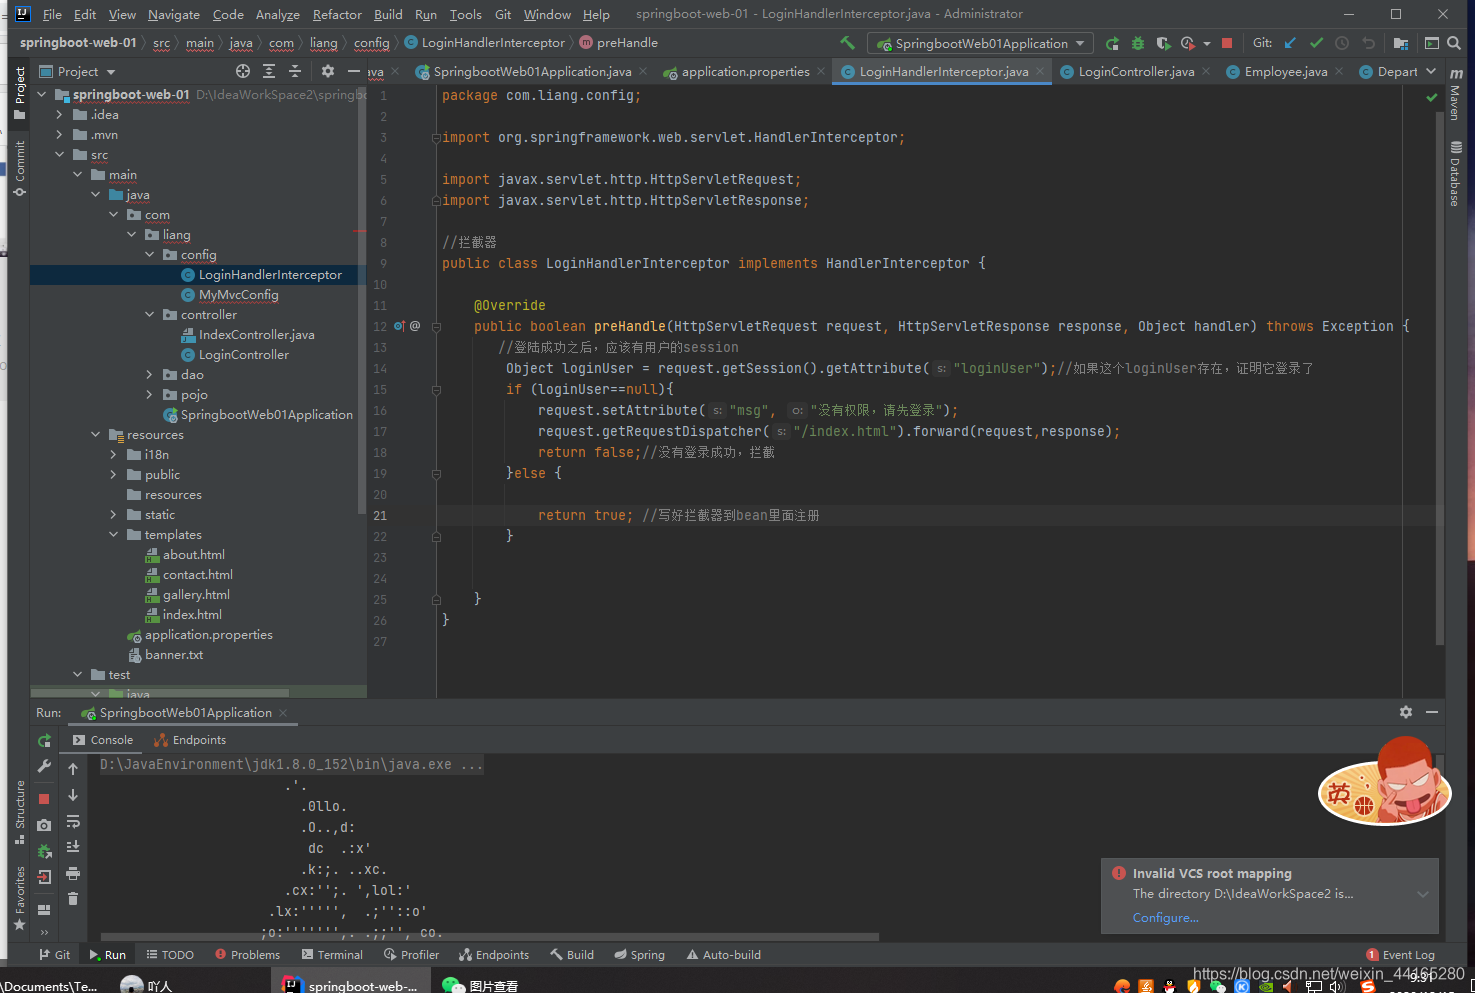
package com.liang.config;

import org.springframework.web.servlet.HandlerInterceptor;

import javax.servlet.http.HttpServletRequest;
import javax.servlet.http.HttpServletResponse;

//拦截器
public class LoginHandlerInterceptor implements HandlerInterceptor {

    @Override
    public boolean preHandle(HttpServletRequest request, HttpServletResponse response, Object handler) throws Exception {
       //登陆成功之后,应该有用户的session
        Object loginUser = request.getSession().getAttribute("loginUser");//如果这个loginUser存在,证明它登录了
        if (loginUser==null){
            request.setAttribute("msg", "没有权限,请先登录");
            request.getRequestDispatcher("/index.html").forward(request,response);
            return false;//没有登录成功,拦截
        }else {

            return true; //写好拦截器到bean里面注册
        }


    }
}
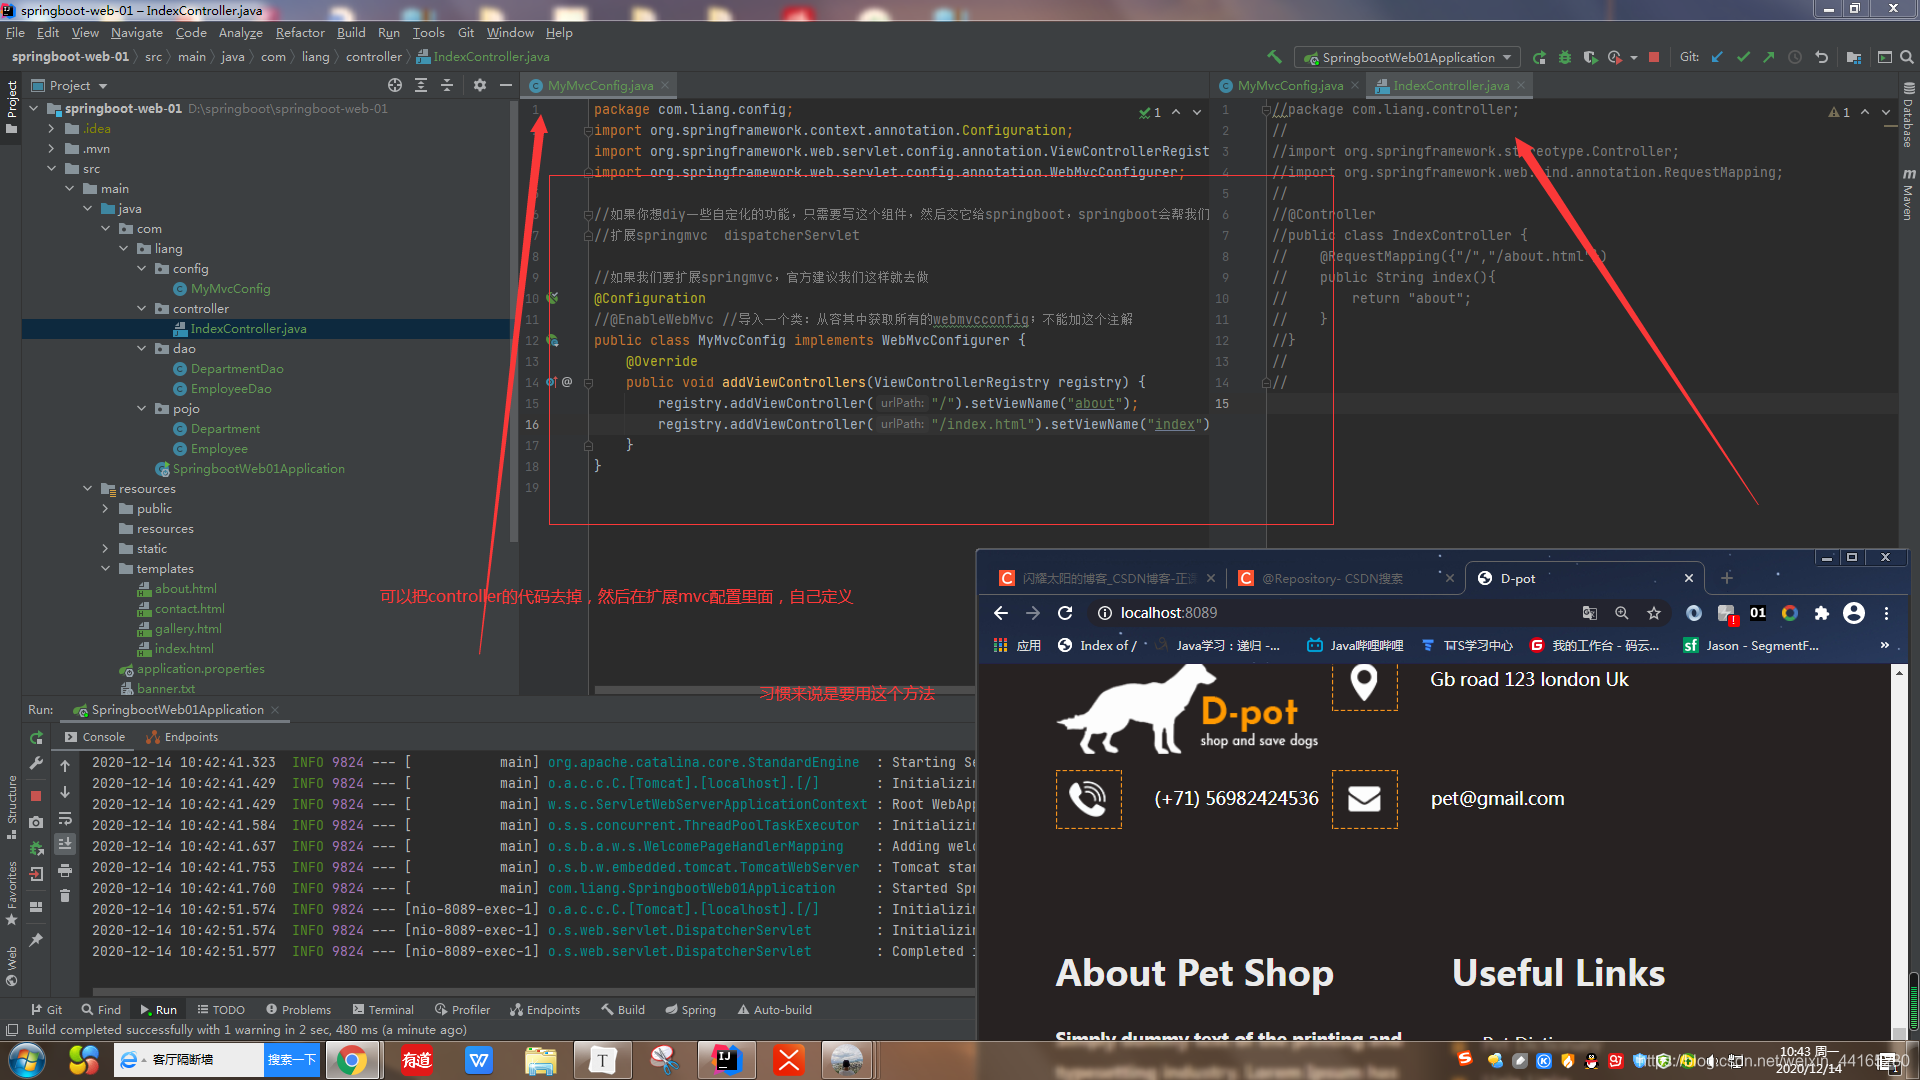
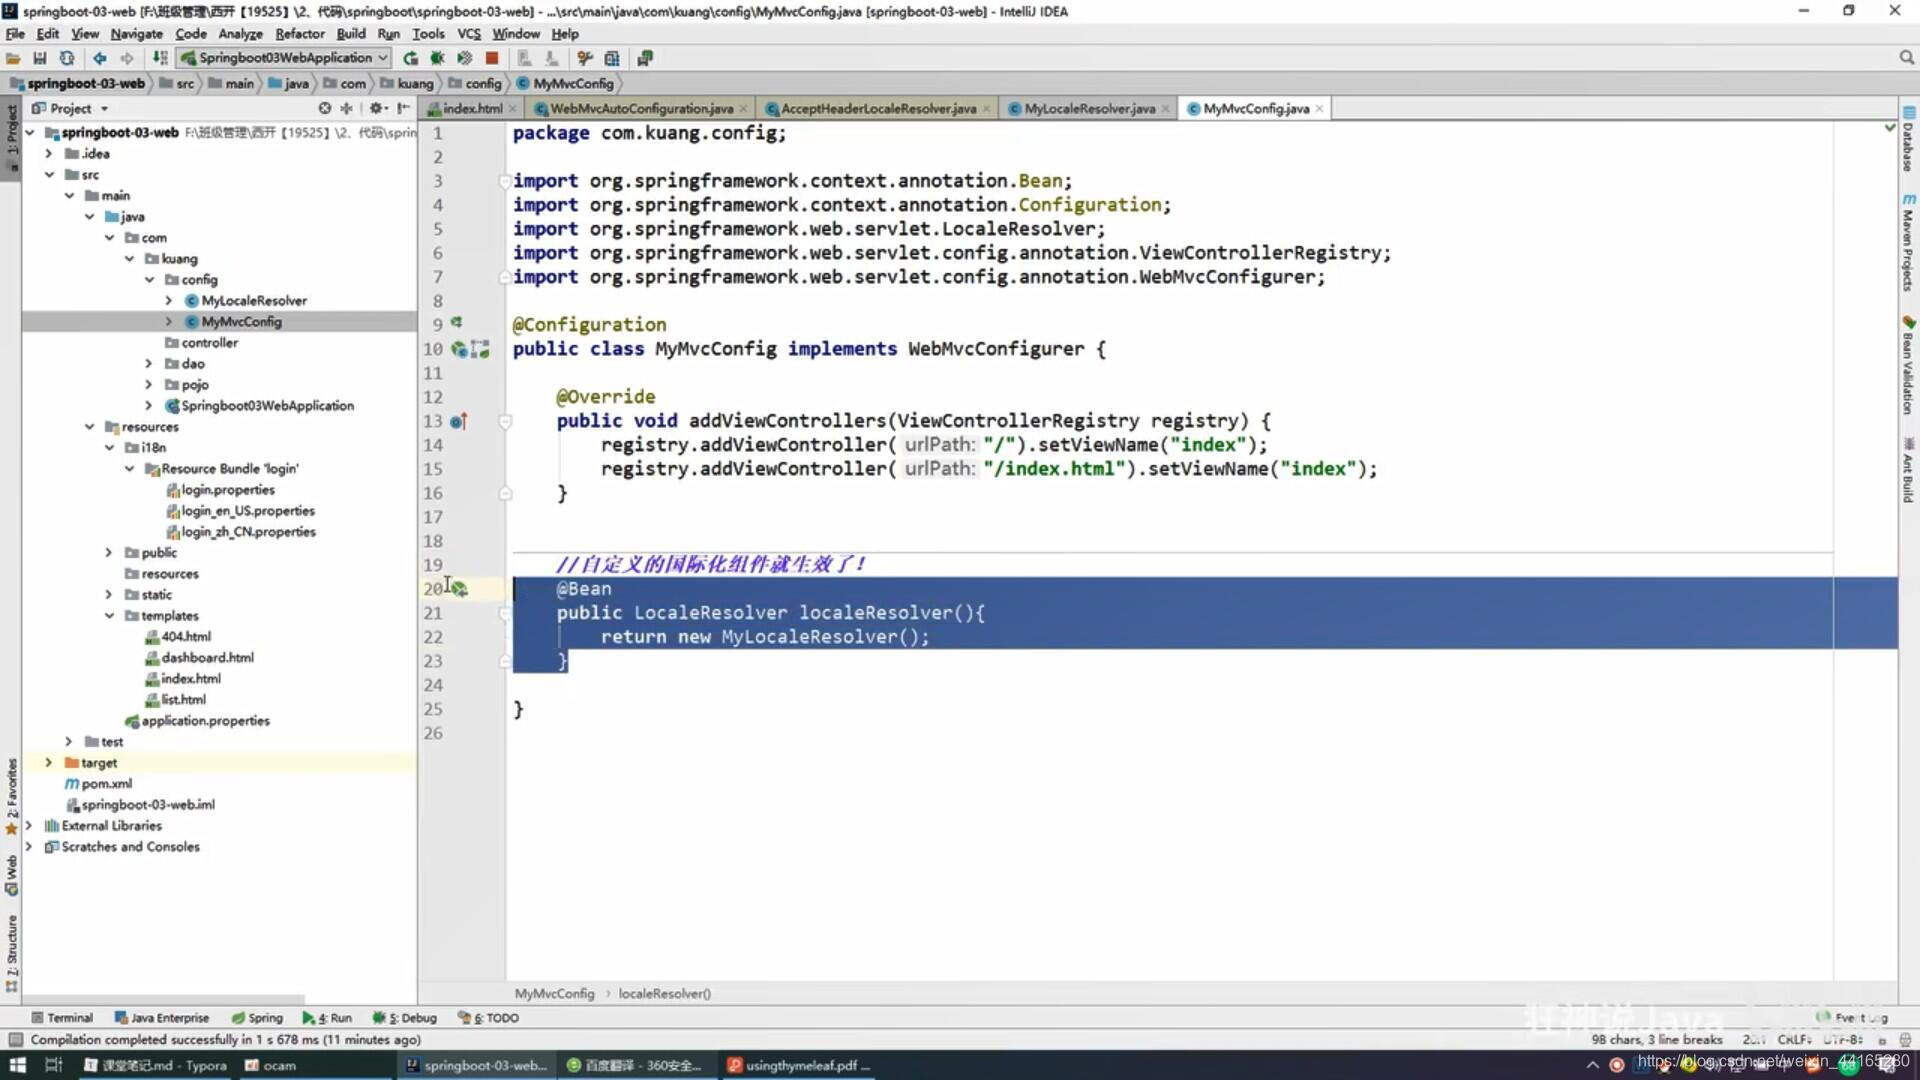
2.在mvc配置类中将其加入spring容器中
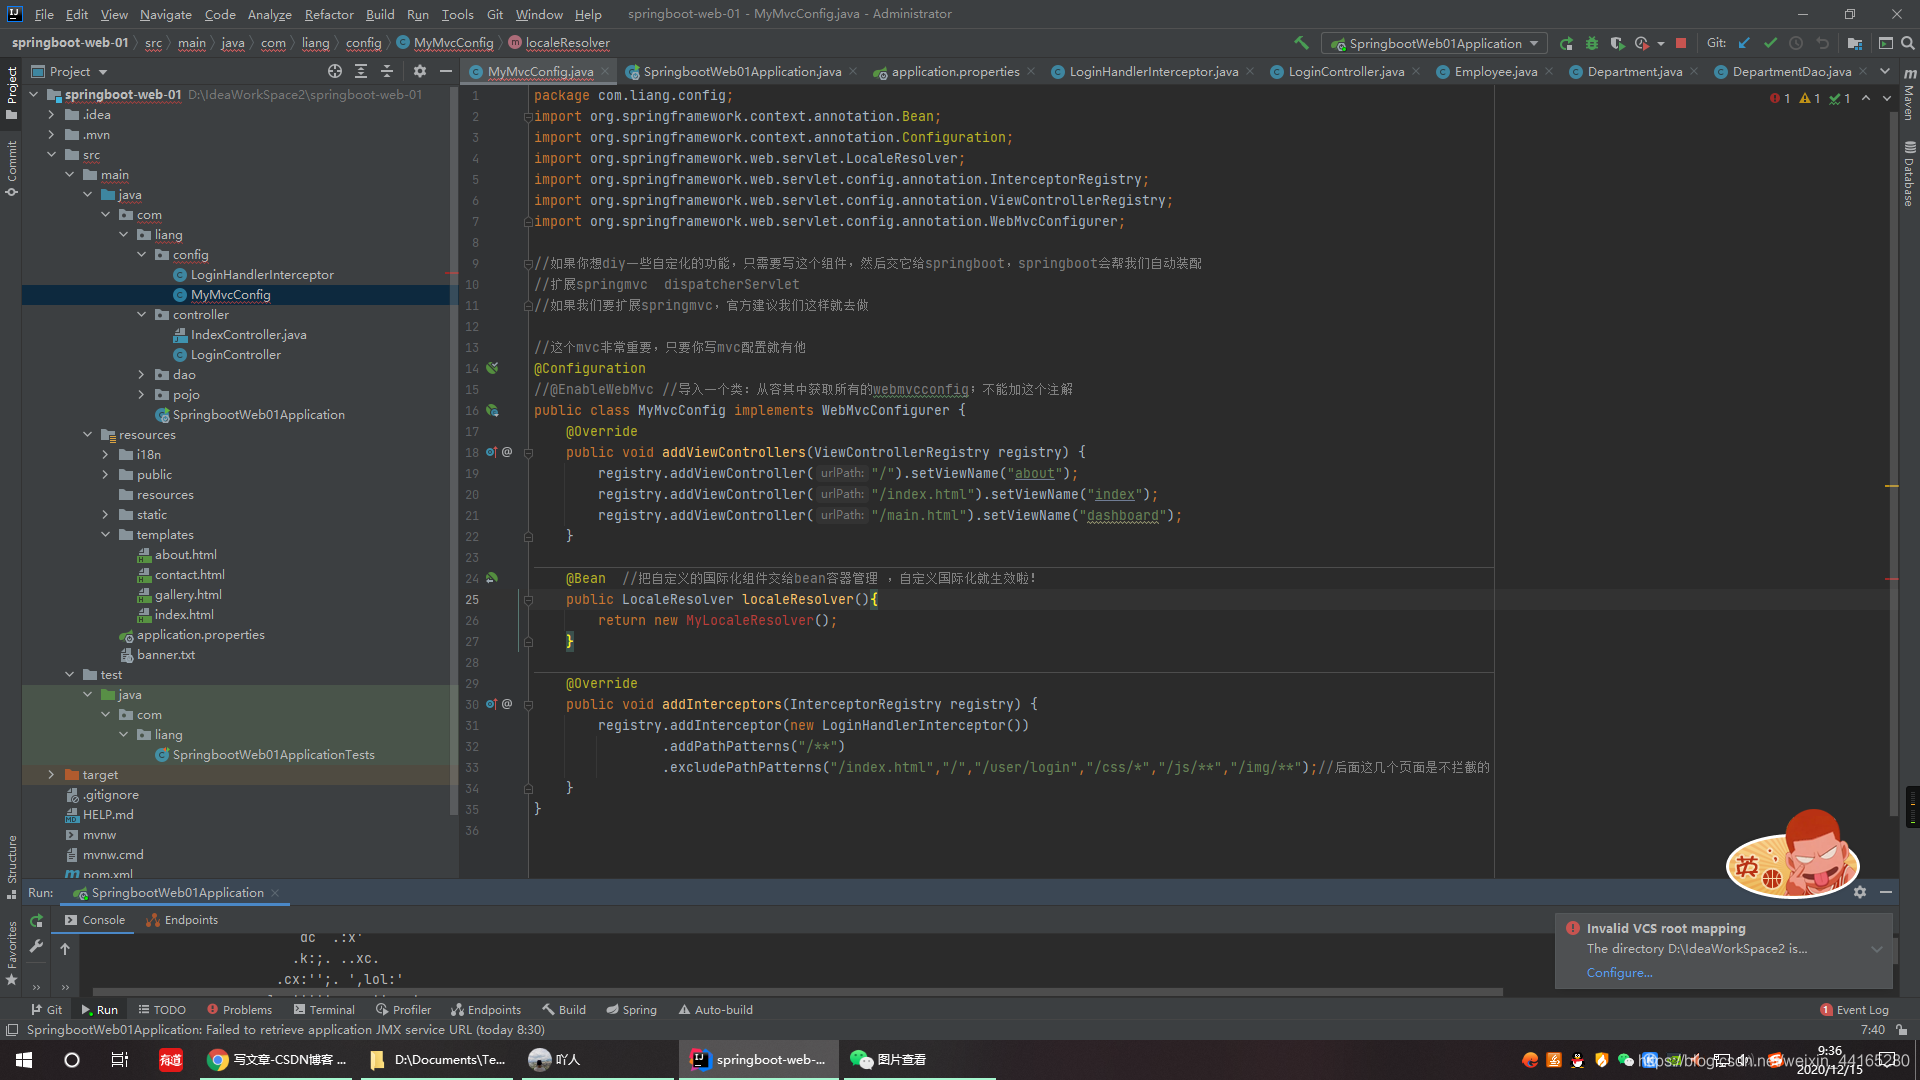
package com.liang.config;
import org.springframework.context.annotation.Bean;
import org.springframework.context.annotation.Configuration;
import org.springframework.web.servlet.LocaleResolver;
import org.springframework.web.servlet.config.annotation.InterceptorRegistry;
import org.springframework.web.servlet.config.annotation.ViewControllerRegistry;
import org.springframework.web.servlet.config.annotation.WebMvcConfigurer;

//如果你想diy一些自定化的功能,只需要写这个组件,然后交它给springboot,springboot会帮我们自动装配
//扩展springmvc  dispatcherServlet
//如果我们要扩展springmvc,官方建议我们这样就去做

//这个mvc非常重要,只要你写mvc配置就有他
@Configuration
//@EnableWebMvc //导入一个类:从容其中获取所有的webmvcconfig;不能加这个注解
public class MyMvcConfig implements WebMvcConfigurer {
    @Override
    public void addViewControllers(ViewControllerRegistry registry) {
        registry.addViewController("/").setViewName("about");
        registry.addViewController("/index.html").setViewName("index");
        registry.addViewController("/main.html").setViewName("dashboard");
    }

    @Bean  //把自定义的国际化组件交给bean容器管理 ,自定义国际化就生效啦!
    public LocaleResolver localeResolver(){
        return new MyLocaleResolver();
    }

    @Override
    public void addInterceptors(InterceptorRegistry registry) {
        registry.addInterceptor(new LoginHandlerInterceptor())
                .addPathPatterns("/**")
                .excludePathPatterns("/index.html","/","/user/login","/css/*","/js/**","/img/**");//后面这几个页面是不拦截的
    }
}
4.员工列表展示
1.提取公共页面
1.1 th:fragment=‘sidebar’
1.2
1.3 如果要传递参数,可以直接使用()传参,接收判断即可!
2.列表循环展示
3.添加员工
3.1按钮提交
3.2跳转到添加页面
3.3添加员工成功
3.4返回首页
可以去bootstrap找需要的组件来自己改,比如表单
使用resultful风格,使用get请求先拿到值,在使用post请求添加按钮,提交表达,两个同时存在,谨记 写代码的时候,先写好逻辑测试ok后,再继续写具体逻辑代码下一步,不然直接写完肯定会出bug就很麻烦了,
传参数Mmodel model可以回显参数


 363
363


 到【灌水乐园】发言


