


@SpringBootApplication:主程序注解,目的是开启自动配置,在*Application类的上方
@SpringBootApplication=(默认)@Configuration+@EnableAutoConfiguration+@ComponentScan
package com.zcy.springbootproject;
import org.springframework.boot.SpringApplication;
import org.springframework.boot.autoconfigure.SpringBootApplication;
//入口类
@SpringBootApplication   //主程序注解
public class SpringbootprojectApplication {
    public static void main(String[] args) {
        SpringApplication.run(SpringbootprojectApplication.class, args);
    }
}
@Controller:@Controller用于标记在一个类上,使用它标记的类就是一个SpringMvc Controller对象,分发处理器会扫描使用该注解的类的方法,并检测该方法是否使用了@RequestMapping注解
package com.zcy.springbootproject.controller;
import org.springframework.stereotype.Controller;
import org.springframework.web.bind.annotation.RequestMapping;
@Controller
public class ViewController {
    @RequestMapping("/view")// url:http://localhost:8080/view
    public String view(){
        return "view.html";
    }
}
如果不加后缀,需要在application.properties中配置以下内容
spring.mvc.view.prefix=/
spring.mvc.view.suffix=.html
@RequestMapping:用来映射URL,可用在类定义处和方法定义处。
类定义处:规定初步的请求映射,相对于web应用的根目录
方法定义处:进一步细分请求映射,相对于类定义处的URL,如果类定义处没有使用该注解,则方法标记的URL相对于根目录而言
ModelAndView:有两个作用,其一,用于设置转向地址;其二,用于传递控制方法除了结果数据到结果页面,也就是说把我们需要在结果页面上需要的数据放到ModelAndView对象中即可。
public ModelAndView data(){
    ModelAndView modelAndView=new ModelAndView();
    modelAndView.setViewName(PAGE);//设置转向位置
    //将结果页面上需要的数据放到ModelAndView对象中
    modelAndView.addObject("str1","I'm HelloWorle");
    modelAndView.addObject("str2","I'am SpringBoot");
    return modelAndView;
}

<div>${str1}</div>//在HTML文件中通过键的形式的变量获取ModelAndView对象中的值
<br>
<div>${str2}</div>
小案例:在页面添加数据
package com.zcy.springbootproject.controller;
import org.springframework.stereotype.Controller;
import org.springframework.web.bind.annotation.RequestMapping;
import org.springframework.web.servlet.ModelAndView;
@Controller
public class ViewController {
    public static final String PAGE="view";//共有的静态常量
    @RequestMapping("/view")// url:http://localhost:8080/view
    public String view(){
        return PAGE;
    }
    @RequestMapping("/data")
    public ModelAndView data(){
        ModelAndView modelAndView=new ModelAndView(PAGE);
        modelAndView.addObject("str1","I'm HelloWorle");
        modelAndView.addObject("str2","I'am SpringBoot");
        return modelAndView;
    }
}
添加模板引擎
<dependency>
    <groupId>org.springframework.boot</groupId>
    <artifactId>spring-boot-starter-freemarker</artifactId>
</dependency>
在application.properties文件中添加配置
//freemarker配置
spring.freemarker.suffix=.html
spring.freemarker.template-loader-path=classpath:/static/
@RequestParam:将请求的参数绑定到你控制器的方法参数上(是springmvc接收普通参数的注解)
package com.zcy.springbootproject.controller;
import org.springframework.stereotype.Controller;
import org.springframework.web.bind.annotation.RequestMapping;
import org.springframework.web.bind.annotation.RequestParam;
import org.springframework.web.servlet.ModelAndView;
@Controller
public class ParamsController {
    public static final String P="param";
    @RequestMapping("/param")
    public ModelAndView param(@RequestParam("id") int id){
        System.out.println("id="+id);
        ModelAndView modelAndView=new ModelAndView(P);
        modelAndView.addObject("id",id);
        return modelAndView;
    }
}
HTML文件中传入参数:
<h2>${id}</h2>
在网页中输入时代入id参数,即可在界面中得到所传入的参数
http://localhost:8080/param?id=10
可以在@RequestParam()中添加默认参数,防止在输入url中不带参数时报错问题
@RequestParam(value=“id”,defaultValue = “0”)
传递多个参数,直接多加@RequestParam(“type”) int type,用逗号分隔开即可
@PathVariable:接收请求路径中占位符的值
package com.zcy.springbootproject.controller;
import org.springframework.stereotype.Controller;
import org.springframework.web.bind.annotation.PathVariable;
import org.springframework.web.bind.annotation.RequestMapping;
import org.springframework.web.bind.annotation.RequestParam;
import org.springframework.web.servlet.ModelAndView;
@Controller
public class ParamsController {
    public static final String P="param";
    @RequestMapping("/path/{id}/{type}")
    public ModelAndView path(@PathVariable(required = false,value = "id") int id,
                              @PathVariable(required = false,value = "type") int type
    ){
        System.out.println("id="+id);
        System.out.println("type="+type);
        ModelAndView modelAndView=new ModelAndView(P);
        modelAndView.addObject("id",id);
        modelAndView.addObject("type",type);
        return modelAndView;
    }
}
HTML文件中的配置
<!DOCTYPE html>
<html lang="en">
<head>
    <meta charset="UTF-8">
    <title>视图页面</title>
</head>
<body>
<div>视图页面</div>
<br>
<div>${str1}</div>
<br>
<div>${str2}</div>
</body>
</html>
在网页中输入对应的路径即可显示
http://localhost:8080/path/12/12
@RestController:获取请求中的各种数据。返回的是输出结果,如json,是提供前端获取数据、提交数据,需要结合@RequsetMapping、@GetMapping、@PostMapping使用。
package com.zcy.springbootproject.controller;
import org.springframework.web.bind.annotation.GetMapping;
import org.springframework.web.bind.annotation.RequestMapping;
import org.springframework.web.bind.annotation.RestController;
@RestController
@RequestMapping("rest")
public class RestFullController {
    @GetMapping("get")
    public String get(){
        return "I'm here";
    }
}
浏览器中输入即可显示:http://localhost:8080/rest/get
package com.zcy.springbootproject.controller;
import com.zcy.springbootproject.entity.User;
import org.springframework.web.bind.annotation.GetMapping;
import org.springframework.web.bind.annotation.PathVariable;
import org.springframework.web.bind.annotation.RequestMapping;
import org.springframework.web.bind.annotation.RestController;
@RestController
@RequestMapping("rest")
public class RestFullController {
    @GetMapping("get")
    public User get(){
        User user=new User(1,"张三","男",25);
        return user;
    }
    @GetMapping("get/{id}")
    public User getById(@PathVariable("id") int id){
        User user1= new User(id,"getById","gril",22);
        System.out.println("getById"+user1);
        return user1;
    }
}
@GetMapping:用于将HTTP GET请求映射到特定处理程序方法的注释;
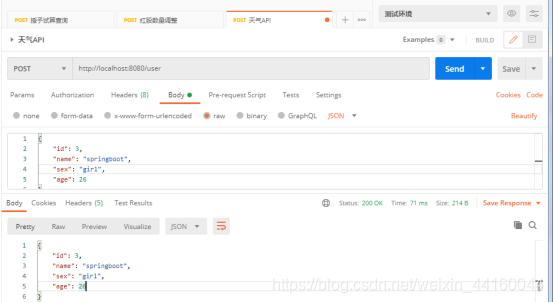
@PostMapping:用于将HTTP POST请求映射到特定处理程序方法的注释,@PostMapping需要与@RequestBody注解一起使用。
package com.zcy.springbootproject.controller;
import com.zcy.springbootproject.entity.User;
import org.springframework.web.bind.annotation.*;
@RestController
@RequestMapping("user")
public class UserController {
//查询数据,不带参数
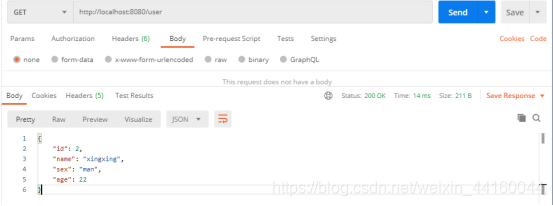
@GetMapping
public User get() {
User user = new User(2, "xingxing", "man", 22);
return user;
}
//新增数据
@PostMapping
public User addUser(@RequestBody User user){
System.out.println(user);
return user;
}
}
在postman上进行测试:
get方式
@RestController相当于@Controller+ReponseBody,实现效果相同
package com.zcy.springbootproject.controller;
import com.zcy.springbootproject.entity.User;
import org.springframework.stereotype.Controller;
import org.springframework.web.bind.annotation.GetMapping;
import org.springframework.web.bind.annotation.ResponseBody;
@Controller
public class User1Controller {
    @GetMapping("param/user1")
    @ResponseBody
    public User getUser1(){
        System.out.println("now,we used controller+responsebody");
        User user1=new User(9999,"李四","男",22);
        System.out.println(user1);
        return user1;
    }
}
如果不一起使用,会出现找不到页面的情况。
小案例:通过类实现接口中的方法的调用
创建一个UserService接口
package com.zcy.springbootproject.service;
import com.zcy.springbootproject.entity.User;
public interface UserService {
    public User get();
    public User getById(int id);
}
定义UserService接口实现类UserServiceImpl
package com.zcy.springbootproject.service;
import com.zcy.springbootproject.entity.User;
public class UserServiceImpl implements UserService {
    @Override
    public User get(){
        User user=new User(222,"张三","男",33);
        System.out.println(user);
        return user;
    }
    @Override
    public User getById(@PathVariable("id") int id){
        User user=new User(id,"getById","男",23);
        return user;
    }
}
定义实体类
package com.zcy.springbootproject.controller;
import com.zcy.springbootproject.entity.User;
import com.zcy.springbootproject.service.UserService;
import com.zcy.springbootproject.service.UserServiceImpl;
import org.springframework.beans.factory.annotation.Autowired;
import org.springframework.stereotype.Controller;
import org.springframework.web.bind.annotation.CrossOrigin;
import org.springframework.web.bind.annotation.GetMapping;
import org.springframework.web.bind.annotation.PathVariable;
import org.springframework.web.bind.annotation.ResponseBody;
@Controller
public class UseractionCtroller {
    private UserService userService;
    @GetMapping("action")
    @ResponseBody
    public User getUser1(){
        userService=new UserServiceImpl();
        return userService.get();
    }
    @GetMapping("{id}")
    @ResponseBody
    public User getById(@PathVariable("id") int id){
        userService=new UserServiceImpl();
        return userService.getById(id);
    }
}
此案例通过@Service和@Autowired实现
接口类:
package com.zcy.springbootproject.service;
import com.zcy.springbootproject.entity.User;
public interface UserService {
    public User get();
    public User getById(int id);
}
实现接口类
package com.zcy.springbootproject.service;
import com.zcy.springbootproject.entity.User;
import org.springframework.stereotype.Service;
import org.springframework.web.bind.annotation.PathVariable;
@Service
public class UserServiceImpl implements UserService {
    @Override
    public User get(){
        User user=new User(222,"张三","男",33);
        System.out.println(user);
        return user;
    }
    @Override
    public User getById(@PathVariable("id") int id){
        User user=new User(id,"getById","男",23);
        return user;
    }
}
实体类
package com.zcy.springbootproject.controller;
import com.zcy.springbootproject.entity.User;
import com.zcy.springbootproject.service.UserService;
import com.zcy.springbootproject.service.UserServiceImpl;
import org.springframework.beans.factory.annotation.Autowired;
import org.springframework.stereotype.Controller;
import org.springframework.web.bind.annotation.CrossOrigin;
import org.springframework.web.bind.annotation.GetMapping;
import org.springframework.web.bind.annotation.PathVariable;
import org.springframework.web.bind.annotation.ResponseBody;
@Controller
public class UseractionCtroller {
    @Autowired
    private UserService userService;
    @GetMapping("action")
    @ResponseBody
    public User getUser1(){
        //userService=new UserServiceImpl();
        return userService.get();
    }
    @GetMapping("{id}")
    @ResponseBody
    public User getById(@PathVariable("id") int id){
        //userService=new UserServiceImpl();
        return userService.getById(id);
    }
}
@CrossOrigin:用于解决跨域问题。
@Service:bean注册
@Component:bean注册
@Autowired:获取bean
@Resource:获取bean
@Autowired + @Qualifier:获取bean
@Configuration+@Bean:bean注册(人为)
@Values:从配置文件中取参数
@Component和@Service实现功能相同;
java–mapper.xml中常用SQL标签
<!--查询用户信息-->
<select id="getUserInfo" resultType="com.zcy.springbootmybatis.SpringbootMybatis.entity.User">
    select * from user where id = #{id}
</select>
<!--删除用户信息-->
<delete id="deleteById" parameterType="int">
    delete from user where id=#{id}
</delete>
<!--根据id更改用户信息-->
<update id="update" parameterType="com.zcy.springbootmybatis.SpringbootMybatis.entity.User">
    update user
    <set >
        <if test="userName != null" >
            userName = #{userName,jdbcType=VARCHAR},
        </if>
        <if test="passWord != null" >
            passWord = #{passWord,jdbcType=VARCHAR},
        </if>
        <if test="realName != null" >
            realName = #{realName,jdbcType=VARCHAR},
        </if>
    </set>
    where id = #{id,jdbcType=INTEGER}
</update>
id=“xxxx”,表示此段SQL执行语句的唯一标识,也是接口的方法名称【必须一致才能找到】
parameterType=“xxxx” 表示SQL语句中需要传入的参数,类型要与对应的接口方法的类型一致
resultType=“xxxx”,定义出参,匹配普通Java类型或自定义的类型【出参类型若不指定,将为语句类型默认类型,如语句返回值为int】
if标签用法:
<select id="listProduct" resultType="Product">
    select * from product_
    <if test="name!=null">
        where name like concat('%',#{name},'%')
    </if>
</select>
where标签:作用,标签会进行自动判断,如果任何条件都不成立,那么就在sql语句里不会出现where关键字;如果有任何条件成立,会自动调多出来的and或者or(就不需要我们追加1=1之类的入侵性代码了)。
<select id="listProduct" resultType="Product">
    select * from product_
    <where>
        <if test="name!=null">
            and name like concat('%',#{name},'%')
        </if>
        <if test="price!=null and price!=0">
            and price > #{price}
        </if>
    </where>
</select>
set标签与where标签类似,在update语句中会碰到多个字段相关问题,这种情况下可以使用set标签
<update id="update" parameterType="com.zcy.springbootmybatis.SpringbootMybatis.entity.User">
    update user
    <set >
        <if test="userName != null" >
            userName = #{userName,jdbcType=VARCHAR},
        </if>
        <if test="passWord != null" >
            passWord = #{passWord,jdbcType=VARCHAR},
        </if>
        <if test="realName != null" >
            realName = #{realName,jdbcType=VARCHAR},
        </if>
    </set>
    where id = #{id,jdbcType=INTEGER}
</update>
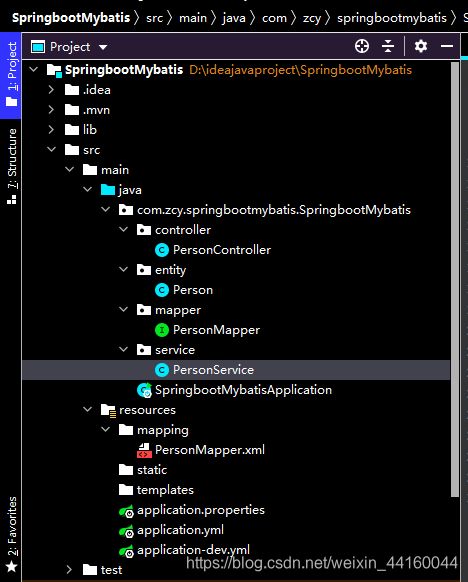
利用SpringBoot+MyBatis实现增删改查功能
项目目录
设计数据库表
CREATE TABLE `person` (
	`id` int(32) NOT NULL AUTO_INCREMENT,
  `pname` varchar(10) DEFAULT NULL,
  `sex` varchar(10) DEFAULT NULL,
  `age` int(10) DEFAULT NULL,
  `address` varchar(10) DEFAULT NULL,
	PRIMARY KEY (`id`)
) ENGINE=InnoDB DEFAULT CHARSET=utf8;
在entity文件夹下创建Person的实体类,定义id、name、sec、age、address变量及其setter和getter方法及toString()方法的重写
package com.zcy.springbootmybatis.SpringbootMybatis.entity;
public class Person {
    private int id;
    private String name;
    private String sex;
    private int age;
    private String address;

    public int getId() {
        return id;
    }

    public void setId(int id) {
        this.id = id;
    }

    public String getName() {
        return name;
    }

    public void setName(String name) {
        this.name = name;
    }

    public String getSex() {
        return sex;
    }

    public void setSex(String sex) {
        this.sex = sex;
    }

    public int getAge() {
        return age;
    }

    public void setAge(int age) {
        this.age = age;
    }

    public String getAddress() {
        return address;
    }

    public void setAddress(String address) {
        this.address = address;
    }

    @Override
    public String toString() {
        return "Person{" +
                "id=" + id +
                ", name='" + name + '\'' +
                ", sex='" + sex + '\'' +
                ", age=" + age +
                ", address='" + address + '\'' +
                '}';
    }
}
在mapper文件夹下创建PersonMapper接口,定义数据库中数据的增删改查抽象方法
package com.zcy.springbootmybatis.SpringbootMybatis.mapper;
import com.zcy.springbootmybatis.SpringbootMybatis.entity.Person;
import java.util.List;
@Repository//在接口中如果不使用该注解,在实现接口类中会提示找不到这个bean,可以用@Resource代替@Autowired
//这是因为该注解的作用不只是将类识别为Bean,同时它还能将所标注的类中抛出的数据访问异常封装为 Spring 的数据访问异常类型。
//Spring本身提供了一个丰富的并且是与具体的数据访问技术无关的数据访问异常结构,用于封装不同的持久层框架抛出的异常,使得异常独立于底层的框架。
public interface PersonMapper {
    //根据id查询用户信息
    Person getPersonInfo(int id);
    //新增用户信息
    int save(Person person);
    //修改用户信息
    int update(Person person);
    //删除用户信息
    int deleteById(int id);
    //查询所有用户信息
    List<Person> selectAll();
}
在service文件夹下创建PersonService类实现PersonMapper接口,重写接口中的方法
package com.zcy.springbootmybatis.SpringbootMybatis.service;
import com.zcy.springbootmybatis.SpringbootMybatis.entity.Person;
import com.zcy.springbootmybatis.SpringbootMybatis.mapper.PersonMapper;
import org.springframework.beans.factory.annotation.Autowired;
import org.springframework.stereotype.Service;
import javax.annotation.Resource;
import java.util.List;
@Service
public class PersonService {
    @Autowired
    private PersonMapper personMapper;
    public Person getPersonInfo(int id){
        return  personMapper.getPersonInfo(id);
    }
    public Person save(Person person){
        int save=personMapper.save(person);
        return person;
    }
    public int update(Person person){
        return personMapper.update(person);
    }
    public int deleteById(int id){
        return personMapper.deleteById(id);
    }
    public List<Person> selectAll(){
        return personMapper.selectAll();
    }
}
然后在控制层增PersonController类
package com.zcy.springbootmybatis.SpringbootMybatis.controller;

import com.zcy.springbootmybatis.SpringbootMybatis.entity.Person;
import com.zcy.springbootmybatis.SpringbootMybatis.service.PersonService;
import org.springframework.beans.factory.annotation.Autowired;
import org.springframework.web.bind.annotation.*;
import javax.annotation.Resource;
import java.util.List;

@RestController
@RequestMapping("/test")
public class PersonController {
    @Autowired
    private PersonService personService;
    //根据id获取用户的信息
    @RequestMapping(value = "/getPerson/{id}",method = RequestMethod.GET)
    public String getPerson(@PathVariable int id){
        return personService.getPersonInfo(id).toString();
    }
    //新增用户
    @RequestMapping(value = "/insert" ,method = RequestMethod.POST)
    public Person insert(Person person){
        return personService.save(person);
    }
    //修改用户信息
    @RequestMapping(value = "/update",method = RequestMethod.POST)
    public String update(Person person){
        int result= personService.update(person);
        if(result>=1){
            return "修改成功";
        }
        else {
            return "修改失败";
        }
    }
    //根据id删除用户信息
    @RequestMapping(value = "/delete",method = RequestMethod.GET)
    public String delete(int id){
        int result=personService.deleteById(id);
        if(result>=1){
            return "删除成功";
        }
        else {
            return "删除失败";
        }
    }
    //查询所有用户信息
    @RequestMapping(value = "/selectAll",method = RequestMethod.GET)
    @ResponseBody   //@ResponseBody:将方法的返回值,以特定格式写入到response的body区域,进而将数据返回给客户端
    public List<Person> ListPerson(){
        return personService.selectAll();
    }
}
配置PersonMapper.xml文件
<?xml version="1.0" encoding="UTF-8"?>
<!DOCTYPE mapper PUBLIC "-//mybatis.org//DTD Mapper 3.0//EN" "http://mybatis.org/dtd/mybatis-3-mapper.dtd">
<mapper namespace="com.zcy.springbootmybatis.SpringbootMybatis.mapper.PersonMapper">
    <resultMap id="GetPersonMap" type="com.zcy.springbootmybatis.SpringbootMybatis.entity.Person">
        <result column="id" jdbcType="INTEGER" property="id" />
        <result column="name" jdbcType="VARCHAR" property="name" />
        <result column="sex" jdbcType="VARCHAR" property="sex" />
        <result column="age" jdbcType="INTEGER" property="age" />
        <result column="address" jdbcType="VARCHAR" property="address" />
    </resultMap>
    <!--查询用户信息-->
    <select id="getPersonInfo" resultType="com.zcy.springbootmybatis.SpringbootMybatis.entity.Person">
        select * from person where id = #{id}
    </select>
    <!--删除用户信息-->
    <delete id="deleteById" parameterType="int">
        delete from person where id=#{id}
    </delete>
    <!--返回所有用户信息-->
    <select id="selectAll"  resultType="com.zcy.springbootmybatis.SpringbootMybatis.entity.Person">
        select * from person
    </select>

    <!--增加用户信息-->
    <insert id="save" parameterType="com.zcy.springbootmybatis.SpringbootMybatis.entity.Person" >
        insert into person
        <trim prefix="(" suffix=")" suffixOverrides="," >
            <if test="id != null" >
                id,
            </if>
            <if test="pname != null" >
                pname,
            </if>
            <if test="sex != null" >
                sex,
            </if>

            <if test="age != null" >
                age,
            </if>
            <if test="address != null" >
                address,
            </if>
        </trim>
        <trim prefix="values (" suffix=")" suffixOverrides="," >
            <if test="id != null" >
                #{id,jdbcType=INTEGER},
            </if>
            <if test="pname != null" >
                #{pname,jdbcType=VARCHAR},
            </if>
            <if test="sex != null" >
                #{sex,jdbcType=VARCHAR},
            </if>
            <if test="age != null" >
                #{age,jdbcType=INTEGER},
            </if>
            <if test="address != null" >
                #{address,jdbcType=VARCHAR},
            </if>
        </trim>
    </insert>
    <!--根据id更改用户信息-->
    <update id="update" parameterType="com.zcy.springbootmybatis.SpringbootMybatis.entity.Person">
        update person
        <set >
            <if test="pname != null" >
                pname = #{pname,jdbcType=VARCHAR},
            </if>
            <if test="sex != null" >
                sex = #{sex,jdbcType=VARCHAR},
            </if>
            <if test="age != null">
                age=#{age,jdbcType=INTEGER},
            </if>
            <if test="address != null" >
                address = #{address,jdbcType=VARCHAR},
            </if>
        </set>
        where id = #{id,jdbcType=INTEGER}
    </update>
</mapper>
在postman上调用接口执行即可:在数据库中存在以下数据
通过id查询id为1的person的数据信息
修改id=1的person的数据信息
刷新后数据库中的信息发生改变
插入新Person数据
查看数据库信息
查询所有用户的信息
删除person表中id为1的客户的信息
成功删除


 1万+
1万+

 被折叠的 条评论
为什么被折叠?
被折叠的 条评论
为什么被折叠?
 到【灌水乐园】发言


