


https://github.com/j2kun/mlir-tutorial
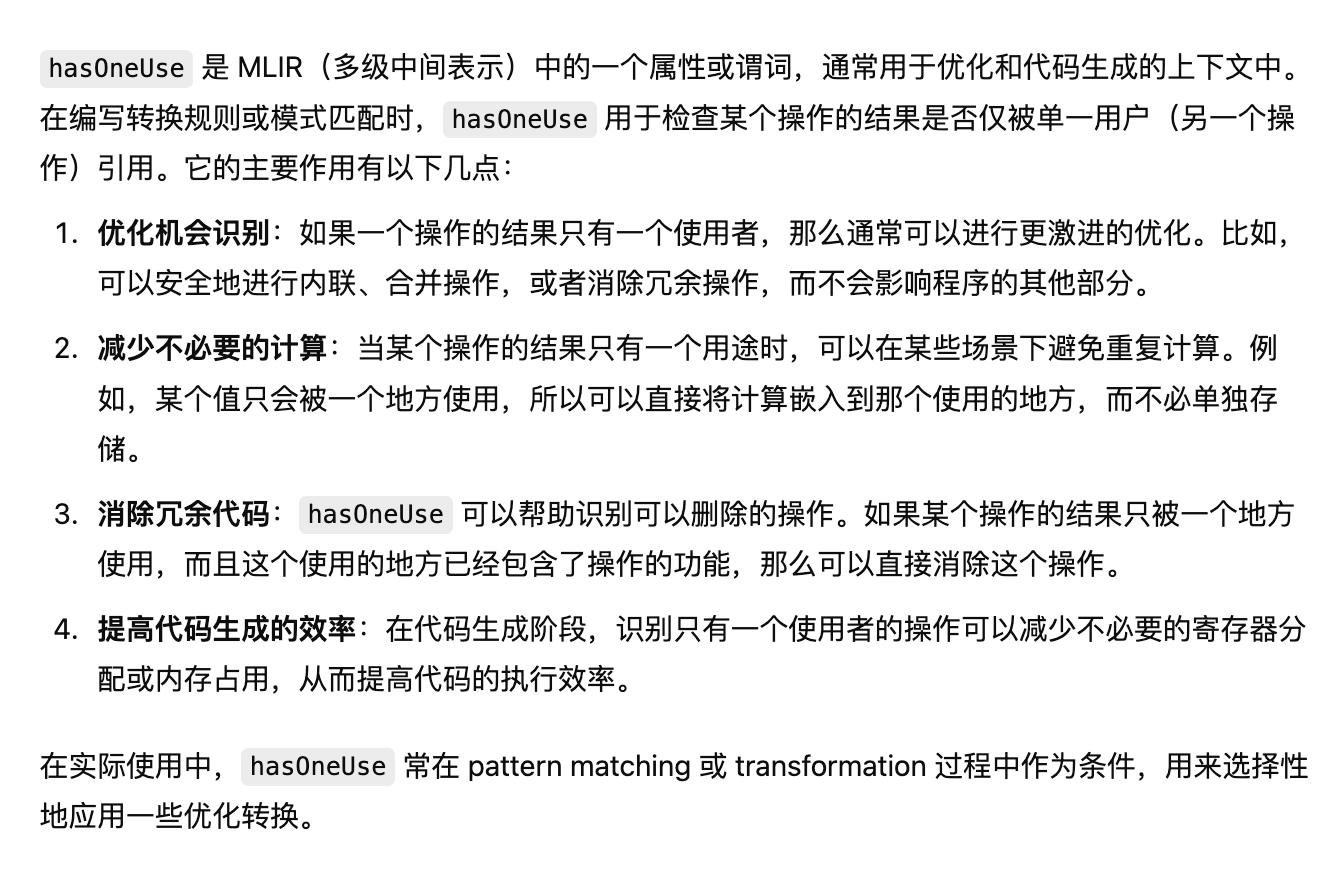
学习这个项目
https://www.jeremykun.com/2023/08/10/mlir-getting-started/
get start
用我的mac编译一下试试看
然后遇到架构不对的问题
因为他的提交默认是x86
https://github.com/j2kun/mlir-tutorial/pull/1/commits/5a267e269d579da0b4ee90f3c7452017fea1ec28#diff-5493ff8e9397811510e780de47c57abb70137f1afe85d1519130dc3679d60ce5
而我的是AARCH64,在这个链接可以看到所有的_LLVM_TARGETS
https://forums.gentoo.org/viewtopic-p-8776988.html?sid=12f4b13276660e37d4bfafa765d54ef3
然后就可以编译成功了
命令是
https://github.com/j2kun/mlir-tutorial.git
git reset --hard 60cfbe01804aa5c157d56a9fb9370521d18f5578
然后修改bazel/setup_llvm.bzl
里面的_LLVM_TARGETS改成AARCH64
bazel build @llvm-project//mlir:IR
bazel build @llvm-project//mlir/...:all
bazel run @llvm-project//mlir:mlir-opt -- --help
第二篇
// 定义一个函数 main,接收一个 i32 类型的参数 arg0,并返回一个 i32 类型的值
func.func @main(%arg0: i32) -> i32 {
  // 调用函数 my_ctlz,传递参数 arg0,返回值存储在 %0 中
  %0 = func.call @my_ctlz(%arg0) : (i32) -> i32
  // 返回 %0 作为结果
  func.return %0 : i32
}

// 定义函数 my_ctlz,计算前导零的数量,接收一个 i32 类型的参数 arg0,并返回一个 i32 类型的值
func.func @my_ctlz(%arg0: i32) -> i32 {
  // 定义常量 32 和 0,都是 i32 类型
  %c32_i32 = arith.constant 32 : i32
  %c0_i32 = arith.constant 0 : i32

  // 比较 arg0 是否等于 0,结果存储在 %0 中
  %0 = arith.cmpi eq, %arg0, %c0_i32 : i32

  // 如果 arg0 等于 0,返回常量 32,表示 32 个前导零
  %1 = scf.if %0 -> (i32) {
    scf.yield %c32_i32 : i32
  } else {
    // 否则,进入循环逻辑
    // 定义一些常量:1 (index类型),1 (i32类型),32 (index类型),0 (i32类型)
    %c1 = arith.constant 1 : index
    %c1_i32 = arith.constant 1 : i32
    %c32 = arith.constant 32 : index
    %c0_i32_0 = arith.constant 0 : i32

    // 使用 for 循环,从 1 到 32,每次步进 1
    // 迭代参数为 %arg2 (初始值为 arg0),%arg3 (初始值为 0),返回 i32 和 i32 类型的结果
    %2:2 = scf.for %arg1 = %c1 to %c32 step %c1 iter_args(%arg2 = %arg0, %arg3 = %c0_i32_0) -> (i32, i32) {

      // 比较 arg2 是否为负数(即左移后是否变为负数)
      %3 = arith.cmpi slt, %arg2, %c0_i32 : i32

      // 如果 %arg2 为负数,终止循环并返回当前 %arg2 和 %arg3
      %4:2 = scf.if %3 -> (i32, i32) {
        scf.yield %arg2, %arg3 : i32, i32
      } else {
        // 否则,更新 %arg3(即前导零的数量加 1)
        %5 = arith.addi %arg3, %c1_i32 : i32
        // 同时将 %arg2 左移 1 位
        %6 = arith.shli %arg2, %c1_i32 : i32
        // 返回更新后的 %arg2 和 %arg3
        scf.yield %6, %5 : i32, i32
      }

      // 循环结束时,返回当前的 %arg2 和 %arg3
      scf.yield %4#0, %4#1 : i32, i32
    }

    // 返回前导零的计数,即循环中 %2#1 的值
    scf.yield %2#1 : i32
  }
  // 返回结果 %1
  func.return %1 : i32
}
这是ctlz的一个实现,是mlir-opt自动生成的,从
module {
  func.func @main(%arg0: i32) -> i32 {
    %0 = math.ctlz %arg0 : i32
    return %0 : i32
  }
}
生成的
git reset --hard 1b4cf45ca0f095c66fc22fd3adc8feaf2da67af2
不要用苹果电脑,会报x86的codegen错误
bazel安装还是挺简单的
只需要看这个https://ym9omojhd5.feishu.cn/wiki/Hrw0wazfCitLGgky6pfc8pMgnbg
软件包下这个https://mirrors.huaweicloud.com/bazel/6.3.2/bazel-6.3.2-linux-x86_64
chmod一下就可以食用了
然后export一下就可以快速使用
然后在mlir-tutorial下使用
bazel test //tests:all
或者
bazel test //tests:ctlz.mlir.test
搞了我好久才弄懂
如果把mlir-tutorial/tests/ctlz_simple.mlir
改成
// RUN: mlir-opt %s --convert-math-to-funcs=convert-ctlz | FileCheck %s

func.func @main(%arg0: i32) -> i32 {
  // CHECK: call
  // CHECK: foo
  // CHECK: return
  %0 = math.ctlz %arg0 : i32
  func.return %0 : i32
}
再执行bazel test //tests:ctlz_simple.mlir.test
就会报错

ctlz_runner.mlir文件是对功能进行测试
// RUN: mlir-opt %s \
// RUN:   -pass-pipeline="builtin.module( \
// RUN:      convert-math-to-funcs{convert-ctlz}, \
// RUN:      func.func(convert-scf-to-cf,convert-arith-to-llvm), \
// RUN:      convert-func-to-llvm, \
// RUN:      convert-cf-to-llvm, \
// RUN:      reconcile-unrealized-casts)" \
// RUN: | mlir-cpu-runner -e test_7i32_to_29 -entry-point-result=i32 > %t
// RUN: FileCheck %s --check-prefix=CHECK_TEST_7i32_TO_29 < %t

func.func @test_7i32_to_29() -> i32 {
  %arg = arith.constant 7 : i32
  %0 = math.ctlz %arg : i32
  func.return %0 : i32
}
// CHECK_TEST_7i32_TO_29: 29


// RUN: mlir-opt %s \
// RUN:   -pass-pipeline="builtin.module( \
// RUN:      convert-math-to-funcs{convert-ctlz}, \
// RUN:      func.func(convert-scf-to-cf,convert-arith-to-llvm), \
// RUN:      convert-func-to-llvm, \
// RUN:      convert-cf-to-llvm, \
// RUN:      reconcile-unrealized-casts)" \
// RUN: | mlir-cpu-runner -e test_7i64_to_61 -entry-point-result=i64 > %t
// RUN:  FileCheck %s --check-prefix=CHECK_TEST_7i64_TO_61 < %t
func.func @test_7i64_to_61() -> i64 {
  %arg = arith.constant 7 : i64
  %0 = math.ctlz %arg : i64
  func.return %0 : i64
}
// CHECK_TEST_7i64_TO_61: 61
这里的mlir经过了多级下降成为llvm,最后使用mlir-cpu-runner运行起来
里面测试了32位的7的ctlz的结果是29
64位的ctlz的7结果是61
第三篇
79fa49ecc0790aecc
这个commit下
执行
bazel run tools:tutorial-opt -- --help
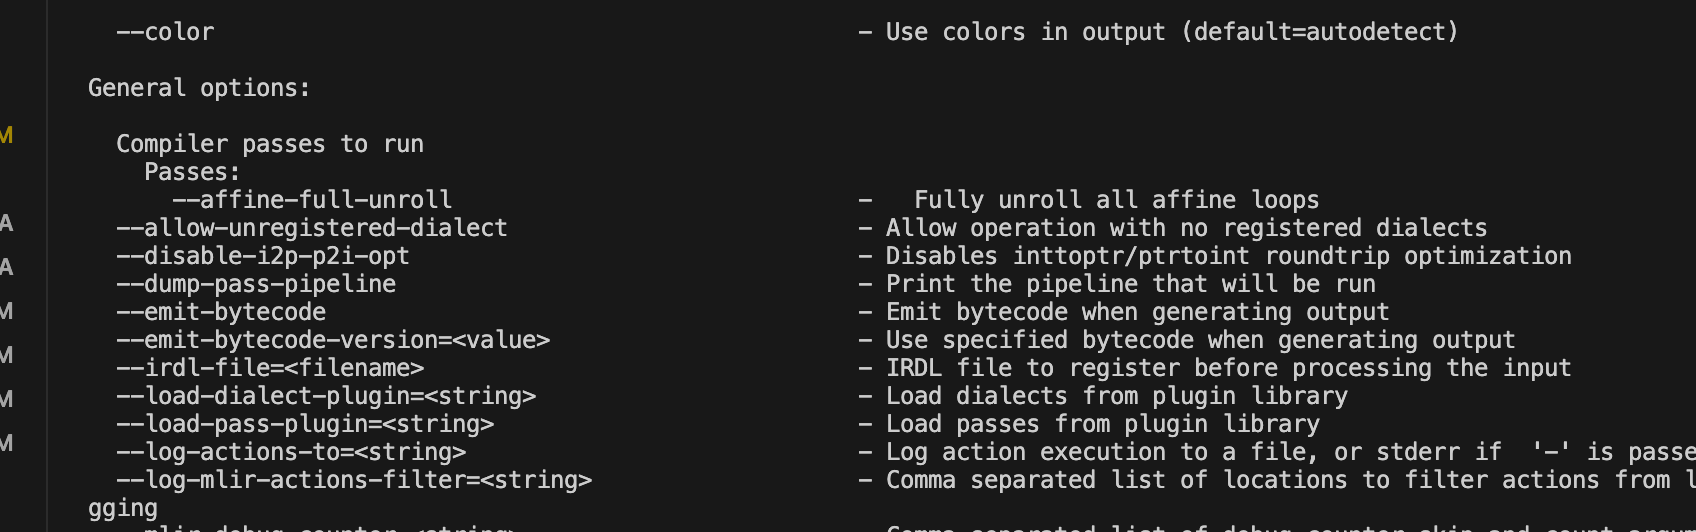
这个就是lib/Transform/Affine/AffineFullUnroll.h
里面写的getArgument和getDescription方法
8a699456fb3cafb02418
这个commit添加了一个断言
// RUN: tutorial-opt %s --affine-full-unroll > %t
// RUN: FileCheck %s < %t

func.func @test_single_nested_loop(%buffer: memref<4xi32>) -> (i32) {
  %sum_0 = arith.constant 0 : i32
  // CHECK-NOT: affine.for
  %sum = affine.for %i = 0 to 4 iter_args(%sum_iter = %sum_0) -> i32 {
    %t = affine.load %buffer[%i] : memref<4xi32>
    %sum_next = arith.addi %sum_iter, %t : i32
    affine.yield %sum_next : i32
  }
  return %sum : i32
}
bazel test //tests:affine_loop_unroll.mlir.test
用这句就可以测试fail

26b712539bd
这个commit补充了runOnOperation的方法
执行
bazel run tools:tutorial-opt – --affine-full-unroll < tests/affine_loop_unroll.mlir
就可以把这个mlir的for展开了
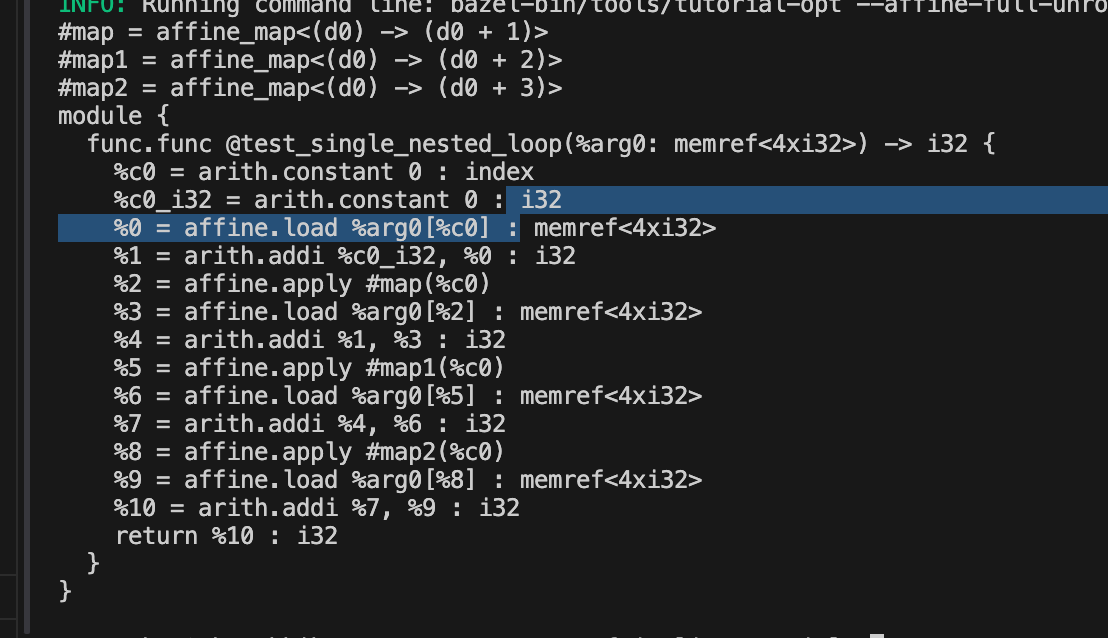
那什么时候循环展开会失败呢
useradd -m wrf
cp /root/.bashrc /home/wrf/.bashrc && chown wrf:wrf /home/wrf/.bashrc
su wrf
bash
chmod -R 775 /mnt/user/wurongfei/.cache
chown -R wrf:wrf /mnt/user/wurongfei/.cache
chmod -R 775 /mnt/user/wurongfei/mlir-tutorial/
chown -R wrf:wrf /mnt/user/wurongfei/mlir-tutorial/
vim ~/.bazelrc
startup --output_user_root=/mnt/user/wurongfei/.cache
sudo
bazel run tools:tutorial-opt – --help
这是root下新建用户的方法
d25d2615b06
这个commit实现了使用td文件来自动生成
bazel run tools:tutorial-opt – --affine-full-unroll < tests/affine_loop_unroll.mlir
第五篇 定义一个新的dialect
06ec7640c1694f
bazel run tools:tutorial-opt – --help
添加了一个空dialect。poly
就会有poly这个dialect了
wrf@nb-e34hra7kkjk0-0:/mnt/user/wurongfei/mlir-tutorial$ bazel run tools:tutorial-opt -- --help
INFO: Analyzed target //tools:tutorial-opt (2 packages loaded, 12 targets configured).
INFO: Found 1 target...
Target //tools:tutorial-opt up-to-date:
  bazel-bin/tools/tutorial-opt
INFO: Elapsed time: 67.358s, Critical Path: 66.66s
INFO: 7 processes: 2 internal, 5 processwrapper-sandbox.
INFO: Build completed successfully, 7 total actions
INFO: Running command line: bazel-bin/tools/tutorial-opt --help
OVERVIEW: Tutorial Pass Driver
Available Dialects: acc, affine, amdgpu, amx, arith, arm_neon, arm_sve, async, bufferization, builtin, cf, complex, dlti, emitc, func, gpu, index, irdl, linalg, llvm, math, memref, ml_program, nvgpu, nvvm, omp, pdl, pdl_interp, poly, quant, rocdl, scf, shape, sparse_tensor, spirv, tensor, tosa, transform, vector, x86vector
USAGE: tutorial-opt [options] <input file>

OPTIONS:
89f4c974b14f23d9
bazel test //tests:poly_syntax.mlir.test
vim /etc/apt/sources.list
deb http://archive.ubuntu.com/ubuntu/ jammy main restricted
deb http://archive.ubuntu.com/ubuntu/ jammy-updates main restricted
deb http://archive.ubuntu.com/ubuntu/ jammy universe
deb http://archive.ubuntu.com/ubuntu/ jammy-updates universe
deb http://archive.ubuntu.com/ubuntu/ jammy multiverse
deb http://archive.ubuntu.com/ubuntu/ jammy-updates multiverse
deb http://archive.ubuntu.com/ubuntu/ jammy-backports main restricted universe multiverse
deb http://security.ubuntu.com/ubuntu/ jammy-security main restricted
deb http://security.ubuntu.com/ubuntu/ jammy-security universe
deb http://security.ubuntu.com/ubuntu/ jammy-security multiverse
sudo apt-get update
bazel clean --expunge
export PIP_REQUIRE_VIRTUALENV=false
source ~/.bashrc
第六篇
612ffb4c72b
bazel run tools:tutorial-opt – tests/code_motion.mlir
module {
  func.func @test_loop_invariant_code_motion() -> !poly.poly<10> {
    %cst = arith.constant dense<[1, 2, 3]> : tensor<3xi32>
    %0 = poly.from_tensor %cst : tensor<3xi32> -> <10>
    %cst_0 = arith.constant dense<[9, 8, 16]> : tensor<3xi32>
    %1 = poly.from_tensor %cst_0 : tensor<3xi32> -> <10>
    %2 = affine.for %arg0 = 0 to 100 iter_args(%arg1 = %0) -> (!poly.poly<10>) {
      %3 = poly.mul %0, %1 : (<10>, <10>) -> <10>
      %4 = poly.add %arg1, %3 : (<10>, <10>) -> <10>
      affine.yield %4 : !poly.poly<10>
    }
    return %2 : !poly.poly<10>
  }
}
git reset --hard 4e063c97b81f
bazel run tools:tutorial-opt – -control-flow-sink – /mnt/user/wurongfei/mlir-tutorial/tests/control_flow_sink.mlir
// RUN: tutorial-opt -control-flow-sink %s | FileCheck %s

// Test that operations can be sunk.

// CHECK-LABEL: @test_simple_sink
func.func @test_simple_sink(%arg0: i1) -> !poly.poly<10> {
  %0 = arith.constant dense<[1, 2, 3]> : tensor<3xi32>
  %p0 = poly.from_tensor %0 : tensor<3xi32> -> !poly.poly<10>
  %1 = arith.constant dense<[9, 8, 16]> : tensor<3xi32>
  %p1 = poly.from_tensor %1 : tensor<3xi32> -> !poly.poly<10>
  // CHECK-NOT: poly.from_tensor
  // CHECK: scf.if
  %4 = scf.if %arg0 -> (!poly.poly<10>) {
    // CHECK: poly.from_tensor
    %2 = poly.mul %p0, %p0 : (!poly.poly<10>, !poly.poly<10>) -> !poly.poly<10>
    scf.yield %2 : !poly.poly<10>
  // CHECK: else
  } else {
    // CHECK: poly.from_tensor
    %3 = poly.mul %p1, %p1 : (!poly.poly<10>, !poly.poly<10>) -> !poly.poly<10>
    scf.yield %3 : !poly.poly<10>
  }
  return %4 : !poly.poly<10>
}
变成了
NFO: Running command line: bazel-bin/tools/tutorial-opt -control-flow-sink -- /mnt/user/wurongfei/mlir-tutorial/tests/control_flow_sink.mlir
module {
  func.func @test_simple_sink(%arg0: i1) -> !poly.poly<10> {
    %0 = scf.if %arg0 -> (!poly.poly<10>) {
      %cst = arith.constant dense<[1, 2, 3]> : tensor<3xi32>
      %1 = poly.from_tensor %cst : tensor<3xi32> -> <10>
      %2 = poly.mul %1, %1 : (<10>, <10>) -> <10>
      scf.yield %2 : !poly.poly<10>
    } else {
      %cst = arith.constant dense<[9, 8, 16]> : tensor<3xi32>
      %1 = poly.from_tensor %cst : tensor<3xi32> -> <10>
      %2 = poly.mul %1, %1 : (<10>, <10>) -> <10>
      scf.yield %2 : !poly.poly<10>
    }
    return %0 : !poly.poly<10>
  }
}
分支用到的变量放到分支里面
这就是–control-flow-sink的作用
51f4d9ad8a28
05b1be0f954
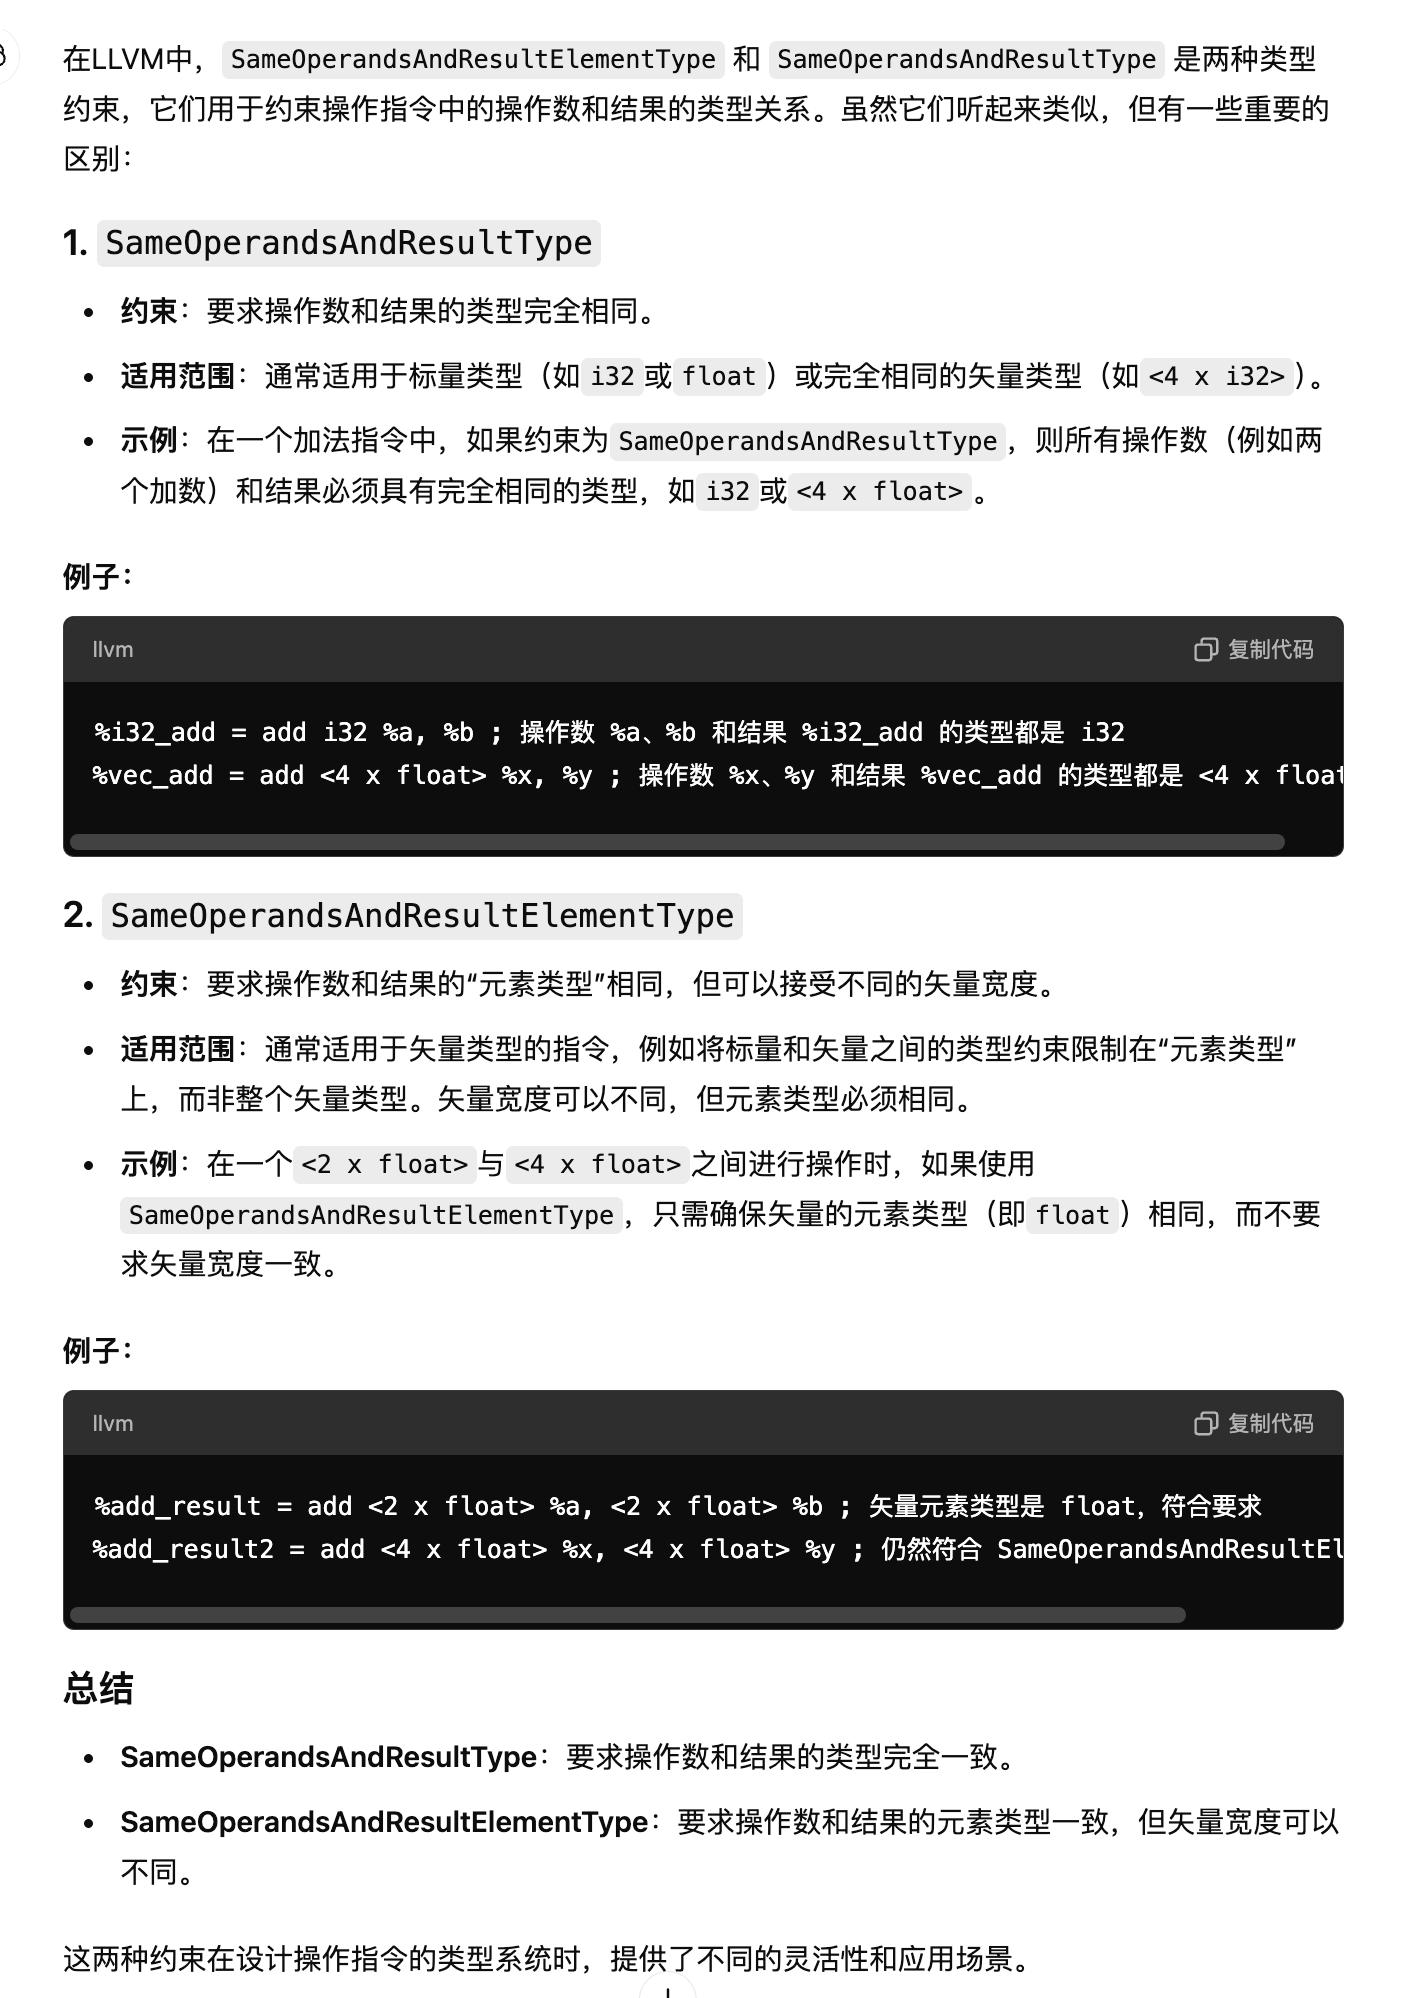
彰显SameOperandsAndResultElementType的作用
要用我的这个
加上SameOperandsAndResultElementType和不加上
执行bazel test //tests:poly_syntax.mlir.test
的结果是不同的
// RUN: tutorial-opt %s > %t
// RUN FileCheck %s < %t

module {
  // CHECK-LABEL: test_type_syntax
  func.func @test_type_syntax(%arg0: !poly.poly<10>) -> !poly.poly<10> {
    // CHECK: poly.poly
    return %arg0 : !poly.poly<10>
  }

  // CHECK-LABEL: test_op_syntax
  func.func @test_op_syntax(%arg0: !poly.poly<10>, %arg1: !poly.poly<10>, %arg2: !poly.poly<9>) -> !poly.poly<10> {
    // CHECK: poly.add
    %0 = poly.add %arg0, %arg1 : (!poly.poly<10>, !poly.poly<10>) -> !poly.poly<10>
    // CHECK: poly.sub
    %1 = poly.sub %arg0, %arg1 : (!poly.poly<10>, !poly.poly<10>) -> !poly.poly<10>
    // CHECK: poly.mul
    %2 = poly.mul %arg0, %arg1 : (!poly.poly<10>, !poly.poly<10>) -> !poly.poly<10>

    %3 = arith.constant dense<[1, 2, 3]> : tensor<3xi32>
    // CHECK: poly.from_tensor
    %4 = poly.from_tensor %3 : tensor<3xi32> -> !poly.poly<10>

    %5 = arith.constant 7 : i32
    // CHECK: poly.eval
    %6 = poly.eval %4, %5 : (!poly.poly<10>, i32) -> i32

    %7 = tensor.from_elements %arg0, %arg1 : tensor<2x!poly.poly<10>>
    // CHECK: poly.add
    %8 = poly.add %7, %7 : (tensor<2x!poly.poly<10>>, tensor<2x!poly.poly<10>>) -> tensor<2x!poly.poly<10>>
    // 违反 SameOperandsAndResultElementType 的操作,类型不一致
    // 这里尝试将不同阶的多项式相加,导致类型不匹配。
    // CHECK: expected error due to type mismatch
    %9 = poly.add %arg0, %arg2 : (!poly.poly<10>, !poly.poly<9>) -> !poly.poly<10>

    return %4 : !poly.poly<10>
  }
}
第七篇
272980efe1834adb
bazel run tools:tutorial-opt – --sccp /mnt/user/wurongfei/mlir-tutorial/tests/sccp.mlir
module {
  func.func @test_arith_sccp() -> i32 {
    %c63_i32 = arith.constant 63 : i32
    %c49_i32 = arith.constant 49 : i32
    %c14_i32 = arith.constant 14 : i32
    %c8_i32 = arith.constant 8 : i32
    %c7_i32 = arith.constant 7 : i32
    return %c14_i32 : i32
  }
  func.func @test_poly_sccp() -> !poly.poly<10> {
    %cst = arith.constant dense<[1, 2, 3]> : tensor<3xi32>
    %0 = poly.from_tensor %cst : tensor<3xi32> -> <10>
    %1 = poly.mul %0, %0 : (!poly.poly<10>, !poly.poly<10>) -> !poly.poly<10>
    %2 = poly.mul %0, %0 : (!poly.poly<10>, !poly.poly<10>) -> !poly.poly<10>
    %3 = poly.add %1, %2 : (!poly.poly<10>, !poly.poly<10>) -> !poly.poly<10>
    return %1 : !poly.poly<10>
  }
}
只会进行常量传播,不会进行死代码消除
同一个commit下
加上canonicalize的pass(不加也行)
然后运行
bazel run tools:tutorial-opt – -pass-pipeline=“builtin.module(func.func(sccp))” /mnt/user/wurongfei/mlir-tutorial/tests/sccp.mlir
bazel run tools:tutorial-opt – --canonicalize – /mnt/user/wurongfei/mlir-tutorial/tests/sccp.mlir
bazel run tools:tutorial-opt – --canonicalize – /mnt/user/wurongfei/mlir-tutorial/tests/poly_canonicalize.mlir
bazel test tests:sccp.mlir.test
/mnt/user/wurongfei/mlir-tutorial/tools/tutorial-opt.cpp
#include "lib/Dialect/Poly/PolyDialect.h"
#include "lib/Transform/Affine/Passes.h"
#include "lib/Transform/Arith/Passes.h"
#include "mlir/include/mlir/InitAllDialects.h"
#include "mlir/include/mlir/InitAllPasses.h"
#include "mlir/include/mlir/Pass/PassManager.h"
#include "mlir/include/mlir/Pass/PassRegistry.h"
#include "mlir/include/mlir/Tools/mlir-opt/MlirOptMain.h"

int main(int argc, char **argv) {
  mlir::DialectRegistry registry;
  registry.insert<mlir::tutorial::poly::PolyDialect>();
  mlir::registerAllDialects(registry);
  mlir::registerAllPasses();

  mlir::tutorial::registerAffinePasses();
  mlir::tutorial::registerArithPasses();
  mlir::MLIRContext context;
  mlir::PassManager pm(&context);
  pm.addPass(mlir::createCanonicalizerPass());  // 添加canonicalize Pass

  return mlir::asMainReturnCode(
      mlir::MlirOptMain(argc, argv, "Tutorial Pass Driver", registry));
}
发现常量传播之后消除了死代码
module {
  func.func @test_arith_sccp() -> i32 {
    %c14_i32 = arith.constant 14 : i32
    return %c14_i32 : i32
  }
  func.func @test_poly_sccp() -> !poly.poly<10> {
    %cst = arith.constant dense<[1, 2, 3]> : tensor<3xi32>
    %0 = poly.from_tensor %cst : tensor<3xi32> -> <10>
    %1 = poly.mul %0, %0 : (!poly.poly<10>, !poly.poly<10>) -> !poly.poly<10>
    return %1 : !poly.poly<10>
  }
}
8ad0653f08
bazel run tools:tutorial-opt – /mnt/user/wurongfei/mlir-tutorial/tests/poly_syntax.mlir
认得constant
直到7c32c62370bcdc0
增加了方言的hasConstantMaterializer
方言才支持常量传播
可以看到之前都只能传播arith方言的,在这个commit中,poly方言也可以常量传播了
bazel run tools:tutorial-opt – /mnt/user/wurongfei/mlir-tutorial/tests/sccp.mlir
第八章
cf013a8bcaed
用了这个verify就不用在mul,add和sub的时候写三次type了
    // CHECK: poly.add
    %0 = poly.add %arg0, %arg1 : !poly.poly<10>
    // CHECK: poly.sub
    %1 = poly.sub %arg0, %arg1 : !poly.poly<10>
    // CHECK: poly.mul
    %2 = poly.mul %arg0, %arg1 : !poly.poly<10>
cf7694904
这里把evalop的verify改成了AllTypesMatch<[“point”, “output”]>
def Poly_EvalOp : Op<Poly_Dialect, "eval", [AllTypesMatch<["point", "output"]>]> {
  let summary = "Evaluates a Polynomial at a given input value.";
  let arguments = (ins Polynomial:$input, AnyInteger:$point);
  let results = (outs AnyInteger:$output);
  let assemblyFormat = "$input `,` $point attr-dict `:` `(` qualified(type($input)) `,` type($point) `)` `->` type($output)";
}
这样output的类型就只能和point一致了
自定义verifier
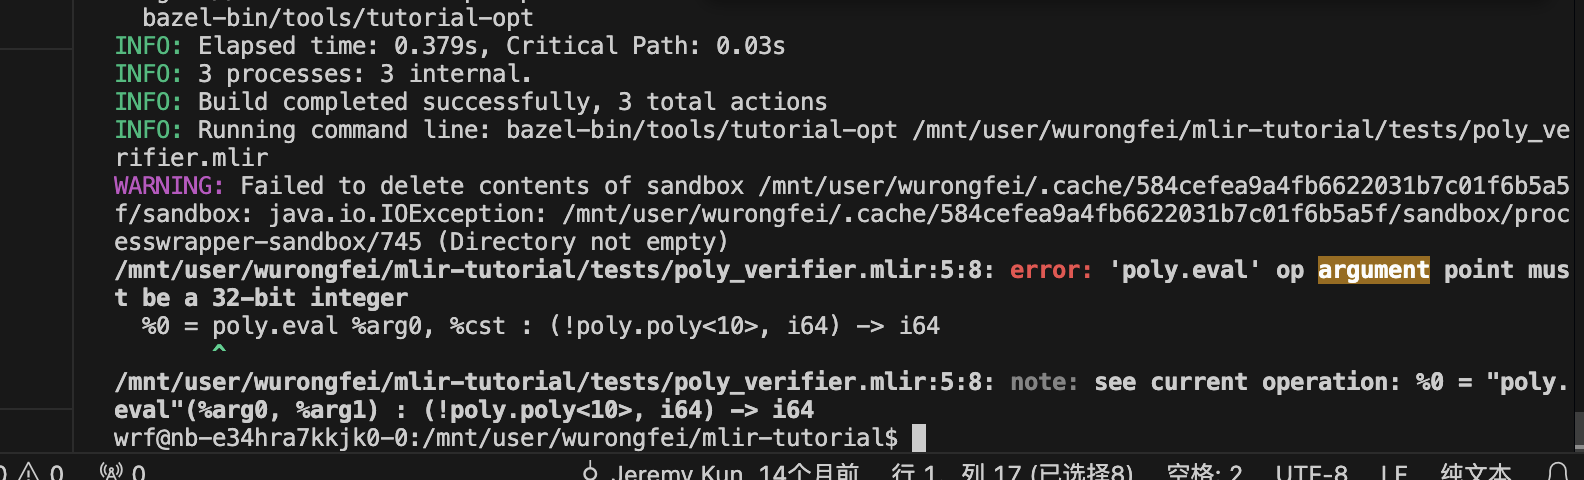
59b95964de
bazel run tools:tutorial-opt – /mnt/user/wurongfei/mlir-tutorial/tests/poly_verifier.mlir
这里只能返回32位,所以会报错
// RUN: tutorial-opt %s 2>%t; FileCheck %s < %t

func.func @test_invalid_evalop(%arg0: !poly.poly<10>, %cst: i64) -> i64 {
  // CHECK: argument point must be a 32-bit integer
  %0 = poly.eval %arg0, %cst : (!poly.poly<10>, i64) -> i64
  return %0 : i64
}
d424613c284
这个是模板自定义verifier
给evalop定义了输入输出相等,并且index和int的op都得是32位的,不然就报错
第九章
8fb25f5815718e82b
讲了Canonicalizers
给ops.td加上let hasCanonicalizer = 1;
然后在cpp中重写add sub和mul的:getCanonicalizationPatterns函数
7b9f2829ac1
定义了一个规范化canonicalizer
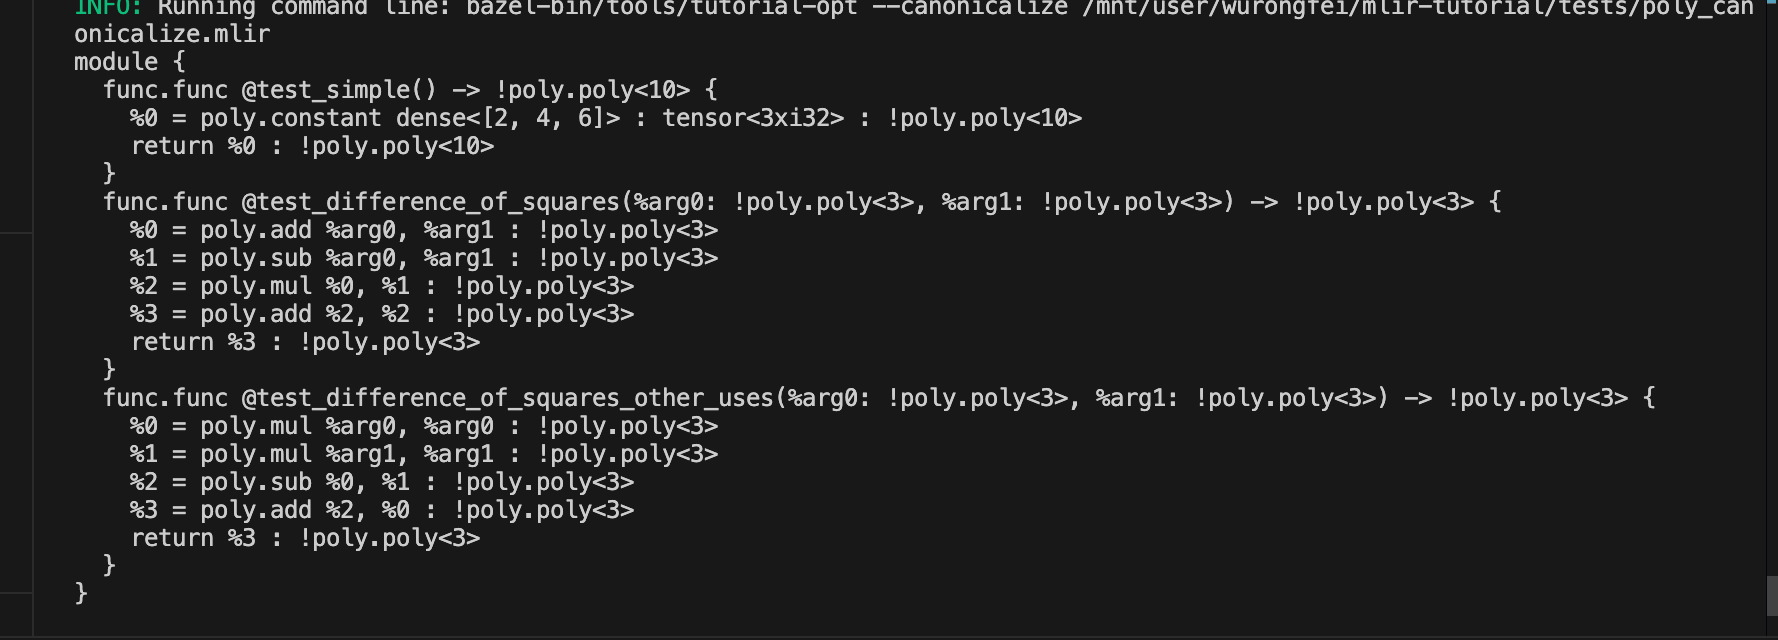
bazel run tools:tutorial-opt – --canonicalize /mnt/user/wurongfei/mlir-tutorial/tests/poly_canonicalize.mlir
可以看到平方差变成了两项相乘
下面那个test_difference_of_squares_other_uses为什么没变呢
因为%5用了一下%2(在源文件中),所以%2倍使用了两次,不能被canonicalier
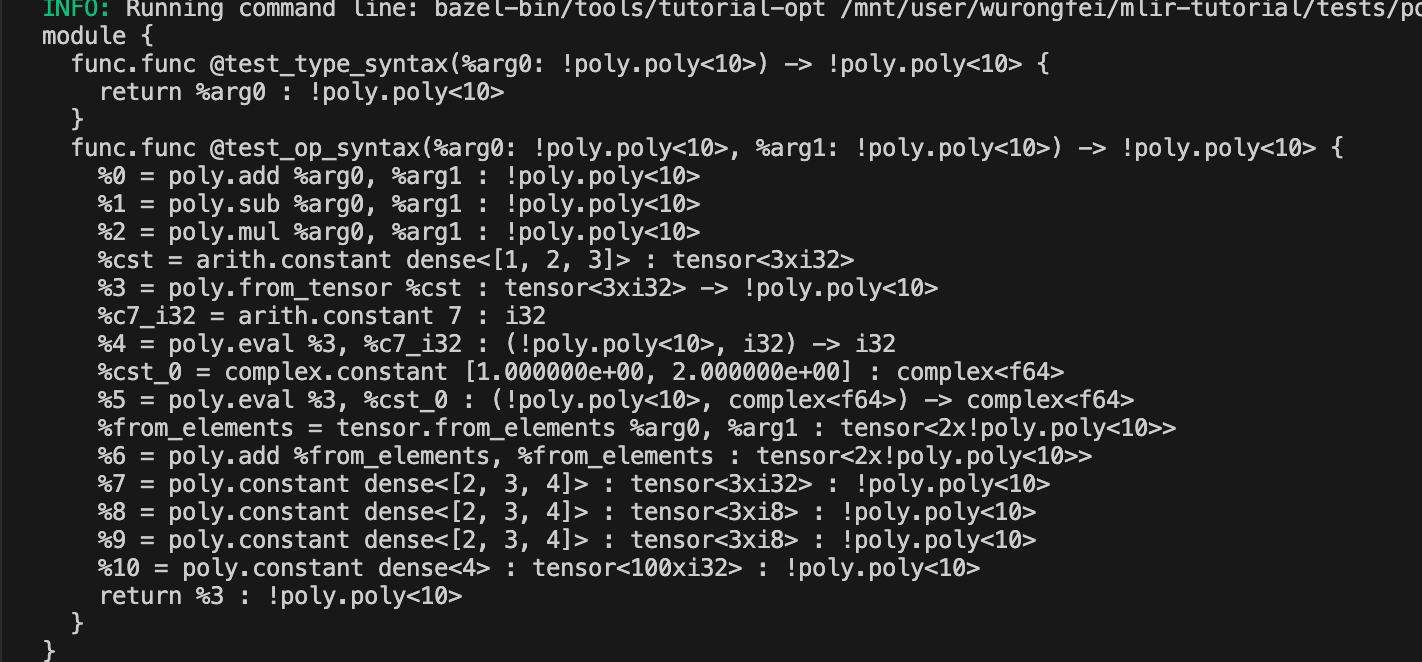
e55bab91be
把输入的类型变成可以是int也可以是complex类型,初始化必须是float类型
可以在/mnt/user/wurongfei/mlir-tutorial/tests/poly_syntax.mlir里看到
poly能够处理complex的多项式运算
bazel run tools:tutorial-opt – /mnt/user/wurongfei/mlir-tutorial/tests/poly_syntax.mlir
69a18e9a1fa5f
bazel run tools:tutorial-opt – --canonicalize – /mnt/user/wurongfei/mlir-tutorial/tests/poly_canonicalize.mlir
func.func @test_normalize_conj_through_eval(
    %f: !poly.poly<3>, %z: complex<f64>) -> complex<f64> {
  // CHECK: %[[evaled:.+]] = poly.eval %[[f]], %[[z]]
  // CHECK-NEXT: %[[eval_bar:.+]] = complex.conj %[[evaled]]
  // CHECK-NEXT: return %[[eval_bar]]
  %z_bar = complex.conj %z : complex<f64>
  %evaled = poly.eval %f, %z_bar : (!poly.poly<3>, complex<f64>) -> complex<f64>
  return %evaled : complex<f64>
}
变成了
func.func @test_normalize_conj_through_eval(%arg0: !poly.poly<3>, %arg1: complex<f64>) -> complex<f64> {
    %0 = poly.eval %arg0, %arg1 : (!poly.poly<3>, complex<f64>) -> complex<f64>
    %1 = complex.conj %0 : complex<f64>
    return %1 : complex<f64>
  }
也就是
f
(
z
ˉ
)
变成了
f
(
z
)
‾
f(\bar{z})变成了\overline{f(z)}
f(zˉ)变成了f(z)
这是因为/mnt/user/wurongfei/mlir-tutorial/lib/Dialect/Poly/PolyPatterns.td的LiftConjThroughEval类
6dea94a522d6
bazel run tools:tutorial-opt – --canonicalize – /mnt/user/wurongfei/mlir-tutorial/tests/poly_canonicalize.mlir
可以发现只在/mnt/user/wurongfei/mlir-tutorial/lib/Dialect/Poly/PolyPatterns.td里面写DifferenceOfSquares和LiftConjThroughEval即可实现模式的转换
05a17d12cba42
这个commit不能成功编译
d9bcf1ffd36e2
bazel run tools:tutorial-opt – --poly-to-standard /mnt/user/wurongfei/mlir-tutorial/tests/poly_syntax.mlir
3421df1e3
这个commit加了一个PolyToStandardTypeConverter
第十篇 dialect转换
05a17d12c
添加了一个conversion文件夹
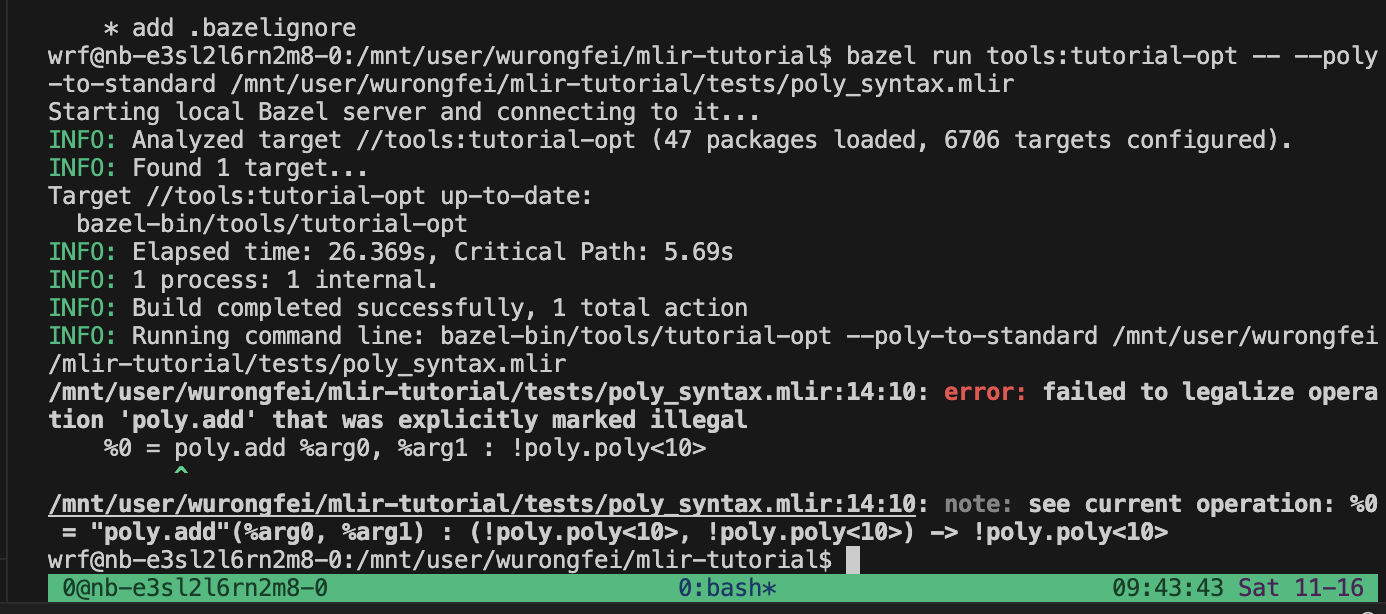
3421df1e32
bazel run tools:tutorial-opt – --poly-to-standard /mnt/user/wurongfei/mlir-tutorial/tests/poly_syntax.mlir

可以看到add转换错误了
78bf9a5a
堆栈错误
bf9fbc99cd
会说sub没定义

b8f089b348
直接写了个
以1 2 3为例子,point=2
得到结果为17
带入lowering的结果是对的
就是
(((3*2)+2)*2+1)=17
%2是需要eval的多项式

1 2 3
0 1 2
p=2
1+2*2+3*4=17

arg3=0

%4=11-1
%5=%point*arg3
extract=%2[10]
%6=%5 + extract=0

arg3=%6

%4=11-9=2
%5=2*0=0
extract=3
%6=3+0

arg3=3

%4=11-10=1
%5=2*3=6
extract=2
%6=6+2=8

arg3=8

%4=11-11=0
%5=8*2=16
extract=1
%6=16+1
a54f23fc2
这个commit构建了一个pipeline,加了tostandard和canonicalizer两个pass
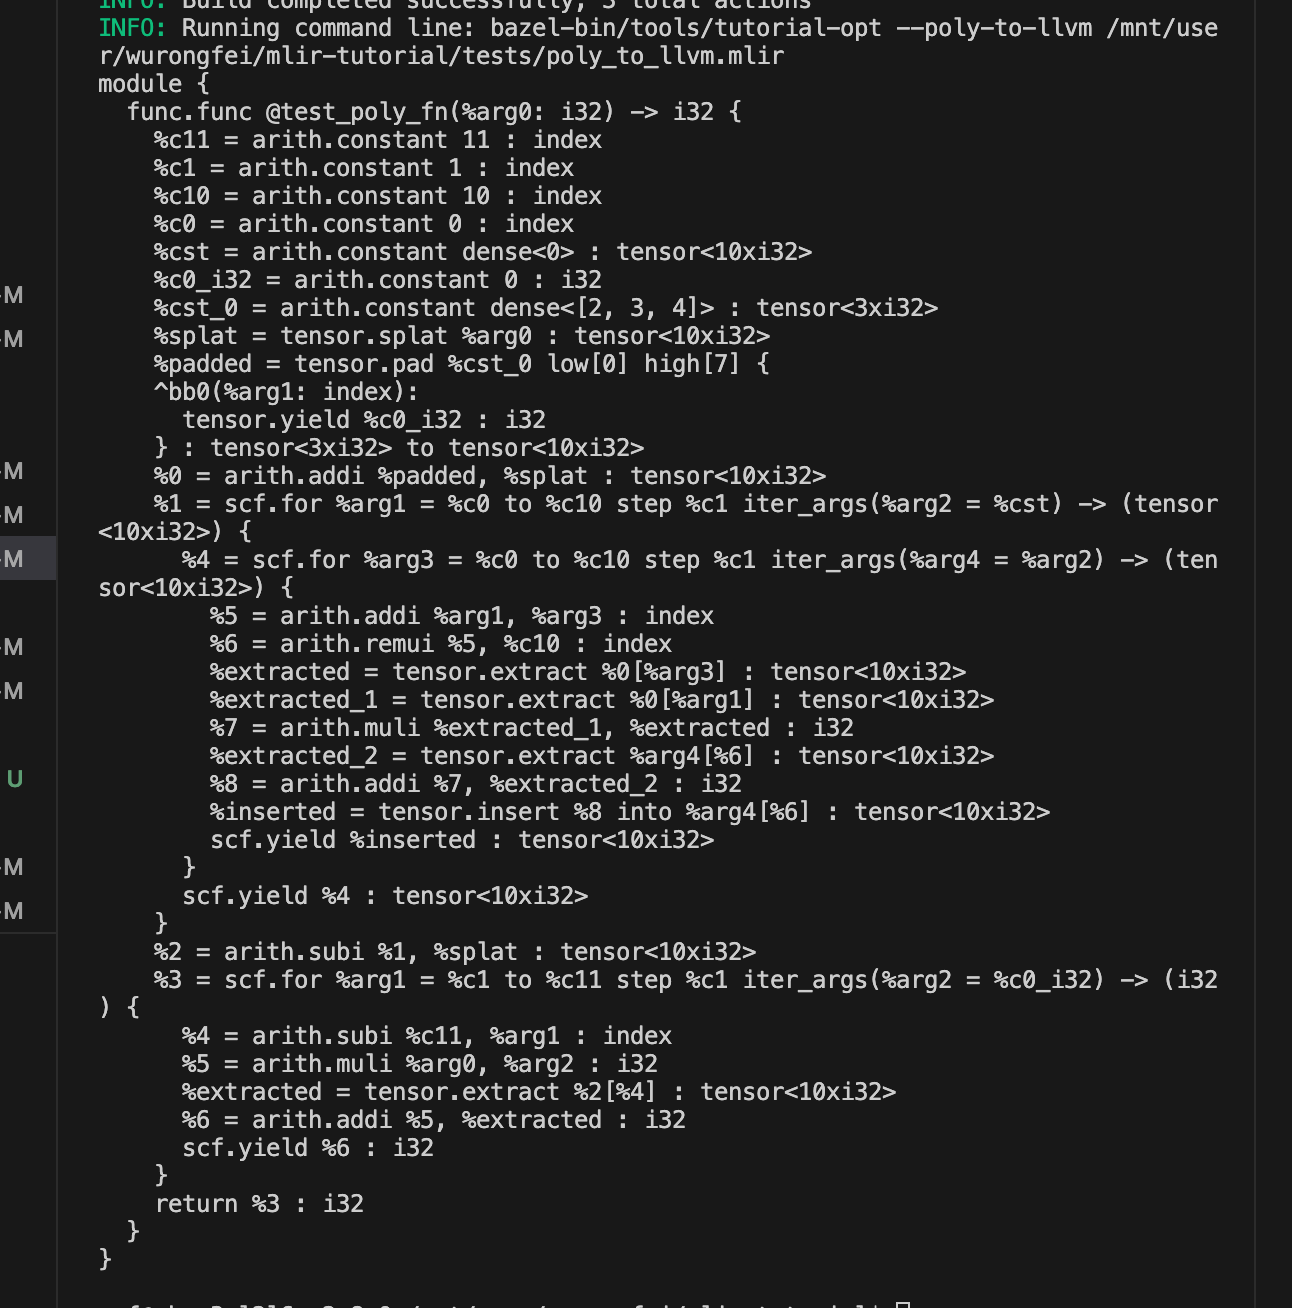
bazel run //tools:tutorial-opt – --poly-to-llvm $PWD/tests/poly_to_llvm.mlir
然后调用这个pipeline就可以把poly方言翻译到standard上并且进行规范化优化
225952a2b
func to llvm
python utils/RunONNXModel.py --compile-args=-O1 -march=x64 --profile-ir=Onnx --verify=ref --verify-every-value --load-ref=/mnt/user/wurongfei/onnx-mlir/test_check/ --model=/mnt/user/wurongfei/onnx-mlir/bertsquad10.onnx
python utils/RunONNXModel.py --compile-args=-O1 -march=x64 --profile-ir=Onnx --verify=ref --verify-every-value --load-ref=/mnt/user/wurongfei/onnx-mlir/test_check/ --model=/mnt/user/wurongfei/onnx-mlir/bertsquad10.onnx


 被折叠的 条评论
为什么被折叠?
被折叠的 条评论
为什么被折叠?
 到【灌水乐园】发言


