


目录
一、SpringJDBC是什么?
SpringJDBC是Spring框架用于处理关系型数据库的模块,对JDBC API进行封装,极大简化开发工作。jdbcTemplate是SpringJDBC的接心类,提供CRUD方法。
疑问:有Mybatis为什么还要SpringJDBC?
答:两者面向的对象不一样 ,Mybatis封装程度较高,适合于比如说中小企业进行软件的敏捷开发。让程序员可以快速的完成与数据库的交互工作,但是Mybatis涉及到一系列的例如xml的配置以及各种各样的操作的细节。实际上Mybatis封装的程度还是比较高的,封装程度高就意味着我们执行效率相对较低。但是spring JDBC只是对原始的的JDBC API进行的简单封装。对于一线的互联网大厂,无论是数据量还是用户的并发量都是非常高的。这时如果使用Mybatis,可能由于微小的性能上的差距,就会导致整体应用变慢,因此作为一线大厂呢,他们很少使用市面上的成熟框架。更多的时候是喜欢使用像spring这样的轻量级的封装框架。在这个基础上结合自己企业的特点来进行二次的封装。可以说spring它的执行效率比起Mybatis是要高的,同时因为有了spring底层这ioc容器的存在,也不至于让程序像原生JDBC那样难以管理。Spring JCBC是介于orm框架和原生JDBC之间的一个折中的选择。
那说到这里作为spring JDBC该如何使用呢?主要有三个步骤。
二、使用实现
1.引入依赖
Maven工程引入spring-jdbc
<dependency>
            <groupId>org.springframework</groupId>
            <artifactId>spring-jdbc</artifactId>
            <version>5.2.6.RELEASE</version>
</dependency>
引入springframework及其他依赖
        <dependency>
            <groupId>org.springframework</groupId>
            <artifactId>spring-context</artifactId>
            <version>5.2.6.RELEASE</version>
        </dependency>
        <dependency>
            <groupId>mysql</groupId>
            <artifactId>mysql-connector-java</artifactId>
            <version>8.0.16</version>
        </dependency>

        <dependency>
            <groupId>junit</groupId>
            <artifactId>junit</artifactId>
            <version>4.12</version>
        </dependency>
        <dependency>
            <groupId>org.springframework</groupId>
            <artifactId>spring-test</artifactId>
            <version>5.2.6.RELEASE</version>
        </dependency>

        <!--logback日志组件,Spring框架默认集成-->
        <dependency>
            <groupId>ch.qos.logback</groupId>
            <artifactId>logback-classic</artifactId>
            <version>1.2.3</version>
        </dependency>
2.配置ApplicationContext.xml
1.配置DataSource数据库数据
2.注册Template类,并为其提供DataSource数据源
代码如下(示例):
<?xml version="1.0" encoding="UTF-8"?>
<beans xmlns="http://www.springframework.org/schema/beans"
xmlns:xsi="http://www.w3.org/2001/XMLSchema-instance"
xmlns:context="http://www.springframework.org/schema/context"
xsi:schemaLocation="http://www.springframework.org/schema/beans
https://www.springframework.org/schema/beans/spring-beans.xsd
http://www.springframework.org/schema/context
https://www.springframework.org/schema/context/spring-context.xsd">
<!-- 数据源 -->
<bean id="dataSource" class="org.springframework.jdbc.datasource.DriverManagerDataSource">
<property name="driverClassName" value="com.mysql.cj.jdbc.Driver"/>
<property name="url"
value="jdbc:mysql://localhost:3306/springJDBC?useSSL=false&useUnicode=true&characterEncoding=UTF-8&serverTimezone=Asia/Shanghai&allowPublicKeyRetrieval=true"/>
<property name="username" value="root"/>
<property name="password" value="abc23456"/>
</bean>
<!--JdbcTemplate提供数据CRUD的API-->
<bean id="jdbcTemplate" class="org.springframework.jdbc.core.JdbcTemplate">
<property name="dataSource" ref="dataSource"/>
</bean>
<bean id="employeeDao" class="com.yygs.spring.jdbc.dao.EmployeeDao">
<!--为Dao注入JdbcTemplate对象-->
<property name="jdbcTemplate" ref="jdbcTemplate"/>
</bean>
<bean id="employeeService" class="com.yygs.spring.jdbc.service.EmployeeService">
<property name="employeeDao" ref="employeeDao"/>
<property name="transactionManager" ref="transactionManager"/>
</bean>
<!--事务管理器-->
<bean id="transactionManager" class="org.springframework.jdbc.datasource.DataSourceTransactionManager">
<property name="dataSource" ref="dataSource"></property>
</bean>
</beans>3.在Dao注入JdbcTemplate对象,实现CRUD
1. 创建entity实体类:
package com.yygs.spring.jdbc.entity;

import java.util.Date;

public class Employee {
    private Integer eno;
    private String ename;
    private Float salary;
    private String dname;
    private Date hiredate;

    public Integer getEno() {
        return eno;
    }

    public void setEno(Integer eno) {
        this.eno = eno;
    }

    public String getEname() {
        return ename;
    }

    public void setEname(String ename) {
        this.ename = ename;
    }

    public Float getSalary() {
        return salary;
    }

    public void setSalary(Float salary) {
        this.salary = salary;
    }

    public String getDname() {
        return dname;
    }

    public void setDname(String dname) {
        this.dname = dname;
    }

    public Date getHiredate() {
        return hiredate;
    }

    public void setHiredate(Date hiredate) {
        this.hiredate = hiredate;
    }

    @Override
    public String toString() {
        return "Employee{" +
                "eno=" + eno +
                ", ename='" + ename + '\'' +
                ", salary=" + salary +
                ", dname='" + dname + '\'' +
                ", hiredate=" + hiredate +
                '}';
    }
}
2.创建Dao:
在类中使用JdbcTemplate进行CRUD操作:
package com.yygs.spring.jdbc.dao;

import com.yygs.spring.jdbc.entity.Employee;
import org.springframework.jdbc.core.BeanPropertyRowMapper;
import org.springframework.jdbc.core.JdbcTemplate;

import java.util.List;
import java.util.Map;

public class EmployeeDao {
    private JdbcTemplate jdbcTemplate;

    public Employee findById(Integer eno){
        String sql = "select * from employee where eno = ?";
        //查询单条数据
        Employee employee = jdbcTemplate.queryForObject(sql, new Object[]{eno}, new BeanPropertyRowMapper<Employee>(Employee.class));
        //BeanPropertyRowMapper,按照实体类顺序从数据库到实体的封装
        return employee;
    }

    public List<Employee> findByDname(String dname){
        String sql = "select * from employee where dname = ?";
        //查询复合数据
        List<Employee> list = jdbcTemplate.query(sql, new Object[]{dname}, new BeanPropertyRowMapper<Employee>(Employee.class));
        return list;
    }

    public List<Map<String, Object>> findMapByDname(String dname){
        String sql = "select eno as empno , salary as s from employee where dname = ?";
        //将查询结果作为Map进行封装
        List<Map<String, Object>> maps = jdbcTemplate.queryForList(sql, new Object[]{dname});
        return maps;
    }

    public void insert(Employee employee){
        String sql = "insert into employee(eno,ename,salary,dname,hiredate) values(?,?,?,?,?)";
        //利用update方法实现数据写入操作
        jdbcTemplate.update(sql,new Object[]{
           employee.getEno() , employee.getEname(),employee.getSalary(),employee.getDname() , employee.getHiredate()
        });
    }

    public int update(Employee employee){
        String sql = "UPDATE employee SET ename = ?, salary = ?, dname = ?, hiredate = ? WHERE eno = ?";
        int count = jdbcTemplate.update(sql, new Object[]{employee.getEname(), employee.getSalary(), employee.getDname(), employee.getHiredate(), employee.getEno()});
        return count;
    }

    public int delete(Integer eno){
        String sql = "delete from employee where eno = ?";
        return jdbcTemplate.update(sql, new Object[]{eno});
    }


    public JdbcTemplate getJdbcTemplate() {
        return jdbcTemplate;
    }

    public void setJdbcTemplate(JdbcTemplate jdbcTemplate) {
        this.jdbcTemplate = jdbcTemplate;
    }
}
3.注入Template:
在xml中,为Dao类注入Template才能使用CRUD方法。
<bean id="employeeDao" class="com.imooc.spring.jdbc.dao.EmployeeDao">
        <!--为Dao注入JdbcTemplate对象-->
        <property name="jdbcTemplate" ref="jdbcTemplate"/>
</bean>
4.在程序入口运行Dao方法:
public class SpringApplication {
    public static void main(String[] args) {
        ApplicationContext context = new ClassPathXmlApplicationContext("classpath:applicationContext.xml");
        EmployeeDao employeeDao = context.getBean("employeeDao", EmployeeDao.class);
        Employee employee = employeeDao.findById(3308);
        System.out.println(employee);
    }
}
4.JdbcTemplate的方法
1.查询单条数据
public class EmployeeDao {
    private JdbcTemplate jdbcTemplate;

    public Employee findById(Integer eno){
        String sql = "select * from employee where eno = ?";
        //查询单条数据
        Employee employee = jdbcTemplate.queryForObject(sql, new Object[]{eno}, new BeanPropertyRowMapper<Employee>(Employee.class));
        return employee;
    }
}
在test/java目录下的JdbcTemplateTestor测试类进行测试:
@RunWith(SpringJUnit4ClassRunner.class)
@ContextConfiguration(locations = {"classpath:applicationContext.xml"})
public class JdbcTemplateTestor {
    @Resource
    private EmployeeDao employeeDao;

    @Test
    public void testFindById(){
        Employee employee = employeeDao.findById(3308);
        System.out.println(employee);
    }
}
2.查询复合数据
public List<Employee> findByDname(String dname){
        String sql = "select * from employee where dname = ?";
        //查询复合数据
        List<Employee> list = jdbcTemplate.query(sql, new Object[]{dname}, new BeanPropertyRowMapper<Employee>(Employee.class));
        return list;
}
@RunWith(SpringJUnit4ClassRunner.class)
@ContextConfiguration(locations = {"classpath:applicationContext.xml"})
public class JdbcTemplateTestor {
@Resource
private EmployeeDao employeeDao;
@Test
public void testFindByDname(){
System.out.println(employeeDao.findByDname("市场部"));
}
}3.返回不是完全实体信息的复合查询
public List<Map<String, Object>> findMapByDname(String dname){
        String sql = "select eno as empno , salary as s from employee where dname = ?";
        //将查询结果作为Map进行封装
        List<Map<String, Object>> maps = jdbcTemplate.queryForList(sql, new Object[]{dname});
        return maps;
}
@RunWith(SpringJUnit4ClassRunner.class)
@ContextConfiguration(locations = {"classpath:applicationContext.xml"})
public class JdbcTemplateTestor {
@Resource
private EmployeeDao employeeDao;
@Test
public void testFindMapByDname(){
System.out.println(employeeDao.findMapByDname("研发部"));
}
}4.插入数据(使用update
public void insert(Employee employee){
        String sql = "insert into employee(eno,ename,salary,dname,hiredate) values(?,?,?,?,?)";
        //利用update方法实现数据写入操作
        jdbcTemplate.update(sql,new Object[]{
           employee.getEno() , employee.getEname(),employee.getSalary(),employee.getDname() , employee.getHiredate()
        });
}
@RunWith(SpringJUnit4ClassRunner.class)
@ContextConfiguration(locations = {"classpath:applicationContext.xml"})
public class JdbcTemplateTestor {
@Resource
private EmployeeDao employeeDao;
@Test
public void testInsert(){
Employee employee = new Employee();
employee.setEno(8888);
employee.setEname("赵六");
employee.setSalary(6666f);
employee.setDname("研发部");
employee.setHiredate(new Date());
employeeDao.insert(employee);
}
}5.数据更新(使用update
public int update(Employee employee){
        String sql = "UPDATE employee SET ename = ?, salary = ?, dname = ?, hiredate = ? WHERE eno = ?";
        int count = jdbcTemplate.update(sql, new Object[]{employee.getEname(), employee.getSalary(), employee.getDname(), employee.getHiredate(), employee.getEno()});
        return count;
}
@RunWith(SpringJUnit4ClassRunner.class)
@ContextConfiguration(locations = {"classpath:applicationContext.xml"})
public class JdbcTemplateTestor {
@Resource
private EmployeeDao employeeDao;
@Test
public void testUpdate(){
Employee employee = employeeDao.findById(8888);
employee.setSalary(employee.getSalary() + 1000);
int count = employeeDao.update(employee);
System.out.println("本次更新" + count + "条数据");
}
}6.删除数据
public int delete(Integer eno){
        String sql = "delete from employee where eno = ?";
        return jdbcTemplate.update(sql, new Object[]{eno});
}
@RunWith(SpringJUnit4ClassRunner.class)
@ContextConfiguration(locations = {"classpath:applicationContext.xml"})
public class JdbcTemplateTestor {
@Resource
private EmployeeDao employeeDao;
@Test
public void testDelete(){
int count = employeeDao.delete(8888);
System.out.println("本次删除" + count + "条数据");
}
}5.SpringJDBC事务
问题:什么是事务?
答:事务是以一种可靠的、一致的方式、访问和操作数据库的程序单元。简单说就是做事情要么把事情做完,要么什么都不做。
事务依赖于数据库实现,MySQL通过事务区作为数据缓冲地带,通过引入事务区的概念,将当前的事务数据进行缓存,当所有操作完成后提交就可以将事物驱动的数据一次性写入到我们真实的表中,如果出现了问题,则将事务区进行回滚。
1.编程式事务
编程式事务是指通过代码手动提交回滚事务的事务控制方法,SpringJDBC通过TransactionManager事务管理器实现事务控制,事务管理器提供commit/rollback方法进行事务提交与回滚。
使用编程式事务,只需要4行代码:
//定义了事务默认的标准配置
TransactionDefinition definition = new DefaultTransactionDefinition();

//开始一个事务,返回事务状态,事务状态说明当前事务的执行阶段
TransactionStatus status = transactionManager.getTransaction(definition);

//提交事务
transactionManager.commit(status);

//回滚事务
transactionManager.rollback(status);
2.jdbc包下创建service包,创建EmployeeService类:
要求:往数据库插入10条数据,一次性提交,若插入过程中出现问题,则10条数据都不插入(即使用数据库的一个连接重复插入10条数据,而不是10次连接)。
public class EmployeeService {
    private EmployeeDao employeeDao;
    private DataSourceTransactionManager transactionManager;

    public void batchImport(){
        //定义了事务默认的标准配置
        TransactionDefinition definition = new DefaultTransactionDefinition();
        //开始一个事务,返回事务状态,事务状态说明当前事务的执行阶段
        TransactionStatus status = transactionManager.getTransaction(definition);
        try {
            for (int i = 1; i <= 10; i++) {
                /*if (i == 3) {
                    throw new RuntimeException("意料之外的异常");
                }*/
                Employee employee = new Employee();
                employee.setEno(8000 + i);
                employee.setEname("员工" + i);
                employee.setSalary(4000f);
                employee.setDname("市场部");
                employee.setHiredate(new Date());
                employeeDao.insert(employee);
            }
            //提交事务
            transactionManager.commit(status);
        }catch (RuntimeException e){
            //回滚事务
            transactionManager.rollback(status);
            throw e;
        }

    }
    public EmployeeDao getEmployeeDao() {
        return employeeDao;
    }

    public void setEmployeeDao(EmployeeDao employeeDao) {
        this.employeeDao = employeeDao;
    }

    public DataSourceTransactionManager getTransactionManager() {
        return transactionManager;
    }

    public void setTransactionManager(DataSourceTransactionManager transactionManager) {
        this.transactionManager = transactionManager;
    }
}
3.xml配置:
<bean id="employeeService" class="com.yygs.spring.jdbc.service.EmployeeService">
        <property name="employeeDao" ref="employeeDao"/>
        <property name="transactionManager" ref="transactionManager"/>
</bean>

<!--事务管理器-->
    <bean id="transactionManager" class="org.springframework.jdbc.datasource.DataSourceTransactionManager">
        <property name="dataSource" ref="dataSource"></property>
</bean>
4.测试方法
@RunWith(SpringJUnit4ClassRunner.class)
@ContextConfiguration(locations = {"classpath:applicationContext.xml"})
public class JdbcTemplateTestor {
    @Resource
    private EmployeeDao employeeDao;

    @Test
    public void testBatchImport(){
        employeeService.batchImport();
        System.out.println("批量导入成功");
    }
}
2.声明式事务
声明式事务是指在不修改源码的情况下通过配置形式自动实现事务控制,声明式事务的本质就是AOP环绕通知。当目标方法执行成功时,自动提交。当目标方法抛出异常时,自动事务回滚。
1.配置TransactionManager事务管理器
引入AOP依赖,否则出现类找不到错误:
<dependency>
            <groupId>org.aspectj</groupId>
            <artifactId>aspectjweaver</artifactId>
            <version>1.9.5</version>
</dependency>
为xml表头增加命名空间
<?xml version="1.0" encoding="UTF-8"?>
<beans xmlns="http://www.springframework.org/schema/beans"
       xmlns:xsi="http://www.w3.org/2001/XMLSchema-instance"
       xmlns:context="http://www.springframework.org/schema/context"

       xmlns:tx="http://www.springframework.org/schema/tx"

       xmlns:aop="http://www.springframework.org/schema/aop"

       xsi:schemaLocation="http://www.springframework.org/schema/beans
        https://www.springframework.org/schema/beans/spring-beans.xsd
        http://www.springframework.org/schema/context
        https://www.springframework.org/schema/context/spring-context.xsd

        http://www.springframework.org/schema/tx
        https://www.springframework.org/schema/tx/spring-tx.xsd

        http://www.springframework.org/schema/aop
        https://www.springframework.org/schema/aop/spring-aop.xsd">
</beans>
2.配置事务通知与事务属性
<!-- 1.事务管理器,用于创建事务/提交/回滚 -->
<bean id="transactionManager" class="org.springframework.jdbc.datasource.DataSourceTransactionManager">
        <property name="dataSource" ref="dataSource"/>
</bean>

<!--2.事务通知配置,决定哪些方法使用事务,哪些方法不使用事务 -->
<tx:advice id="txAdvice" transaction-manager="transactionManager">
        <tx:attributes>
            <!-- 目标方法名为batchImport时,启用声明式事务,成功提交,运行时异常回滚 -->
            <tx:method name="batchImport" propagation="REQUIRED"/>

            <!-- 设置所有batchXXX通用方法需要使用事务 -->
            <tx:method name="batch*" propagation="REQUIRED"/>

            <!-- 设置所有findXXX方法不需要使用事务 -->
            <tx:method name="find*" propagation="NOT_SUPPORTED" read-only="true"/>
            <tx:method name="get*" propagation="NOT_SUPPORTED" read-only="true"/>

            <tx:method name="importJob1" propagation="REQUIRES_NEW"/>
            <tx:method name="importJob2" propagation="REQUIRES_NEW"/>

            <!-- 设置不符合以上方法外的所有方法要使用事务 -->
            <tx:method name="*" propagation="REQUIRED"/>
        </tx:attributes>
</tx:advice>
3.为事务通知绑定PointCut切点
<!--3. 定义声明式事务的作用范围-->
<aop:config>
        <aop:pointcut id="pointcut" expression="execution(* com.imooc..*Service.*(..))"/>
        <aop:advisor advice-ref="txAdvice" pointcut-ref="pointcut"/>
</aop:config>
测试方法:
public class EmployeeService {
    private EmployeeDao employeeDao;
    private BatchService batchService;

    public void batchImport() {
        for (int i = 1; i <= 10; i++) {
            /*if(i==3){
                throw new RuntimeException("意料之外的异常");
            }*/
            Employee employee = new Employee();
            employee.setEno(8000 + i);
            employee.setEname("员工" + i);
            employee.setSalary(4000f);
            employee.setDname("市场部");
            employee.setHiredate(new Date());
            employeeDao.insert(employee);
        }
    }
}
@RunWith(SpringJUnit4ClassRunner.class)
@ContextConfiguration(locations = {"classpath:applicationContext.xml"})
public class JdbcTemplateTestor {
@Resource
private EmployeeDao employeeDao;
@Test
public void testBatchImport(){
employeeService.batchImport();
System.out.println("批量导入成功");
}
}3.事务传播行为
事务传播行为是指多个拥有事务的方法在嵌套调用时的事务控制方式。
XML: <tx:method name="..." propagation="REQUIRED"/>注解: @Transactional(propagation = Propagation.REQUIRES_NEW)事务传播行为七种类型
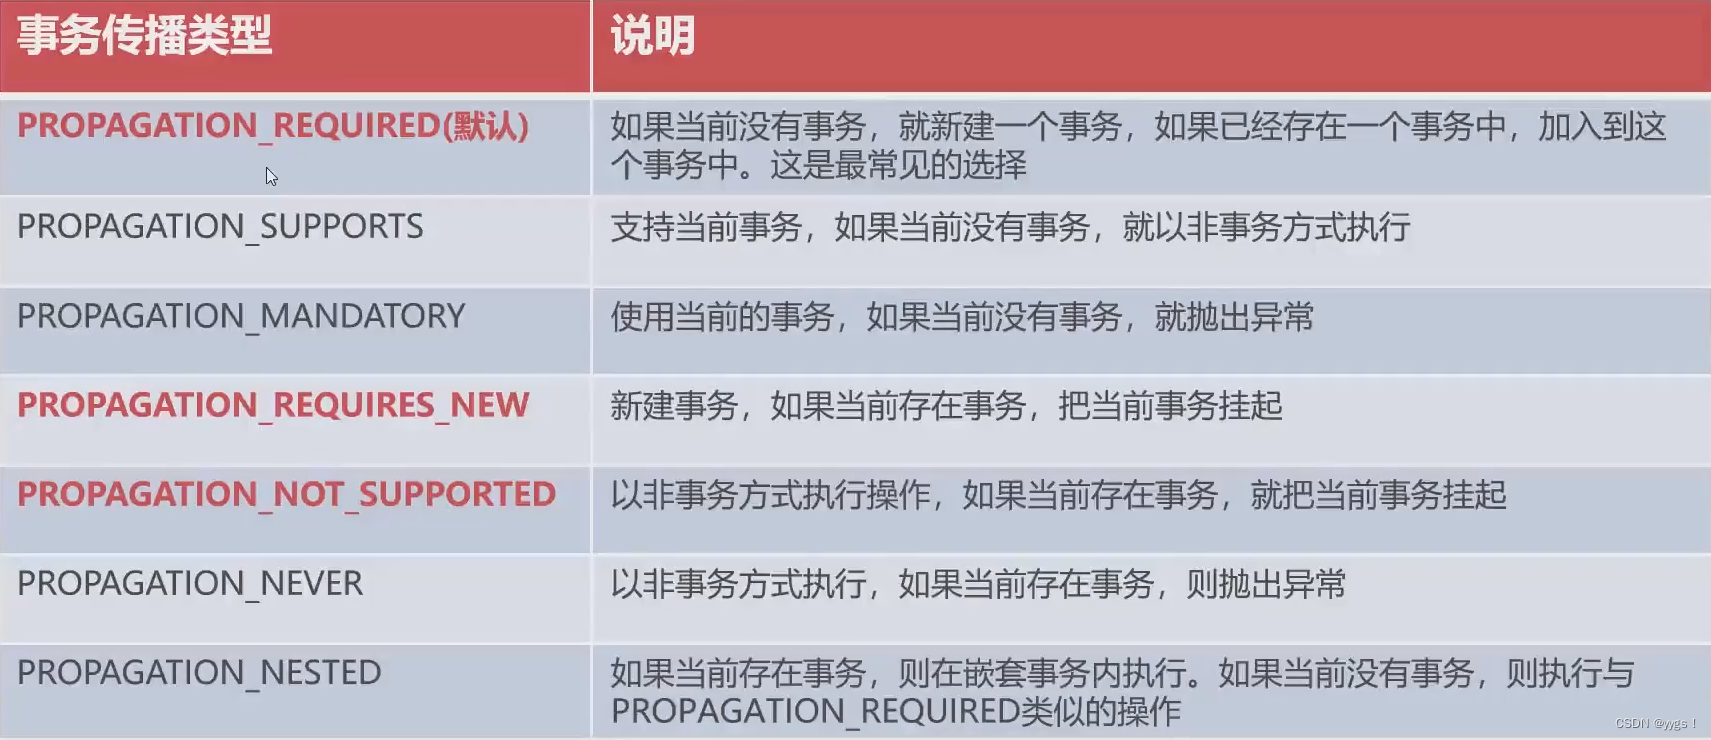
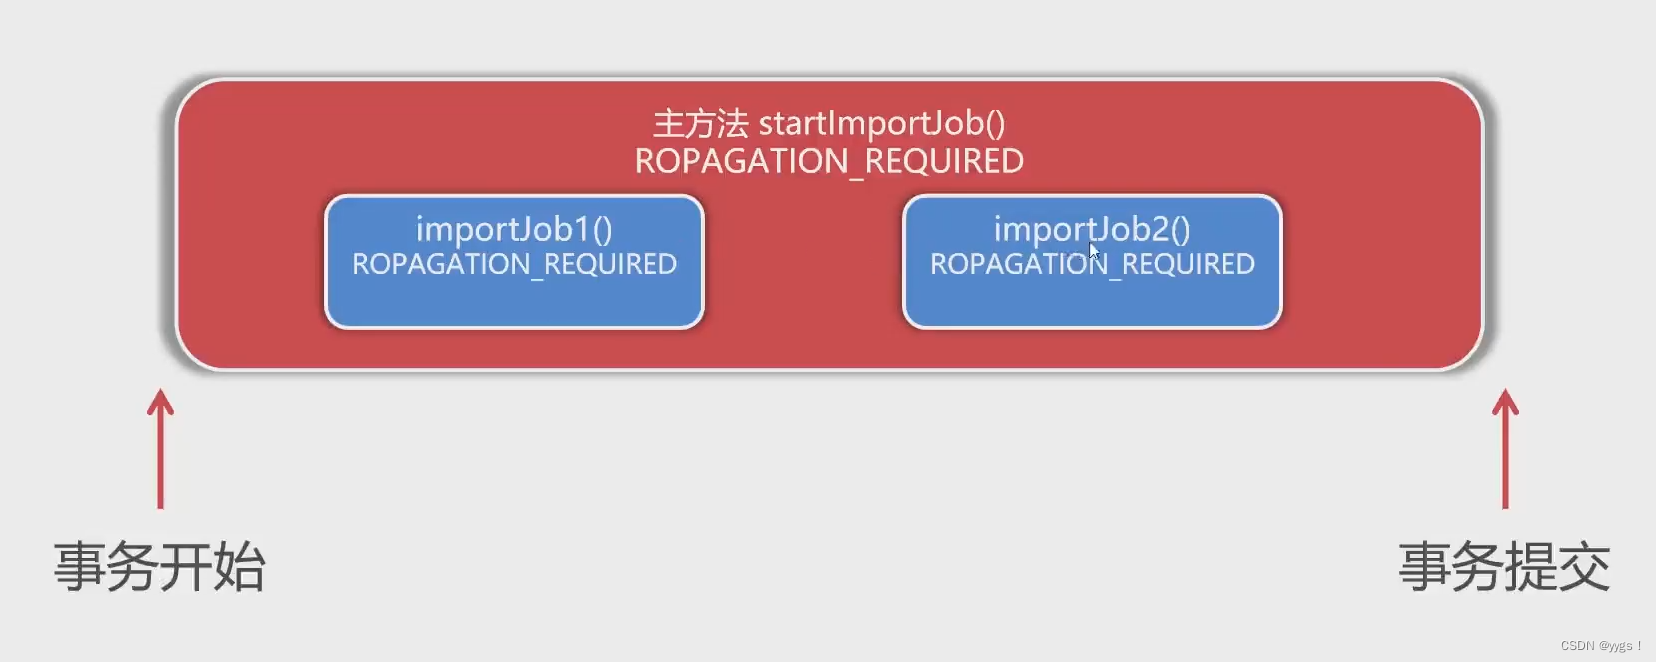
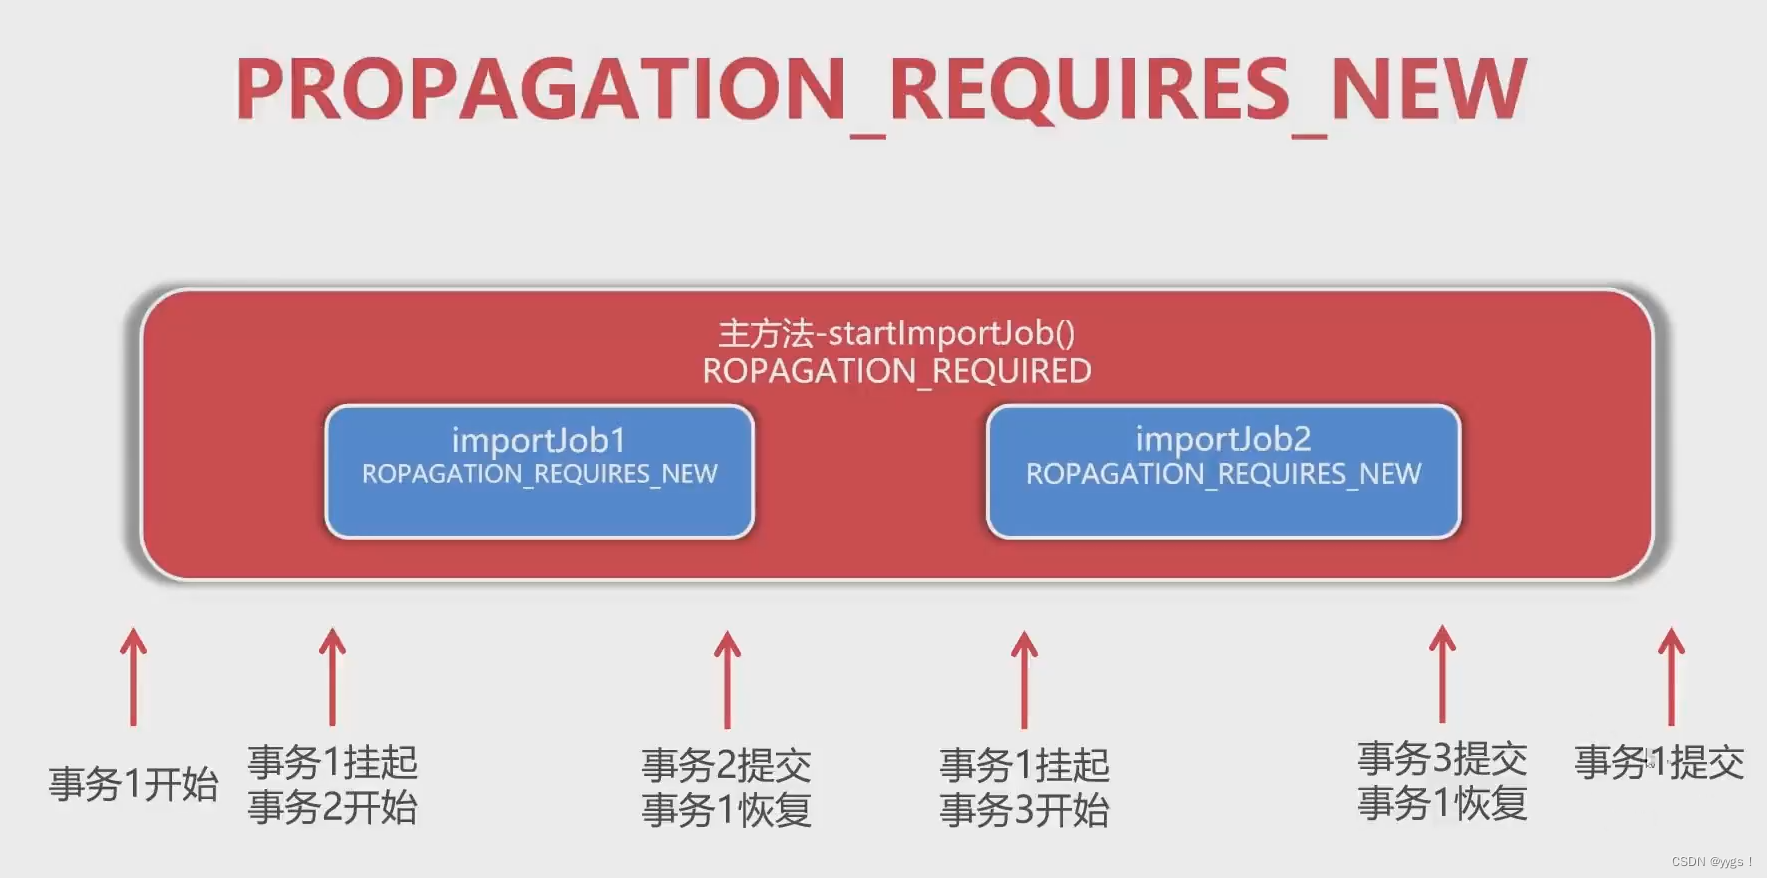
PROPAGATIO_REQUIRED:即使Job1执行成功,在Job2之前发生错误,事务也会回滚到最外层的事务Job开始时。
PROPAGATIO_NOT_SUPPORTED: 更多用在查询上,因为一般不涉及事务
4.注解式声明事务
1.导入依赖
<?xml version="1.0" encoding="UTF-8"?>
<project xmlns="http://maven.apache.org/POM/4.0.0"
         xmlns:xsi="http://www.w3.org/2001/XMLSchema-instance"
         xsi:schemaLocation="http://maven.apache.org/POM/4.0.0 http://maven.apache.org/xsd/maven-4.0.0.xsd">
    <modelVersion>4.0.0</modelVersion>

    <groupId>com.imooc.spring</groupId>
    <artifactId>jdbc</artifactId>
    <version>1.0-SNAPSHOT</version>
    <dependencies>
        <dependency>
            <groupId>org.springframework</groupId>
            <artifactId>spring-context</artifactId>
            <version>5.2.6.RELEASE</version>
        </dependency>
        <dependency>
            <groupId>org.springframework</groupId>
            <artifactId>spring-jdbc</artifactId>
            <version>5.2.6.RELEASE</version>
        </dependency>
        <dependency>
            <groupId>mysql</groupId>
            <artifactId>mysql-connector-java</artifactId>
            <version>8.0.16</version>
        </dependency>

        <dependency>
            <groupId>junit</groupId>
            <artifactId>junit</artifactId>
            <version>4.12</version>
        </dependency>
        <dependency>
            <groupId>org.springframework</groupId>
            <artifactId>spring-test</artifactId>
            <version>5.2.6.RELEASE</version>
        </dependency>

        <!--logback日志组件,Spring框架默认集成-->
        <dependency>
            <groupId>ch.qos.logback</groupId>
            <artifactId>logback-classic</artifactId>
            <version>1.2.3</version>
        </dependency>
        <dependency>
            <groupId>org.aspectj</groupId>
            <artifactId>aspectjweaver</artifactId>
            <version>1.9.5</version>
        </dependency>
    </dependencies>

</project>
2.配置xml
<?xml version="1.0" encoding="UTF-8"?>
<beans xmlns="http://www.springframework.org/schema/beans"
xmlns:xsi="http://www.w3.org/2001/XMLSchema-instance"
xmlns:context="http://www.springframework.org/schema/context"
xmlns:tx="http://www.springframework.org/schema/tx"
xmlns:aop="http://www.springframework.org/schema/aop"
xsi:schemaLocation="http://www.springframework.org/schema/beans
https://www.springframework.org/schema/beans/spring-beans.xsd
http://www.springframework.org/schema/context
https://www.springframework.org/schema/context/spring-context.xsd
http://www.springframework.org/schema/tx
https://www.springframework.org/schema/tx/spring-tx.xsd
http://www.springframework.org/schema/aop
https://www.springframework.org/schema/aop/spring-aop.xsd">
<context:component-scan base-package="com.imooc"/>
<!--数据源-->
<bean id="dataSource" class="org.springframework.jdbc.datasource.DriverManagerDataSource">
<property name="driverClassName" value="com.mysql.cj.jdbc.Driver"/>
<property name="url"
value="jdbc:mysql://localhost:3306/springJDBC?useSSL=false&useUnicode=true&characterEncoding=UTF-8&serverTimezone=Asia/Shanghai&allowPublicKeyRetrieval=true"/>
<property name="username" value="root"/>
<property name="password" value="abc123456"/>
</bean>
<!--JdbcTemplate-->
<bean id="jdbcTemplate" class="org.springframework.jdbc.core.JdbcTemplate">
<property name="dataSource" ref="dataSource"/>
</bean>
<!--事务管理器-->
<bean id="transactionManager" class="org.springframework.jdbc.datasource.DataSourceTransactionManager">
<property name="dataSource" ref="dataSource"/>
</bean>
<!-- 启用注解形式声明式事务 -->
<tx:annotation-driven transaction-manager="transactionManager"/>
</beans>3.写注解
在dao目录下的Employeedao类:
@Repository
public class EmployeeDao {
    @Resource
    private JdbcTemplate jdbcTemplate;

    public Employee findById(Integer eno){
        String sql = "select * from employee where eno = ?";
        //查询单条数据
        Employee employee = jdbcTemplate.queryForObject(sql, new Object[]{eno}, new BeanPropertyRowMapper<Employee>(Employee.class));
        return employee;
    }

    public List<Employee> findByDname(String dname){
        String sql = "select * from employee where dname = ?";
        //查询复合数据
        List<Employee> list = jdbcTemplate.query(sql, new Object[]{dname}, new BeanPropertyRowMapper<Employee>(Employee.class));
        return list;
    }

    public List<Map<String, Object>> findMapByDname(String dname){
        String sql = "select eno as empno , salary as s from employee where dname = ?";
        //将查询结果作为Map进行封装
        List<Map<String, Object>> maps = jdbcTemplate.queryForList(sql, new Object[]{dname});
        return maps;
    }

    public void insert(Employee employee){
        String sql = "insert into employee(eno,ename,salary,dname,hiredate) values(?,?,?,?,?)";
        //利用update方法实现数据写入操作
        jdbcTemplate.update(sql,new Object[]{
           employee.getEno() , employee.getEname(),employee.getSalary(),employee.getDname() , employee.getHiredate()
        });
    }

    public int update(Employee employee){
        String sql = "UPDATE employee SET ename = ?, salary = ?, dname = ?, hiredate = ? WHERE eno = ?";
        int count = jdbcTemplate.update(sql, new Object[]{employee.getEname(), employee.getSalary(), employee.getDname(), employee.getHiredate(), employee.getEno()});
        return count;
    }

    public int delete(Integer eno){
        String sql = "delete from employee where eno = ?";
        return jdbcTemplate.update(sql, new Object[]{eno});
    }


    public JdbcTemplate getJdbcTemplate() {
        return jdbcTemplate;
    }

    public void setJdbcTemplate(JdbcTemplate jdbcTemplate) {
        this.jdbcTemplate = jdbcTemplate;
    }
}
Service目录下的Service类:
@Transactional 注解:声明式事务核心注解。放在类上,事务配置会应用于当前类的所有方法上,默认事务传播为 REQUIRED,放在方法上,会优先使用方法上的方法。
@Service
@Transactional(propagation = Propagation.NOT_SUPPORTED,readOnly = true)
public class BatchService {
    @Resource
    private EmployeeDao employeeDao;
    @Transactional(propagation = Propagation.REQUIRES_NEW)
    public void importJob1(){
        for (int i = 1; i <= 10; i++) {
            Employee employee = new Employee();
            employee.setEno(8000 + i);
            employee.setEname("研发部员工" + i);
            employee.setSalary(4000f);
            employee.setDname("研发部");
            employee.setHiredate(new Date());
            employeeDao.insert(employee);
        }
    }

    @Transactional(propagation = Propagation.REQUIRES_NEW)
    public void importJob2(){
        for (int i = 1; i <= 10; i++) {
            Employee employee = new Employee();
            employee.setEno(9000 + i);
            employee.setEname("市场部员工" + i);
            employee.setSalary(4500f);
            employee.setDname("市场部");
            employee.setHiredate(new Date());
            employeeDao.insert(employee);
        }
    }

    public EmployeeDao getEmployeeDao() {
        return employeeDao;
    }

    public void setEmployeeDao(EmployeeDao employeeDao) {
        this.employeeDao = employeeDao;
    }
}
@Service
//声明式事务核心注解
//放在类上,将声明式事务配置应用于当前类所有方法,默认事务传播为 REQUIRED
@Transactional
public class EmployeeService {
    @Resource
    private EmployeeDao employeeDao;
    @Resource
    private BatchService batchService;

    @Transactional(propagation = Propagation.NOT_SUPPORTED , readOnly = true)
    public Employee findById(Integer eno){
        return employeeDao.findById(eno);
    }

    public void batchImport() {
        for (int i = 1; i <= 10; i++) {
            if(i==3){
                throw new RuntimeException("意料之外的异常");
            }
            Employee employee = new Employee();
            employee.setEno(8000 + i);
            employee.setEname("员工" + i);
            employee.setSalary(4000f);
            employee.setDname("市场部");
            employee.setHiredate(new Date());
            employeeDao.insert(employee);
        }
    }

    public void startImportJob(){
        batchService.importJob1();
        if(1==1){
            throw new RuntimeException("意料之外的异常");
        }
        batchService.importJob2();
        System.out.println("批量导入成功");
    }

    public EmployeeDao getEmployeeDao() {
        return employeeDao;
    }

    public void setEmployeeDao(EmployeeDao employeeDao) {
        this.employeeDao = employeeDao;
    }

    public BatchService getBatchService() {
        return batchService;
    }

    public void setBatchService(BatchService batchService) {
        this.batchService = batchService;
    }
}


 被折叠的 条评论
为什么被折叠?
被折叠的 条评论
为什么被折叠?
 到【灌水乐园】发言


