


 本文介绍了如何使用HAProxy进行负载均衡配置,包括roundrobin、static-rr、leastconn等多种调度算法,并通过实际测试展示了不同算法的效果,强调了HAProxy在web和数据库负载均衡中的应用。
之前一直想做mysql的读写分离实验,发现haproxy更多的是负载均衡,针对的是多从库间的负载均衡(其实也可以做web端的负载均衡)
haproxy ip 192.168.3.3
slave1 192.168.3.8
slave2 192.168.3.5
centos6.7yum库里有haproxy
yum安装完后
[root@mycat3 src]# find / -name haproxy
/usr/sbin/haproxy
/etc/rc.d/init.d/haproxy
/etc/haproxy
/var/lock/subsys/haproxy
/var/lib/haproxy
/root/haproxy-1.7.11/haproxy
主要 /etc/haproxy/haproxy.cfg
**********************************************************************
#---------------------------------------------------------------------
# Global settings
#---------------------------------------------------------------------
global
# to have these messages end up in /var/log/haproxy.log you will
# need to:
#
# 1) configure syslog to accept network log events. This is done
# by adding the '-r' option to the SYSLOGD_OPTIONS in
# /etc/sysconfig/syslog
#
# 2) configure local2 events to go to the /var/log/haproxy.log
# file. A line like the following can be added to
# /etc/sysconfig/syslog
#
# local2.* /var/log/haproxy.log
#
log 127.0.0.1 local2
chroot /var/lib/haproxy
pidfile /var/run/haproxy.pid
maxconn 4000
user haproxy
group haproxy
daemon
defaults
mode http
log global
option httplog
option dontlognull
option http-server-close
option forwardfor except 127.0.0.0/8
option redispatch
retries 3
timeout http-request 10s
timeout queue 1m
timeout connect 10s
timeout client 1m
timeout server 1m
timeout http-keep-alive 10s
timeout check 10s
maxconn 30000
listen stats #关联前端和后端定义一个完整的代理
mode http #设置代理协议
bind 0.0.0.0:8080 #绑定相应的端口
stats enable #开启Haproxy统计状态
stats refresh 3s #统计页面自动刷新时间间隔
stats hide-version #隐藏代理服务器版本
stats uri /haproxyadmin?stats #访问的url
stats realm Haproxy\ Statistics #统计页面认证时提示内容信息
stats auth admin:123456 #设置登录用户和密码
stats admin if TRUE #如果认证通过,则就可以打开stats
frontend http-in
bind *:80
mode http
log global
option httpclose
option logasap
option dontlognull
capture request header Host len 20
capture request header Referer len 60
default_backend servers
frontend healthcheck
bind :1099
mode http
option httpclose
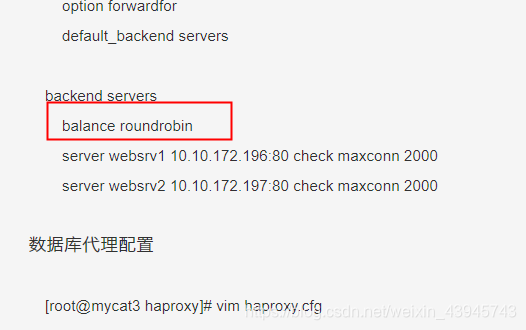
option forwardfor
default_backend servers
backend servers
balance roundrobin
server websrv1 10.10.172.196:80 check maxconn 2000
server websrv2 10.10.172.197:80 check maxconn 2000
数据库代理配置
[root@mycat3 haproxy]# vim haproxy.cfg


global
    log         127.0.0.1 local2
    chroot      /var/lib/haproxy
    pidfile     /var/run/haproxy.pid
    maxconn     4000
    user        haproxy
    group       haproxy
    daemon
    stats socket /var/lib/haproxy/stats

defaults
        log     global
        log 127.0.0.1 local3
        mode    http
        option  tcplog
        option  dontlognull
        retries 10
        option redispatch
        maxconn         2000
        timeout connect         10s
        timeout client          1m
        timeout server          1m
        timeout http-keep-alive 10s
        timeout check           10s

listen  mysql
        bind 0.0.0.0:7306    监听所有IP的7306端口
        mode tcp
        balance roundrobin
        server mysql1 192.168.3.8:3306
        server mysql2 192.168.3.5:3306

listen stats                                  #这个是配置的web页面内容,通过web方式来查看haproxy的状态
        bind 0.0.0.0:1080
        mode http
        option httplog
        maxconn 10
        stats refresh 30s
        stats uri /stats
        stats realm XingCloud\ Haproxy
        stats auth admin:admin #用这个账号和密码登录,可以自己设置
        stats auth Frank:Frank
        stats hide-version
        stats admin if TRUE
Navicat for MySQL 进行连接 haproxy的端口 7306
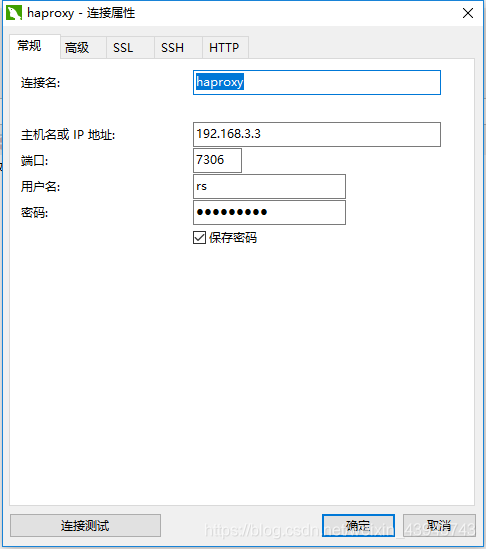
可以看得出来轮询slave1和slave2的内容
web查看方式 192.168.3.3:1080/stats 之前配置文件中配置的账户是admin密码是admin

这里的负载均衡都采用的roundrobin(轮询调度)
轮询调度(Round Robin 简称’RR’)算法就是按依次循环的方式将请求调度到不同的服务器上,该算法最大的特点就是实现简单。轮询算法假设所有的服务器处理请求的能力都一样的,调度器会将所有的请求平均分配给每个真实服务器
roundrobin
 #配置
    balance     roundrobin
    server  web1 192.168.10.203:80 check
    server  web2 192.168.10.204:80 check

    #测试,haproxy以1:1的权重比对后端服务器进行轮询
    ]# curl 192.168.10.201
    welcome to web2
    ]# curl 192.168.10.201
    welcome to web1
    ]# curl 192.168.10.201
    welcome to web2
    ]# curl 192.168.10.201
    welcome to web1
#配置
balance roundrobin
server web1 192.168.10.203:80 weight 3 check
server web2 192.168.10.204:80 weight 1 check
#测试,可以在运行时动态调整权重
]# systemctl reload haproxy
]# curl 192.168.10.201
welcome to web1
]# curl 192.168.10.201
welcome to web1
]# curl 192.168.10.201
welcome to web1
]# curl 192.168.10.201
welcome to web2
static-rr
#配置
balance static-rr
server web1 192.168.10.203:80 check
server web2 192.168.10.204:80 check
#测试
]# curl 192.168.10.201
welcome to web1
]# curl 192.168.10.201
welcome to web2
]# curl 192.168.10.201
welcome to web1
]# curl 192.168.10.201
welcome to web2
#配置
balance static-rr
server web1 192.168.10.203:80 weight 1 check
server web2 192.168.10.204:80 weight 3 check
#测试,重读配置文件一样可以生效,有点糊涂了…静态方法和动态方法区别???
]# systemctl reload haproxy
]# curl 192.168.10.201
welcome to web1
]# curl 192.168.10.201
welcome to web1
]# curl 192.168.10.201
welcome to web1
]# curl 192.168.10.201
welcome to web2
leastconn
#配置
balance leastconn
server web1 192.168.10.203:80 check
server web2 192.168.10.204:80 check
#测试
和roundrobin一摸一样…果然不适合http这种短连接?
first
#配置
balance first
server web1 192.168.10.203:80 check
server web2 192.168.10.204:80 check
#测试,一直是203web服务器在响应,估计要等到最大连接数才转换到204吧
]# curl 192.168.10.201
welcome to web1
]# curl 192.168.10.201
welcome to web1
]# curl 192.168.10.201
welcome to web1
]# curl 192.168.10.201
welcome to web1
source
#配置
balance source
server web1 192.168.10.203:80 check
server web2 192.168.10.204:80 check
#测试,在node2上访问一直是web1,在node1上访问一直是web2
[root@node2 ~]# curl 192.168.10.201
welcome to web1
[root@node2 ~]# curl 192.168.10.201
welcome to web1
[root@node1 ~]# curl 192.168.10.201
welcome to web2
[root@node1 ~]# curl 192.168.10.201
welcome to web2
uri
#配置
balance uri
server web1 192.168.10.203:80 check
server web2 192.168.10.204:80 check
#测试,同一uri绑定在同一台服务器
]# curl 192.168.10.201/test1.html
welcome to page1 on web2
]# curl 192.168.10.201/test1.html
welcome to page1 on web2
]# curl 192.168.10.201/test2.html
welcome to page2 on web1
]# curl 192.168.10.201/test2.html
welcome to page2 on web1
]# curl 192.168.10.201/test3.html
welcome to page3 on web2
]# curl 192.168.10.201/test3.html
welcome to page3 on web2
url_param
#配置文件
balance     url_param test
server  web1 192.168.10.203:80 check
server  web2 192.168.10.204:80 check

#测试,同一param会被调度到同一台服务器,若没有param则会使用roundrobin算法
]# curl 192.168.10.201?test=one
welcome to web1
]# curl 192.168.10.201?test=one
welcome to web1
]# curl 192.168.10.201?test=1
welcome to web2
]# curl 192.168.10.201?test=1
welcome to web2
]# curl 192.168.10.201
welcome to web1
]# curl 192.168.10.201
welcome to web2
hdr(< name>)
#配置
balance hdr(user-agent)
server web1 192.168.10.203:80 check
server web2 192.168.10.204:80 check
#测试,不同的浏览器,不同的user-agent会被固定分配到不同的服务器
使用chrome:welcome to web1
使用ie:welcome to web2
总结
HAProxy是一款优秀的负载均衡软件,丰富的配置使其可以轻松实现会话绑定,url绑定,hdr绑定乃至动静分离等功能
作者:staightChen
来源:优快云
原文:https://blog.youkuaiyun.com/eddie_cm/article/details/79796883
版权声明:本文为博主原创文章,转载请附上博文链接!


 被折叠的 条评论
为什么被折叠?
被折叠的 条评论
为什么被折叠?
 到【灌水乐园】发言


