


中软实习培训记录十三(0804)
Shiro框架
简介
shiro是一个安全框架,集成了很多安全上的操作和功能,包括处理身份验证、授权等等,为非常多的企业所使用。除了Shiro外,spring security也是一种安全框架,但是相比之外Shiro更加的简单,所以此次项目中,选择运用Shiro。
Shiro框架搭建
1、对于权限,我们不再像前面的功能模块那样出现在界面上,我们直接在数据库中建一张权限表t_permission

为了实现用户和权限之间的联系,我们需要中间表和角色表【该角色主要是针对进入后台管理页面的管理员,对这些管理员的职能进行划分】
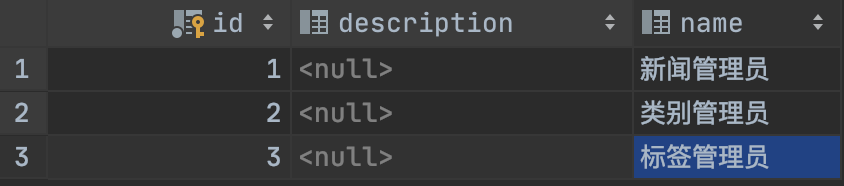
角色表:
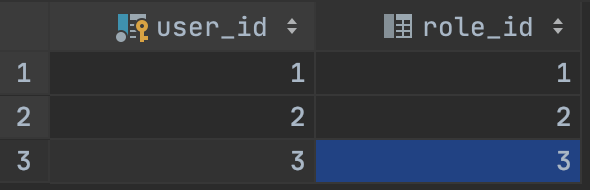
中间表1 t_user_roles【将用户user与角色身份绑定】:
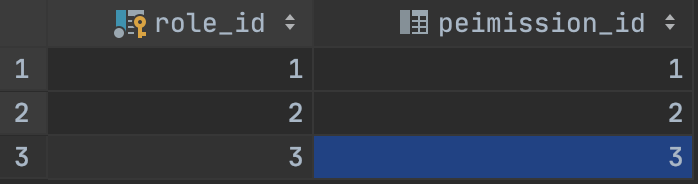
中间表2 t_role_permissions【将角色与权限绑定】:
2、对应上述的数据库设计,我们修改实体类,增加Role实体类【一个角色会有多个用户对应,同样一个用户也可以拥有多个角色,同理对应权限】:
@Entity
@Table(name = "t_role")
public class Role implements Serializable {

    private static final long serialVersionUID = -8533282361798299549L;

    @Id
    private Long id;
    private String name;
    private String description;

    @ManyToMany(mappedBy = "roles")
    private Set<User> users = new HashSet<>(0);

    @ManyToMany(fetch = FetchType.EAGER)
    private Set<Permission> permissions = new HashSet<>(0);

    public static long getSerialVersionUID() {
        return serialVersionUID;
    }

    public Long getId() {
        return id;
    }

    public void setId(Long id) {
        this.id = id;
    }

    public String getName() {
        return name;
    }

    public void setName(String name) {
        this.name = name;
    }

    public String getDescription() {
        return description;
    }

    public void setDescription(String description) {
        this.description = description;
    }

    public Set<User> getUsers() {
        return users;
    }

    public void setUsers(Set<User> users) {
        this.users = users;
    }

    public Set<Permission> getPermissions() {
        return permissions;
    }

    public void setPermissions(Set<Permission> permissions) {
        this.permissions = permissions;
    }

    @Override
    public String toString() {
        return "Role{" +
                "id=" + id +
                ", name='" + name + '\'' +
                ", description='" + description + '\'' +
                ", permissions=" + permissions +
                '}';
    }
}
增加一个Permission类:
@Entity
@Table(name = "t_permission")
public class Permission implements Serializable {

    private static final long serialVersionUID = 4276172530134629694L;

    @Id
    @GeneratedValue(strategy = GenerationType.IDENTITY)
    private Long id;
    private String name;
    private String code;
    private String description;

    @ManyToMany(mappedBy = "permissions")
    private Set<Role> roles = new HashSet<>();

    public static long getSerialVersionUID() {
        return serialVersionUID;
    }

    public Long getId() {
        return id;
    }

    public void setId(Long id) {
        this.id = id;
    }

    public String getName() {
        return name;
    }

    public void setName(String name) {
        this.name = name;
    }

    public String getCode() {
        return code;
    }

    public void setCode(String code) {
        this.code = code;
    }

    public String getDescription() {
        return description;
    }

    public void setDescription(String description) {
        this.description = description;
    }

    public Set<Role> getRoles() {
        return roles;
    }

    public void setRoles(Set<Role> roles) {
        this.roles = roles;
    }

    @Override
    public String toString() {
        return "Permission{" +
                "id=" + id +
                ", name='" + name + '\'' +
                ", code='" + code + '\'' +
                ", description='" + description + '\'' +
                '}';
    }
}
因为我们设置了实体类之间的关联,所以对应的在User类中也要添加对应的关联:
 @ManyToMany(fetch = FetchType.EAGER)
    private Set<Role> roles = new HashSet<>(0);
3、在上述实体类的构建过程中,我们可以看到我们使role和permission实体类实现了接口Serializable,,并且添加了一个序列化的属性值。该部分是需要我们额外配置的。
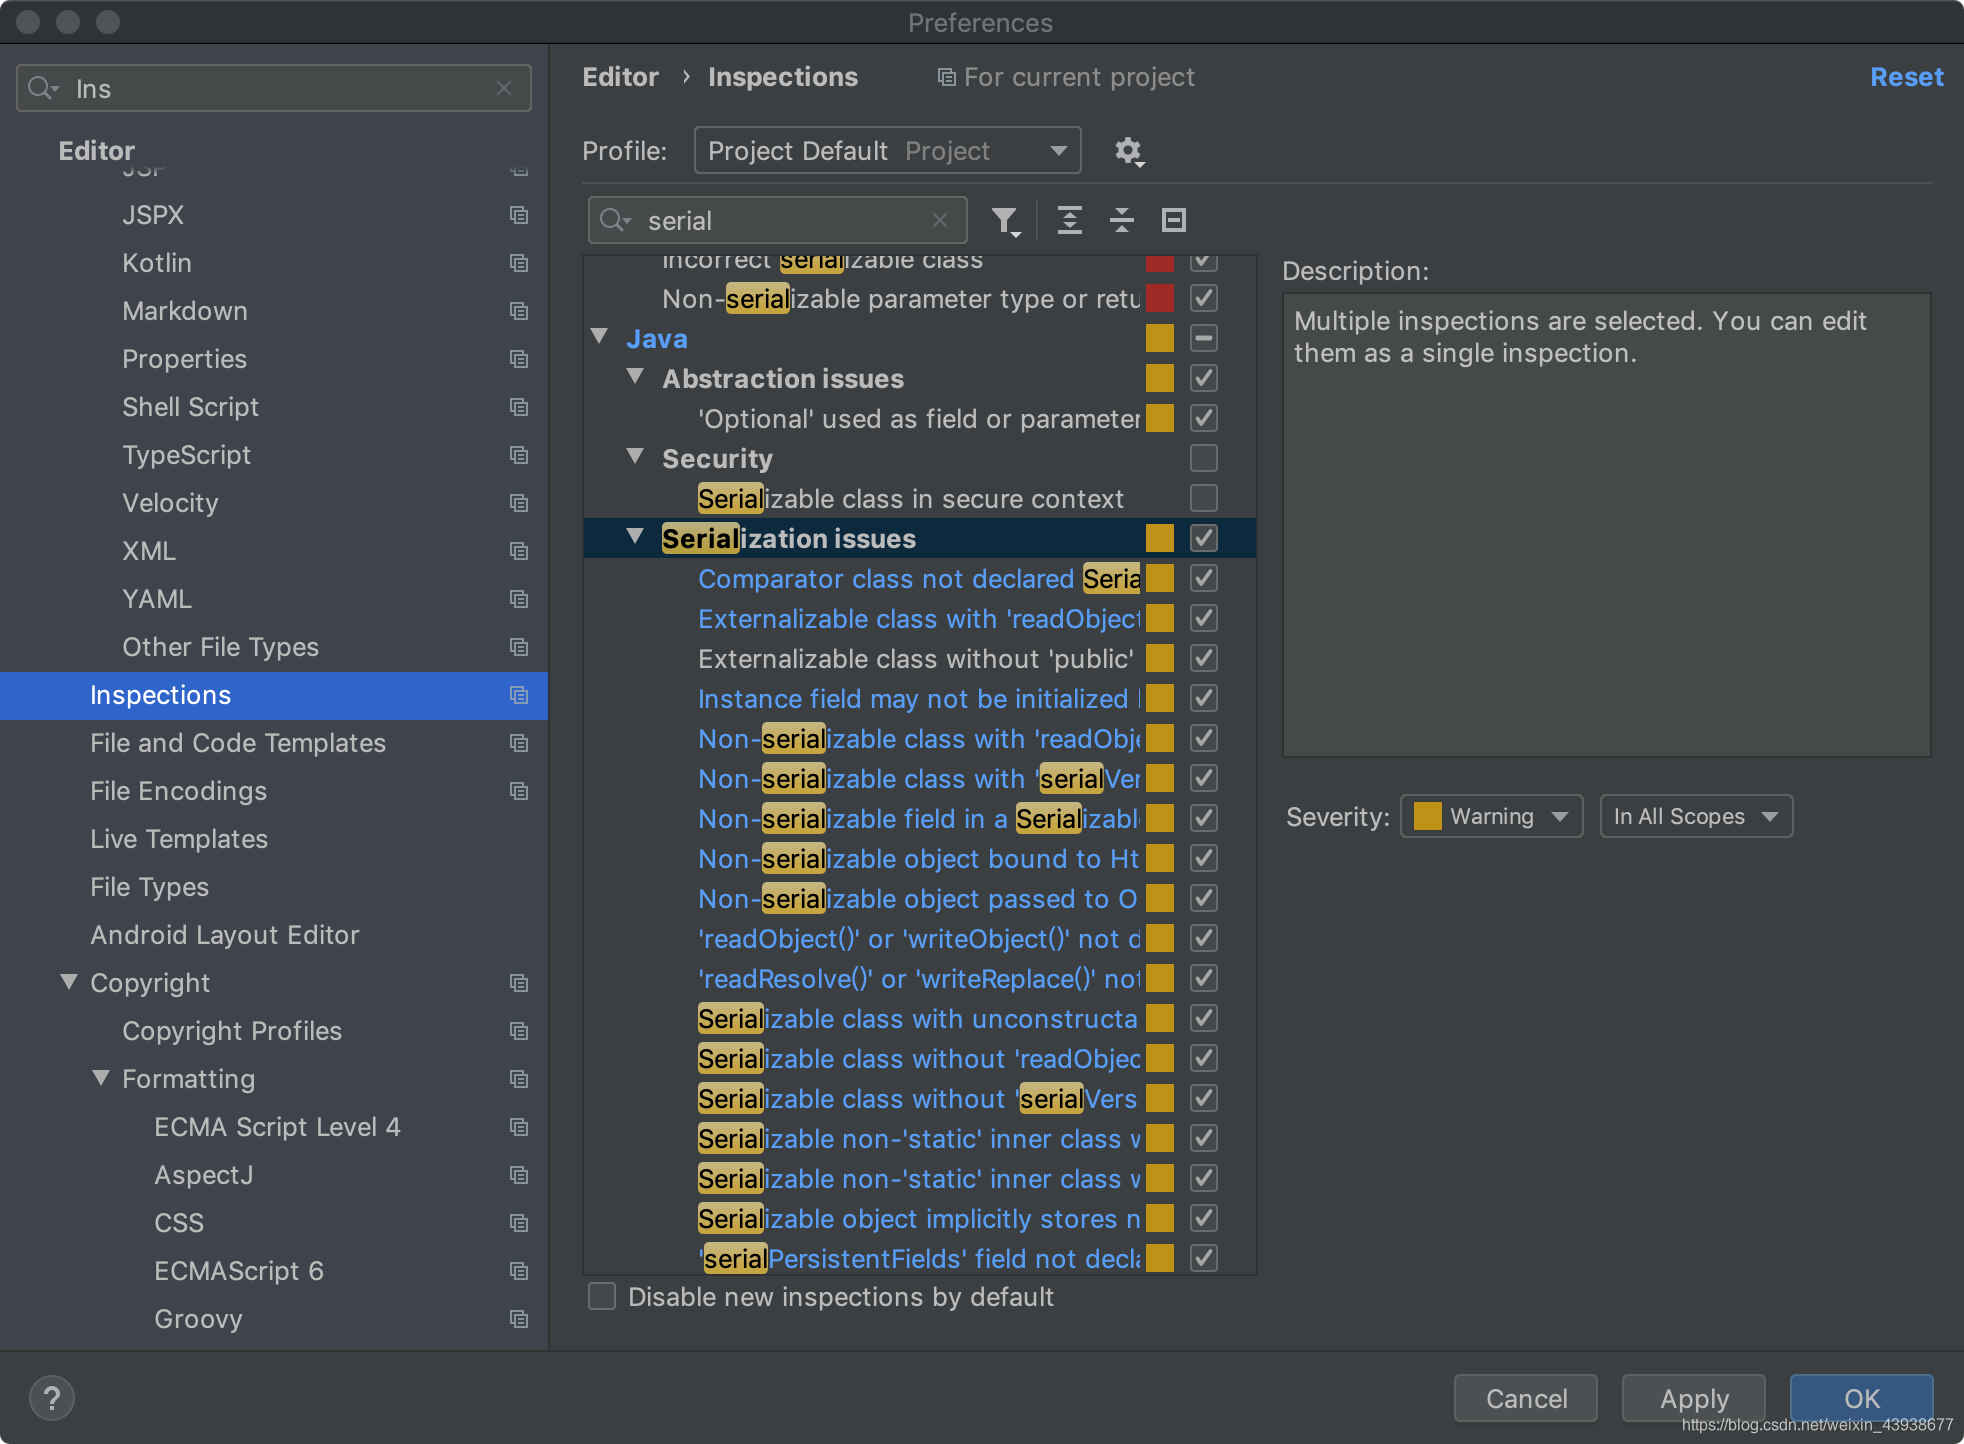
将serialization issues全部勾选,apply,OK,点一下Role和Permission类名,option+回车,添加序列IDserialVersionUID
这样,在数据库中就会自动帮助我们建好t_role_permissions和t_user_roles表
4、实体类建完之后,我们需要在pom.xml中添加依赖:
<dependency>
            <groupId>org.apache.shiro</groupId>
            <artifactId>shiro-core</artifactId>
            <version>1.3.2</version>
        </dependency>

        <dependency>
            <groupId>org.apache.shiro</groupId>
            <artifactId>shiro-spring</artifactId>
            <version>1.3.2</version>
        </dependency>
记得刷新依赖jar包。
4、我们要完成Shiro,需要进行一定的配置,首先得再建一个realm包,在其中建NewsRealm类,使其继承AuthorizingRealm
public class NewsRealm extends AuthorizingRealm {

    @Autowired
    private UserService userService;

    public void setName(String name){
       super.setName("newsRealm");
    }

    @Override
    protected AuthorizationInfo doGetAuthorizationInfo(PrincipalCollection principalCollection) {
        //获得认证的用户数据
        User user = (User) principalCollection.getPrimaryPrincipal();
        //构造认证数据
        SimpleAuthorizationInfo info = new SimpleAuthorizationInfo();
        Set<Role> roles = user.getRoles();
        for(Role role: roles){
            //添加角色信息
            info.addRole(role.getName());
            for(Permission permission: role.getPermissions()){
                //添加权限信息
                info.addStringPermission(permission.getCode());
            }
        }
        return info;
    }

    @Override
    protected AuthenticationInfo doGetAuthenticationInfo(AuthenticationToken authenticationToken) throws AuthenticationException {
        UsernamePasswordToken upToken = (UsernamePasswordToken)authenticationToken;
        String username = upToken.getUsername();
        String password = new String(upToken.getPassword());
        User user = userService.checkUser(username, password);
        if(user != null){
            return new SimpleAuthenticationInfo(user,user.getPassword(),this.getName());
        }
        return null;
    }
}
5、再在与web、dao等包同级的地方,新建一个Shiro的配置文件——ShiroConfiguration类,其中包含了shiro框架的一个大致流程:
- 创建realm
- 创建安全管理器
- 配置Shiro过滤器工厂
- 开启Shiro注解支持
@Configuration
public class ShiroConfiguration {
//创建realm
@Bean
public NewsRealm getRealm(){
return new NewsRealm();
}
//创建安全管理器
@Bean
public SecurityManager securityManager(NewsRealm realm){
//使用默认的安全管理器
DefaultWebSecurityManager securityManager = new DefaultWebSecurityManager();
//将自定义realm交给安全管理器统一调度管理
return securityManager;
}
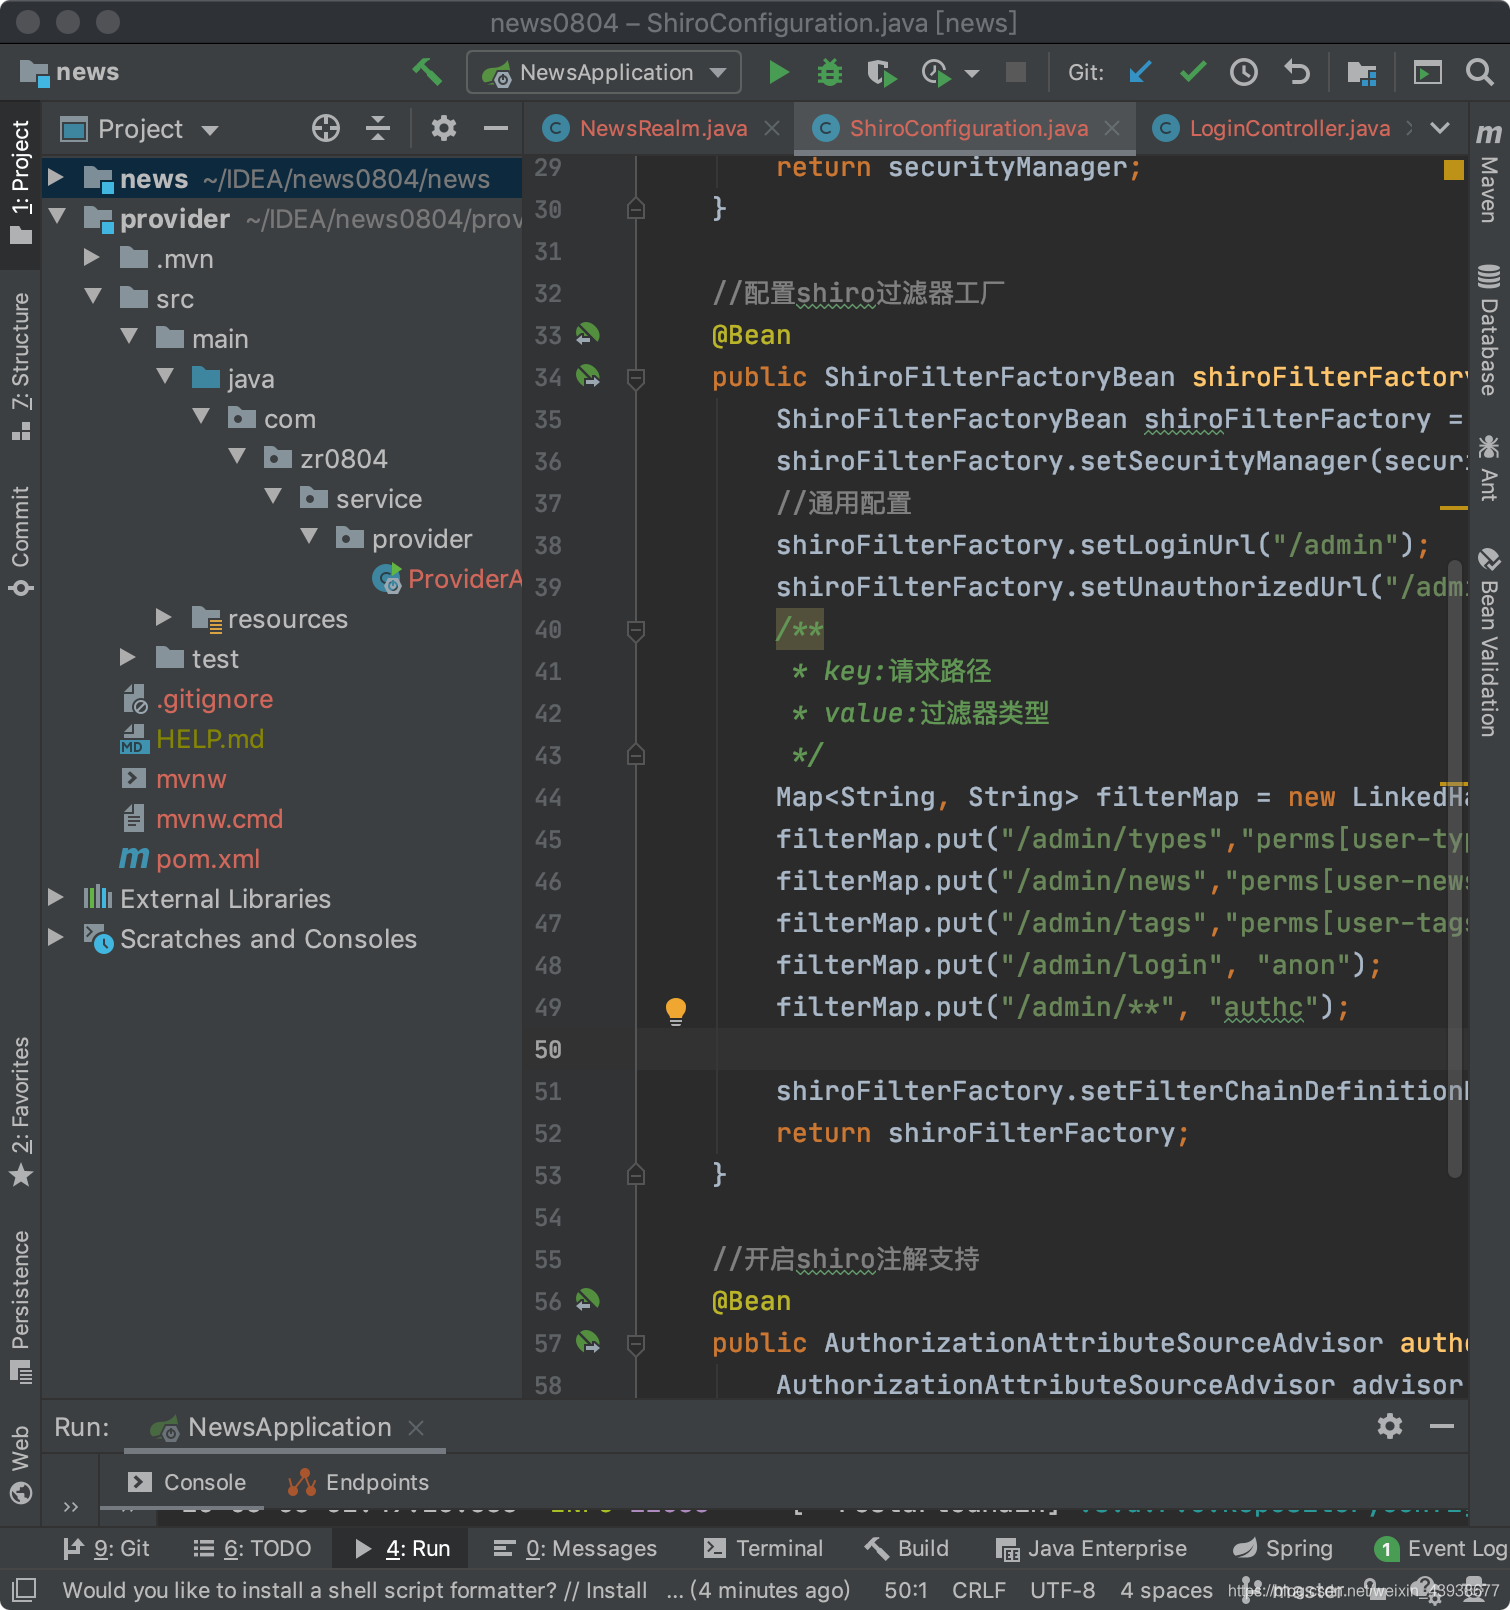
//配置shiro过滤器工厂
@Bean
public ShiroFilterFactoryBean shiroFilterFactoryBean(SecurityManager securityManager){
ShiroFilterFactoryBean shiroFilterFactory = new ShiroFilterFactoryBean();
shiroFilterFactory.setSecurityManager(securityManager);
//通用配置
shiroFilterFactory.setLoginUrl("/admin");
shiroFilterFactory.setUnauthorizedUrl("/admin");
/**
* key:请求路径
* value:过滤器类型
*/
Map<String, String> filterMap = new LinkedHashMap<>();
filterMap.put("/admin/login", "anon");//游客访问,登录请求不做权限设置
filterMap.put("/admin/**", "authc");//登录需要认证
shiroFilterFactory.setFilterChainDefinitionMap(filterMap);
return shiroFilterFactory;
}
//开启shiro注解支持
@Bean
public AuthorizationAttributeSourceAdvisor authorizationAttributeSourceAdvisor(SecurityManager securityManager){
AuthorizationAttributeSourceAdvisor advisor = new AuthorizationAttributeSourceAdvisor();
advisor.setSecurityManager(securityManager);
return null;
}
}
以上我们就完成了基本的shiro框架的搭建。后续若有对配置进行更改的,也会在后面的博客中具体指出。
登录拦截实现
我们完成了基本的Shiro框架搭建,现在开始进行应用
1、在Controller中,我们将原来写的login方法中的操作注释掉,写入新的内容:
@PostMapping("/login")
    public String login(@RequestParam String username, @RequestParam String password,
                        HttpSession session, RedirectAttributes attributes){

//        User user = userService.checkUser(username, password);
//        if(user != null){
//            user.setPassword(null);
//            session.setAttribute("user", user);
//            return "admin/index";
//        }else{
//            attributes.addFlashAttribute("message", "用户名密码错误");
//            return "redirect:/admin";
//        }
        try{
            //构造登录令牌
            UsernamePasswordToken uptoken = new UsernamePasswordToken(username, password);
            //获取subject
            Subject subject = SecurityUtils.getSubject();
            subject.login(uptoken);
            User user = (User) subject.getPrincipal();
            session.setAttribute("user", user);
            return "admin/index";
        }catch (Exception e){
            attributes.addFlashAttribute("message", "用户名或密码错误");
            return "redirect:/admin";
        }
    }
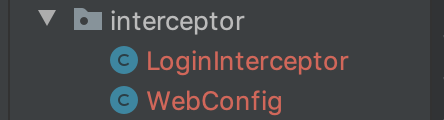
2、将原来写过的两个拦截器类:
都注释掉。此时若我们运行程序,如果Shiro没有成功,则我们可以直接跳过登录进入界面,若生效了,目前实现的效果就与拦截器一致。
权限管理实现
上文我们已经说明了,为权限管理建立了四张表,分别是t_role、t_permission、t_user_roles、t_role_permissions
1、在ShiroConfiguration的配置过滤器工厂环节,增加三个过滤器,对应三种权限
filterMap.put("/admin/types","perms[user-types]");
        filterMap.put("/admin/news","perms[user-news]");
        filterMap.put("/admin/tags","perms[user-tags]");
2、此时再次运行程序,可以发现,我们原先设定用户名为1 的用户登录之后,只能进入news界面,tags和types的界面进不去,一旦点击这两个,就会直接回到登陆界面。说明权限管理生效。
微服务 Spring Cloud
微服务特点:
- 单一职责
- 自治(每一个单独的服务都有自己的数据源,单一部署)
引入Spring Cloud
在Spring Cloud中,有几大组件:
- Eureka: 服务治理组件,脑寒了服务注册中心,服务注册与发现机制的实现
- Zuul:网管组件,提供智能路由
- Ribbon:负载均衡
- Feign:服务调用
- Hystrix:容错管理组件
了解了几大组件之后,我们尝试在我们的项目中进行使用,由于时间关系,仅以Eureka组件为例进行实现。
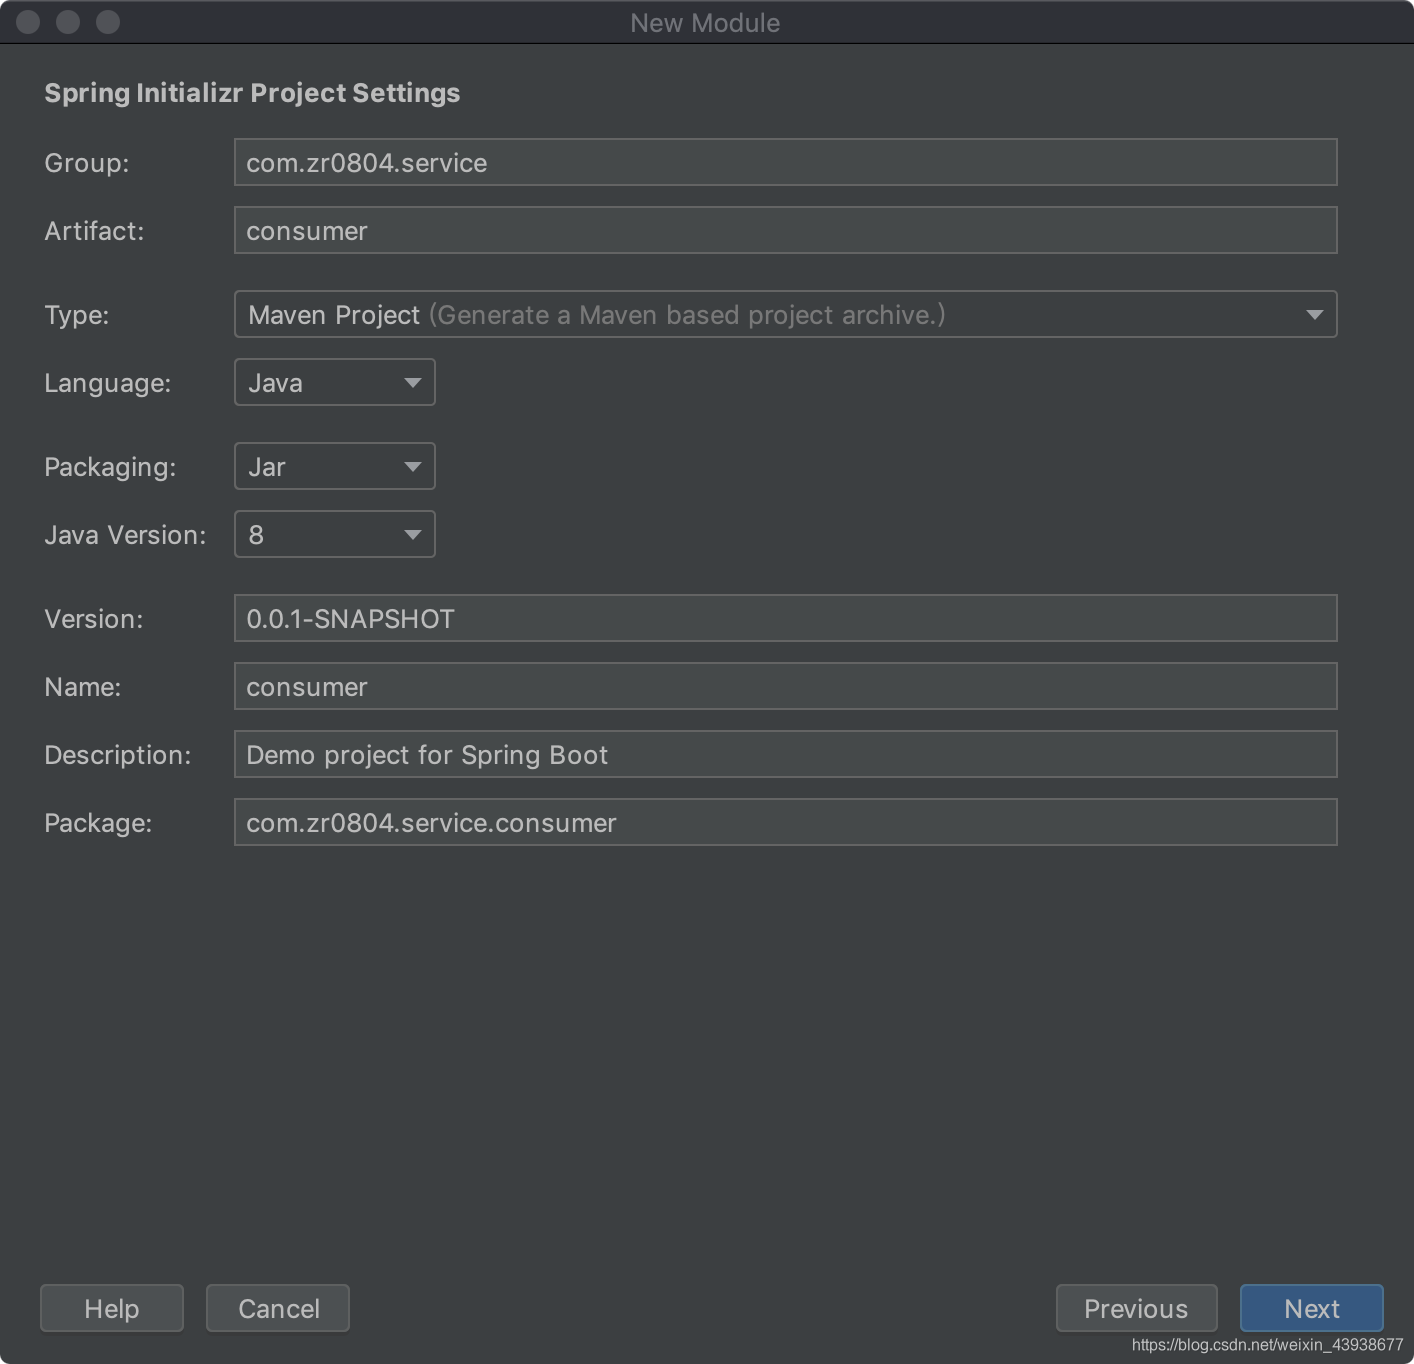
1、new Module
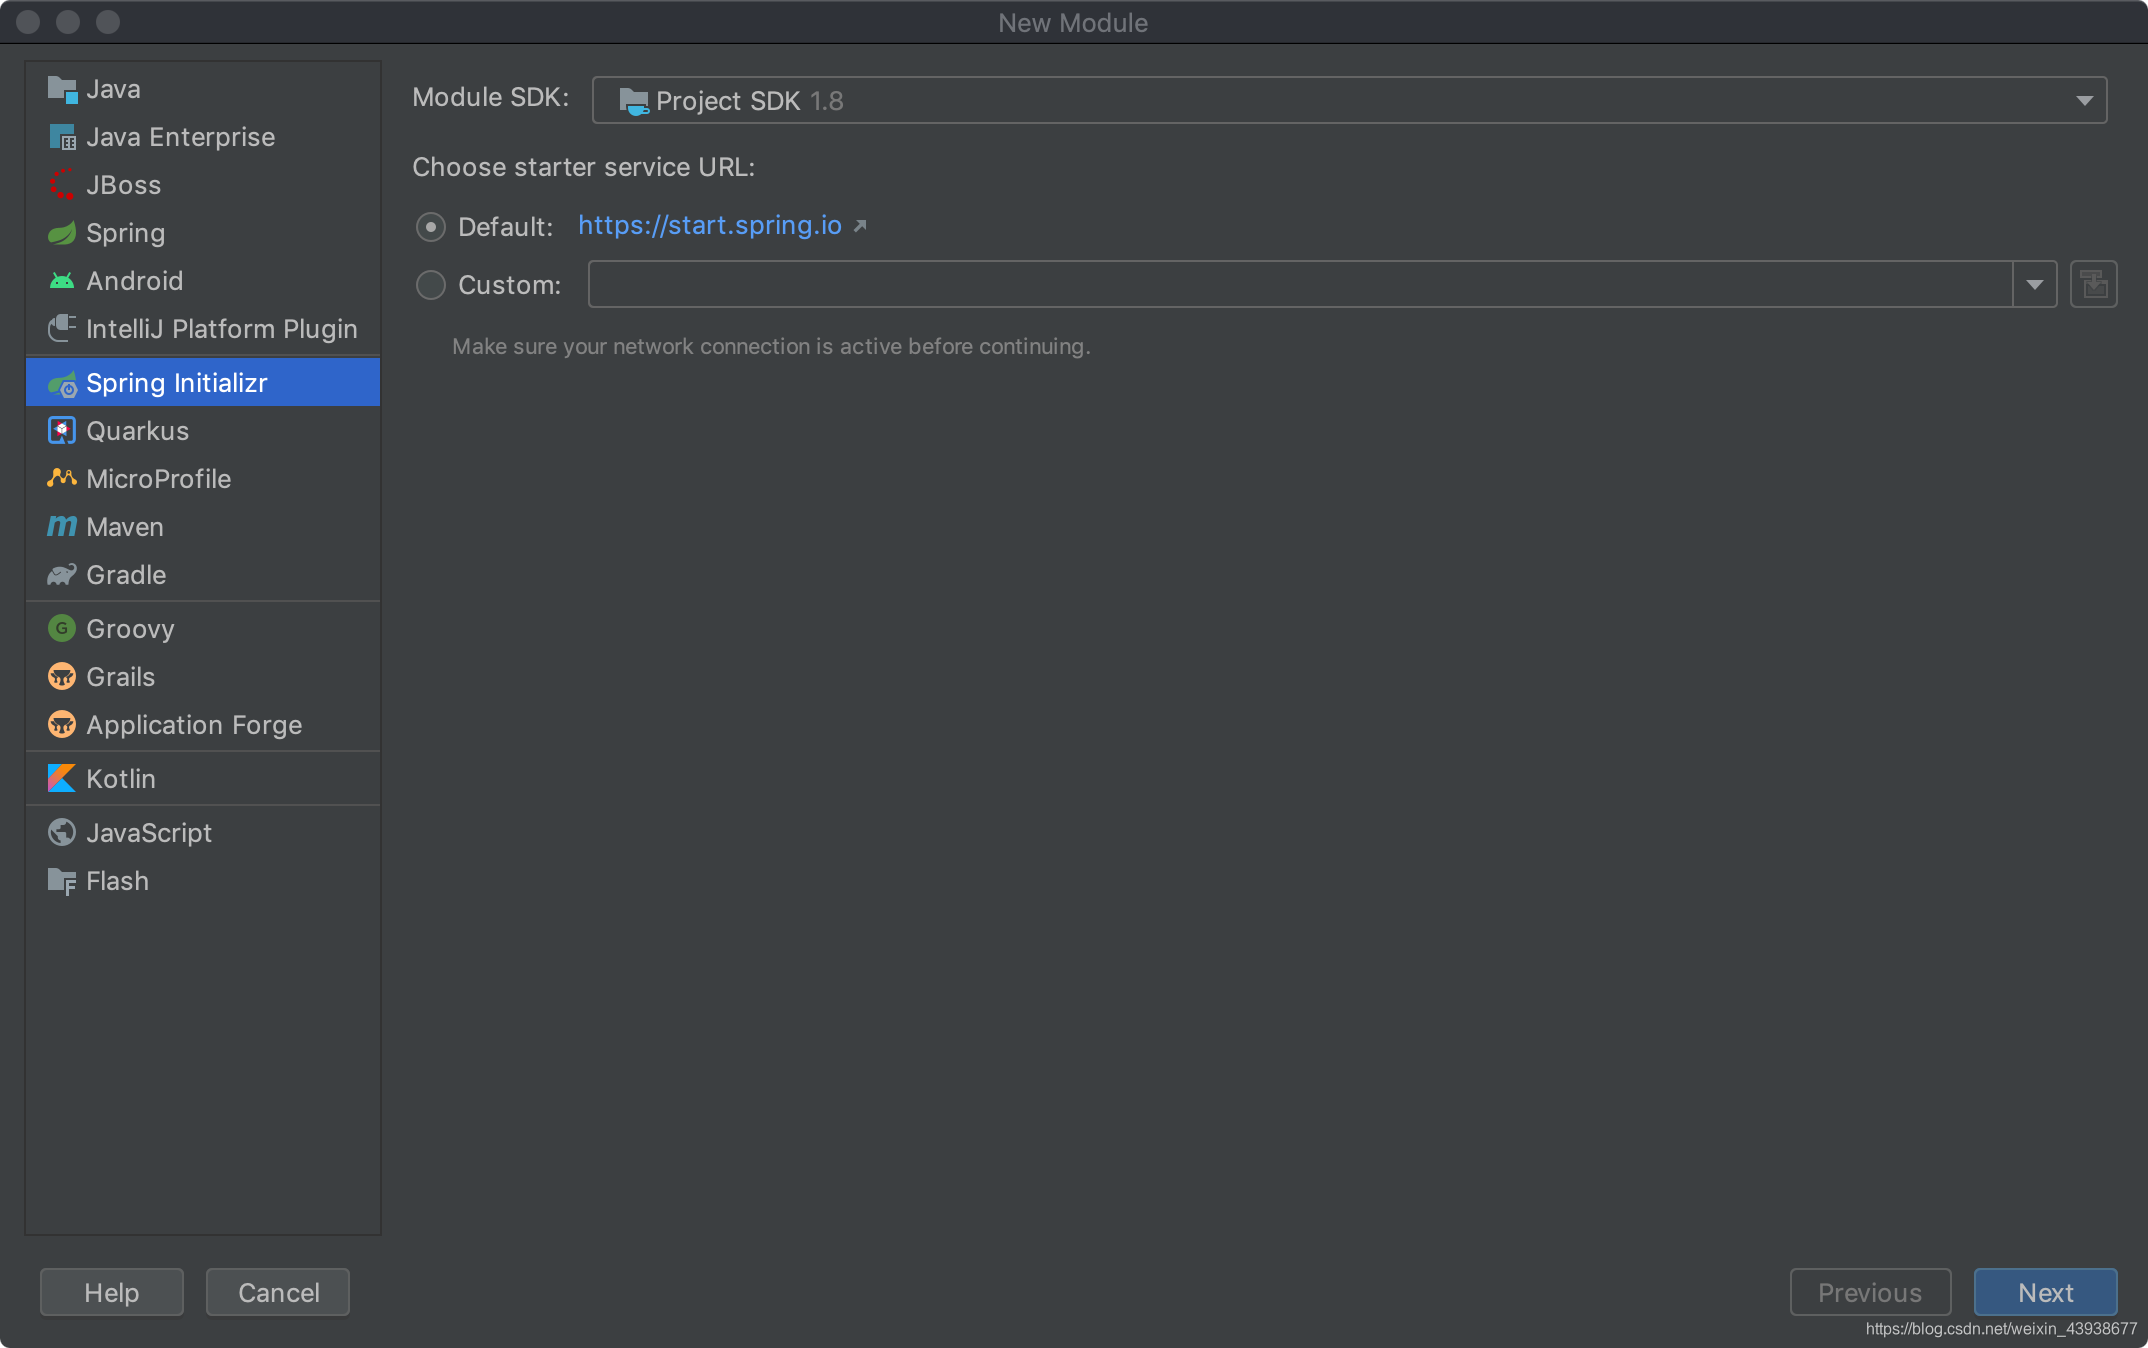
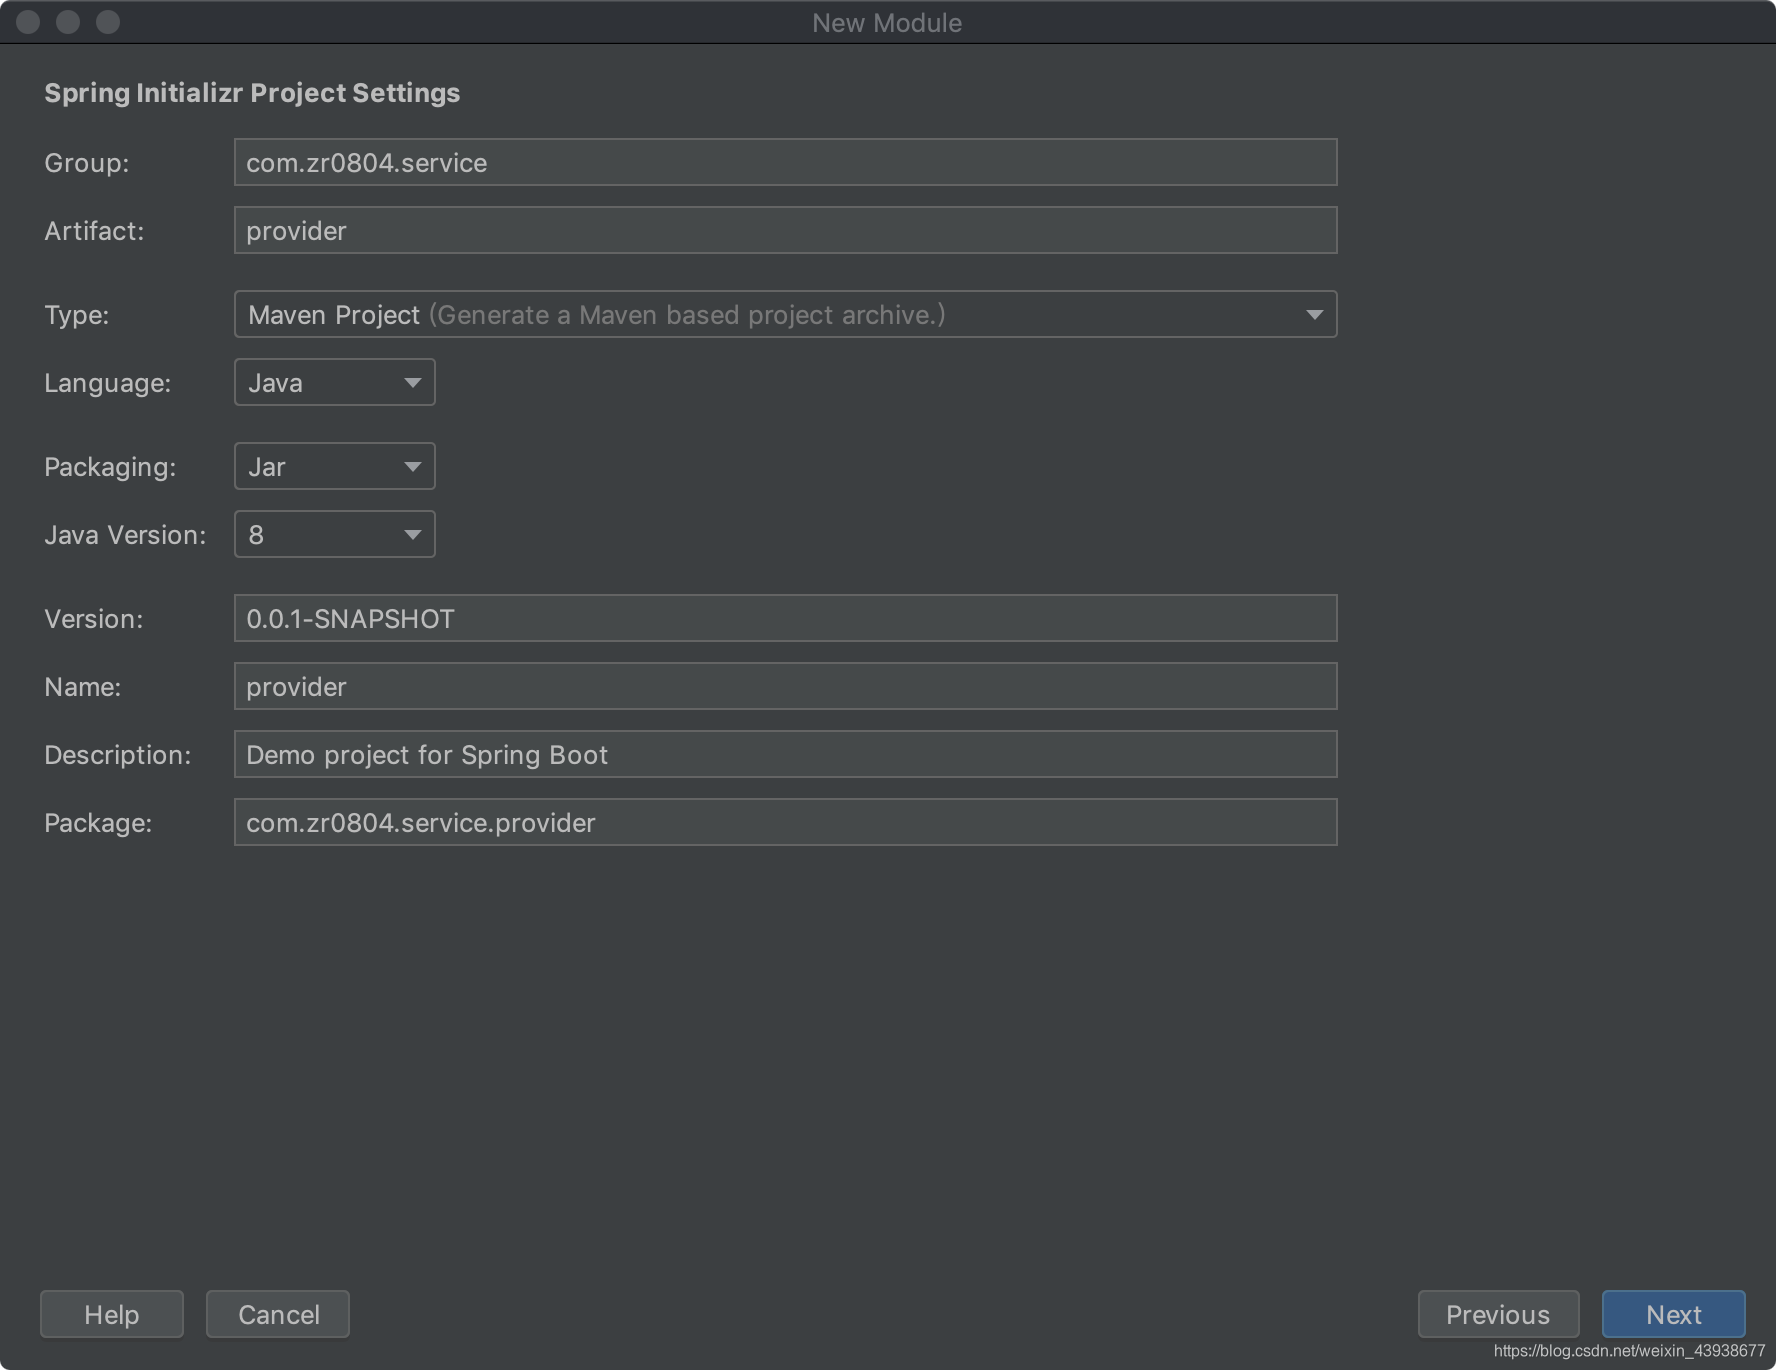
点击next,修改文件信息
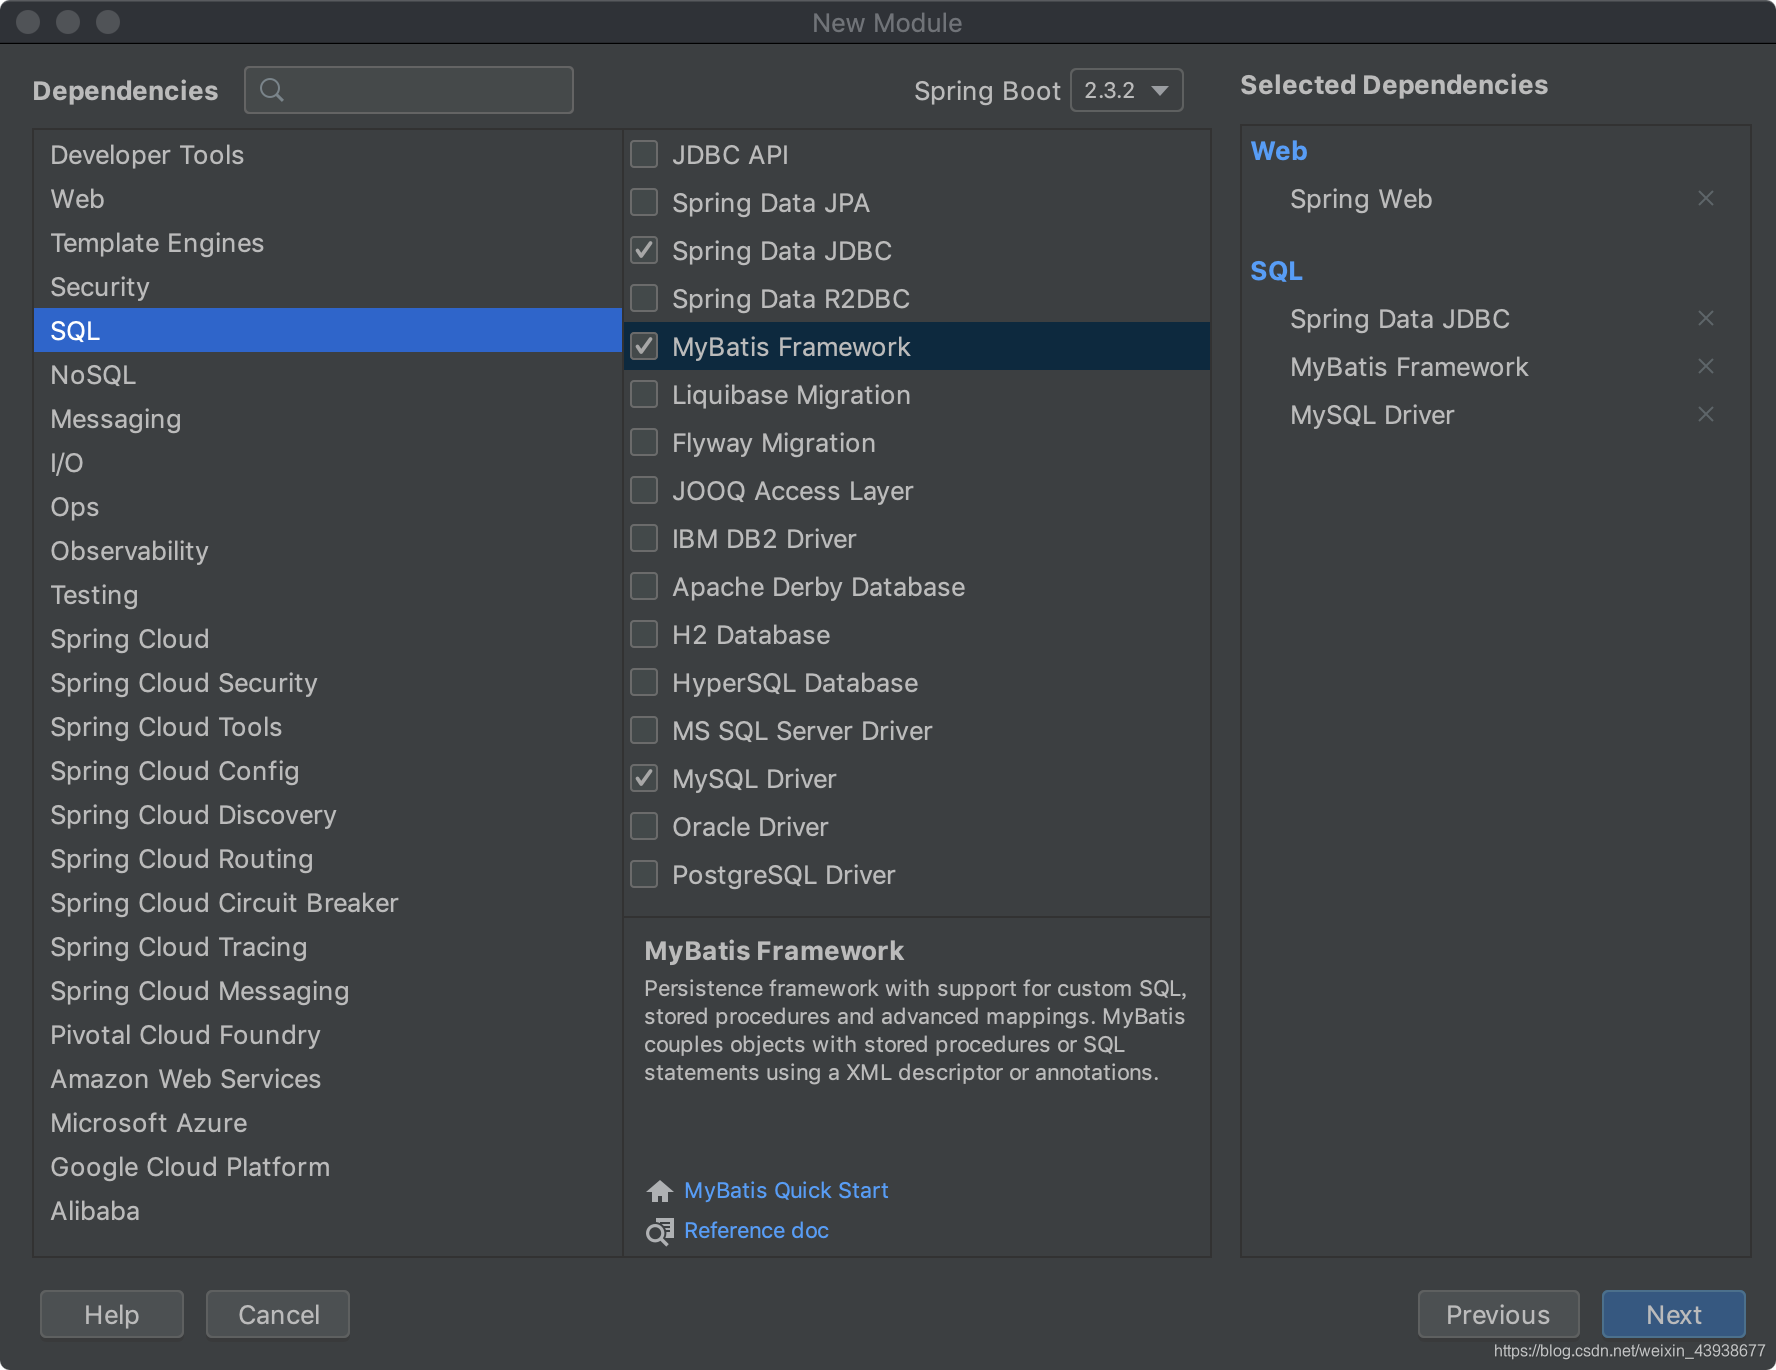
选择项目依赖
选择完依赖之后,修改文件保存路径,点击完成,就会发现news项目开始加载。
加载完成之后,IDEA左侧的项目目录中就会出现新建的provider:
2、打开新建的Module项目provider中的pom.xml文件,修改Spring版本,添加数据库版本号,导入新依赖,记得刷新。
新依赖为:
<dependency>
    <groupId>tk.mybatis</groupId>
    <artifactId>mapper-spring-boot-starter</artifactId>
    <version>2.0.4</version>
</dependency>
3、同其他项目一样,我们也需要建立目录,并且将resources中的application文件后缀改成yml

4、在po中新建User实体类
@Table(name = "tb_user")
public class User implements Serializable {

    private static final long serialVersionUID = 1947927662410296894L;

    @Id
    @GeneratedValue(strategy = GenerationType.IDENTITY)
    private Long id;
    private String username;
    private String password;
    private String name;
    private Integer age;
    private Integer sex;
    private Date birthday;
    private Date created;
    private Date updated;

    public static long getSerialVersionUID() {
        return serialVersionUID;
    }

    public Long getId() {
        return id;
    }

    public void setId(Long id) {
        this.id = id;
    }

    public String getUsername() {
        return username;
    }

    public void setUsername(String username) {
        this.username = username;
    }

    public String getPassword() {
        return password;
    }

    public void setPassword(String password) {
        this.password = password;
    }

    public String getName() {
        return name;
    }

    public void setName(String name) {
        this.name = name;
    }

    public Integer getAge() {
        return age;
    }

    public void setAge(Integer age) {
        this.age = age;
    }

    public Integer getSex() {
        return sex;
    }

    public void setSex(Integer sex) {
        this.sex = sex;
    }

    public Date getBirthday() {
        return birthday;
    }

    public void setBirthday(Date birthday) {
        this.birthday = birthday;
    }

    public Date getCreated() {
        return created;
    }

    public void setCreated(Date created) {
        this.created = created;
    }

    public Date getUpdated() {
        return updated;
    }

    public void setUpdated(Date updated) {
        this.updated = updated;
    }
}
注意:此部分虽然我们也进行表的相关注解,但是这里并不会自动建表,需要我们自行去数据库添加,加的注解是为了一个映射关系
5、建一个新的数据库 db3,在其中建一张表,与上述实体一致
6、到mapper中,新建一个UserMapper接口,使其继承Mapper,类似之前的Repository
package com.zr0804.service.provider.mapper;

import com.zr0804.service.provider.po.User;
import tk.mybatis.mapper.common.Mapper;

@org.apache.ibatis.annotations.Mapper
public interface UserMapper extends Mapper<User> {
}
7、现在service中我们直接建立一个UserService的类,由于只需要实现一个小demo,所以这里不将接口和实现分开。
@Service
public class UserService {
    @Autowired
    private UserMapper userMapper;

    public User queryById(Long id){
        return this.userMapper.selectByPrimaryKey(id);
    }

}
这里的userMapper可能就出现红色下划线,但是实际上不影响操作,可以在注解上加上@Autowired(required = false)就可以去掉红色下划线
8、在controller中建一个UserController【注意注解】
@RestController
@RequestMapping("user")
public class UserController {

    @Autowired
    private UserService userService;

    @GetMapping("{id}")
    public User queryById(@PathVariable("id")Long id){
        return  this.userService.queryById(id);
    }
}
9、配置application.yml文件
server:
  port: 8081
spring:
  datasource:
  	driver-class-name: com.mysql.cj.jdbc.Driver
    url: jdbc:mysql://localhost:3307/db3?urlSSL=false&useUnicode=true&characterEncoding=UTF-8&serverTimezone=Asia/Shanghai
    username: root
    password: 1234567890

mybatis:
  type-aliases-package: com.zr0804.service.provider.po
注意运行的时候,要选择,不要直接选点击绿色三角按钮
至此,我们简单完成了demo的提供者,接下来还需要完成一个服务的消费者,通过消费者我们可以得到提供者提供的信息。
10、再新建一个module,这次我们写的是一个服务调用者,一个消费方
下面选择依赖的时候,只需要选择Spring Web就可以了,不需要再倒入Mybatis,因为provider已经提供了接口,consumer仅是通过访问provider进行操作
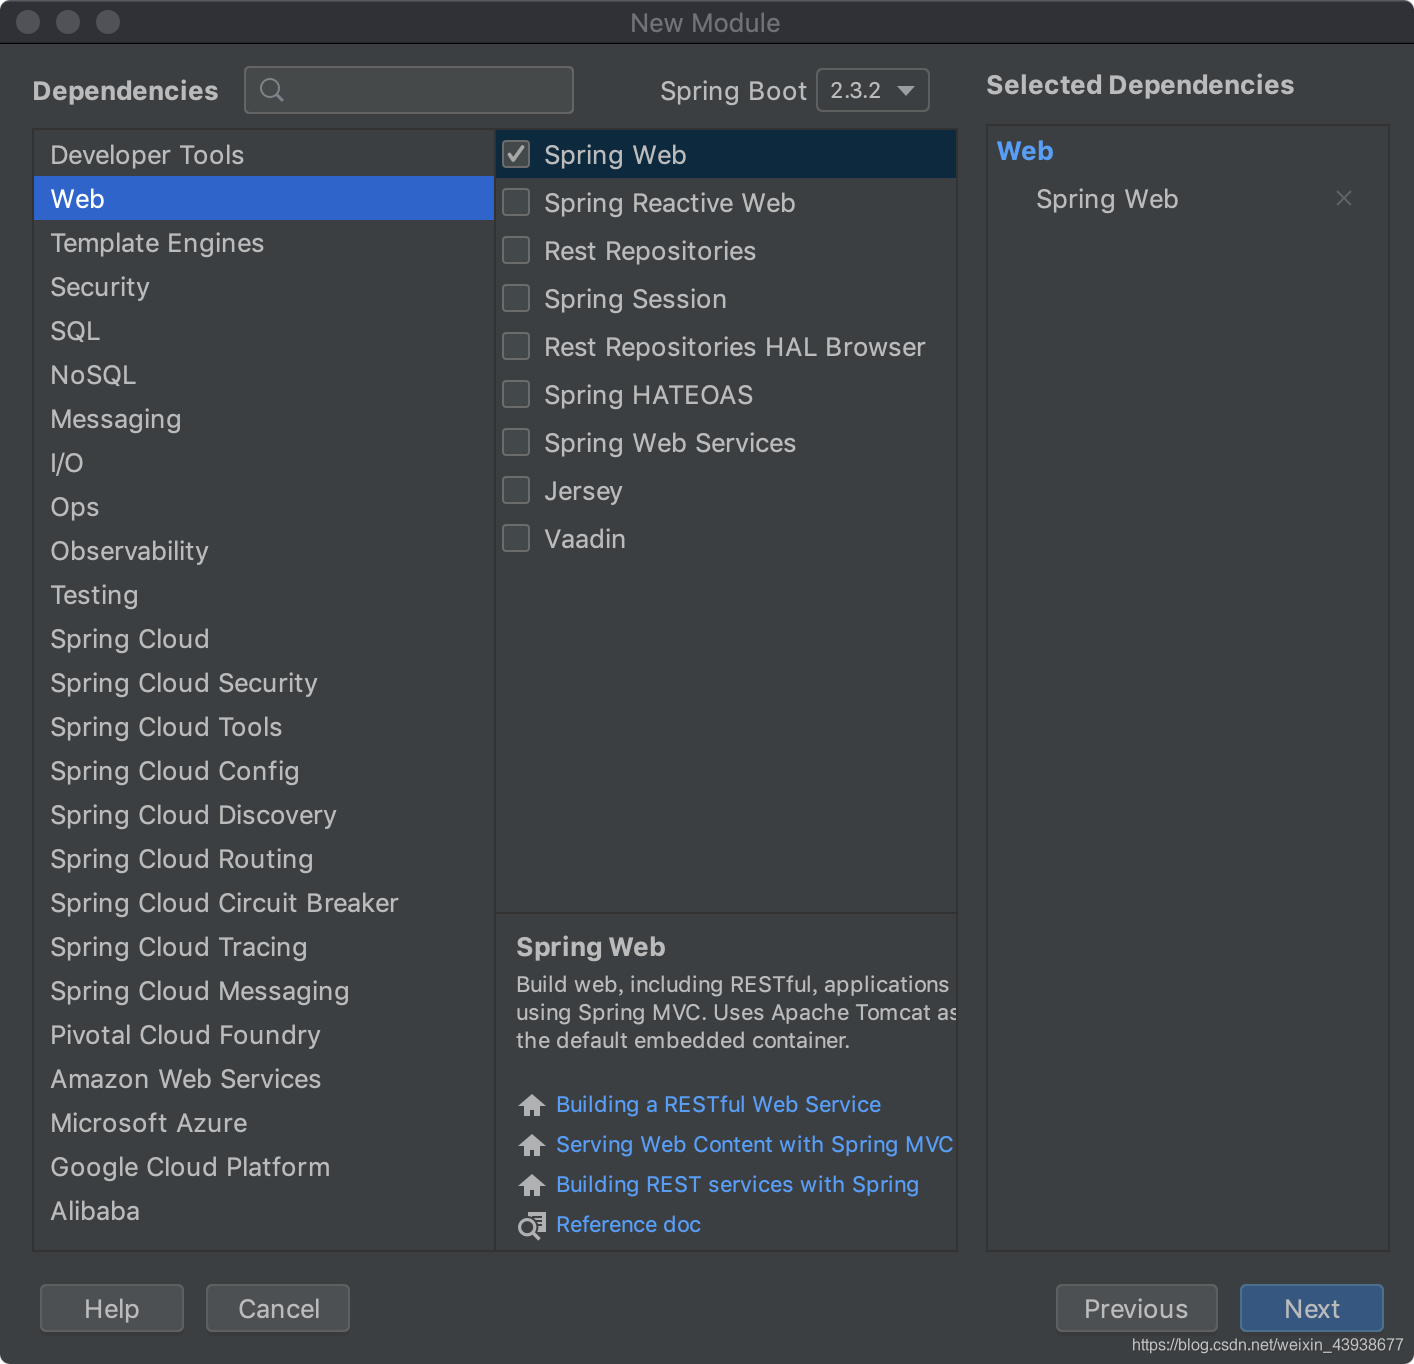
完成创建。
11、这次我们直接进入新建项目consumer的ConsumerApplication启动类中,注册一下RestTemplate
@SpringBootApplication
public class ConsumerApplication {
//注册RestTemplate
    @Bean
    public RestTemplate restTemplate(){
        return new RestTemplate();
    }

    public static void main(String[] args) {
        SpringApplication.run(ConsumerApplication.class, args);
    }

}
12、同样对application配置文件,改变其后缀为yml,在其中指定一个端口:
server:
  port: 80
13、接着,我们创建必要的一些包和类,新建po包,在里面建一个跟provider项目一模一样的实体类User,但是那些注解(与数据库关联建表的注解)需要全部删除,仅保留实体类本身即可:
public class User implements Serializable {

    private static final long serialVersionUID = 1947927662410296894L;


    private Long id;
    private String username;
    private String password;
    private String name;
    private Integer age;
    private Integer sex;
    private Date birthday;
    private Date created;
    private Date updated;

    public static long getSerialVersionUID() {
        return serialVersionUID;
    }

    public Long getId() {
        return id;
    }

    public void setId(Long id) {
        this.id = id;
    }

    public String getUsername() {
        return username;
    }

    public void setUsername(String username) {
        this.username = username;
    }

    public String getPassword() {
        return password;
    }

    public void setPassword(String password) {
        this.password = password;
    }

    public String getName() {
        return name;
    }

    public void setName(String name) {
        this.name = name;
    }

    public Integer getAge() {
        return age;
    }

    public void setAge(Integer age) {
        this.age = age;
    }

    public Integer getSex() {
        return sex;
    }

    public void setSex(Integer sex) {
        this.sex = sex;
    }

    public Date getBirthday() {
        return birthday;
    }

    public void setBirthday(Date birthday) {
        this.birthday = birthday;
    }

    public Date getCreated() {
        return created;
    }

    public void setCreated(Date created) {
        this.created = created;
    }

    public Date getUpdated() {
        return updated;
    }

    public void setUpdated(Date updated) {
        this.updated = updated;
    }
}
新建controller包,在其中创建UserController类,在其中注入RestTemplate :
@Controller
@RequestMapping("consumer/user")
public class UserController {
    @Autowired
    private RestTemplate restTemplate;

    @GetMapping
    @ResponseBody
    public User queryById(@RequestParam("id")Long id){
        //url为提供方的接口
        User user=this.restTemplate.getForObject("http://localhost:8081"+id,User.class);
        return user;
    }
}
14、再次运行,同样需要切换启动类,运行成功后,进入localhost/consumer/user?Id=1,可以查询到数据内容
目前为止,我们还没有用到Eureka,接下来我们就要开始使用了。首先我们就需要明白注册中心与已经创建的provider和consumer之间有什么关联

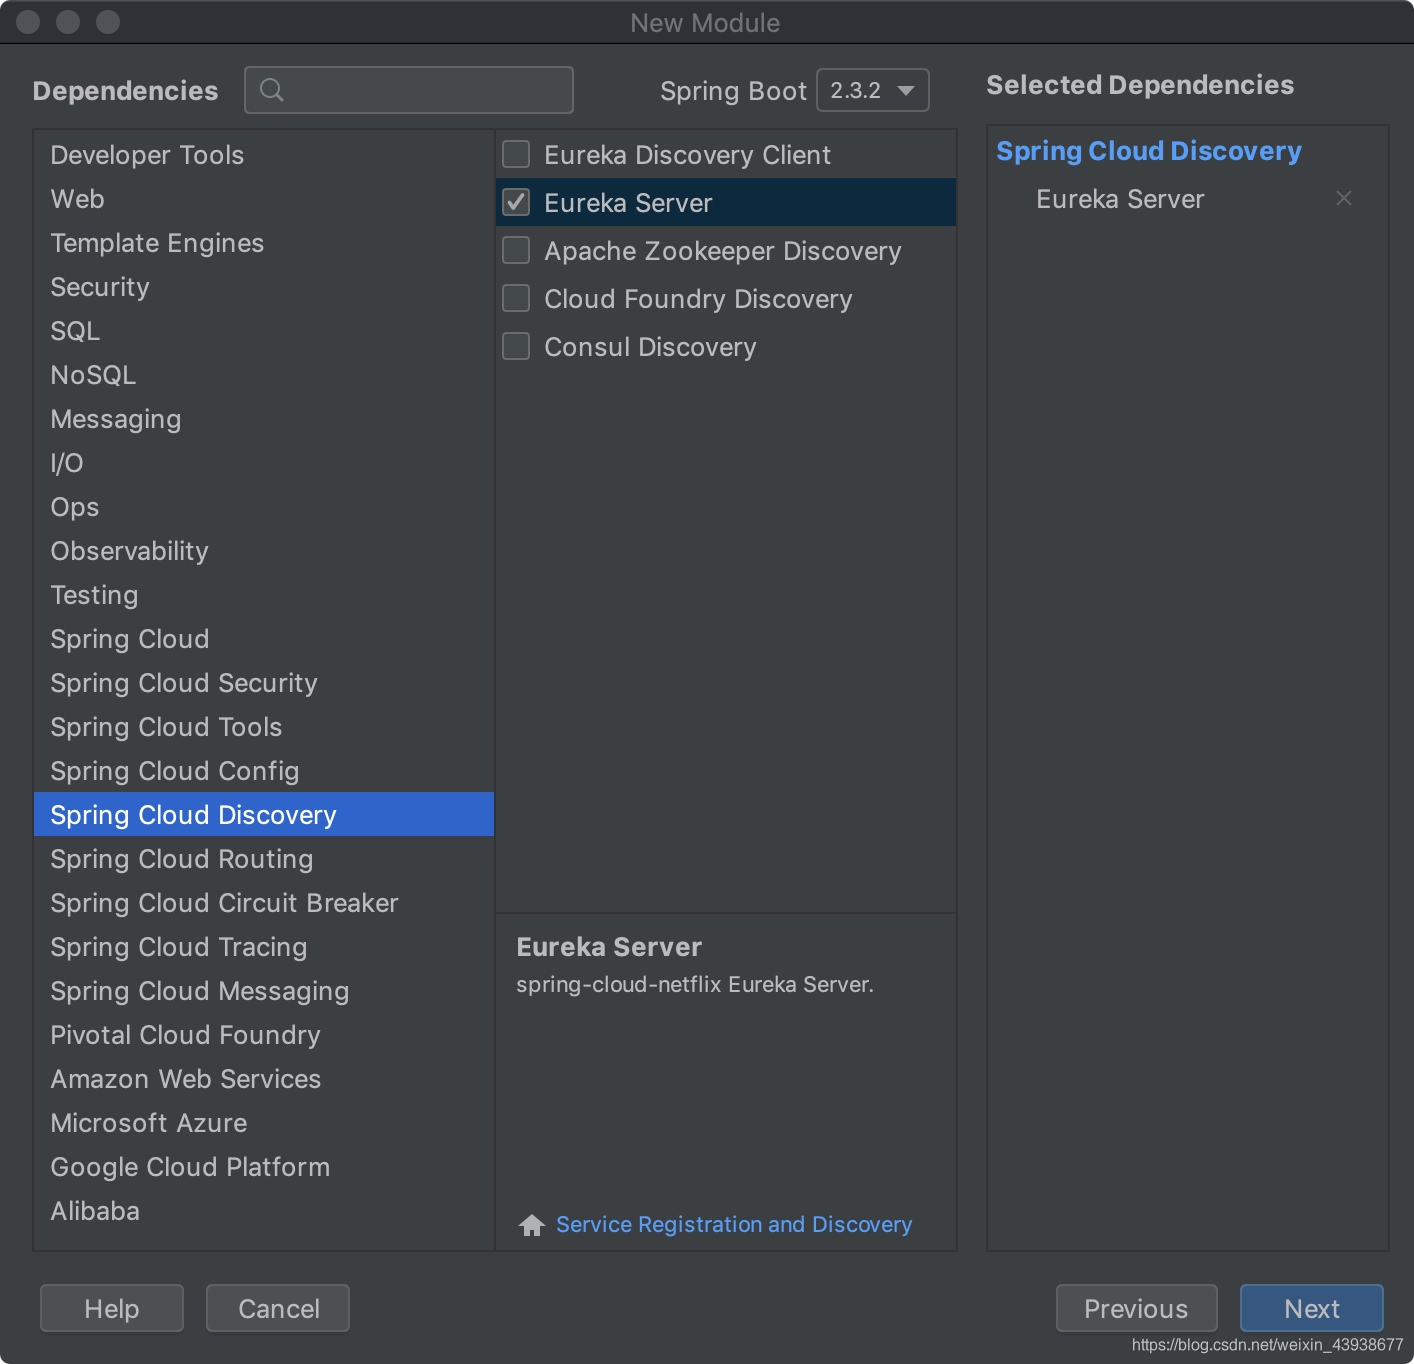
15、再新建一个Module,此处我们要选择依赖就是Spring Cloud Discovery中的Eureka Server,只需要这一个就可以:
16、进入新建好的eureka项目,同样修改配置文件application,后缀名改为yml,添加端口:
server:
  port: 10086
spring:
  application:
    name: eureka-server #应用名称,会在Eureka中显示
eureka:
  client:
    service-url: #eurekaServer地址
      defaultZone: http://localhost:${server.port}/eureka
17、到启动类中,添加一个注解
@SpringBootApplication
@EnableEurekaServer   //声明springboot应用是一个eureka服务中心
public class EurekaApplication {

    public static void main(String[] args) {
        SpringApplication.run(EurekaApplication.class, args);
    }

}
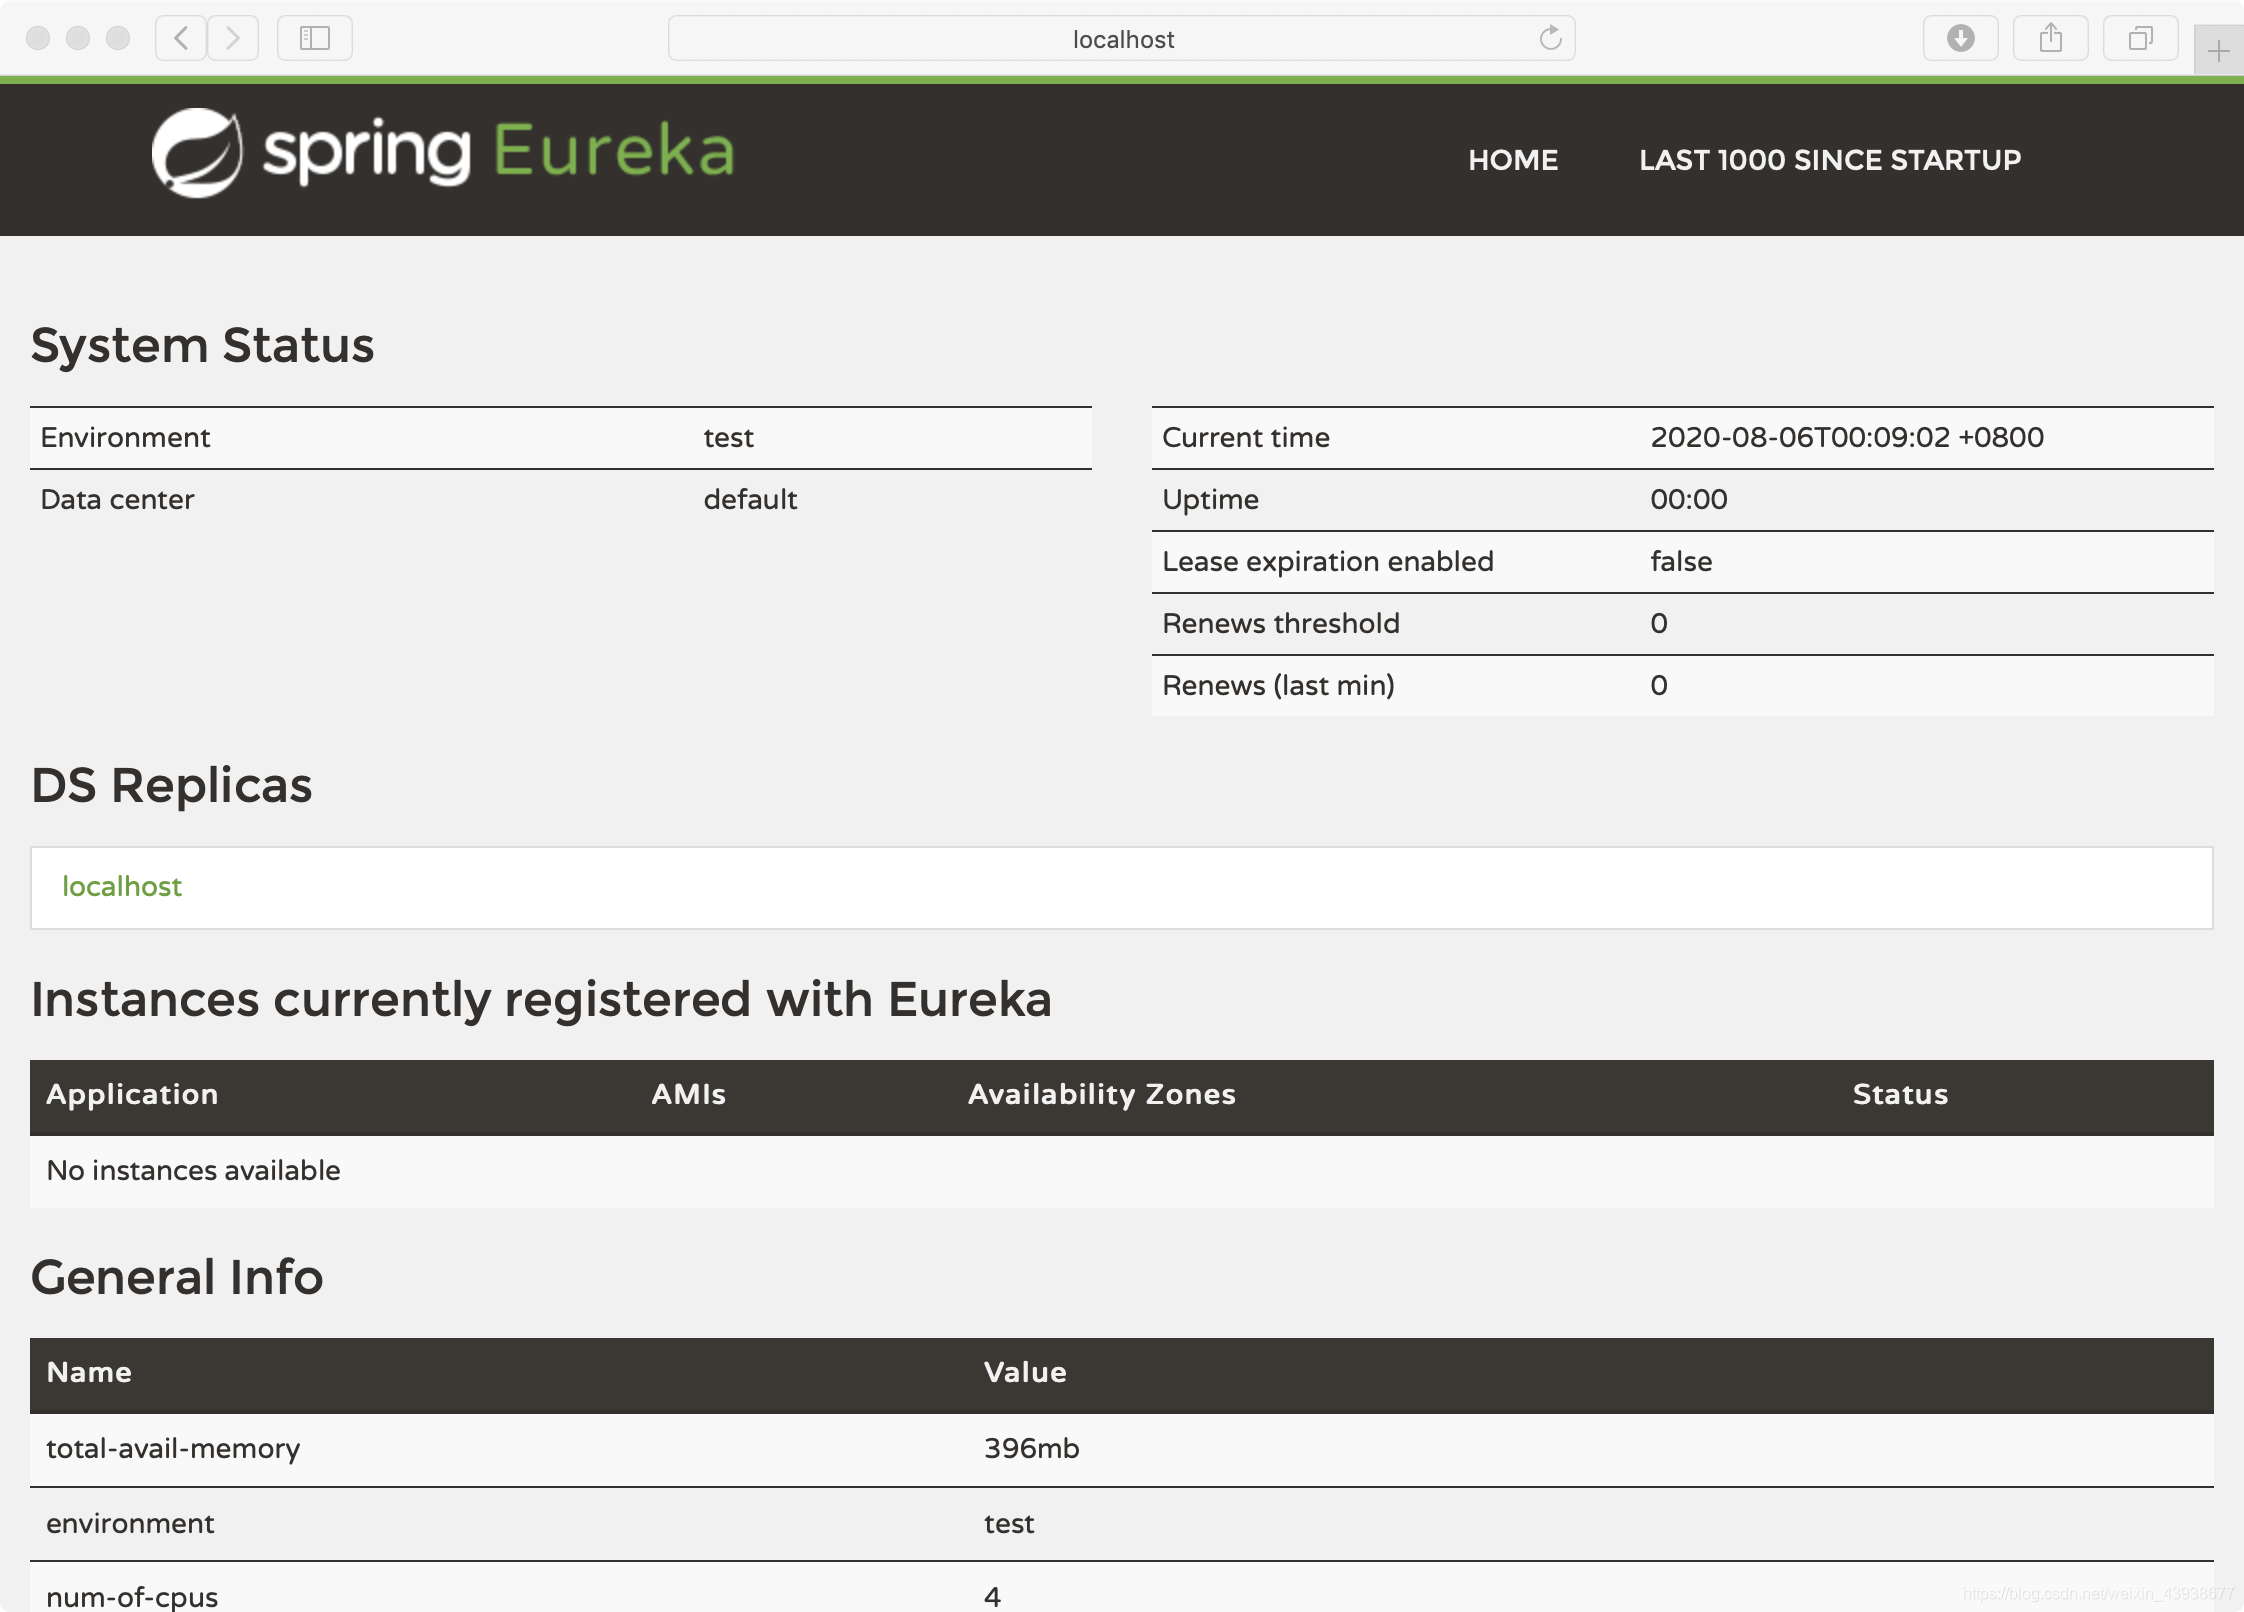
进行启动,成功启动后进入到浏览器中:
localhost:10086 就可以成功进入监控页面
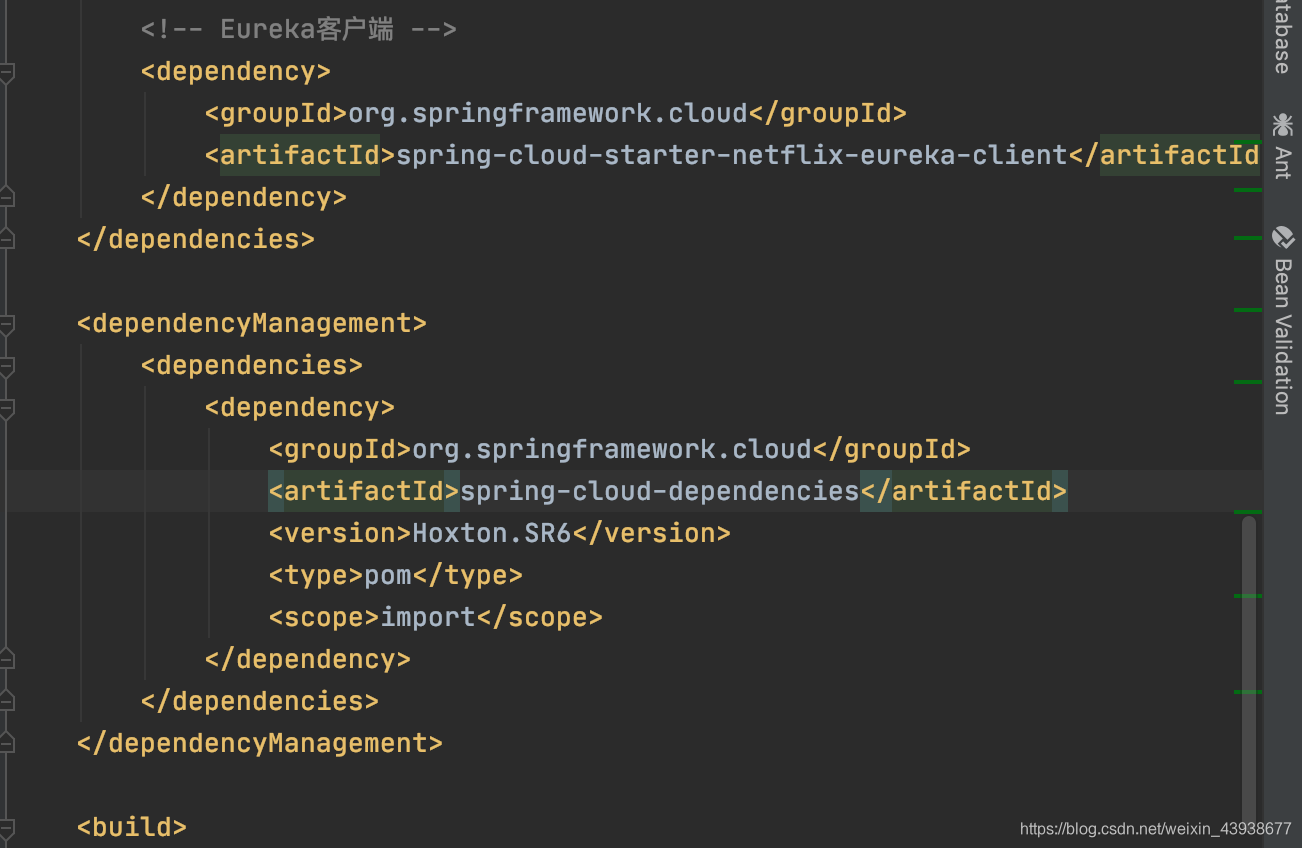
18、我们接着补充,是其他服务也能注册到Eureka里面,因此我们对provider进行一个修改,首先就要为他pom文件中添加一个spring cloud的依赖
<!-- Eureka客户端 -->
<dependency>
    <groupId>org.springframework.cloud</groupId>
    <artifactId>spring-cloud-starter-netflix-eureka-client</artifactId>
</dependency>
<dependencyManagement>
        <dependencies>
            <dependency>
                <groupId>org.springframework.cloud</groupId>
                <artifactId>spring-cloud-dependencies</artifactId>
                <version>Hoxton.SR6</version>
                <type>pom</type>
                <scope>import</scope>
            </dependency>
        </dependencies>
    </dependencyManagement>
19、接着修改一下配置文件application.yml的配置:
server:
  port: 8081
spring:
  datasource:
    driver-class-name: com.mysql.cj.jdbc.Driver
    url: jdbc:mysql://localhost:3307/db3?urlSSL=false&useUnicode=true&characterEncoding=UTF-8&serverTimezone=Asia/Shanghai
    username: root
    password: 1234567890
  application:
    name: service-provider #应用名称 注册到Eureka后的服务名称

mybatis:
  type-aliases-package: com.zr0804.service.provider.po

eureka:
  client:
    service-url: # eurekaSever地址
      defaultZone: http://localhost:10086/eureka
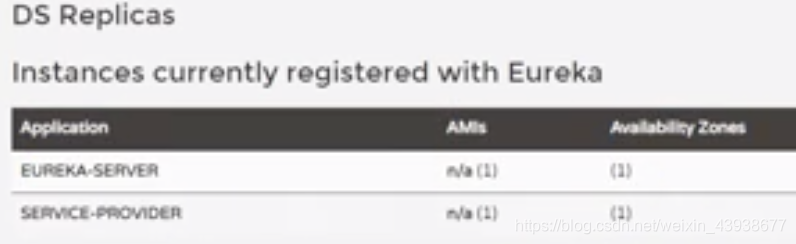
20、在provider的启动类中,同样添加一个注解@EnableEurekaClient,进行重启,启动成功后进入浏览器eureka的监控页面,刷新一下,可以看到在注册服务那里,已经能够看到新注册的provider了
这样我们就完成了一个简单的对Eureka的上手学习。


 被折叠的 条评论
为什么被折叠?
被折叠的 条评论
为什么被折叠?
 到【灌水乐园】发言


