


 文章详细介绍了在Vue项目中使用axios进行API请求、element-ui组件的运用,包括菜单与router绑定、动态路由、分页、表单验证以及数据交互的实践步骤。
项目开发前端准备工作:
前端导入axios注意在script中进行引用import axios from axios
axios安装直接在控制台输入:vue add axios
axios安装成功后后在node_moudle中出现axios目录
使用3.0装vue需要将main.js中的import eleui删掉
(目前建议使用vue2.0,对axios和element-ui兼容性较好)
项目前端建立过程:
1.vue前端渲染方式
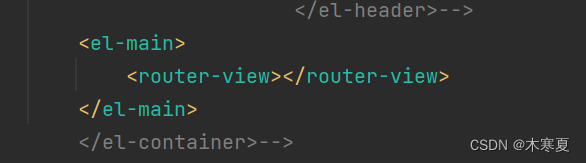
首先还是访问app.vue,在router-view只是一个窗口,主要看自己给的资源是什么(访问路径链接,例如/bookmanage,就会将router-view页面刷新成增加图书页面)。
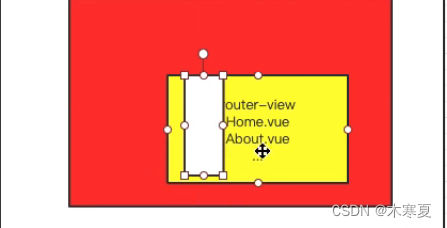
如图红色是App.vue,使用下面代码嵌套index.vue:

index左边加载导航栏。index右边使用嵌套pageone

主要实现界面在index.vue中:
**1.el-container:**构建整个页面框架
**2.el-aside:**构建左侧菜单
**3.el-menu:**左侧菜单内容,
常用属性:
:default-open:默认展开哪个菜单,用菜单的index标注
:default-active:默认选中的菜单,也是菜单的:index
**4.el-submenu:**可以展开的菜单
index:菜单下标,文本类型’1’
template:菜单名
i:通过class属性设置菜单图标
**5.el-menu-item:**不可再展开的子节点
6.通过vue router动态构建左侧菜单:
使用v-for循环,必须写index不然点击不了
 <el-menu>
              <el-submenu v-for="(item,index) in $router.options.routes" :index="index+''"  v-if="item.show">
              <template slot="title"><i class="el-icon-message"></i>{{item.name}}</template>
                  <el-menu-item v-for="(item2,index2) in item.children" :index="index+'-'+index2">{{item2.name}}</el-menu-item>
              </el-submenu>
          </el-menu>
7.菜单与router绑定:
①<el-menu添加router属性>
②在页面添加标签,他是一个容器,可以动态渲染页面
③标签index值就是要跳转的路径
8.如何访问初始连接直接跳转到指定页面,在Index.js文件中加:redirect(“/pageone”)
9.如何动态选中菜单变蓝:当当导航栏路径等于访问路径时变蓝,在菜单子节点中加:
:class=“$route.path==item2.path?‘is-active’:‘’”
10.分页操作:
①在eui官网随便找一个table模板,加一个
②找一个分页模板,设置页码改变事件@current-change=“函数名”,函数在script的method中写
    <el-pagination
        background
        layout="prev, pager, next"
        :page-size="pageSize"
        :total="total"
        @current-change="page">
    </el-pagination>
11.使用axios调用后端接口返回值到前端设置_this的原因是在resp中this指代出现窗口返回值。const _this=this,用_this表明当前vue对象
created()中进行页面数据初始化赋值(第一页开始,展示5条数据,总数据量为后端穿会的total)
`created() {`
    `const _this=this`
    `axios.get("http://localhost:8181/book/findAll/1/5").then(function (resp){`
            `_this.tableData=resp.data.content`
            `_this.pageSize = resp.data.size`
            `_this.total=resp.data.totalElements`
    `})`
`},`
 page(currentPage) {
        const _this=this
        axios.get("http://localhost:8181/book/findAll/"+currentPage+"/5").then(function (resp){
             _this.tableData=resp.data.content
                _this.pageSize = resp.data.size
                _this.total=resp.data.totalElements
        })
    },
传递数据总数和表中数据
 <el-pagination
        background
        layout="prev, pager, next"
        page-size="4"
        :total="total"
        @current-change="page">
    </el-pagination>
  <el-table
        :data="tableData"
        border
        style="width: 100%">
12.增加表单
表单中:model=是绑定名称()数据绑定,:rules是绑定校验的规则
定义rules对象,在rules中设置表单各个选项的校验规则
required:是否为必选项
message:提示信息
trigger:触发事件
ref=“”:这个就是formName属性
怎么把前端对象数据传给后端:
传一个对象:在axios的post方法中用(url,this.表单数据名ruleForm)
 axios.post("http://localhost:8181/book/update",this.ruleForm).then(function(resp){
                       if(resp.data=="success"){
                           _this.$alert("《"+_this.ruleForm.name+'》修改成功', '修改成功',  "消息",{
                               confirmButtonText: '确定',
                               callback: action => {
                                   _this.$router.push("/BookManage")
                               }
                           });
                       }
                    })
                } else {
                    console.log('error submit!!')
                    return false;
                }
            });
        },
13.提示成功弹窗
_this.$message(‘添加成功’);
14.添加成功如何跳转到其它页面
_this.$router.push(“/BookManage”);
15.修改信息的方法
先添加路由,在index.js中增加updatebook路由
添加修改按钮事件,当点击修改按钮时,跳转到修改图书信息页面,并且将图书id传到updatebook页面

slot-scope=“scope”
这是作用域插槽中定义一个对象(这里对象被定义为scope)来存储插槽上绑定的数据的用法
scope.row
在这里使用ElementUI表格模板渲染数据时,“当前行数据的获取也会用到插槽,scope相当于一行的数据, scope.row相当于当前行的数据对象
16.如何带参跳转页面用query
`edit(row){`
    `this.$router.push({`
        `path:"/update",`
        `query: {`
            `id: row.id`
        `}`
    `})`

`}`
给updatebook页面添加created()函数拿到传递的id数据this.$route.query.id
`created(){`
    `const _this=this;`
    `axios.get("http://localhost:8181/book/findById/"+this.$route.query.id).then(function(resp){`
            `_this.ruleForm=resp.data`
    `});`

`}`
17.设置某个属性不可修改(readOnly)
18.在提交函数中调用数据更新接口
`submitForm(formName) {`
    `const _this=this
    this.$refs[formName].validate((valid) => {
        if (valid) {
            axios.post("http://localhost:8181/book/update",this.ruleForm).then(function(resp){
                if(resp.data=="success"){
                    _this.$alert("《"+_this.ruleForm.name+'》添加成功', '添加成功',  "消息",{`
                        `confirmButtonText: '确定',`
                        `callback: action => {`
                            `_this.$router.push("/BookManage");`
                        `}`
                    `});`
                `}`
            `})`
        `} else {`
            `console.log('error submit!!');`
            `return false;`
        `}`
    `});`
`},`
19.根据页面传的id删除指定数据,并动态刷新页面
        deleted(row){
            const _this=this
            axios.delete("http://localhost:8181/book/deleteById/"+row.id).then(function(resp){
                        **window**.location.reload()//动态刷新
                });

}
    },
17.index.js中设置内容
show属性:设置是否遍历路由,
<el-submenu v-for="(item,index) in $router.options.routes" :index="index+''" v-if="item.show">
{
  path: '/',
  name: '图书管理',
  component: index,
  show:true,
  redirect: '/BookManage',
  children:[
      {
    path: '/BookManage',
    name: '查询图书',
    component: BookManage
 },
    {
      path: '/AddBook',
      name: '添加图书',
      component:AddBook
   }]
},
{
  path: '/update',
  component:UpdateBook,
  show:false
}


 2万+
2万+

 被折叠的 条评论
为什么被折叠?
被折叠的 条评论
为什么被折叠?
 到【灌水乐园】发言


