


dubbo之入门
Dubbo简介
Dubbo是一款高性能的Java RPC框架。其前身是阿里巴巴公司开源的、轻量级的Java RPC框架,可以和Spring框架无缝集成,2018年阿里巴巴把这个框架捐献给apache基金会。
什么是RPC
- RPC全称为remote procedure call,即远程过程调用。
比如两台服务器A和B,A服务器上部署一个应用,B服务器上部署一个应用,A服务器想要调用B服务器上的应用提供的方法,由于两个应用不在一个内存空间,不能直接调用,所以需要网络来表达调用的语义和传达调用的数据。 - RPC不是一个具体的技术,而是指整个网络远程调用过程。
RPC是一个泛化的概念,严格来说一切远程调用的手段都属于RPC范畴。Java的RPC框架有:RMI、Hessian、Dubbo等。
Dubbo核心能力
面向接口的远程方法调用、智能容错和负载均衡、服务自动注册和发现
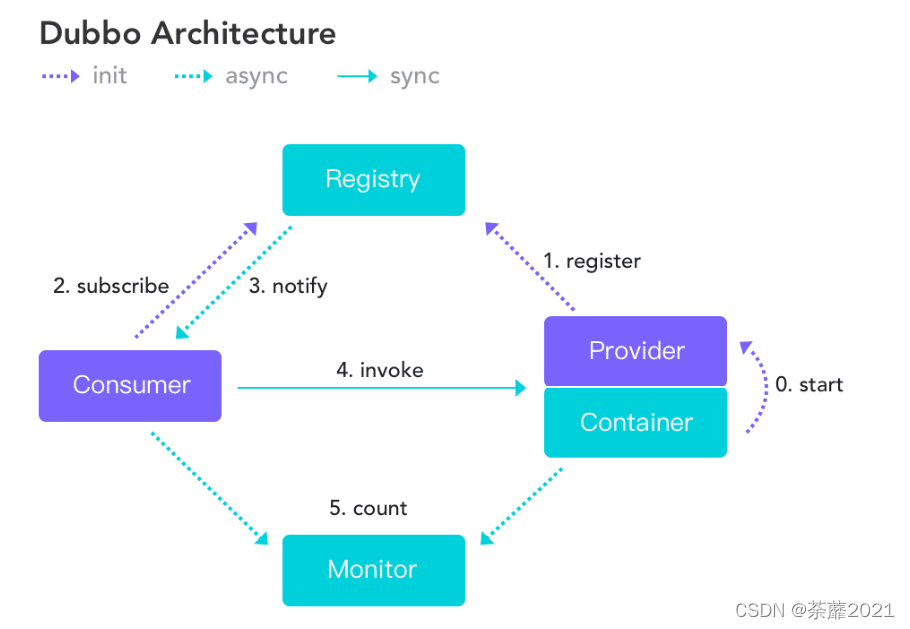
Dubbo架构
| 节点 | 角色名称 |
|---|---|
| Provider | 暴露服务的服务提供方 |
| Consumer | 调用远程服务的服务消费方 |
| Register | 服务注册与发现的注册中心 |
| Monitor | 统计服务的调用次数和调用时间的监控中心 |
| Container | 服务运行容器 |
调用关系说明:
0.服务容器负责启动、加载、运行服务提供者
1.服务提供者在启动时,向注册中心注册自己提供的服务
2.服务消费者在启动时,向注册中心订阅自己所需的服务
3.注册中心返回服务提供者地址列表给消费者,如有变更,注册中心将基于长连接推送变更数据给消费者
4.服务消费者,从提供者地址列表中,基于软负载均衡算法,选择一台提供者进行调用,如果调用失败,再选另一台调用。
5.服务消费者和提供者,在内存中累计调用次数和调用时间,定时每分钟发送一次统计数据到监控中心
服务注册中心Zookeeper
Dubbo官网推荐使用Zookeeper作为服务注册中心
Zookeeper
Zookeeper 是 Apache Hadoop 的子项目,是一个树型的目录服务,支持变更推送,适合作为 Dubbo服务的注册中心,工业强度较高,可用于生产环境,并推荐使用。
Zookeeper树型目录服务:
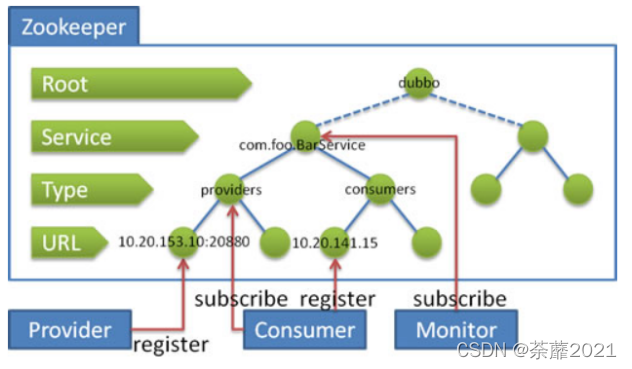
流程说明:
- 服务提供者(Provider)启动时: 向 /dubbo/com.foo.BarService/providers 目录下写入自己的URL 地址
- 服务消费者(Consumer)启动时: 订阅 /dubbo/com.foo.BarService/providers 目录下的提供者URL 地址。并向 /dubbo/com.foo.BarService/consumers 目录下写入自己的 URL 地址
- 监控中心(Monitor)启动时: 订阅 /dubbo/com.foo.BarService 目录下的所有提供者和消费者URL 地址
安装Zookeeper
下载地址:http://archive.apache.org/dist/zookeeper/
第一步:安装 jdk https://blog.youkuaiyun.com/weixin_43915128/article/details/121090963
第二步:把 zookeeper 的压缩包上传到 linux 系统
第三步:解压缩压缩包 tar -zxvf zookeeper-3.4.6.tar.gz -C /usr 第四步:进入zookeeper-3.4.6目录,创建data目录 mkdir data
第五步:进入conf目录 ,把zoo_sample.cfg 改名为zoo.cfg cd conf
mv zoo_sample.cfg zoo.cfg
第六步:打开zoo.cfg文件, 修改dataDir=/usr/zookeeper-3.4.6/data(自己data所在目录)
启动、停止Zookeeper
进入Zookeeper的bin目录,
启动服务命令: ./zkServer.sh start
停止服务命令: ./zkServer.sh stop
查看服务状态: ./zkServer.sh status
客户端连接: ./zkCli.sh
Dubbo快速入门
服务提供方开发
新建maven项目
    <properties>
        <project.build.sourceEncording>UTF-8</project.build.sourceEncording>
        <maven.compiler.source>1.8</maven.compiler.source>
        <maven.compiler.target>1.8</maven.compiler.target>
        <spring.version>5.0.5.RELEASE</spring.version>
    </properties>
    <dependencies>
        <dependency>
            <groupId>org.springframework</groupId>
            <artifactId>spring-context</artifactId>
            <version>${spring.version}</version>
        </dependency>
        <dependency>
            <groupId>org.springframework</groupId>
            <artifactId>spring-beans</artifactId>
            <version>${spring.version}</version>
        </dependency>
        <dependency>
            <groupId>org.springframework</groupId>
            <artifactId>spring-webmvc</artifactId>
            <version>${spring.version}</version>
        </dependency>
        <dependency>
            <groupId>org.springframework</groupId>
            <artifactId>spring-jdbc</artifactId>
            <version>${spring.version}</version>
        </dependency>
        <dependency>
            <groupId>org.springframework</groupId>
            <artifactId>spring-aspects</artifactId>
            <version>${spring.version}</version>
        </dependency>
        <dependency>
            <groupId>org.springframework</groupId>
            <artifactId>spring-jms</artifactId>
            <version>${spring.version}</version>
        </dependency>
        <dependency>
            <groupId>org.springframework</groupId>
            <artifactId>spring-context-support</artifactId>
            <version>${spring.version}</version>
        </dependency>

        <dependency>
            <groupId>com.alibaba</groupId>
            <artifactId>dubbo</artifactId>
            <version>2.6.0</version>
        </dependency>
        <dependency>
            <groupId>org.apache.zookeeper</groupId>
            <artifactId>zookeeper</artifactId>
            <version>3.4.7</version>
        </dependency>
        <dependency>
            <groupId>com.github.sgroschupf</groupId>
            <artifactId>zkclient</artifactId>
            <version>0.1</version>
        </dependency>
        <dependency>
            <groupId>javassist</groupId>
            <artifactId>javassist</artifactId>
            <version>3.12.1.GA</version>
        </dependency>
        <dependency>
            <groupId>com.alibaba</groupId>
            <artifactId>fastjson</artifactId>
            <version>1.2.76</version>
        </dependency>
        <dependency>
            <groupId>mysql</groupId>
            <artifactId>mysql-connector-java</artifactId>
            <version>5.1.49</version>
        </dependency>
        <dependency>
            <groupId>com.alibaba</groupId>
            <artifactId>druid</artifactId>
            <version>1.1.21</version>
        </dependency>
        <dependency>
            <groupId>org.mybatis</groupId>
            <artifactId>mybatis-spring</artifactId>
            <version>2.0.6</version>
        </dependency>
    </dependencies>
    <build>
        <plugins>
            <plugin>
                <groupId>org.apache.maven.plugins</groupId>
                <artifactId>maven-compiler-plugin</artifactId>
                <version>2.3.2</version>
                <configuration>
                    <source>1.8</source>
                    <target>1.8</target>
                </configuration>
            </plugin>
            <plugin>
                <groupId>org.apache.tomcat.maven</groupId>
                <artifactId>tomcat7-maven-plugin</artifactId>
                <configuration>
                    <port>8083</port>
                    <path>/</path>
                </configuration>
            </plugin>
        </plugins>
    </build>
配置web.xml
<?xml version="1.0" encoding="UTF-8"?>
<web-app xmlns="http://xmlns.jcp.org/xml/ns/javaee"
         xmlns:xsi="http://www.w3.org/2001/XMLSchema-instance"
         xsi:schemaLocation="http://xmlns.jcp.org/xml/ns/javaee http://xmlns.jcp.org/xml/ns/javaee/web-app_4_0.xsd"
         version="4.0">
    <context-param>
        <param-name>contextConfigLocation</param-name>
        <param-value>classpath*:application.xml</param-value>
    </context-param>
    <listener>
        <listener-class>org.springframework.web.context.ContextLoaderListener</listener-class>
    </listener>
</web-app>
创建服务接口
package com.dmlll.service;
public interface HelloService {
    public String sayHello(String name);
}
创建服务实现类
import com.alibaba.dubbo.config.annotation.Service;
import com.dmlll.service.HelloService;
import org.springframework.transaction.annotation.Transactional;

@Transactional
@Service(interfaceClass = HelloService.class)
public class HelloServiceImpl implements HelloService {
    @Override
    public String sayHello(String name) {
        return " 8083 hello "+ name;
    }
}
注意:服务实现类上使用的Service注解是Dubbo提供,用于对外发布服务
创建application.xml
<?xml version="1.0" encoding="UTF-8"?>
<beans xmlns="http://www.springframework.org/schema/beans"
       xmlns:context="http://www.springframework.org/schema/context"
       xmlns:mvc="http://www.springframework.org/schema/mvc"
       xmlns:tx="http://www.springframework.org/schema/tx"
       xmlns:xsi="http://www.w3.org/2001/XMLSchema-instance"
       xmlns:dubbo="http://code.alibabatech.com/schema/dubbo"
       xsi:schemaLocation="http://www.springframework.org/schema/beans
            http://www.springframework.org/schema/beans/spring-beans.xsd
            http://www.springframework.org/schema/context
            http://www.springframework.org/schema/context/spring-context.xsd
            http://www.springframework.org/schema/tx
            http://www.springframework.org/schema/tx/spring-tx.xsd
            http://code.alibabatech.com/schema/dubbo
            http://code.alibabatech.com/schema/dubbo/dubbo.xsd
            http://www.springframework.org/schema/mvc
            http://www.springframework.org/schema/mvc/spring-mvc.xsd ">
    <!--当前应用名称,用于注册中心计算应用间依赖关系,注意:消费者和提供者名称不要一样-->
    <dubbo:application name="dubbo-provider"/>
    <!--连接服务注册中心zookeeper id为zookeeper所在服务器的ip地址-->
    <dubbo:registry address="zookeeper://192.168.25.136:2181"/>
    <!--注册 协议和port-->
    <dubbo:protocol name="dubbo" port="20883"></dubbo:protocol>
    <!--扫描指定包,加入@Service注解的类会被发布为服务-->
    <dubbo:annotation package="com.dmlll.service.impl"/>
    <bean id="dataSource" class="com.alibaba.druid.pool.DruidDataSource">
        <property name="username" value="root"/>
        <property name="password" value="521123cry"/>
        <property name="driverClassName" value="com.mysql.jdbc.Driver"/>
        <property name="url" value="jdbc:mysql://localhost:3306/kaikeba"/>
    </bean>
    <bean id="transactionManager" class="org.springframework.jdbc.datasource.DataSourceTransactionManager">
        <property name="dataSource" ref="dataSource"/>
    </bean>
    <tx:annotation-driven proxy-target-class="true" transaction-manager="transactionManager"/>
</beans>
启动服务
tomcat7:run
服务消费方开发
复制上面的maven,修改端口号和服务名
配置web.xml
<?xml version="1.0" encoding="UTF-8"?>
<web-app xmlns="http://xmlns.jcp.org/xml/ns/javaee"
         xmlns:xsi="http://www.w3.org/2001/XMLSchema-instance"
         xsi:schemaLocation="http://xmlns.jcp.org/xml/ns/javaee http://xmlns.jcp.org/xml/ns/javaee/web-app_4_0.xsd"
         version="4.0">
    <context-param>
        <param-name>contextConfigLocation</param-name>
        <param-value>classpath*:application*.xml</param-value>
    </context-param>
    <listener>
        <listener-class>org.springframework.web.context.ContextLoaderListener</listener-class>
    </listener>

    <servlet>
        <servlet-name>dispatcherServlet</servlet-name>
        <servlet-class>org.springframework.web.servlet.DispatcherServlet</servlet-class>
        <init-param>
            <param-name>contextConfigLocation</param-name>
            <param-value>classpath:application-web.xml</param-value>
        </init-param>
    </servlet>
    <servlet-mapping>
        <servlet-name>dispatcherServlet</servlet-name>
        <url-pattern>/</url-pattern>
    </servlet-mapping>
</web-app>
将服务提供者工程中的HelloService接口复制到当前工程
编写Controller
import com.alibaba.dubbo.config.annotation.Reference;
import com.dmlll.service.HelloService;
import org.springframework.web.bind.annotation.RequestMapping;
import org.springframework.web.bind.annotation.RestController;

@RestController
@RequestMapping("/consumer")
public class HelloController {
    @Reference
    private HelloService helloService;

    @RequestMapping("hello")
    public String sayHello(String name){
        //远程调用
        String result = helloService.sayHello(name);
        System.out.println(result);
        return result;
    }
}
注意:Controller中注入HelloService使用的是Dubbo提供的@Reference注解
在src/main/resources下创建application-web.xml
<?xml version="1.0" encoding="UTF-8"?>
<beans xmlns="http://www.springframework.org/schema/beans"
       xmlns:context="http://www.springframework.org/schema/context"
       xmlns:mvc="http://www.springframework.org/schema/mvc"
       xmlns:xsi="http://www.w3.org/2001/XMLSchema-instance" xmlns:mc="http://www.springframework.org/schema/mvc"
       xmlns:dubbo="http://code.alibabatech.com/schema/dubbo"
       xsi:schemaLocation="http://www.springframework.org/schema/beans
            http://www.springframework.org/schema/beans/spring-beans.xsd
            http://www.springframework.org/schema/context
            http://www.springframework.org/schema/context/spring-context.xsd
            http://code.alibabatech.com/schema/dubbo
            http://code.alibabatech.com/schema/dubbo/dubbo.xsd
            http://www.springframework.org/schema/mvc http://www.springframework.org/schema/mvc/spring-mvc.xsd
        ">
    <!--当前应用名称,用于注册中心计算应用间依赖关系,注意:消费者和提供者名称不要一样-->
    <dubbo:application name="dubbo-consumer"/>
    <!--连接服务注册中心zookeeper id为zookeeper所在服务器的ip地址-->
    <dubbo:registry address="zookeeper://192.168.25.136:2181"/>
    <!--扫描指定包,加入@Service注解的类会被发布为服务-->
    <dubbo:annotation package="com.dmlll.controller"/>
</beans>
运行测试
tomcat7:run
访问localhost:8082/consumer/hello?name=dam
Dubbo管理控制台
我们在开发时,需要知道Zookeeper注册中心都注册了哪些服务,有哪些消费者来消费这些服务。我们可以通过部署一个管理中心来实现。其实管理中心就是一个web应用,部署到tomcat即可。
安装
(1)下载dubbo-admin-2.6.0.war文件复制到tomcat的webapps目录下
(2)启动tomcat,此war文件会自动解压
(3)修改WEB-INF下的dubbo.properties文件,注意dubbo.registry.address对应的值需要对应当前使用的Zookeeper的ip地址和端口号
dubbo.registry.address=zookeeper://192.168.134.129:2181 dubbo.admin.root.password=root
dubbo.admin.guest.password=guest
(4)重启tomcat
使用
(1)访问http://localhost:8080/dubbo-admin-2.6.0/,输入用户名(root)和密码(root)
(2)启动服务提供者工程和服务消费者工程,可以在查看到对应的信息


 943
943

 被折叠的 条评论
为什么被折叠?
被折叠的 条评论
为什么被折叠?
 到【灌水乐园】发言


