


 本文介绍了在Vue-router中实现单页面多路由区域的操作方法。通过配置文件,可以在同一页面设置多个路由区域,并展示如何创建first.vue和second.vue文件。每个区域的router-view可以通过name属性进行区分和配置,例如默认的HelloWorld区域,以及新增的first和second区域。通过调整路由配置,可以观察到不同路由区域的内容变化。
Vue-router
单页面多路由区域操作
当一个页面存在两个或多个<router-view>区域,可以通过配置index.js文件来操作这些区域。
1.在src/App.vue文件中增加两个路由区域,加入一些css样式可以更加值观地查看执行效果。
<router-view style="width: 100%;height: 200px;background-color: aquamarine;"></router-view>
<router-view name="left" style="float:left;background-color:darkred;width:50%;height:200px;color: white;"></router-view>
<router-view name="right" style="float:right;background-color:greenyellow;width:50%;height:200px"></router-view>
2.在src/components目录下新建两个模板,分别命名为first.vue文件和second.vue文件,在index.js文件的上边引入新建的两个文件。
import HelloWorld from '@/components/HelloWorld'
import First from '@/components/first'
import Second from '@/components/second'
3.HelloWorld.vue文件的代码,简单的输出“这是第一个router-view”
<template>
  <div class="hello">
    <h1>{{ msg }}</h1>
  </div>
</template>
<script>
export default {
  name: 'HelloWorld',
  data () {
    return {
      msg: '这是第一个router-view'
    }
  }
}
</script>

<!-- Add "scoped" attribute to limit CSS to this component only -->
<style scoped>
first.vue文件的代码,简单的输出“这是第二个router-view”
<template>
	<div><h1>{{msg}}</h1></div>
</template>

<script>
	export default{
		data(){
			return{
				msg:'这是第二个router-view'
			}
		}
	}
</script>
<style>
</style>
second.vue文件的代码,简单的输出“这是第三个router-view”
<template>
	<div><h1>{{msg}}</h1></div>
</template>

<script>
	export default{
		data(){
			return{
				msg:'这是第三个router-view'
			}
		}
	}
</script>
<style>
</style>
4.若在同一个页面中存在三个路由区域,则需要在src/index.js进行路由配置。这时需要在components字段进行配置,<router-view>标签中若没有name属性,则默认是为default,当<router-view>标签中增加了name属性时,配置路由的名称应该与在标签中name属性的值保持一致。
export default new Router({
	routes: [
		{
		   path:'/',
		   name:'HelloWorld',
		   components:{
			   default:HelloWorld,
			   left:First,
			   right:Second
		   }

		}
})
这里默认的第一个路由区域是HelloWorld,第二个路由区域是first,第三个路由区域是second。
运行结果:

附加:
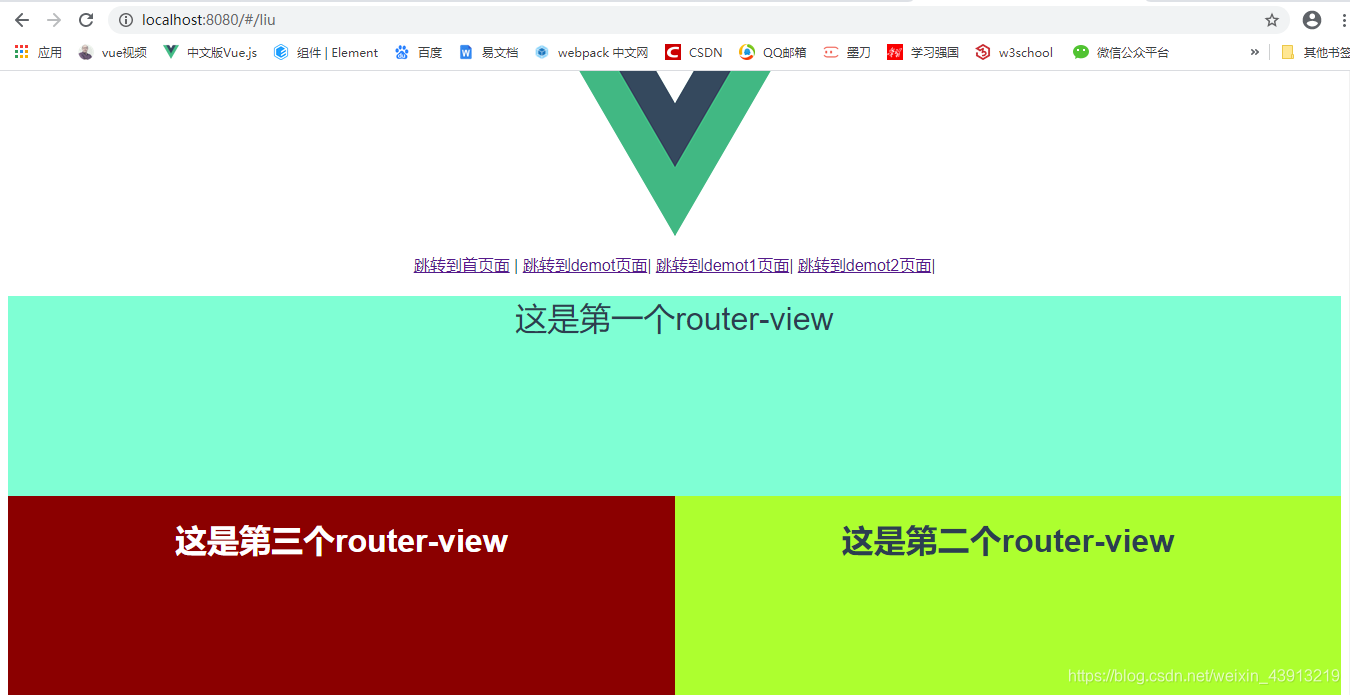
可以通过增加一个路由配置,使得路由区域发生变化。在index.js文件中增‘/liu’路径,在浏览器中输入http://localhost:8080/#/liu
export default new Router({
	routes: [
		{
		   path:'/',
		   name:'HelloWorld',
		   components:{
			   default:HelloWorld,
			   left:First,
			   right:Second
		   }

		},
		{
		   path:'/liu',
		   name:'HelloWorld',
		   components:{
			   default:HelloWorld,
			   left:First,
			   right:Second
		   }

	  }
})
运行结果:


 995
995

 被折叠的 条评论
为什么被折叠?
被折叠的 条评论
为什么被折叠?
 到【灌水乐园】发言


