


 本文详细介绍了Spring MVC的拦截器开发,包括拦截器的定义、执行流程、自定义拦截器的实现以及多个拦截器的执行顺序。同时,文章探讨了控制器接收各类请求参数的方式,如普通参数、@RequestParam、URL参数、JSON参数、列表数据、表单序列化及重定向。此外,还讲解了如何保存和获取属性参数,如@RequestAttribute和@SessionAttributes的使用。
Spring MVC组件开发
一、拦截器(p417)
1.1 拦截器的定义
SpringMVC的拦截器与过滤器的区别:
- 拦截器是使用JDK动态代理实现的,拦截的是应调用方法的拦截
- 过滤器是使用Filter实现的,拦截的是request对象
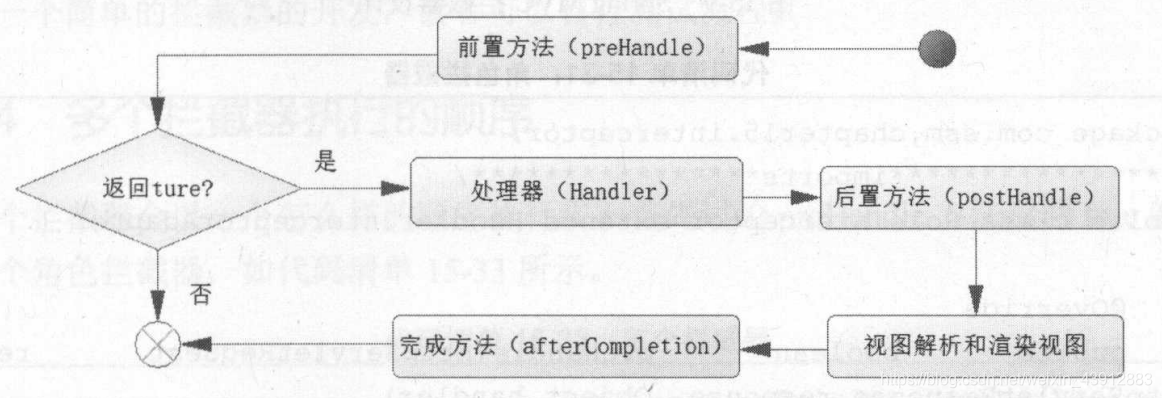
Spring MVC可以使用拦截器对请求进行拦截处理,用户可以自定义拦截器来实现特定的功能,它可以在进入处理器之前做一些操作,或者在处理器完成后进行操作,甚至是在渲染视图后进行操作。Spring要求处理器的拦截器都要实现接口org.spring.framework.web.servlet.HandlerInterceptor,这个接口定义了三个方法:
-
preHandle():这个方法在业务处理器处理请求之前被调用,在该方法中对用户请求request进行处理,如果该拦截器请求进行拦截处理后还要调用其他的拦截器,或者是业务处理器去进行处理,则返回true,否则返回false
-
postHandle():这个方法在业务处理器处理完请求后,但是DispatcherServlet向客户端返回响应前被调用,在该方法中对用户请求request进行处理
-
afterCompletion():这个方法在DispatcherServlet完全处理完请求后被调用,可以在该方法中进行一些资源清理的操作,无论是否产生异常都会在渲染视图后执行的方法
1.2 拦截器的执行流程
1.3 开发拦截器
1.3.1 自定义的拦截器LoginInterceptor,实现HandlerInterceptor接口
public class LoginInterceptor implements HandlerInterceptor {
    public boolean preHandle(HttpServletRequest request, HttpServletResponse response, Object handler) throws Exception {
        User user = (User)request.getSession().getAttribute("session_user");
        if(user==null) {
            System.out.println("1:keketip--login====preHandle===>");
            response.sendRedirect(request.getContextPath()+"/login");
            return false;
        }
        return true;//会终止所有的请求
    }

    public void postHandle(HttpServletRequest request, HttpServletResponse response, Object handler, ModelAndView modelAndView) throws Exception {
        System.out.println("3:-----keketip==--login==postHandle===>");
    }

    public void afterCompletion(HttpServletRequest request, HttpServletResponse response, Object handler, Exception ex) throws Exception {
        System.out.println("4--->keketip=--login===afterCompletion===>");
    }
}
1.3.2 SpringMVC配置文件中配置拦截器
用元素< mvc:interceptors >配置拦截器,path属性告诉springMVC该拦截器拦截什么请求,class配置指定为需要使用的拦截器,exclude-mapping排除一些请求被拦截
    <!-- 拦截器的注册 -->
    <mvc:interceptors>
        <mvc:interceptor>
            <mvc:mapping path="/user/**"/>
            <bean class="com.imooc.core.LogInterceptor"></bean>
        </mvc:interceptor>

        <mvc:interceptor>
            <mvc:mapping path="/user/**"></mvc:mapping>
            <!--exclude-mapping在所有拦截中进行排除,一般在通配符会有意义。-->
            <mvc:exclude-mapping path="/user/updatepwd"></mvc:exclude-mapping>
            <mvc:exclude-mapping path="/user/updatebackground/*"></mvc:exclude-mapping>
            <bean class="com.imooc.core.LoginInterceptor"></bean>
        </mvc:interceptor>
    </mvc:interceptors>
1.4 多个拦截器执行顺序
1.4.1 SpringMVC配置文件中配置3个拦截器
    <mvc:interceptors>
        <mvc:interceptor>
            <mvc:mapping path="/user/**"/>
            <bean class="com.imooc.core.LogInterceptor1"></bean>
        </mvc:interceptor>
                <mvc:interceptor>
            <mvc:mapping path="/user/**"/>
            <bean class="com.imooc.core.LogInterceptor2"></bean>
        </mvc:interceptor>
                <mvc:interceptor>
            <mvc:mapping path="/user/**"/>
            <bean class="com.imooc.core.LogInterceptor3"></bean>
        </mvc:interceptor>
    </mvc:interceptors>
1.4.2 运行结果
Spring会先从第一个拦截器开始进入前置方法,这样的前置方法是按配置顺序运行的,然后运行处理器的代码,最后运行后置方法,后置方法和完成方法则是按照配置逆序的,和责任链模式的运行顺序的一致的
...
preHandle1
preHandle2
preHandle3
...
postHandle3
postHandle2
postHandle1
...
afterCompletion3
afterCompletion2
afterCompletion1
1.4.3 preHandle2返回false
当其中的一个preHandle方法返回为false后,按配置顺序,后面的preHandle方法都不会运行,而控制器和所有的后置方法postHandle也不会再运行,执行过preHandle方法且该方法返回为true的拦截器的afterCompletion会按照配置的逆序执行
preHandle1
preHandle2
afterCompletion1
二、控制器接收各类请求参数
2.1 接收普通请求参数
如果传递过来的参数名称和HTTP的保存一致,那么无须任务注解也可以获取参数
2.1.1 html主要代码
<form id="form" action="./params/commonParams.do">
    <input id="roleName" name="roleName">
    <input id="note" name="note">
</form>
2.1.2 无注解获取HTTP请求参数
@ReuqstMapping("/commonParams")
public ModelAndView commonParams(String roleName,String note){
    ...
}
2.1.3 通过POJO获取HTTP参数
@ReuqstMapping("/commonParamPojo")
public ModelAndView commonParams(RoleParams roleParams){
    String name = roleParams.getRoleName();
    String note = roleParams.getRolenote();
    ...
}
2.2 使用@RequestParam注解获取参数
2.1中如果http的参数名称变化,后台代码也需要重新绑定规则,使用注解@RequestParam可以轻松解决这类问题,而以后修改代码只需要修改@RequestParam里面的value即可
@ReuqstMapping("/requestParam")
public ModelAndView commonParams(@RequestParam("role_name") String roleName,String note){
    String name = roleName
    String note = note
    ...
}
@RequestParam注解默认情况下不能为空,如果为空系统就会抛出异常,如果希望允许它为空,就修改它的配置项required为false
(@RequestParam(value="role_name",required=false) String roleName
2.3 使用URL传递参数
一些网站使用URL的形式传递参数,这符合RESTful风格,对于一些业务比较简单的应用是十分常见的,例如获取角色信息,可以把URL写作/params/getRole/1,1便是角色编号参数
//{id}代表接收一个参数
@ReuqstMapping("/params/{id}")
//注解@PathVariable表示从URL的请求地址中获取参数
public ModelAndView commonParams(@PathVariable("id") Long id){
    Role role = roleService.getRole(id);
}
请求地址的如下
localhost:8080/Derrick/params/getRole/1.do
2.4 传递JSON参数
假设需要传递角色名称、备注和分页参数
2.4.1 PageParams分页参数
public class PageParams{
    private int start;
    private int limit;
}
2.4.2 带有分页参数的角色参数查询
public class RoleParams{
    private String roleName;
    private String note;
    private PageParam pageParams = null;
}
2.4.3 JQuery传递JSON参数
传递的JSON数据需要和对应参数的POJO保持一致,并且设置参数类型为JSON,将JSON数据转换为字符串
$(document).ready(function(){
   //JSON需要和RoleParams一一对应
    var data = {
        roleName:'role',
        note:'note',
        pageParams:{
            start:1,
            limit:20
        }
    }
    //JQuery的post请求
    $.post({
        url:"./params/findRoles.do",
        //设置contentType传递参数类型为JSON
        contentType:"application/json",
        //将JSON转换为字符串传递
        data:JSON.stringify(data),
        //成功后的方法
        success:function(result){
        }
    });
});
2.4.4 使用@RequestBody接收参数
@ReuqstMapping("/findRoles")
public ModelAndView FindRoles(@RequestBody RoleParams roleParams){
    List<Role> roleList = roleService.findRoles(roleParams);
}
2.5 接受列表数据
2.5.1 一次性删除多个角色,传递id数组
$(document).ready(function(){
    //删除角色数组
    var idList={1,2,3};
    //JQuery的post请求
    $.post({
        url:"./params/deleteRoles.do",
        //设置contentType传递参数类型为JSON
        contentType:"application/json",
        //将JSON转换为字符串传递
        data:JSON.stringify(idList),
        //成功后的方法
        success:function(result){
        }
    });
});
2.5.2 DeleteRoles
@RequestMapping("/deleteRoles")
public ModelAndView FindRoles(@RequestBody List<Long>idList){
    int total = roleService.deleteRoles(idList);
}
2.5.3 角色数组
$(document).ready(function(){
    //删除角色数组
    var roleList={
        {roleName:'role_name_1',note:'note_1'},
        {roleName:'role_name_2',note:'note_2'},
        {roleName:'role_name_3',note:'note_3'}
    };
    //JQuery的post请求
    $.post({
        url:"./params/addRoles.do",
        //设置contentType传递参数类型为JSON
        contentType:"application/json",
        //将JSON转换为字符串传递
        data:JSON.stringify(roleList),
        //成功后的方法
        success:function(result){
        }
    });
});
2.5.4 AddRoles
@RequestMapping("/addRoles")
public ModelAndView FindRoles(@RequestBody List<Long>idList){
    int total = roleService.deleteRoles(idList);
}
2.6 接收表单序列化
通过表单序列化也可以将表单数据转换为字符串传递给后台
2.6.1 提交序列化表单
将form表单序列化,传递给后台,则将数据以roleName=XXX&¬e=XXX传递
<script type="text/javascript">
    $(document).ready(function(){
    $("commit").click(function(){
        var str=$("form").serialize();
        //提交表单
        $.post({
            url:"./params/commonParamPojo2.do",
            data:${"form"}.serialize(),
            //成功的方法
            success:function(result){

            }
        });
    });
});
</script>
2.6.2 接收序列化表单
@RequestMapping("/commonParamPojo2")
public ModelAndView FindRoles(String roleName,String note){
    ...
}
2.7 重定向
2.7.1 返回字符串实现重定向
当有一个showRoleJsonInfo处理器是负责将角色信息转换为视图时,当我们另外一个处理器是需要新增角色后以JSON视图的形式展示给请求者,我们可以将角色信息传递给showRoleJsonInfo
Spring MVC有一个约定,当返回的字符串带有redirect的时候,它就会认为需要的是一个重定向
@RequestMapping("/addRole")
//Model为重定向数据模型,Spring MVC会自动初始化它
public String addRole(Model model,String roleName,String note){
    Role role = new Role();
    role.setRoleName(roleName);
    role.setNote(note);
    roleService.insertRole(role);
    //绑定重定向数据模型
    model.addAttribute("roleName",roleName);
    model.addAttribute("note",note);
    model.addAttribute("id",role.getId());
    return "redirect:./showRoleJsonInfo.do";
}
2.7.2 返回ModelAndView实现重定向
@RequestMapping("/addRole2")
//ModelAndView对象,Spring MVC会自动初始化它
public ModelAndView addRole2(ModelAndView mv,String roleName,String note){
    Role role = new Role();
    role.setRoleName(roleName);
    role.setNote(note);
    roleService.insertRole(role);
    //绑定重定向数据模型
    model.addAttribute("roleName",roleName);
    model.addAttribute("note",note);
    model.addAttribute("id",role.getId());
    mv.setViewName("redirect:./showRoleJsonInfo.do");
    return mv
}
2.7.3 重定向传递POJO
以上都是传递一个一个参数,但有时候需要传递POJO来完成任务,而不是一个个字段的传递,我们将POJO转化为JSON视图,代码如下
@RequestMapping("/showRoleJsonInfo2")
public ModelAndView addRole(Role role){
    ModelAndView mv = new ModelAndView();
    mv.setView(new MappingJackson2JsonView());
    mv.addObject("role",role);
    return mv;
}
但是在URL重定向过程中,HTTP的重定向参数是以字符串传递的,这是并不能有效传递对象,需要借助数据模型RedirectAttribute,使用它的addFlashAttribute方法后,Spring MVC会将数据保存到Session中,重定向后就会将其清楚,流程如下
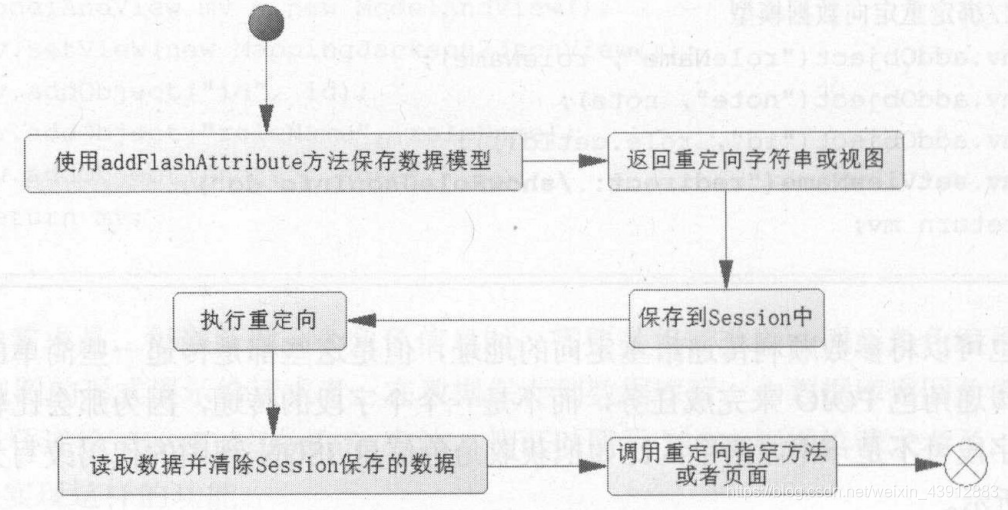
@RequestMapping("/addRole3")
public ModelAndView addRole3(RedirectAttributes ra,Role role){
    roleService.insertRole(role);
    //绑定重定向数据模型
    ra.addFlashAttribute("role",role);
    return "redirect:./showRoleJsonInfo2.do";
}
三、保存并获取属性参数
- @RequestAttribute获取HTTP的请求request对象属性值,用来传递给控制器的参数
- @SessionAttribute在HTTP的会话session对象属性值中,用来传递给控制器的参数
- @SessionAttributes可以给它配置一个字符串数组,这个数组对应的是数据模型对应键值对
3.1 @RequestAttribute
RequestAttribute注解的参数默认不能为空,有一个required配置项,它是一个boolean值,设置为false代表可以为空
3.1.1 reuqest
//设置请求属性
request.setAttribute("id",1L);
//转发给控制器
request.getRequestDispatcher("./requestAttribute.do").forword(request,response);
3.1.2 控制器获取请求属性
@RequestMapping("/requestAttribute")
publiv ModelAndView reqAttr(@RequestAttribute(name="id",required=false) Long id){
    ...
}
3.2 @SessionAttributes
注解和HTTP会话对象有关,在控制器中可以使用注解@SessionAttributes来设置对应的键值对,不过这个注解只能对类进行标准,不能对方法或参数注解。它可以配置属性名称或属性类型,它的作用是当这个类被注解后,Spring MVC执行完控制器的逻辑后,将数据模型中对应的属性名或属性类型保存到HTTP的Session对象中
如下代码中如果请求/attribute/sessionAttributes.do?id=1,sessionAttrs方法中数据模型保存了一个id和角色,由于它们满足了@SessionAttribute的配置,所以最后它会保存到Session对象中
@Controller
@RequestMapping("/attribute")
//可以配置数据模型的名称和类型
@SessionAttributes(name={"id"},types={Role.class})
public class AttributeController{
    @RequestMapping("/sessionAttributes")
    public ModleAndView sessionAttrs(Long id){
        ...
        mv.addObject("id",id);
        ...
    }
}
3.3 @SessionAttribute
3.3.1 JSP设置Session属性
<%
    //设置session属性
    session.setAttribute("id",1L);
	...
%>
3.3.2 获取Session属性
@RequestMapping("/sessionAttribute")
public ModelAndView sessionAttr(@SessionAttribute("id")Long id){
    ...
}


 被折叠的 条评论
为什么被折叠?
被折叠的 条评论
为什么被折叠?
 到【灌水乐园】发言


