


一、scrapy
环境配置:直接conda 一个环境,然后
conda create -n pachong python=3.7
安装包
pip install scrapy
激活环境
conda activate pachong
使用scrapy创建一个项目
scrapy startproject 项目名
如(项目名)pachong

然后进入目录会有以下文件:

Scrapy完成爬虫需要涉及的文件和步骤
-
新建项目 (scrapy startproject xxx):新建一个新的爬虫项
-
明确目标(编写items.py):明确你想要抓取的目标
-
制作爬虫(spiders/xxspider.py):制作爬虫开始爬取网页
-
中间件(middlewares.py):处理请求(比如加头,代理ip等)
-
存储内容(pipelines.py):设计管道存储爬取内容
-
全局的设置(setting.py):对自定义的方法进行调用
二、使用步骤
1.item.py
爬取的网站:https://www.kuaidaili.com/free/inha/
获取其免费的ip
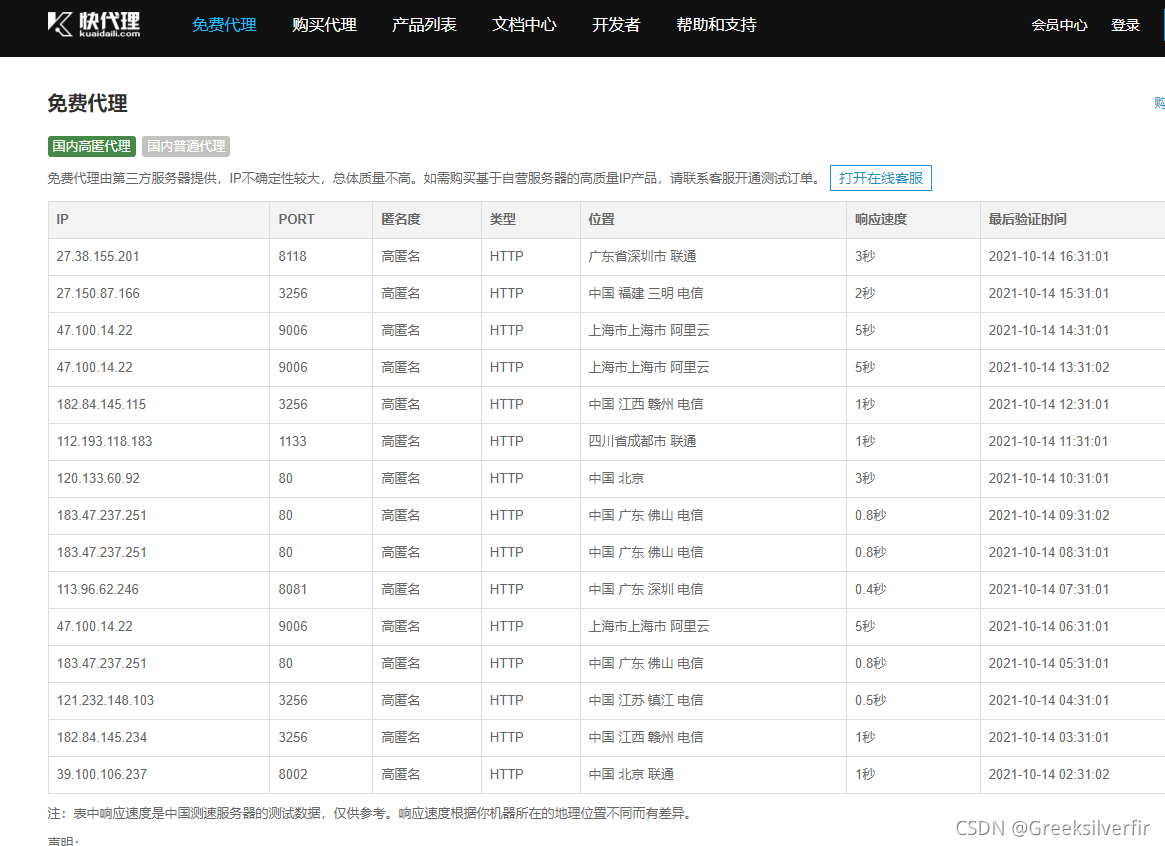
从中我们需要一个是ip和port。所以在items.py文件下编写
import scrapy
class GetIpItem(scrapy.Item):
    # define the fields for your item here like:
    # name = scrapy.Field()
    ip=scrapy.Field()
    port=scrapy.Field()
已经知道要获取什么数据,现在是如何通过网页进行获取
2.制作爬虫
进入spiders 文件夹里,新建一个get_ip.py文件,进行编写,爬取数据。
网页右击检查(chrome)
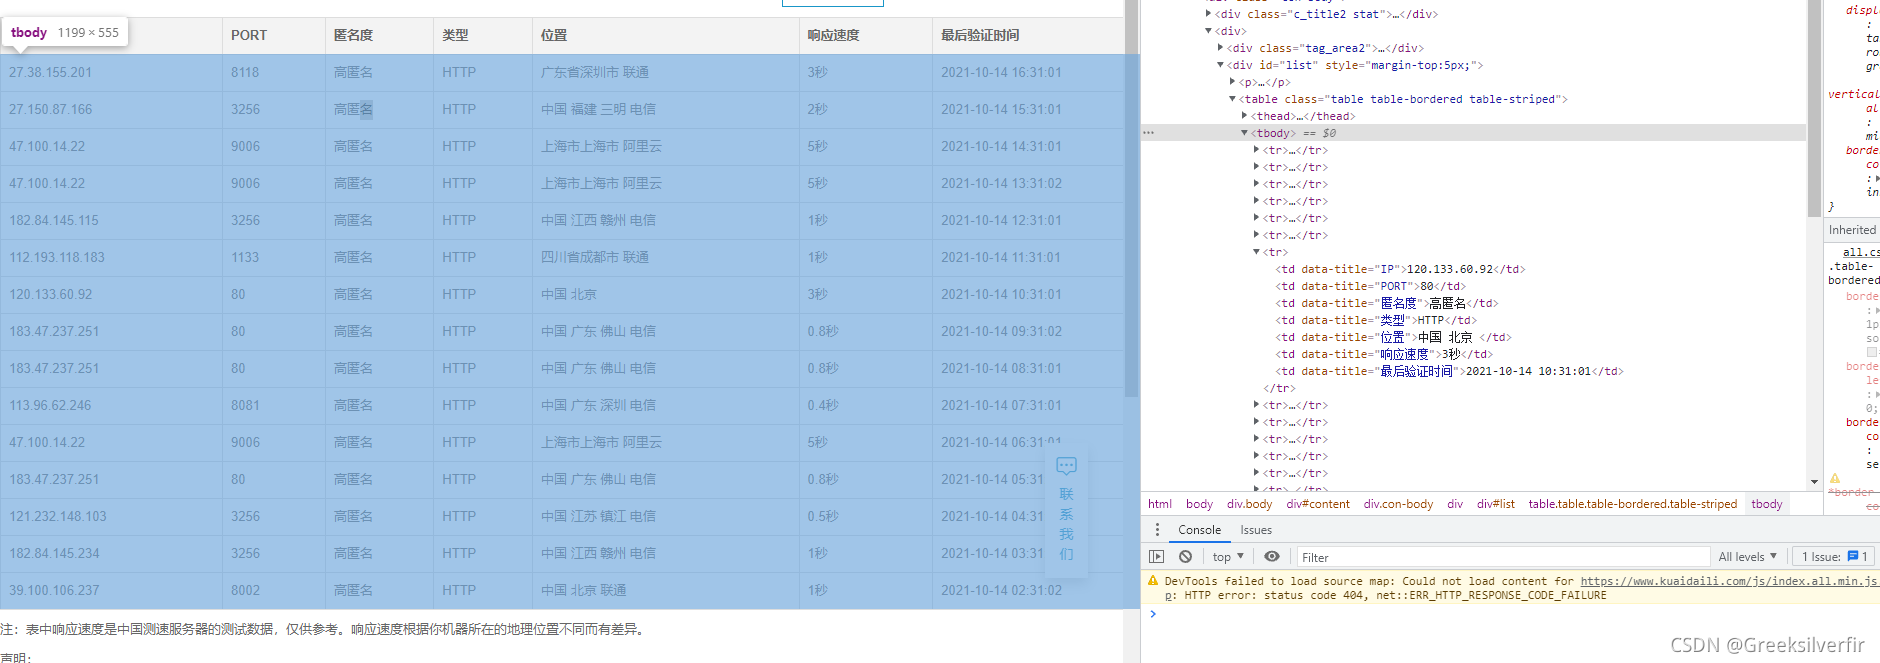
如图,获取当前页所有ip。在指定源码位置右击copy 选在 copy xpath,则获得:
//*[@id=“list”]/table/tbody。这样就获取了全部的ip信息。然后 .//tr . 进入当前目录下的所有tr文件,这样就返回一个list集合
代码如下(示例):
import os
import scrapy
import requests
import random
import time
from lxml import etree
from get_ip.items import GetIpItem
class get_ip(scrapy.Spider):
    name='get_ip' # 用来启动爬虫的命名,同一个目录下,是唯一的
    def start_requests(self):  # 启动之后第一步是调用这里
        url='https://www.kuaidaili.com/free/inha/1/'
        yield scrapy.Request(url=url,callback=self.parse)       # 返回响应给parse进行处理

    def parse(self, response,**kwargs):  # 处理响应,获取想要的资源
        ip_list=response.xpath('//*[@id="list"]/table/tbody').xpath('.//tr')
        item=GetIpItem()
        for link in ip_list:		#text() 获取文本,如果是当前标签下其他方法,可以用(如@href)
            item['ip']=link.xpath('.//td[1]/text()').extract()  # 使用extract()  就成了一个字符串了
            item['host']=link.xpath('.//td[2]/text()').extract()
            yield item      # 这里是使用 yield 到 pipline 类中进行处理,下载保存之类

        # new_links = response.xpath('//a[text()="下一页"]/@href').extract()
        # if new_links and len(new_links) > 0:
        #         # 获取下一页的链接
        #         new_link = new_links[0]
        #         # 再次发送请求获取下一页数据
        #         yield scrapy.Request("https://www.ygdy8.net/html/gndy/china/" + new_link, callback=self.parse)

        for link in new_links:
            new_link=link.xpath('.//a/@href').extract()            # 获取下一页的链接   返回的是list的字符串  如['/free/inha/1/']
            print(new_link)
            time.sleep(4)											# 不能直接一直发送请求,会报错
            if new_link:                                            # 链接不为空则开始下一页
                # 再次发送请求获取下一页数据
                yield scrapy.Request("https://www.kuaidaili.com" + new_link[0], callback=self.parse)
3.中间件
# 设置ip池
import random
from example.settings import IPPOOL
class MyproxiesSpiderMiddleware(object):
    def __init__(self, ip=''):
        self.ip = ip
    def process_request(self, request, spider):
        thisip = random.choice(IPPOOL)
        print("this is ip:" + "https://" + thisip["ipaddr"])
        request.meta["proxy"] = "http://" + thisip["ipaddr"]
4.存储内容
步骤2获得的数据会在pipline进行处理,保存。
from itemadapter import ItemAdapter
import pandas as pd

class GetIpPipeline:
    def __init__(self):
        self.save_csv=pd.DataFrame(columns=['ip','host'])

    def close_spider(self, spider):#重写close_spider回调方法
        self.save_csv.to_csv("movie.csv")

    def process_item(self, item, spider):
        # self.save_text.write(item['ip']+','+item['host'])
        print(item['ip'][0],item['host'][0])
        self.save_csv=self.save_csv.append({'ip':item['ip'][0],'host':item['host'][0]},ignore_index=True)
5.setting的配置
# Obey robots.txt rules  是否遵循机器爬虫,一般fasle,否则会造成有些网站不能爬取
ROBOTSTXT_OBEY = False
COOKIES_ENABLED = False         #禁用cookies,防止某些网站根据Cookie来封锁爬虫。
IPPOOL=[  # ip池
    {"ipaddr": "120.133.60.92:80"},
    {"ipaddr": "183.47.237.251:80"},
]
ITEM_PIPELINES = {
   'get_ip.pipelines.GetIpPipeline': 300,
}
三、request爬虫方式
爬取网站:https://subscene.com/
也是一个电影字幕的网址
1.导包
import requests
from lxml import etree		# 解析 requests 返回的html 页面
import time
2.请求
搜索栏输入我和我的祖国,点击搜索,
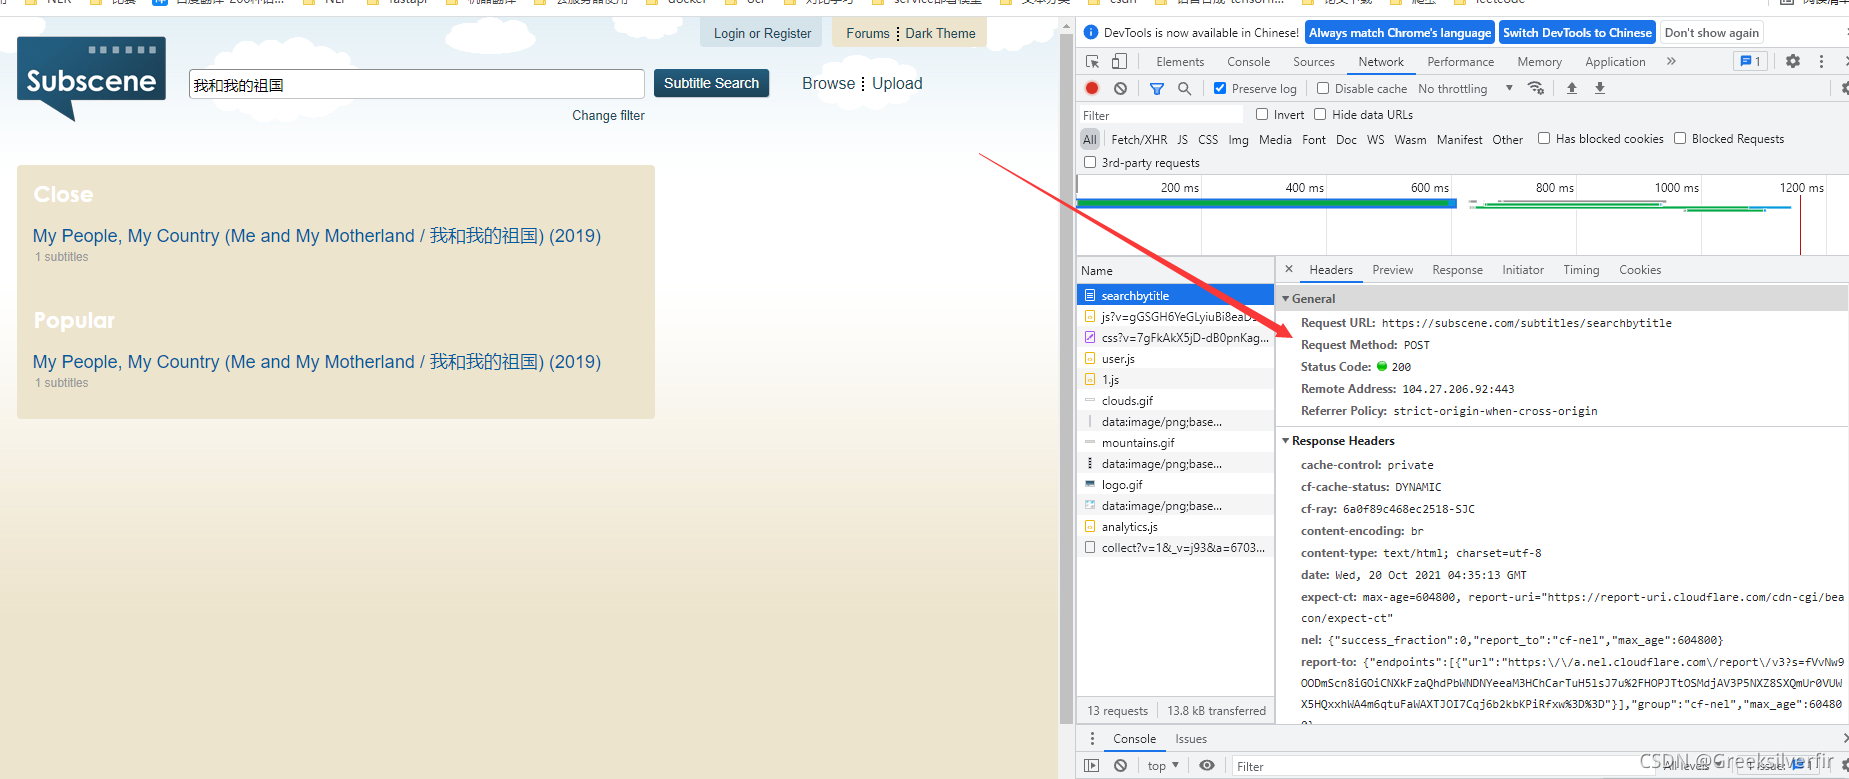
可以从中看出是一个post的请求,定义header信息
no_subscene=[]
movies_is_exist=[]
language_list=[]
header = {
        "accept": "text/html,application/xhtml+xml,application/xml;q=0.9,image/avif,image/webp,image/apng,*/*;q=0.8,application/signed-exchange;v=b3;q=0.9",
        "accept-encoding": "gzip, deflate, br",
        "accept-language": "zh-CN,zh;q=0.9,en;q=0.8",
        "cache-control": "max-age=0",
#         "content-length": "27",
        "content-type": "application/x-www-form-urlencoded",
        "cookie": "_ga=GA1.2.505677917.1634012451; _gid=GA1.2.715886252.1634012451; __cf_bm=Ab8DXP.UZzQf_vsmlftfQQTNhh1IP1RaEEskGCRa9N8-1634117297-0-AQ3K+taJ0uYRxVqeSMtDly6BhQU9ZsHltvE+D9NuCW2eUUI5Acl534W5gxjrlnAUvzwFm2+BkE7DTuwMVpsFud196eGKyaJxhOD1fQSydDPfTsZTSjIu0P4zmZA6b/WcSQ==; _gat=1",
        "origin": "https://subscene.com",
        "referer": "https://subscene.com/subtitles/searchbytitle",
        "sec-ch-ua": '"Chromium";v="94", "Google Chrome";v="94", ";Not A Brand";v="99"',
        "sec-ch-ua-mobile": "?0",
        "sec-ch-ua-platform": '"Windows"',
        "sec-fetch-dest": "document",
        "sec-fetch-mode": "navigate",
        "sec-fetch-site": "same-origin",
        "sec-fetch-user": "?1",
        "upgrade-insecure-requests": "1",
        "user-agent": "Mozilla/5.0 (Windows NT 10.0; Win64; x64) AppleWebKit/537.36 (KHTML, like Gecko) Chrome/94.0.4606.81 Safari/537.36"}
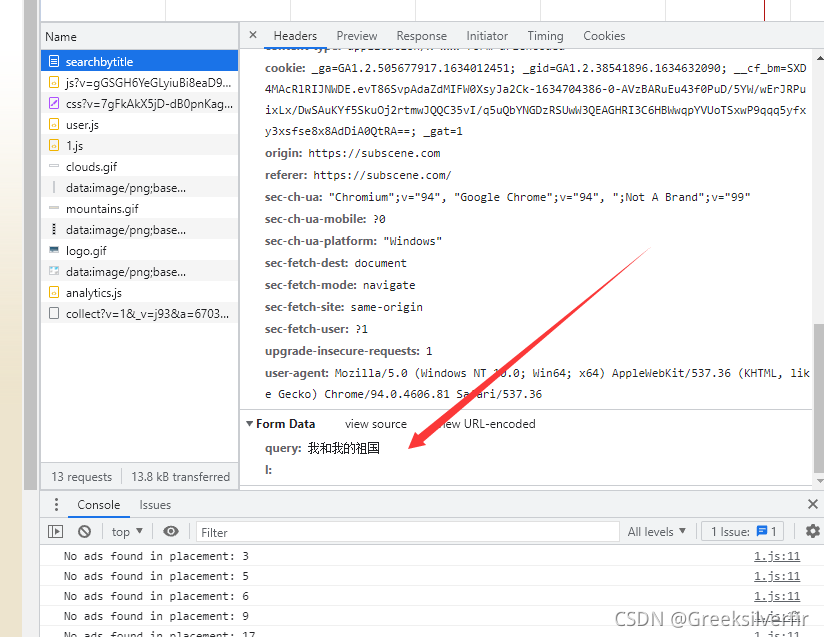
这是是发送post请求,附加的数据
#下面的电影名存储的txt文件
for line in open('C:\\Users\\***\\Desktop\\pachong\\example(1)\\example\\example\\no_exist.txt', 'r',
                 encoding='utf-8'):
    line=line.replace('\n','')			#
# 这里写循环的原因在于,post请求不像get请求那样,返回快,如果一时间访问过多,会报409
    while 1:
        content=requests.post(url="https://subscene.com/subtitles/searchbytitle",data={'query':f'{line}'},headers=header)			# 发送post请求  data 中的字典就是上图的Frome data
        if content.status_code==409:
            time.sleep(3)
            continue
        else:
            break
当请求发送成功之后,会返回一个200 和一个html页面源码,这时候就要使用etree进行解析页面
    etree_html = etree.HTML(content.content)		#将html的内容进行传入etree 进行解析
    text = etree_html.xpath('//*[@id="left"]/div/div/h2/text()')
    if text[0]=='No results found':
        no_subscene.append(line)
    else:
        movies_item=etree_html.xpath('//*[@id="left"]/div/div/ul')[0].xpath('.//li')	# 获取全部li的html	这里返回的就是list ,和scrapy 有一定区别

        for link in movies_item:
            movies_name=link.xpath('.//div/a/text()')		# 对每个li中进行获取电影名  返回的是list
#             print(movies_name)
            if line in movies_name[0]:						# 网站会返回多个电影数据 这时候就要进行判断是否有匹配的电影
                try:
                    new_link=link.xpath('.//div/a/@href')	#如果匹配,则获取其链接
                 	content=requests.get(url="https://subscene.com"+new_link[0],headers=header) #跳转到当前电影字幕的网页
                    etree_html = etree.HTML(content.content)
                    text = etree_html.xpath('//*[@id="content"]/div[2]/div[4]/table/tbody')[0].xpath('.//tr') #获取当前电影的全部字幕
                    for language in text:
                        text=language.xpath('.//@id')		  # 获取语言 即English等
                        try:
                            language_list.append(text[0])
                            if 'chinese' in text[0]:			 # 只要获取有中文字幕的电影
                                movies_is_exist.append(line)
                                break
                            else:
                                print(text[0])
                        except:
                            continue
                    no_subscene.append(line)
                except:
                    print(movies_name)


 1380
1380

 被折叠的 条评论
为什么被折叠?
被折叠的 条评论
为什么被折叠?
 到【灌水乐园】发言


