


-
入门
- data:用于定义属性
- methods用于定义的函数
- {{}}用于输出对象的属性和函数的返回值
- 当vue实例被创建时,它向vue的响应式系统中加入其data对象中能找到的所以属性当这些属性值发生改变时,html视图也会发生相应的变化
-
模板语法
-
文本:{{}}
<!DOCTYPE html> <html> <head> <meta charset="utf-8" /> <title>vue测试</title> </head> <script src="https://cdn.staticfile.org/vue/2.2.2/vue.min.js"></script> <body> <div id="app"> <p>{{message}}</p> <p> {{test()}} </p> </div> <div id="vue_app"> <p> {{message2}} </p> </div> </body> <script> new Vue({ el: "#app", data: { message: "Hello World", }, methods: { test: function() { return this.message; } } }); var data = { message2: "Hello Vue" }; var vue = new Vue({ el: "#vue_app", data: data }); document.write(data.message2 == vue.message2); //true document.write("<br>") document.write(vue.$data == data); //true data.message2 = "HELLO VUE"; </script> </html> -
Html: v-html
-
属性: v-bind:url,v-html:target,v-bind:class,v-bind:id
-
js表达式
-
if语句
-
过滤器
<!DOCTYPE html> <html> <head> <meta charset="utf-8"> <title> vue</title> <script src="https://cdn.staticfile.org/vue/2.2.2/vue.min.js"></script> </head> <style> .class1{ background-color: aqua; font-size: larger; } </style> <body> <div id="app"> <!-- v-html使用 --> <p v-html="message"></p> <!-- v-model与v-bind使用 --> <span>点击切换颜色</span> <input type="checkbox" v-model="test" /> <p v-bind:class="{class1:test}">Test</p> <!-- vue对于js表达式的支持 --> <p>{{10+10}}</p> <p>{{flag==true?"Yes":"No"}}</p> <p>{{name.split('').reverse().join('')}}</p> <!-- v- 标签使用 --> <button v-on:click="a">点击切换</button> <p v-if="seen">you can see me</p> <a v-bind:href="url" v-bind:target="target">百度一下</a> <br /> <!-- 双向数据绑定 --> <input type="text" v-model="message1" /> <p v-html="message1"></p> <h2>字符串反转</h2> <input type="text" v-model="message2" /> <button v-on:click="reverse">点击反转</button> <br /> <!-- 获得dom节点 --> <input type="text" ref="userInfo" v-model="msg" /> <!-- 过滤器 --> <span>原始数据:</span><input type="text" v-model="message3" /> <span>过滤后的数据:</span> <span> {{message3 | format("2131")}} </span> </div> </body> <script> var vue = new Vue({ el: "#app", data: { message: "Hello World", test: false, flag: true, name: "Jamin", seen: false, url: "http://www.baidu.com", target: "_blank", message1: "测试", message2: "123", message3: "" }, methods: { a: function() { if (this.seen == true) { this.seen = false; } else { this.seen = true; } }, reverse: function() { this.message2 = this.message2.split('').reverse().join(''); alert(this.$refs.userInfo.value); } }, filters: { format: function(value, a) { return value.charAt(0).toUpperCase() + value.slice(1) + a; } } }) </script> </html> -
-
条件语句与循环语句
 <!DOCTYPE html>
 <!-- 循环判断 -->
 <html>
     <head>
         <meta charset="utf-8">
         <title>条件与循环语句</title>
         <script src="https://cdn.staticfile.org/vue/2.2.2/vue.min.js"></script>
     </head>
     <body>
         <div id="app">
             <h1 v-if="ok">Hello Vue</h1>
             <span>输入你的成绩</span>
             <input type="text" v-model="grade">
             <span>你的等级为:</span>
             <p v-if="grade>=90">优秀</p>
             <p v-else-if="grade>=60">及格</p>
             <p v-else>不及格</p>
             <p v-show="show">123</p>
             <ul>
                 <li v-for="(value,key,index) in object">{{index}}:{{key}}:{{value}}</li>
             </ul>
             <ol>
                 <li v-for="n in 10">{{n}}</li>
             </ol>

             <ul>
                 <li v-for="people in   sites ">{{people.name}}</li>
         </ul>
         <div v-for="m in 9">
		<b v-for="n in m">
			{{m}}*{{n}}={{m*n}}
		</b>
	</div>
     </div>
 </body>
 <script>
     new Vue({
         el: "#app",
         data: {
             ok: true,
             grade: "",
             show: 213,
             object: {
                 name: "张三",
                 age: 12,
                 sex: "男"
             },
             sites: [{
                 name: "张三",
                 age: 12
             }, {
                 name: "李四",
                 age: 16
             }, {
                 name: "王五",
                 age: 18
             }]
         }
     });
 </script>
</html>
	1. v-show与v-if区别
		1. v-show在dom树中显示等同与display:none v-if直接不显示
		2. v-show消耗更高的初始渲染 v-if更多小号切换渲染
		3. v-show中定义的值为0、null、undefined、false 时为假其余为真
-
计算属性computed
     <!DOCTYPE html>
 <html>
     <head>
         <meta charset="utf-8">
         <title>computed</title>
         <script src="https://cdn.staticfile.org/vue/2.2.2/vue.min.js"></script>
     </head>
     <body>
         <div id="app">
             <p>"源message"{{message}}</p>
             <p>"计算首次调用"{{reversedMessage}}</p>
             <p>"方法首次调用"{{resver()}}</p>
             <p>"计算二次调用"{{reversedMessage}}</p>
             <p>"方法二次调用"{{resver()}}</p>
         </div>
         <script>
             var i = 1;
             new Vue({
                 el: "#app",
                 data: {
                     message: "Vue"
                 },
                 computed: {
                     reversedMessage: function() {
                         i += 1;
                         return this.message.split("").reverse().join("") + i;
                     }
                 },
                 methods: {
                     resver: function() {
                         i += 1;
                         return this.message.split("").reverse().join("") + i;
                     }
                 }
             })
         </script>
     </body>
 </html>
1.computed 与method的区别
- computed依赖缓存
-
监听属性
<!DOCTYPE html> <html> <head> <meta charset="utf-8"> <title>监听属性</title> <script src="https://cdn.staticfile.org/vue/2.2.2/vue.min.js"></script> </head> <body> <div id="app"> <p> {{counter}} </p> <button @click="counter++">点击增加</button> <br /> <span>千米:</span><input v-model="kilometers" type="text" /> <span>米:</span><input v-model="meters" type="text" /> <p id="info"></p> </div> <script> vue = new Vue({ el: "#app", data: { counter: 1, kilometers: 0, meters: 0 }, watch: { kilometers: function(value) { this.kilometers = value; this.meters = this.kilometers * 1000; }, meters: function(value) { this.kilometers = value / 1000; this.meters = value; } } }); vue.$watch("counter", function(nval, oval) { alert("以前的值" + oval + "现在变成了" + nval); }); vue.$watch("kilometers", function(newValue, oldValue) { document.getElementById("info").innerHTML = "以前的值" + oldValue + "现在变成了" + newValue; }); </script> </body> </html> -
Vue表单
 <!DOCTYPE html>
 <html>
     <head>
         <meta charset="utf-8">
         <title>Form表单</title>
         <script src="https://cdn.staticfile.org/vue/2.2.2/vue.min.js"></script>
     </head>
     <body>
         <div id="app">
             <h3>双向输出</h3>
             <input type="text" v-model="message" />
             <p> 输入的内容为:{{message}}</p>
             <br />
             <h3>单个复选框</h3>
             <input type="checkbox" id="test" v-model="checked" value="测试" /><label for="test">测试</label>
             <p>选择为{{checked}}</p>
             <h3>多个复选框</h3>
             <span>请选择:</span>
             <input type="checkbox" id="test1" v-model="check" value="测试1" /><label for="test1">测试1</label>
             <input type="checkbox" id="test2" v-model="check" value="测试2" /> <label for="test2">测试2</label>
             <input type="checkbox" id="test3" v-model="check" value="测试3" /><label for="test3">测试3</label>
             <p>选择为{{check}}</p>
             <h3>单选框</h3>
             <input type="radio" v-model="test4" value="测试4" id="test4" /><label for="test4">测试4</label>
             <input type="radio" v-model="test4" value="测试5" id="test5" /><label for="test5">测试5</label>
             <p>选择为{{test4}}</p>
             <h3>下拉框</h3>
             <select v-model="select">
                 <option value="测试1">1</option>
                 <option value="测试2">2</option>
             </select>
             <p>你的选择为{{select}}</p>
             <h3>全选 1</h3>
             <input type="checkbox" v-model="allChecked" id="allChecked" @change="checkedAll" /><label for="allChecked">全选</label>
             <span>{{allChecked}}</span>
             <br />
             <input type="checkbox" value="Test6" v-model="checkName" id="test6" /><label for="test6">Test6</label>
             <input type="checkbox" value="Test7" v-model="checkName" id="test7" /><label for="test7">Test7</label>
             <input type="checkbox" value="Test8" v-model="checkName" id="test8" /><label for="test8">Test8</label>
             <p>{{checkName}}</p>
             <h3>全选2</h3>
             <input type="checkbox" id="checkbox" v-model="checkAll" @change="allchecked" /><label for="checkbox">全选</label>
             <label v-for="list in checkList"><input type="checkbox" v-model="checkListOn" v-bind:value="list.name" />{{list.name}}</label>
             <p>{{checkListOn}}</p>
         </div>
     </body>
     <script>
         var vue = new Vue({
             el: "#app",
             data: {
                 message: "测试",
                 check: [],
                 checked: false,
                 test4: "",
                 select: "",
                 checkName: [],
                 checkArray: ["Test6", "Test7", "Test8"],
                 allChecked: false,
                 checkList: [{
                     name: "测试1"
                 }, {
                     name: "测试2"
                 }, {
                     name: "测试3"
                 }],
                 checkListOn: [],
                 checkAll: false
             },
             methods: {
                 checkedAll: function() {
                     if (this.allChecked) {
                         this.checkName = this.checkArray;
                     } else {
                         this.checkName = [];
                     }
                 },
                 allchecked: function() {
                     if (this.checkAll) {
                         var checkArray = [];
                         for (var i = 0; i < this.checkList.length; i++) {
                             checkArray.push(this.checkList[i].name);
                         }
                         this.checkListOn = checkArray;
                     } else {
                         this.checkListOn = [];
                     }
                 }
             },
             watch: {
                 "checkName": function() {
                     if (this.checkName.length == 3) {
                         this.allChecked = true;
                     } else {
                         this.allChecked = false;
                     }
                 },
                 "checkListOn": function() {
                     if (this.checkListOn.length == this.checkList.length) {
                         this.checkAll = true;
                     } else {
                         this.checkAll = false;
                     }
                 }
             }
         })
     </script>
 </html>
修饰符
- .lazy: 默认情况下v-model是双向同步的,但你可以添加.lazy转变为在change事件中同步
- .number:自动将用户的输入值转为number类型,如果原值的转换结果为NaN则返回原值
- .trim:自动过滤首尾空格
-
组件:封装可重用的代码
<!DOCTYPE html>
<html>
	<head>
		<meta charset="utf-8">
		<title>vue组件</title>
		<script src="https://cdn.jsdelivr.net/npm/vue@2.6.10/dist/vue.js"></script>
	</head>
	<body>
		<div id="app">
			<test></test>
			<test2></test2>
			<child message="Hello Vue"></child>
			<!-- 动态绑定 -->
			<child v-bind:message="message1"></child>
			<check1></check1>
			<br />
			<p>{{total}}</p>
			<test3 v-on:increment="incrementTotal"></test3>
			<br />
			<test3 v-on:increment="incrementTotal"></test3>
		</div>
	</body>`
	<script>
		// 全局组件
		Vue.component("test", {
			template: "<h1>测试</h1>"
		});
		//局部组件
		var Child = {
			template: "<h3>测试2</h3>"
		};
		Vue.component("child", {
			//父组件用来传递数据的属性
			props: ["message"],
			template: "<h5>{{message}}</h5>"
		});
		Vue.component("test3", {
			template: '<div><button v-on:click="incrementHandler(1)">-</button>{{count}}<button v-on:click="incrementHandler(2)">+</button></div>',
			data: function() {
				return {
					count: 0
				}
			},
			methods: {
				incrementHandler: function(value) {
					if (value == 1) {
						this.count -= 1;
						this.$emit('increment', value);
					} else {
						this.count += 1;
						this.$emit('increment', value);
					}
				}
			}
		})
		//props验证(版本要是开发者版本)
		Vue.component("check1", {
			props: {
				age: {
					//数据类型
					type: [Number, Boolean],
					//必填项
					required: true,
					//初始值
					default: 100,

				}
			},
			template: "<h6>测试props验证{{age}}</h6>"
		})
		new Vue({
			el: "#app",
			components: {
				"test2": Child
			},
			data: {
				message1: "Hello",
				total: 0
			},
			methods: {
				incrementTotal: function(value) {
					if (value == 1) {
						this.total--;
					} else {
						this.total++;
					}
				}
			}
		});
		/* prop是单项绑定的,当父组件的值发生变化时会传递到子组件但不会反过来 */
	</script>
</html>
- 自定义指令
- 钩子
- 钩子函数
- bind:第一次绑定到元素时调用
- insterted:被绑定的元素插入到父节点时调用
- update:被绑定元素所在的模板更新时调用
- comppantUpdated:被绑定元素所在模板完成一次更新周期时调用
- unbind:只调用一次,指令与元素解绑时调用
- 钩子参数
- el:指定所绑定的元素,可以直接用来操作DOM
- binding:一个对象
- name:指令名,不包括v-前缀
- oldValue:指令绑定的前一个值,仅在update和compantUpdated钩子中可用
- expreession: 绑定值的表达式或变量名
- arg:转给指令的参数
- modifiers:一个包含修饰符的对象
- vnode:Vue编译出的虚拟节点
- oldVnode:上一个虚拟节点,仅在update和compantUpdated钩子中可用
- 钩子函数
- 钩子
<!DOCTYPE html>
<html>
	<head>
		<meta charset="utf-8">
		<title>自定义指令</title>
		<script src="https://cdn.staticfile.org/vue/2.2.2/vue.min.js"></script>
	</head>
	<body>
		<div id="app">
			<input type="text" v-focus />
			<p v-test="{color:'red',text:'测试'}"></p>
		</div>

	</body>
	<script>
		//聚焦
		Vue.directive("focus", {
			inserted: function(el) {
				el.focus();
			}
		});

		new Vue({
			el: "#app",
			directives: {
				test: {
					inserted: function(el, binding) {
						el.innerHTML = binding.value.text;
						el.style.backgroundColor = binding.value.color;
					}
				}
			}

		})
	</script>
</html>
- Vue路由
<!DOCTYPE html>
<html>
	<head>
		<meta charset="utf-8">
		<script src="https://cdn.staticfile.org/vue/2.2.2/vue.min.js"></script>
		<script src="https://cdn.staticfile.org/vue-router/2.7.0/vue-router.min.js"></script>
		<title>路由</title>
		<style>
			._active {
				background-color: blue;
			}
		</style>
	</head>
	<body>
		<div id="app">
			<p>
				<!-- to属性 -->
				<!-- 字符串 -->
				<router-link to="foo">Go to Foo1</router-link>
			</p>
			<p>
				<!--  使用v-bind的JS表达式 -->
				<router-link v-bind:to="'foo'">Go to Foo2</router-link>
			</p>
			<p>
				<!--不写bind -->
				<router-link :to="'foo'">Go to foo3</router-link>
			</p>
			<p>
				<!--  使用path -->
				<router-link :to="{path:'foo'}">path</router-link>
			</p>
			<p>
				<!-- 命名路由 -->
				<router-link :to="{name:'user',params:{userId:123},path:'foo'}">命名路由</router-link>
			</p>
			<p>
				<!-- 带参数查询 "/foo?test=test1"-->
				<router-link :to="{path:'foo',query:{test:'test1'}}">带参数查询</router-link>
			</p>
			<p>
				<!--  replace-->
				<router-link :to="{path:'foo'}" replace>replace</router-link>
			</p>
			<p>
				<!-- 在当前路径下追加foo 而不是跳转到foo -->
				<router-link :to="'foo'" append>append</router-link>
			</p>
			<p>
				<router-link to="foo" tag="li">li标签</router-link>
			</p>
			<p>
				<!-- 激活后的样式 -->
				<router-link to="foo" active-class="_active">active-class</router-link>
			</p>
			<p>
				<!--  当链接被精准匹配时-->
				<router-link to="foo" exact-active-class="_active">当链接被精准匹配时</router-link>
			</p>
			<!-- active-class与exact-active-class的区别 router-link默认为模糊匹配,
			当设置<router-link to="foo/1" exact-active-class> 与<router-link to="foo/1" active-class>
			当用户 点击foo时会触发active-class而不会触发exact-active-class
			-->
			<p>
				<!-- event事件 -->
				<router-link to="foo" event="mouseover">事件-当鼠标移动到这里时</router-link>
			</p>
			<p>
				<router-link to="/bar">Go to Bar</router-link>
			</p>
			<router-view></router-view>
		</div>
	</body>
	<script>
		//  定义路由组件
		const Foo = {
			template: '<div>foo</div>'
		}
		const Bar = {
			template: '<div>bar</div>'
		};
		//定义路由
		const routes = [{
				path: '/foo',
				component: Foo
			},
			{
				path: '/bar',
				component: Bar
			}
		]
		//创建路由实例,然后传路由的配置
		const router = new VueRouter({
			routes
		});
		//创建和挂载根实例
		const app = new Vue({
			router
		}).$mount("#app");
	</script>
</html>
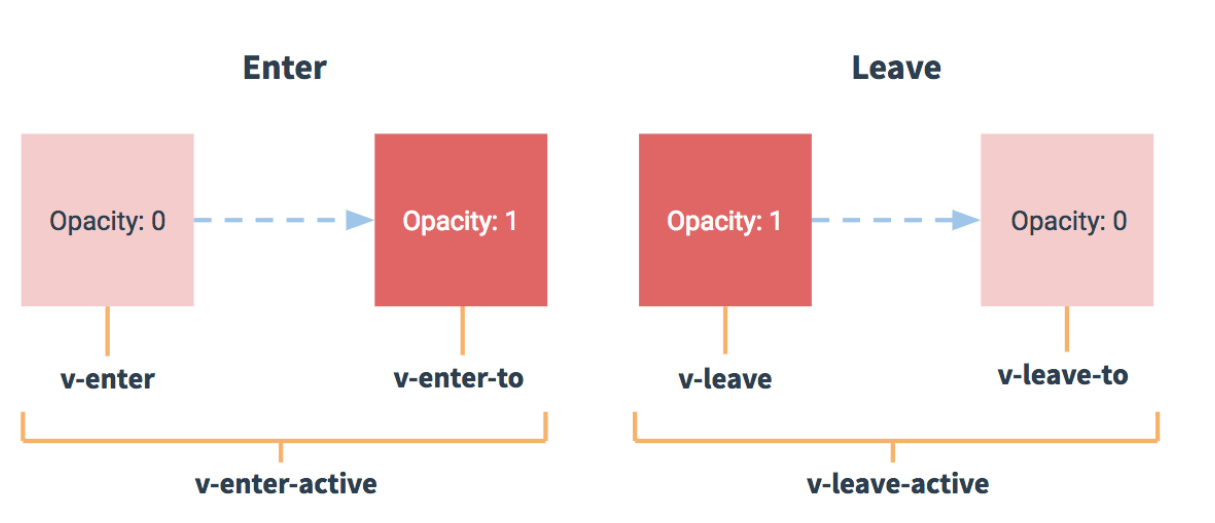
- vue过渡动画
- 过渡
- enter:定义进入过渡时的开始状态,在元素插入之前生效,在元素被插入之后的下一帧移除
- v-enter-active:定义进入过渡生效时的状态,在元素插入之前生效,在过渡动画完成之后移除
- v-enter-to:定义进入过渡的结束状态,在元素被插入之后,在元素被插入之后下一帧生效,在过渡/动画完成之后移除
- v-leave-active:定义离开过渡生效时的状态,在离开过渡时立即触发,在过渡完成之后移除
- v-leave-to:在离开过渡之后的下一帧生效,在过渡完成之后移除
- 自定义类名
- enter-class
- enter-active-class
- enter-to-class
- leave-class
- leave-active-class
- leave-to-class
- 显性过渡持续时间
<transition :duration="1000">...</transition>
<transition :duration="{enter:500,leave:800}" </transition>
- 过渡
<!DOCTYPE html>
<html>
	<head>
		<meta charset="utf-8">
		<script src="https://cdn.staticfile.org/vue/2.2.2/vue.min.js"></script>
		<link href="https://cdn.jsdelivr.net/npm/animate.css@3.5.1" rel="stylesheet" type="text/css" />
		<title>动画实例</title>
		<style>
			.fade-enter-active,.fade-leave-active{
			transition: opacity 2s
		}
		.fade-enter,.fade-leave-to{
			opacity: 0
		}
		.test-enter-active{
			animation:test-in .5s;
			}
		.test-leave-active{
				animation: test-in .5s reverse;
			}
			@keyframes test-in{
				0%{
					transform: scale(0);
				}
				50%{
					transform: scale(1.5);
				}
				100%{
					transform: scale(1);
				}
			}
		</style>
	</head>
	<body>
		<div id="app">
			<input type="button" v-on:click="show=!show" value="点击" />
			<transition name=" fade">
				<p v-show="show" v-bind:style="styleobj">{{message}}</p>
			</transition>
			<transition name="test">
				<p v-show="show">菜鸟教程 -- 学的不仅是技术,更是梦想!!!</p>
			</transition>
			<transition name="test1" enter-active-class="animated tada" leave-active-class="animated bounceOutRight">
				<p v-show="show">测试1-测试2-测试3</p>
			</transition>
		</div>
	</body>
	<script>
		new Vue({
			el: "#app",
			data: {
				message: "动画实例",
				show: true,
				styleobj: {
					color: 'red',
					fontsize: '30px'
				}
			}
		})
	</script>
</html>
- Vue混入
- ajax
<!DOCTYPE html>
<html>
	<head>
		<meta charset="utf-8">
		<title>Vue 测试实例 - 菜鸟教程(runoob.com)</title>
		<script src="https://cdn.staticfile.org/vue/2.4.2/vue.min.js"></script>
		<script src="https://cdn.staticfile.org/axios/0.18.0/axios.min.js"></script>
	</head>
	<body>
		<div id="app">info
			<div id=""></div>
			{{ info }}
		</div>
		<script type="text/javascript">
			var vue = new Vue({
				el: '#app',
				data: {
					info: null
				}
			});
			var url = "http://how2j.cn/study/json.txt";
			axios.get(url).then(function(response) {
				var jsonObject = response.data;
				var jsonString = JSON.stringify(jsonObject);
				document.getElementById(info).innerHTML = " 数据:" + jsonString;
			})
		</script>
	</body>
</html>
- vue-cli
- 安装
- 安装node.jshttps://nodejs.org/zh-cn/
- 检测是否安装成功
node --version - 安装vue的脚手架
npm install @vue/cli -g - 创建vue项目
vue create 项目名 - 安装路由模块
npm install vue-router - 安装axios
npm install axios - 启动
npm run serve
- 目录结构
- node-modules:模块包
- public:存放html与title图标
- src:用户自定义文件,assets静态文件,components自定义组件,App.vue主模块,main.js节点挂载和创建路由的实例
- 安装
补充
- 组件使用
- 引用组件
- 挂载组件
- 使用组件
- 封装方法
- 代码
/* 封装保存方法 */
var storage = {
	set(key, value) {
		localStorage.setItem(key, JSON.stringify(value));
	},
	get(key) {
		return JSON.parse(localStorage.getItem(key));
	},
	remove(key) {
		localStorage.removeItem(key);
	}
}
export default storage;
2. 引用
3. 使用
- 生命周期
		beforeCreate() {
			console.log("beforeCreate");
		},
		created() {
			console.log("Created");
		},
		beforeMount() {
			console.log("beforeMount");
		},
        /*常用*/
		mounted() {
			console.log("mounted");
		},
		beforeUpdate() {
			console.log("beforeUpdate");
		},
		updated() {
			console.log("updated");
		},
        /*常用*/
		beforeDestroy() {
			console.log("beforeDestroy");
		},
		destroyed() {
			console.log("destoryed");
		}
- vue-resource
- 安装vue-resource模块,注意加上save
npm install vue-resource --save - 在main.js中导入
import Vuesource from 'vue-resource' - 使用 ‘Vue.use(Vuesource)’
- 在组件中使用this.$http.get
- 安装vue-resource模块,注意加上save
<template>
	<div>
		<button @click="getData()">测试</button>
		<ul>
			<li v-for="l in list">
				<p>{{l.title}}</p>
			</li>
		</ul>
	</div>
</template>
<script>
	export default {
		data() {
			return {
				list: []
			}
		},
		methods: {
			getData() {
				var api = "http://www.phonegap100.com/appapi.php?a=getPortalList&catid=20&page=1";
				this.$http.get(api).then((response) => {
					this.list = response.data.result;
				}, function(erro) {
					console.log(erro);
				})
			}
		}
	}
</script>
- axios
- 安装npm install axios --save
- 引用 import axios from ‘axios’
- 使用 Axios.get(url).then().catch()
<template>
	<div>
		<button @click="getData()">测试</button>
		<ul>
			<li v-for="l in list">{{l.title}}</li>
		</ul>
	</div>
</template>
<script>
	import Axios from "axios"
	export default {
		data() {
			return {
				list: []
			}
		},
		methods: {
			getData() {
				var api = "http://www.phonegap100.com/appapi.php?a=getPortalList&catid=20&page=1";
				Axios.get(api).then((response)=> {
					this.list = response.data.result
				}).catch((erro) => {
					alert(erro);
				})
			}
		}
	}
</script>
- 父组件给子组件传值
- 需要的值
- props
- :需要的值=传值
<template>
	<div>
		<h1>我是子组件{{title}}</h1>
		<button @click="getTitle('sdads')">父组件方法</button>
	</div>
</template>
<script>
	export default {
		props: ["title", "getTitle"]
	}
</script>
<v-passValue :title="'测试'" :getTitle="getTitle"></v-passValue>
- 父组件获取子组件的值
- 标签添加属性ref=属性值
- this. r e f s . 属 性 值 . 值 的 名 称 ‘ a l e r t ( t h i s . refs.属性值.值的名称 `alert(this. refs.属性值.值的名称‘alert(this.refs.passValue.msg);`
- 子组件获取父组件的值
- 使用this.
p
a
r
e
n
t
.
属
性
名
‘
a
l
e
r
t
(
t
h
i
s
.
parent.属性名 `alert(this.
parent.属性名‘alert(this.parent.width);`
9.路由 - 安装,导入,并使用
- 创建路由组件
- 配置组件
- 实例化组件
- 挂载
- 使用this.
p
a
r
e
n
t
.
属
性
名
‘
a
l
e
r
t
(
t
h
i
s
.
parent.属性名 `alert(this.
parent.属性名‘alert(this.parent.width);`
import VueRouter from "vue-router"
Vue.use(VueRouter);
//创建组件
import Home from "./components/Home.vue"
import Test from "./components/Test.vue"
//配置组件
const routes = [{
		path: '/home',
		component: Home
	},
	{
		path: '/test',
		component: Test
	},{
		path: '*' ,
		redirect: '/home'
	}
]
//实例化组件
const router = new VueRouter({
	routes
});
//挂载
new Vue({
	el: "#app",
	router,
	render: h => h(App),
})
- 动态路由
<!-- <router-link :to="'/content?id='+key">{{key}}---{{l}}</router-link> -->
<router-link :to="'/content/'+l.aid">{{l.title}}</router-link>
获取传值的方法
this.$route.query
this.$route.params
11. 编程式导航
1. 直接跳转this.$router.push('news');或this.$router.push({path:'news'});
2. 带参数跳转
1.必须使用命名路由this.$router.push({name: 'content',params: {aid:499}})
2.主要此处标点为不是单引号this.$router.push({path:/content/KaTeX parse error: Expected 'EOF', got '}' at position 6: {id}`}̲)` 3. get方式的动…router.push({path:’/content’,query:{aid: id}})12. History模式const router = new VueRouter({mode: “history”,routes});`
13. 嵌套路由
1. 创建组件
2. 配置路由==>父组件下children下配置
{ path: '/user', component: User, children: [{ path: 'useradd', component: Useradd }, { path: 'userdel', component: Userdel } ] }
3. 使用组件
```
添加用户
删除用户
            </ul>
        </div>
        <div id="right">
            <router-view></router-view>
        </div>
    </div>
</template>
```


 755
755

 被折叠的 条评论
为什么被折叠?
被折叠的 条评论
为什么被折叠?
 到【灌水乐园】发言


