


 本文详细介绍了如何在 CentOS7 上安装 MySQL,包括下载、安装、设置安全选项、修改字符集、授权及重启服务。通过运行 mysql_secure_installation 脚本,确保了数据库的安全性,并展示了如何登录、查看及修改数据库编码为 utf8。最后,讨论了允许外部访问的步骤,包括设置权限和重启服务。
Linux(centos7)安装mysql
1、下载mysql
wget http://repo.mysql.com/mysql-community-release-el7-5.noarch.rpm
2、安装软件
sudo rpm -ivh mysql-community-release-el7-5.noarch.rpm
3、升级(可不做)
yum update
4、安装mysql
yum install mysql-server
5、启动mysql
systemctl start mysqld
6、启动mysql脚本
mysql_secure_installation
运行mysql_secure_installation会执行几个设置:
a)为root用户设置密码
b)删除匿名账号
c)取消root用户远程登录
d)删除test库和对test库的访问权限
e)刷新授权表使修改生效
[root@server1 ~]# mysql_secure_installation

NOTE: RUNNING ALL PARTS OF THIS SCRIPT IS RECOMMENDED FOR ALL MySQL

SERVERS IN PRODUCTION USE! PLEASE READ EACH STEP CAREFULLY!

In order to log into MySQL to secure it, we'll need the current

password for the root user. If you've just installed MySQL, and

you haven't set the root password yet, the password will be blank,

so you should just press enter here.

Enter current password for root (enter for none):<–初次运行直接回车

OK, successfully used password, moving on…

Setting the root password ensures that nobody can log into the MySQL

root user without the proper authorisation.

Set root password? [Y/n] <– 是否设置root用户密码,输入y并回车或直接回车

New password: <– 设置root用户的密码

Re-enter new password: <– 再输入一次你设置的密码

Password updated successfully!

Reloading privilege tables..

… Success!

By default, a MySQL installation has an anonymous user, allowing anyone

to log into MySQL without having to have a user account created for

them. This is intended only for testing, and to make the installation

go a bit smoother. You should remove them before moving into a

production environment.

Remove anonymous users? [Y/n] <– 是否删除匿名用户,生产环境建议删除,所以直接回车

… Success!

Normally, root should only be allowed to connect from 'localhost'. This

ensures that someone cannot guess at the root password from the network.

Disallow root login remotely? [Y/n] <–是否禁止root远程登录,根据自己的需求选择Y/n并回车,建议禁止

… Success!

By default, MySQL comes with a database named 'test' that anyone can

access. This is also intended only for testing, and should be removed

before moving into a production environment.

Remove test database and access to it? [Y/n] <– 是否删除test数据库,直接回车

- Dropping test database…

… Success!

- Removing privileges on test database…

… Success!

Reloading the privilege tables will ensure that all changes made so far

will take effect immediately.

Reload privilege tables now? [Y/n] <– 是否重新加载权限表,直接回车

… Success!

Cleaning up…

All done! If you've completed all of the above steps, your MySQL

installation should now be secure.

Thanks for using MySQL!
7、登录mysql
mysql -uroot -p
输入设置的密码
8、查看MySql的编码并修改
mysql>show variables like '%character%';
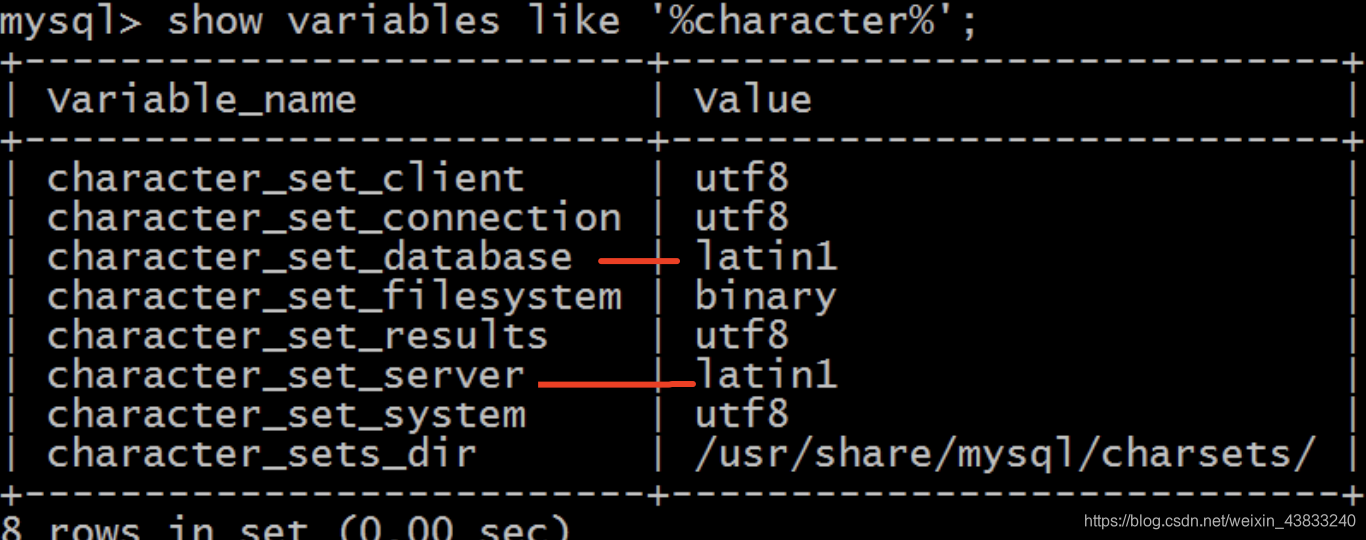
可以看到database和server编码都为latin1,我们修改为utf8
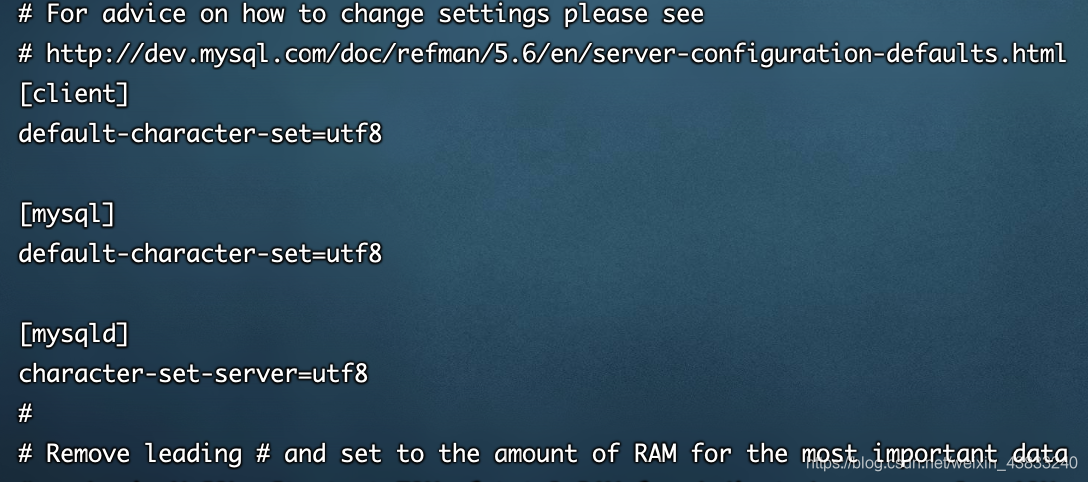
编辑/ect/my.cnf文件
[root@server1 ~]#vim /etc/my.cnf
添加
[client]
default-character-set=utf8
[mysql]
default-character-set=utf8
[mysqld]
character-set-server=utf8
9、重启mysql
[root@server1 ~]#systemctl restart mysql.service
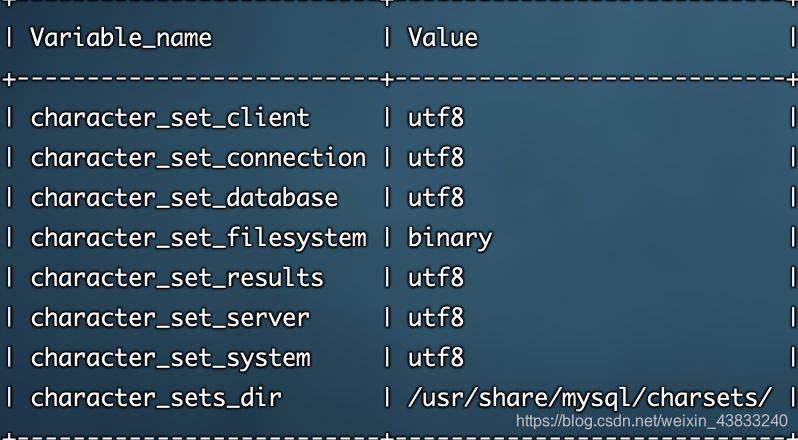
10、重新进入mysql服务
重复第7步
mysql>show variables like '%character%';
11、让外部环境访问
如果是阿里云的云服务器ECS设置安全组放开端口限制,轻量应用是防火墙
如果还不行,接着设置
mysql> use `mysql`;
Database changed
mysql> GRANT ALL PRIVILEGES ON *.* TO 'root'@'%' IDENTIFIED BY '628@Yang9986' WITH GRANT OPTION;
Query OK, 0 rows affected (0.00 sec)

mysql> FLUSH PRIVILEGES;
Query OK, 0 rows affected (0.00 sec)
保险起见:重启mysql服务


 被折叠的 条评论
为什么被折叠?
被折叠的 条评论
为什么被折叠?
 到【灌水乐园】发言


