


1.几个重要类型
1.W:Activity向WMS提供的IPC接口
每个Activity创建时都会通过ViewRootImpl创建并持有一个W对象(extend IWindow),它也是一个Binder对象,向WMS提供服务;
WMS通过该Activity的WindowState持有W的代理对象从而间接调用Activity;
2.WindowSession: WMS向Activity提供的IPC接口
WMS的WindowState中持有session extends IWindowSession 它也是一个Binder对象向Application进程提供服务;
每个Activity需要调用WMS的方法都要通过session对象的代理;
3.其他:
WindowManagerService:系统单例,提供统一的Window管理;
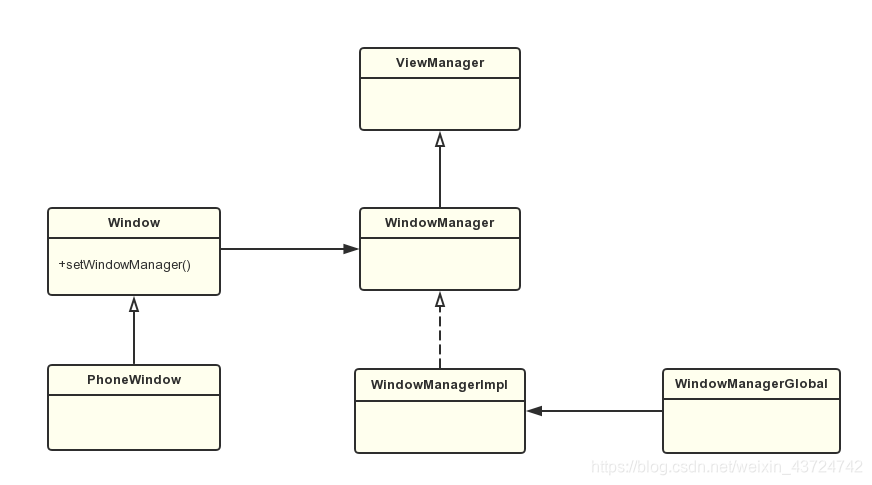
Window:抽象,实现类是PhoneWindow,不可直接访问;每个Window对应一个View和一个ViewRootImpl
WindowManager:是一个接口,实现类是WindowManagerImpl,访问Window只能通过WindowManager;
WindowManagerGlobal:WindowManagerImpl的实际处理逻辑都委托给该类处理;
WindowState:每个Window实体都对应着一个WindowState,这些WindowState存储在WMS的一张Map中
WindowToken:
1.一个 WindowToken 就代表着一个应用组件,应用组件包括Activity等,Windowtoken和Window不是一一对应的关系,在WMS中属于同一 WindowToken 的做统一处理;
2.同时WindowToken 具有令牌的作用,应用组件在添加 Window 时都需要提供一个有效的 WindowToken 以表明自己的身份(系统窗口除外,WMS 会自动为该系统窗口隐式的创建 WindowToken)
AppWindowToken:WindowToken的子类,代表Activity的窗口令牌。
 AMS和WMS中Token的整理参考:Token
2.Activity添加后创建DecorView的过程:
1.Activity执行attach时创建Window:
Activity.attach在创建新的Activity之后,onCreate之前执行,具体参考Activity启动过程
void attach() {
	...
	mWindow = PolicyManager.makeNewWindow(this);			//return new PhoneWindow;
}
2.setContentView:
public void setContentView(int layoutResId) {
	getWindow().setContentView(layoutResId);
}
PhoneWindow#setContentView:
@Override
public void setContentView(int layoutResID) {
	//DecorView默认有两个子View,一个是Title,一个是Content
	//这里的mContentParent是PhoneWindow的一个成员变量,代表DecorView的Content
    if (mContentParent == null) { // 1
        installDecor();
    } else if (!hasFeature(FEATURE_CONTENT_TRANSITIONS)) {
        mContentParent.removeAllViews();
    }
	//加载layoutResID这个资源到mContentParent上
    if (hasFeature(FEATURE_CONTENT_TRANSITIONS)) {
        final Scene newScene = Scene.getSceneForLayout(mContentParent, layoutResID,
                getContext());
        transitionTo(newScene);
    } else {
        mLayoutInflater.inflate(layoutResID, mContentParent); // 2
    }
    final Callback cb = getCallback();
    if (cb != null && !isDestroyed()) {
        cb.onContentChanged();
    }
}
3.PhoneWindow新建一个DecorView
//className = PhoneWindow#installDecor:
private void installDecor() {
	//mDecor就是PhoneWindow的成员变量DecorView
	if(mDecor == null){
		DecorView = new DecorView();
		View view = mLayoutInflater.inflate(layoutResId);
		DecorView.addView(view);
	}
	//mDecor就是PhoneWindow的成员变量DecorView
	if (mContentParent == null) {
		//这个方法根据有无Title等属性向mDecor中添加Title布局和Content布局,并把Content返回赋给mContentParent
        mContentParent = generateLayout(mDecor);
    }
}
4.回调Activity的onContentChanged方法通知View已经初始化完毕;(此时Window和DecorView还没有建立联系)
acitivty.onContentChanged();
5.通过WMS把DecorView添加至Window:
在Activity的Resume阶段会执行:
final void handleResumeActivity(IBinder token, boolean clearHide, boolean isForward) {
    //...
    ActivityClientRecord r = performResumeActivity(token, clearHide); // 这里面会调用到onResume()方法

    if (r != null) {
        final Activity a = r.activity;

        //...
        if (r.window == null && !a.mFinished && willBeVisible) {
            r.window = r.activity.getWindow(); // 获得window对象
            View decor = r.window.getDecorView(); // 获得DecorView对象
            decor.setVisibility(View.INVISIBLE);
            ViewManager wm = a.getWindowManager(); // 获得windowManager对象
            WindowManager.LayoutParams l = r.window.getAttributes();
            a.mDecor = decor;
            l.type = WindowManager.LayoutParams.TYPE_BASE_APPLICATION;
            l.softInputMode |= forwardBit;
            if (a.mVisibleFromClient) {
                a.mWindowAdded = true;
                // 调用addView方法会创建ViewRootImpl
                wm.addView(decor, l);
            }
            //...
        }
    }
}
可以看到ViewRootImpl是在Activity启动的resume前创建的,至此,Activity创建后添加DecorView的过程结束
这里调用了WindowManager.add()方法,后面的逻辑就和添加普通的Window一致,后面将通过添加普通Window的逻辑介绍WindowManager
3.添加普通的Window
除了Activity创建时添加DecorView会向WMS发出请求,添加普通的Window(如Dialog和Toast)也会与WMS发生一些交互,它们都是以Window的形式添加的,但添加的流程与Activity窗口的过程有所不同。
1. 比如我们通过WindowManager在屏幕上添加一个Button,分析其添加流程:
	Button button = new Button(this);
    WindowManager.LayoutParams params = new WindowManager.LayoutParams(
        		ViewGroup.LayoutParams.WRAP_CONTENT,
        		ViewGroup.LayoutParams.WRAP_CONTENT);
    params.x = 100;
    params.y = 100;
    getWindowManager().addView(button,params);
2.WindowManager是一个接口,它的实现类是WindowManagerImpl
它们的关系如下,可以类比Context的类结构:
	interface WindowManager {
		public void addView(View view, ViewGroup.LayoutParams params);
		public void updateViewLayout(View view, ViewGroup.LayoutParams params);
		public void removeView(View view);
	}

	class WindowManagerGlobal implements WindowManager{
		...
	}

	public class WindowManagerImpl implements WindowManager {
		private WindowManagerGlobal mGlobal;
		...
	}
WindowManagerImpl的addView方法:
public final class WindowManagerImpl implements WindowManager {
    private final WindowManagerGlobal mGlobal = WindowManagerGlobal.getInstance();
    ...
    @Override
    public void addView(View view, ViewGroup.LayoutParams params) {
        mGlobal.addView(view, params, mDisplay, mParentWindow);
    }
}
3.在WindowManagerGlobal中新建ViewRootImpl
通过WindowManagerGlobal的addView方法添加窗口:
class WindowManagerGlobal{
	//当前进程中所有Window对应的View;
	private final ArrayList<View> mViews = new ArrayList<View>();
	//当前进程中所有Window对应的ViewRootImpl;
	private final ArrayList<ViewRootImpl> mRoots= new ArrayList<ViewRootImpl>();
	//当前进程中所有Window对应的View的LayoutParams;
	private final ArrayList<WindowManager.LayoutParams> mViews = new ArrayList<View>();
	private final ArraySet<View> mDyingViewViews = new ArraySet<View>();

	public void scheduleTraversals()        //完成Measuer,Layout,Draw 三个过程

	public void addView(View view,LayoutParams params) {
		ViewRootImpl root;
        View panelParentView = null;
        synchronized (mLock) {
        	//WindowManagerGlobal添加View时为该View创建了ViewRoolImpl;
            root = new ViewRootImpl(view.getContext(), display);
            view.setLayoutParams(wparams);
            mViews.add(view);
            mRoots.add(root);
            mParams.add(wparams);
        }
        //通过跨进程的方式向WMS(WindowManagerService)发起一个调用,从而将DecorView最终添加到Window上
        //在这个过程中,ViewRootImpl、DecorView和WMS会彼此关联,参考ViewRootImpl类的结构
        root.setView(view, wparams, panelParentView);
	}
}
ViewRootImpl.setView方法通过WindowSession将添加DecorView的请求发送给WMS
//className = ViewRootImpl
public void setView(View view, WindowManager.LayoutParams attrs, View panelParentView) {
      res = mWindowSession.addToDisplay(mWindow, mWindowAttributes, ...);
}
4.在新建ViewRootImpl时创建W:
在Client端,ViewRootImpl创建时会创建一个W对象和IWindowSession 对象:
public ViewRootImpl(Context context, Display display) {
	//可以看到每个窗口都对应一个W对象,后面可以发现它在WMS端将作为这个Window的唯一标识
    mWindow = new W(this);
    mWindowSession = WindowManagerGlobal.getWindowSession();
}
创建IWindowSession:
//className = WindowMangagerGlobal
public static IWindowSession getWindowSession() {
      synchronized (WindowManagerGlobal.class) {
          if (sWindowSession == null) {
              InputMethodManager imm = InputMethodManager.getInstance();
                  IWindowManager windowManager = getWindowManagerService();
                  sWindowSession = windowManager.openSession(imm, ...);		//跨进程调用
          }
          return sWindowSession;
      }
  }
//className = WindowManagerService
public IWindowSession openSession(InputMethodManager imm) {
        return new Session(this, imm, ...);
}
5.然后通过viewRootImpl.scheduleTraversals对View进行绘制;
public void requestLayout(){
	scheduleTraversals();
}
再调用WindowSession代理调用WMS的addToDisplay()去添加一个窗口,WMS中为每一个窗口保留一个Session;
res = wWindowSession.addToDisPlay(mWindow,attr, ...) //这里只传递了Window,并没有把View传给WMS
WindowSession:
public int addToDisplay(IWindow window, WindowManager.LayoutParams attrs, ...) {
     return mService.addWindow(this, window, attrs, ...); 				//Call WMS
}
6.WMS对新的Window进行处理:
class WindowManagerService {
	//这里的binder类型的键值就是这个Window的W对象
	private Map<Binder,WindowState> mWindowMap;

	public int addWindow(Session session, IWindow client, WindowManager.LayoutParams attrs, ...) {
		  //为添加的Window创建一个WindowState
          final WindowState win = new WindowState(this, session, client, token, parentWindow,
                    appOp[0], seq, attrs, viewVisibility, session.mUid,
                    session.mCanAddInternalSystemWindow);

          mPolicy.adjustWindowParamsLw(win.mAttrs);
          win.setShowToOwnerOnlyLocked(mPolicy.checkShowToOwnerOnly(attrs));
          res = mPolicy.prepareAddWindowLw(win, attrs);
          if (res != WindowManagerGlobal.ADD_OKAY) {
              return res;
          }
          win.attach();
          //将这个新的Window记录在map中
          mWindowMap.put(client.asBinder(), win);
    }
}
4.附一些类的描述:
WindowManagerService描述:
class WindowManagerService IWindowManager.Stub
			 implements Watchdog.Monitor, WindowManagerPolicy.WindowManagerFuncs {
 	final IActivityManager mActivityManager;
 	final InputManagerService mInputManager;

 	final HashMap<IBinder, WindowToken> mTokenMap = new HashMap<>();
 	//Key值为appToken,这个map的规模和Activity数量相同
 	final HashMap<IBinder, AppWindowToken> mApptokenMap = new HashMap();
 	//Key值为IWindow,由于每个Window都对应一个IWindow值,所以这个Map的大小和Window
	final HashMap<IBinder, WindowState> mWindowMap = new HashMap<>();

 	@Override	//这里根据token来创建WindowToken并保存在map中;
   	public void addWindowToken(IBinder token, int type) {
       //省略检查android.Manifest.permission.MANAGE_APP_TOKENS权限;
       synchronized(mWindowMap) {
           WindowToken wtoken = mTokenMap.get(token);
           if (wtoken != null) {
               return;
           }
           wtoken = new WindowToken(this, token, type, true);
           mTokenMap.put(token, wtoken);
       }
    }

	//这个方法是AMS调用的,AMS在创建完一个新的ActivityRecord之后会调用WMS的这个方法,即向WMS注册此Activity
	//这里的token就是ActivityRecord中的appToken;
	public void addAppToken(IApplicationToken token, ...) {
        ......
        synchronized(mWindowMap) {
            AppWindowToken atoken = findAppWindowToken(token.asBinder());
            if (atoken != null) {
                return;
            }
            atoken = new AppWindowToken(this, token, voiceInteraction);
            mApptokenMap.put(token.asBinder(), atoken);
       }
	}

   //WMS向Client提供的添加Window的接口
   public int addWindow(Session session, IWindow client, int seq,
            WindowManager.LayoutParams attrs, int viewVisibility, int displayId,
            Rect outContentInsets, Rect outStableInsets, Rect outOutsets,
            InputChannel outInputChannel) {

            final WindowState win = new WindowState(this, session, client, token, parentWindow,
                    appOp[0], seq, attrs, viewVisibility, session.mUid,
                    session.mCanAddInternalSystemWindow);
            win.attach();
            mWindowMap.put(client.asBinder(), win);
            win.mToken.addWindow(win);
    }

}
ViewRootImpl 描述:
public class ViewRootImpl extends AbsViewRootImpl implements ViewParent,
        View.AttachInfo.Callbacks, ThreadedRenderer.DrawCallbacks {
    static IWindowSession sWindowSession;
    final W mWindow;
    View mView;

    public ViewRootImpl(Context context, Display display) {
        mWindow = new W(this, context);
    }

    public void setView(View view, WindowManager.LayoutParams attrs, View panelParentView) {
           res = mWindowSession.addToDisplay(mWindow, mWindowAttributes, ...);
    }
}
W描述:
static class W extends IWindow.Stub {
        private final WeakReference<ViewRootImpl> mViewAncestor;
        private final IWindowSession mWindowSession;

        W(ViewRootImpl viewAncestor) {
            mViewAncestor = new WeakReference<ViewRootImpl>(viewAncestor);
            mWindowSession = viewAncestor.mWindowSession;
        }
}
WindowState描述:
WindowState(WindowManagerService service, Session s, IWindow c, WindowToken token,
           WindowState parentWindow, WindowManager.LayoutParams a, ...) {
        mService = service;
        mSession = s;
        mClient = c;
        mToken = token;
        mAppToken = mToken.asAppWindowToken();
    }
这里addWindowToken中所需要的token就是在AMS中创建的对应与Activity的token
WindowToken描述:
class WindowToken extends WindowContainer<WindowState> {
    private static final String TAG = TAG_WITH_CLASS_NAME ? "WindowToken" : TAG_WM;

    protected final WindowManagerService mService;

    final IBinder token;

    final int windowType;

    protected DisplayContent mDisplayContent;

    WindowToken(WindowManagerService service, IBinder _token, int type, boolean persistOnEmpty,
            DisplayContent dc, boolean ownerCanManageAppTokens) {
        mService = service;
        token = _token;
        windowType = type;
        mPersistOnEmpty = persistOnEmpty;
        mOwnerCanManageAppTokens = ownerCanManageAppTokens;
        onDisplayChanged(dc);
    }

    void onDisplayChanged(DisplayContent dc) {
        dc.reParentWindowToken(this);
        mDisplayContent = dc;
        SurfaceControl.openTransaction();
        for (int i = mChildren.size() - 1; i >= 0; --i) {
            final WindowState win = mChildren.get(i);
            win.mWinAnimator.updateLayerStackInTransaction();
        }
        SurfaceControl.closeTransaction();

        super.onDisplayChanged(dc);
    }
}
WindowToken会在WindowManagerService.addWindowToken中创建
ViewManager描述:
public interface ViewManager {
	public void addView(View view, ViewGroup.LayoutParams params);
	public void updateViewLayout(View view, ViewGroup.LayoutParams params);
	public void removeView(View view);
}
总结:
Activity会在attach时为新的Activity创建Window;
在setContentView方法中,创建DecorView,并把layout资源文件解析成View添加到DecorView中;
在resume阶段把DecorView通过windowManager.addView的方式添加到Window中;
WindowManagerImpl通过WindowManagerGlobal来addView,这时为待添加的View创建了ViewRootImpl
ViewRootImpl创建时内部创建了WindowSession,ViewRootImpl添加View实际上是与WMS的一次跨进程通信


 被折叠的 条评论
为什么被折叠?
被折叠的 条评论
为什么被折叠?
 到【灌水乐园】发言


