


在写这个例子时,用到了自定义属性,之前对自定义属性不太了解
在HTML5规范里增加了一个自定义data属性, 这个自定义data属性的用法非常的简单,就是你可以往HTML标签上添加任意以 "data-"开头的属性,这些属性页面上是不显示的,它不会影响到你的页面布局和风格,但它却是可读可写的。
下面看一下放大镜的例子:
html代码:
<div class="block">
    <div class="bigimage">
    </div>
    <div class="centerimage">
        <div class="ceng"></div>
       <img class="middleimage" src="img/61782be166c826c8-653ea5468e5789eb-0f703c3e0bf6ca9456813b43bf811835.jpg" alt=""/>
    </div>
    <div class="samllimage">
       <div data-big="img/61782be166c826c8-653ea5468e5789eb-e2c14fbb4e9833c01ab35b5f22a124bf.jpg"
               data-src="img/61782be166c826c8-653ea5468e5789eb-e2c14fbb4e9833c01ab35b5f22a124bf.jpg">
           <img src="img/61782be166c826c8-653ea5468e5789eb-e2c14fbb4e9833c01ab35b5f22a124bf.jpg" alt=""/>
       </div>
       <div data-big="img/61782be166c826c8-653ea5468e5789eb-b7d53ac01ba7dd22da073da592dd95e5.jpg" data-src="img/61782be166c826c8-653ea5468e5789eb-b7d53ac01ba7dd22da073da592dd95e5.jpg">
           <img src="img/61782be166c826c8-653ea5468e5789eb-b7d53ac01ba7dd22da073da592dd95e5.jpg" alt=""/>
       </div>
       <div data-big="img/61782be166c826c8-653ea5468e5789eb-843845522370b47a15d22edc84793f4e.jpg" data-src="img/61782be166c826c8-653ea5468e5789eb-843845522370b47a15d22edc84793f4e.jpg">
           <img src="img/61782be166c826c8-653ea5468e5789eb-843845522370b47a15d22edc84793f4e.jpg" alt=""/>
       </div>
    </div>
</div>
css样式:
*{
            margin: 0;
            padding:0;
        }
        .block{
            position:relative;
            width:580px;
            height:530px;
            margin-left:200px;
        }
        .centerimage{
            position:relative;
            width:576px;
            height:360px;
            overflow: hidden;
        }
        .middleimage{
            width:576px;
            height:360px;
            vertical-align: middle;
        }
        .samllimage>div{
            float:left;
            width:180px;
            height:120px;
            margin: 30px 4px;
            border: 2px solid transparent;
        }
        .samllimage>div>img{
            width:100%;
            height:100%;
        }
        .ceng{
            position: absolute;
            display: none;
            width:100px;
            height:100px;
            z-index: 1;
            background:url("img/1.png");
            background-size: 5px 5px;
            background-color: rgba(255, 237, 79, 0.2);
        }
        .bigimage{
            position:absolute;
            display:none;
            width:500px;
            height:500px;
            margin-left:580px;
            background-repeat: no-repeat;
            border:1px solid silver;
            background-image: url("img/61782be166c826c8-653ea5468e5789eb-0f703c3e0bf6ca9456813b43bf811835.jpg");
        }
    </style>
JS代码:
var bigimage=document.getElementsByClassName("bigimage")[0];
    var block=document.getElementsByClassName("block")[0];
    var ceng=document.getElementsByClassName("ceng")[0];
    var center=document.getElementsByClassName("centerimage")[0];
    var middle=document.getElementsByClassName("middleimage")[0];
    var samllimage=document.getElementsByClassName("samllimage")[0];
    var samll=samllimage.children;
    samll[0].style.borderColor="red";
    var col=samll[0];
    for(var i=0;i<samll.length;i++){
        samll[i].function(){
            col.style.borderColor="transparent";
            this.style.borderColor="red";
            col=this;
            //console.log(this.getAttribute("data-src"));//data-src自定义属性,可以设任何值;
            middle.src=this.getAttribute("data-src");//getAttribute获取属性值
            var big=this.getAttribute("data-big");
            bigimage.style.backgroundImage="url("+big+")";
        }
    }
    center.function(e) {
        this.style.cursor = "move";
        var x = e.pageX || e.clientX;
        var y = e.pageY || e.clientY;
        ceng.style.display = "block";
        bigimage.style.display="block";
        var left=(x - block.offsetLeft - 50)<=0?0:(x - block.offsetLeft - 50)>=476?476:(x - block.offsetLeft - 50);
        var top=(y - block.offsetTop - 50)<=0?0:(y- block.offsetTop - 50)>=260?260:(y- block.offsetTop - 50);
        ceng.style.left = left + "px";
        ceng.style.top = top+ "px";
        bigimage.style.backgroundPosition=-(x-block.offsetLeft)*2.4+"px "+(-y)*1.86+"px ";
    }
    center.function(){
        ceng.style.display="none";
        bigimage.style.display="none";
    }
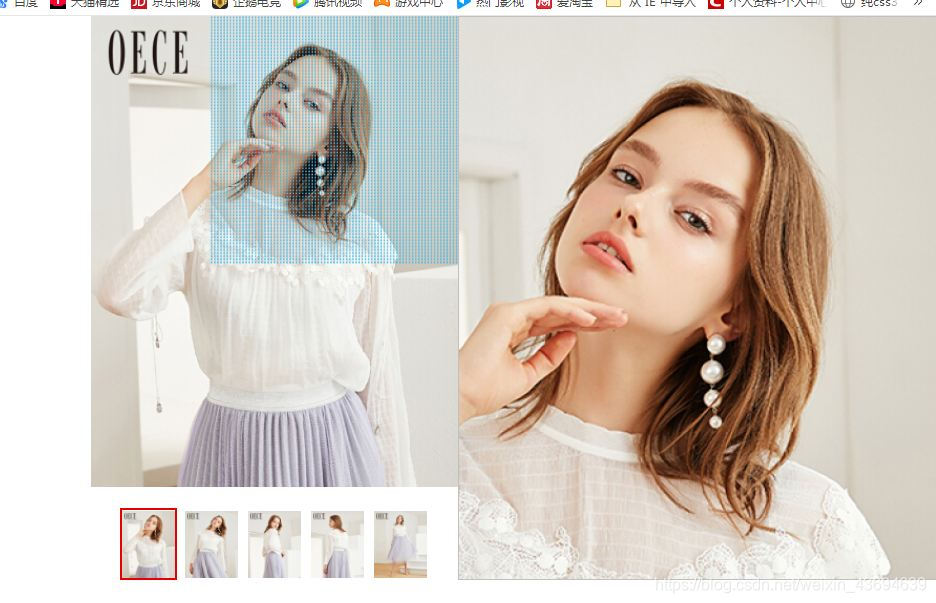
效果如下:
是个新手,有需要改进的地方欢迎指正:)


 238
238

 被折叠的 条评论
为什么被折叠?
被折叠的 条评论
为什么被折叠?
 到【灌水乐园】发言


