


【OpenCV】直方图反向投影(Back Projection)
反向投影
- 反向投影是反映直方图模型在目标图像中的分布情况
- 简单点说就是用直方图模型去目标图像中寻找是否有相似的对象。通常用HSV色彩空间的HS两个通道直方图模型
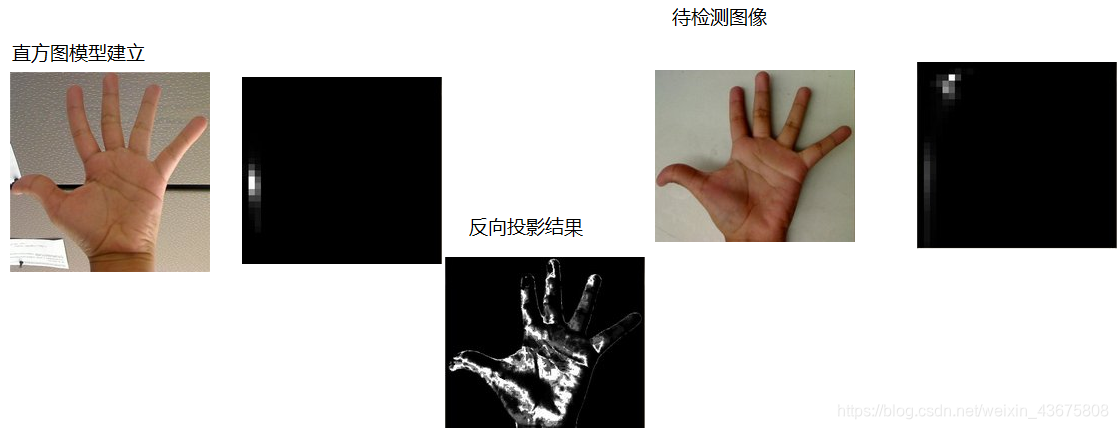
反向投影 – 步骤
1.建立直方图模型
2.计算待测图像直方图并映射到模型中
3.从模型反向计算生成图像
实现步骤与相关API
- 加载图片
imread - 将图像从RGB色彩空间转换到HSV色彩空间
cvtColor - 计算直方图和归一化
calcHist与normalize Mat与MatND,其中Mat表示二维数组,MatND表示三维或者多维数据,此处均可以用Mat表示。- 计算反向投影图像
- calcBackProject
代码实现
#include<opencv2/opencv.hpp>
#include<iostream>
#include<math.h>

using namespace std;
using namespace cv;

Mat src, dst, hsv, hue;
void Hist_and_Backprojection(int, void*);
int bins = 12;

int main(int argc, char **argv)
{
	src = imread("1.jpg");
	if (src.empty()) {
		printf("can not load the image...\n");
		return -1;
	}
	const char* input_title = "input";
	namedWindow(input_title, CV_WINDOW_AUTOSIZE);
	namedWindow("BackProjection", CV_WINDOW_AUTOSIZE);
	namedWindow("Histogram", CV_WINDOW_AUTOSIZE);

	cvtColor(src, hsv, CV_BGR2HSV);
	hue.create(hsv.size(), hsv.depth());
	int nchannels[] = { 0,0 };
	mixChannels(&hsv, 1, &hue, 1, nchannels, 1);

	createTrackbar("Histogram Bins:", input_title, &bins, 180, Hist_and_Backprojection);

	imshow(input_title, src);

	Hist_and_Backprojection(0,0);
	waitKey(0);
	return 0;
}

void Hist_and_Backprojection(int, void*) {

	float range[] = { 0,180 };
	const float *histRange = { range };
	Mat h_hist;
	calcHist(&hue, 1, 0,Mat(), h_hist, 1, &bins, &histRange, true, false);//计算直方图
	normalize(h_hist, h_hist, 0, 255, NORM_MINMAX, -1, Mat());//归一化

	Mat backProjectionImage;
	calcBackProject(&hue, 1, 0, h_hist, backProjectionImage, &histRange, 1, true);//直方图反向投影
	imshow("BackProjection", backProjectionImage);

	int hist_w = 400;
	int hist_h = 400;
	Mat histImage(hist_w, hist_h, CV_32FC3, Scalar(0, 0, 0));
	int bin_w = (hist_w / bins);
	for (int i = 1; i < bins; i++) {
		rectangle(histImage,
			Point((i - 1)*bin_w, (hist_h - cvRound(h_hist.at<float>(i - 1) * (400 / 255)))),
			//Point(i*bin_w, (hist_h - cvRound(h_hist.at<float>(i) * (400 / 255)))),
			Point(i*bin_w, hist_h),
			Scalar(0, 0, 255), -1);
	}
	imshow("Histogram", histImage);//绘制直方图
	return;
}
实验结果.


 被折叠的 条评论
为什么被折叠?
被折叠的 条评论
为什么被折叠?
 到【灌水乐园】发言


