cuda tips

1.block大小限制

CUDA中对能够定义的网格大小和线程块大小做了限制。对任何从开普勒到图灵架构
的GPU来说,网格大小在x、y和z这3个方向的最大允许值分别为2^31-1、65535和65535;
线程块大小在x、y和z这3个方向的最大允许值分别为1024、1024和64。另外还要求线
程块总的大小,即blockDim.x、blockDim.y和blockDim.z的乘积不能大于1024。也就
是说,不管如何定义,一个线程块最多只能有1024个线程。这些限制是必须牢记的。

2 减少数据传输CPU-GPU

GPU计算核心和设备内存之间数据传输的峰值理论带宽要远高于GPU和CPU之间数据传输的带宽。大概相差几十倍。
要获得可观的GPU加速,就必须尽量缩减数据传输所花时间的比例。有时候,即使有些计算在GPU中的速度并不高,也要尽量在GPU中实现,避免过多的数据经由PCIe传递。
这是CUDA编程中较重要的原则之一

3 计算时间

可以通过 事件 计时 或 nvprof 统计时间。
一般,单精度float版本的核函数都比双精度double版本核函数快。
一个CUDA程序能够获得高性能的必要(但不充分)条件有如下几点:
• 数据传输比例较小。
• 核函数的算术强度较高。一个计算问题的算术强度指的是其中算术操作的工作量与必要的内存操作的工作量之比。
• 核函数中定义的线程数目较多。

4 检查内存错误

用cuda-memcheck 检查内存错误。
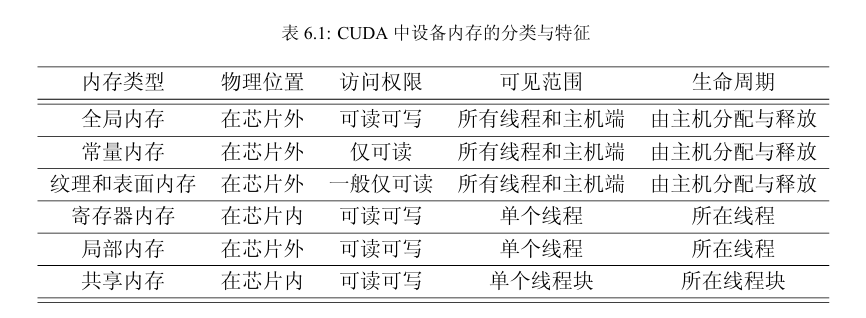
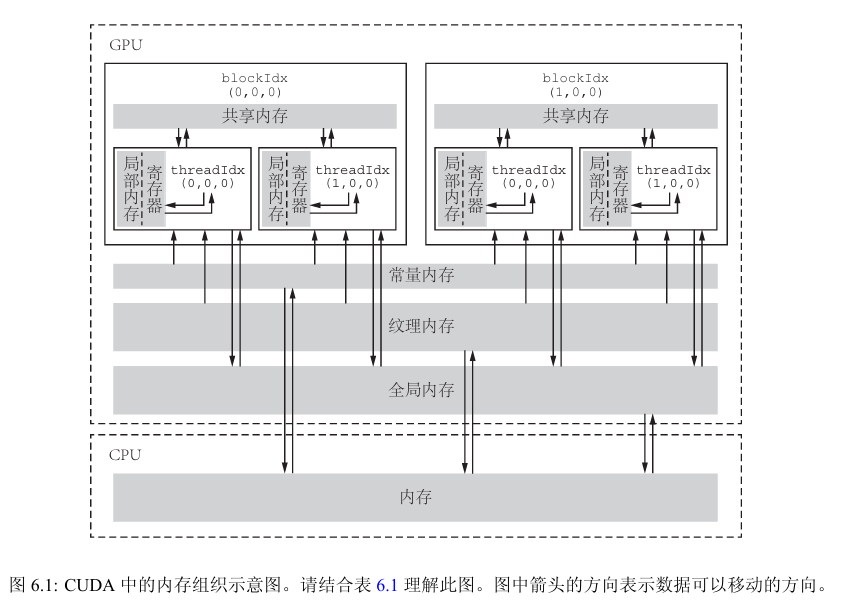
5 cuda内存分级

表6.1: CUDA中设备内存的分类与特征

内存类型 				物理位置			 	访问权限 			可见范围 					生命周期
全局内存 				在芯片外 			可读可写 		所有线程和主机端 		由主机分配与释放
常量内存 				在芯片外 			仅可读 			所有线程和主机端 		由主机分配与释放
纹理和表面内存 			在芯片外 			一般仅可读 		所有线程和主机端 		由主机分配与释放
共享内存 				在芯片内 			可读可写 			单个线程块 					所在线程块
寄存器内存 				在芯片内 			可读可写 			单个线程						所在线程
局部内存				 	在芯片外 			可读可写 			单个线程						所在线程

在这里插入图片描述
在这里插入图片描述

6 线程分配

线程束的大小是32,所以一个线程块的大小最好是32的整数倍

### PyCUDA Compatibility and Installation Guide for CUDA 11.7 For ensuring compatibility between PyCUDA and CUDA 11.7, several factors need consideration including the Python version, operating system specifics, and existing NVIDIA drivers. #### Verifying System Compatibility Before installing any components, verify that the current setup supports CUDA 11.7 by checking the installed NVIDIA driver through `nvidia-smi` command[^1]. The output should indicate whether the hardware can support this particular CUDA version without issues related to driver mismatch which could lead to computational errors or crashes[^4]. #### Installing Required Components To proceed with using CUDA 11.7 alongside PyCUDA: - **Install CUDA Toolkit**: Download and install CUDA 11.7 from the official [CUDA Toolkit Archive](https://developer.nvidia.com/cuda-toolkit-archive). Follow the instructions provided on the site carefully. - **Set Up Environment Variables**: After installation, ensure environment variables such as PATH and LD_LIBRARY_PATH (on Linux systems) point correctly towards the newly installed CUDA directories so applications like PyCUDA recognize them properly during runtime. ```bash export PATH=/usr/local/cuda-11.7/bin${PATH:+:${PATH}} export LD_LIBRARY_PATH=/usr/local/cuda-11.7/lib64${LD_LIBRARY_PATH:+:${LD_LIBRARY_PATH}} ``` - **Verify Installation**: Use commands like `nvcc --version` to confirm successful installation of CUDA toolkit at desired version level. #### Installing PyCUDA Once the appropriate CUDA environment is set up: - Install PyCUDA via pip after confirming its availability for CUDA 11.7: ```python pip install pycuda==2023.1 ``` Note: Always check the latest documentation regarding supported versions since software libraries frequently update their dependencies over time. #### Testing Setup After completing these steps, test the configuration thoroughly before moving forward into more complex projects involving GPU computations. Running simple tests included within PyCUDA examples helps validate proper functioning under chosen configurations. --related questions-- 1. What are common troubleshooting tips when encountering problems while setting up CUDA? 2. How does one determine the correct cuDNN version needed based on an already installed CUDA version? 3. Can TensorRT be used effectively with different combinations of CUDA and cuDNN beyond officially tested setups? 4. Are there alternative methods besides using pip to install specialized builds of PyCUDA tailored specifically toward certain CUDA releases?
评论
添加红包

请填写红包祝福语或标题

红包个数最小为10个

红包金额最低5元

当前余额3.43前往充值 >
需支付:10.00
成就一亿技术人!
领取后你会自动成为博主和红包主的粉丝 规则
hope_wisdom
发出的红包
实付
使用余额支付
点击重新获取
扫码支付
钱包余额 0

抵扣说明:

1.余额是钱包充值的虚拟货币,按照1:1的比例进行支付金额的抵扣。
2.余额无法直接购买下载,可以购买VIP、付费专栏及课程。

余额充值