


 这篇博客详细介绍了在Android中如何使用MediaPlayer类播放音乐,包括创建对象、设置音频路径、控制播放状态等步骤。此外,还讲解了使用VideoView类播放视频的基本流程,强调了VideoView对raw目录中视频资源的支持,以及其在复杂视频播放场景中的局限性。
一、播放音乐
1、使用 MediaPlayer 播放音乐
在Android中播放音频文件一般是使用MediaPlayer类实现的,它对多种格式的音频文件提供了非常全面的控制方法,从而使播放音乐的工作变得十分简单。下面列出了MediaPlayer类中一些较为常用的控制方法。
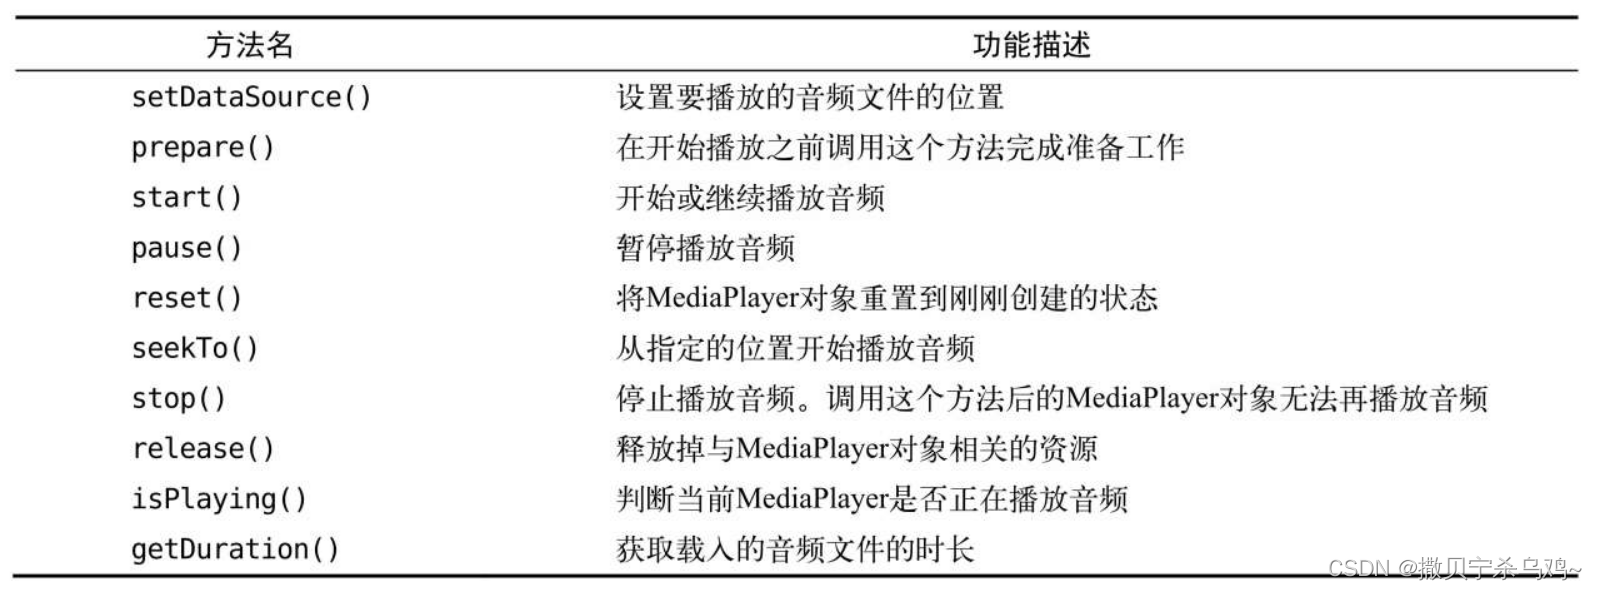
我们来梳理一下MediaPlayer的工作流程。首先需要创建一个MediaPlayer对象,然后调用setDataSource()方法设置音频文件的路径,再调用prepare()方法使MediaPlayer进入准备状态,接下来调用start()方法就可以开始播放音频,调用pause()方法就会暂停播放,调用reset()方法就会停止播放。
布局文件
<?xml version="1.0" encoding="utf-8"?>
<LinearLayout xmlns:android="http://schemas.android.com/apk/res/android"
    xmlns:app="http://schemas.android.com/apk/res-auto"
    xmlns:tools="http://schemas.android.com/tools"
    android:layout_width="match_parent"
    android:layout_height="match_parent"
    tools:context=".MainActivity"
    android:orientation="vertical">

    <Button
        android:id="@+id/play"
        android:layout_width="match_parent"
        android:layout_height="wrap_content"
        android:text="Play"
        android:textAllCaps="false"/>

    <Button
        android:id="@+id/pause"
        android:layout_width="match_parent"
        android:layout_height="wrap_content"
        android:text="Pause"
        android:textAllCaps="false"/>

    <Button
        android:id="@+id/stop"
        android:layout_width="match_parent"
        android:layout_height="wrap_content"
        android:text="Stop"
        android:textAllCaps="false"/>

</LinearLayout>
逻辑代码
MediaPlayer可以用于播放网络、本地以及应用程序安装包中的音频。这里简单起见,我们就以播放应用程序安装包中的音频来举例吧。
public class MainActivity extends AppCompatActivity {

    ActivityMainBinding mBinding;
    MediaPlayer mMediaPlayer = new MediaPlayer();

    @Override
    protected void onCreate(Bundle savedInstanceState) {
        super.onCreate(savedInstanceState);
        // 初始化 ViewBinding
        mBinding = ActivityMainBinding.inflate(getLayoutInflater());
        setContentView(mBinding.getRoot());

        initMediaPlayer();
        initListener();
    }

    private void initListener() {
        // 播放
        mBinding.play.setOnClickListener(new View.OnClickListener() {
            @Override
            public void onClick(View view) {
                if (!mMediaPlayer.isPlaying()) {
                    mMediaPlayer.start();
                }
            }
        });

        // 暂停
        mBinding.pause.setOnClickListener(new View.OnClickListener() {
            @Override
            public void onClick(View view) {
                if (mMediaPlayer.isPlaying()) {
                    mMediaPlayer.pause();
                }
            }
        });

        // stop
        mBinding.stop.setOnClickListener(new View.OnClickListener() {
            @Override
            public void onClick(View view) {
                if (mMediaPlayer.isPlaying()) {
                    mMediaPlayer.reset();
                    initMediaPlayer();
                }
            }
        });
    }

    private void initMediaPlayer() {
        AssetManager assetManager = getAssets();
        try {
            AssetFileDescriptor assetFileDescriptor = assetManager.openFd("music.mp3");
            mMediaPlayer.setDataSource(assetFileDescriptor.getFileDescriptor(), assetFileDescriptor.getStartOffset(), assetFileDescriptor.getLength());
            mMediaPlayer.prepare();
        } catch (IOException e) {
            e.printStackTrace();
        }
    }

    @Override
    protected void onDestroy() {
        super.onDestroy();
        mMediaPlayer.stop();
        mMediaPlayer.release();
    }
}
二、播放视频
1、使用 VideoView 类实现
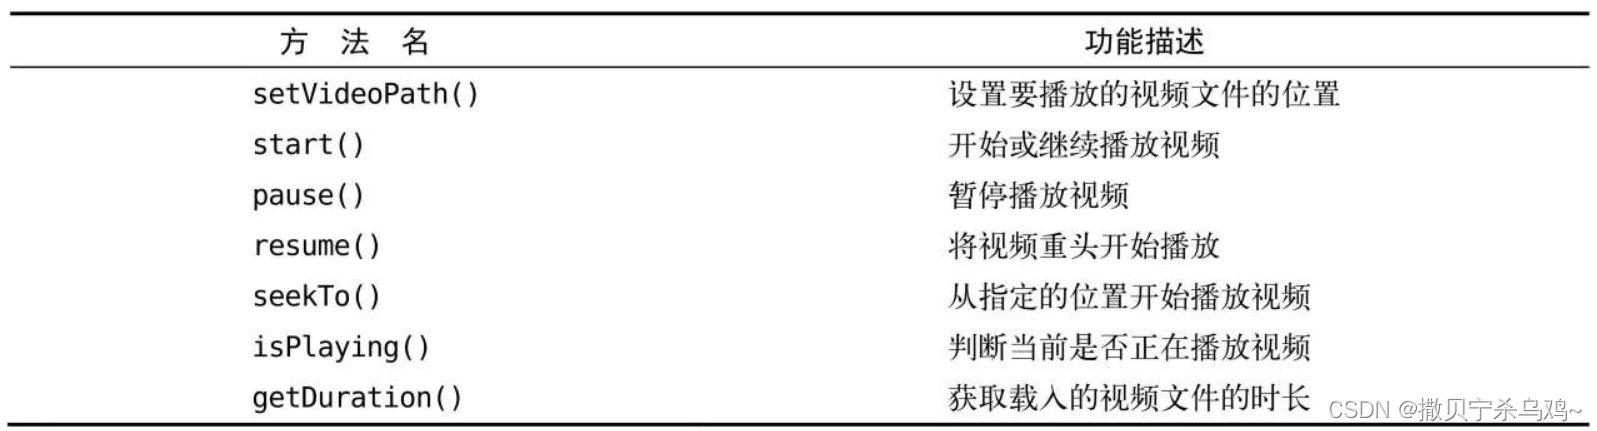
播放视频文件其实并不比播放音频文件复杂,主要是使用VideoView类来实现的。这个类将视频的显示和控制集于一身,我们仅仅借助它就可以完成一个简易的视频播放器。VideoView的用法和MediaPlayer也比较类似,常用方法如下所示。
接下来的问题就是存放视频资源了,很可惜的是,VideoView不支持直接播放assets目录下的视频资源,所以我们只能寻找其他的解决方案。res目录下允许我们再创建一个raw目录,像诸如音频、视频之类的资源文件也可以放在这里,并且VideoView是可以直接播放这个目录下的视频资源的。
布局文件
<?xml version="1.0" encoding="utf-8"?>
<LinearLayout xmlns:android="http://schemas.android.com/apk/res/android"
    xmlns:app="http://schemas.android.com/apk/res-auto"
    xmlns:tools="http://schemas.android.com/tools"
    android:layout_width="match_parent"
    android:layout_height="match_parent"
    tools:context=".MainActivity"
    android:orientation="vertical">

    <LinearLayout
        android:layout_width="match_parent"
        android:layout_height="wrap_content"
        android:orientation="horizontal"
        android:gravity="center_vertical">
        <Button
            android:id="@+id/playVideo"
            android:layout_width="0dp"
            android:layout_weight="1"
            android:layout_height="wrap_content"
            android:text="Play"
            android:textAllCaps="false"/>

        <Button
            android:id="@+id/pauseVideo"
            android:layout_width="0dp"
            android:layout_weight="1"
            android:layout_height="wrap_content"
            android:text="Pause"
            android:textAllCaps="false"/>

        <Button
            android:id="@+id/replayVideo"
            android:layout_width="0dp"
            android:layout_weight="1"
            android:layout_height="wrap_content"
            android:text="Replay"
            android:textAllCaps="false"/>

    </LinearLayout>

    <VideoView
        android:id="@+id/videoView"
        android:layout_width="match_parent"
        android:layout_height="wrap_content"/>

</LinearLayout>
逻辑代码
public class MainActivity extends AppCompatActivity {

    ActivityMainBinding mBinding;
    MediaPlayer mMediaPlayer = new MediaPlayer();
    private VideoView mVideoView;

    @Override
    protected void onCreate(Bundle savedInstanceState) {
        super.onCreate(savedInstanceState);
        mBinding = ActivityMainBinding.inflate(getLayoutInflater());
        setContentView(mBinding.getRoot());

        // 播放视频
        playVideo();
    }

    private void playVideo() {
    // 获得 res 目录下 video 文件的 uri
        Uri uri = Uri.parse( "android.resource://"  + getApplicationContext().getPackageName() +  "/"  +R.raw.video);
        //Uri uri = Uri.parse("android.resource://$packageName/${R.raw.video}");
        //  val uri = Uri.parse("android.resource://$packageName/${R.raw.video}")

        mVideoView = mBinding.videoView;
        mBinding.videoView.setVideoURI(uri);

        // 开始播放
        mBinding.playVideo.setOnClickListener(new View.OnClickListener() {
            @Override
            public void onClick(View view) {
                if (!mVideoView.isPlaying()) {
                    mVideoView.start();
                }
            }
        });
        // 暂停播放
        mBinding.pauseVideo.setOnClickListener(new View.OnClickListener() {
            @Override
            public void onClick(View view) {
                if (mVideoView.isPlaying()) {
                    mVideoView.pause();
                }
            }
        });
        // 重新播放
        mBinding.replayVideo.setOnClickListener(new View.OnClickListener() {
            @Override
            public void onClick(View view) {
                if (mVideoView.isPlaying()) {
                    mVideoView.resume();
                }
            }
        });
    }

    @Override
    protected void onDestroy() {
        super.onDestroy();

        // 释放 VideoView 占用的资源
        mVideoView.suspend();
    }
}
这样的话,你就已经将VideoView的基本用法掌握得差不多了。不过,为什么它的用法和MediaPlayer这么相似呢?其实VideoView只是帮我们做了一个很好的封装而已,它的背后仍然是使用MediaPlayer对视频文件进行控制的。另外需要注意,VideoView并不是一个万能的视频播放工具类,它在视频格式的支持以及播放效率方面都存在着较大的不足。所以,如果想要仅仅使用VideoView就编写出一个功能非常强大的视频播放器是不太现实的。但是如果只是用于播放一些游戏的片头动画,或者某个应用的视频宣传,使用VideoView还是绰绰有余的。
效果


 被折叠的 条评论
为什么被折叠?
被折叠的 条评论
为什么被折叠?
 到【灌水乐园】发言


