


 本文深入讲解了Linux系统下的网络配置,包括IP地址、子网掩码的概念,网络的临时和永久设定方法,虚拟机通过宿主机上网的步骤,以及scp在Windows 10下的使用技巧。
目录
1. 介绍
--> ip地址:
是指互联网协议地址(Internet Protocol Address),是IP Address的缩写;
计算机要实现网络通信,就必须有一个快速定位的网络地址;
ip地址就是计算机在网络中的唯一身份ID,地址为32位;
组成: ip地址= 网络地址 + 主机地址。
--> 子网掩码:
用来划分网络区域
子网掩码非0位置对应的ip上的数字表示这个ip的网络位
子网掩码0位对应的数字是ip的主机位
网络位表示网络区域
主机位表示网络区域内的某台主机
2. 网络临时设定
ping //检测网络是否畅通
ifconfig //查看网络或设定网络接口
ifconfig device(etho网卡名称) ip/24 //设定ip 子网掩码
ifconfig device down //关闭(eth0)
ifconfig device up //开启(eth0)
ip addr //检测或者设定网络接口
ip addr show //检测
ip addr add ip/24 dev device //设定(也可以添加)
(以上均为临时设定)
3. 网络永久设定
图形方式:
--> nm-connectio-editor
--> 如果没有生效执行 systemctl stop NetworkManager.service(记录网络服务状态)
--> systemctl restart network (status)
命令方式:
nmcli device connectio eth0 //开启eth0网络
nmcli device disconnectio eth0 //关闭eth0网络
nmcli device show eth0 //查看网卡信息
nmcli device status eth0 //查看网卡服务接口信息
nmcli connection show //显示已配置好网络的信息
nmcli connection down desktop198 //注销此网络
nmcli connection up desktop198 //开启此网络
nmcli connection delete desktop198 //删除此网络
nmcli connection add type ethernet con-name redhat ifname eth0 ip4 xxx.xxx.xxx.xxx/24(xx) //添加且设定网络
nmcli connection modify desktop198 ipv4.method auto //网卡的工作方式动态
nmcli connection modify desktop198 1pv4.method manual //网卡的工作方式位静态
文件方式:
路径 /etc/sysconfig/network-scripts/
vim ifcfg-xxxxxx //以ifcfg开头
DEVICE=eth0
ONBOOT=yes
IPADDR=xxx.xxx.xxx.xxx
NETMASK=255.255.255.0
BOOTPROTO=static //网络设备的工作模式
NAME=xxxxx //网络名称,与文件名称无关
--> systemctl restart network //重启网络
--> route -n //查看网关信息
4. 虚拟机通过真机上网
真机 :
--> systemctl start firewalld
--> firewall-cmd --list-all
--> firewall-cmd --permanent --add-masquerade //添加 masquerade
--> firewall-cmd --reload //重载防火墙
--> firewall-cmd --list-all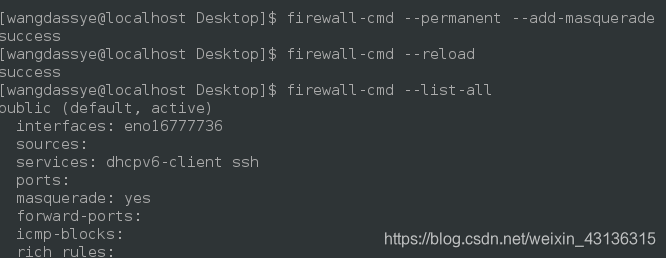
虚拟机:
--> vim /etc/sysconfig/network //设置全局网关 ,针对所有没有设定网关的网络生效
GATEWAY=xxx.xxx.xxx.xxx(真机ip)
重启网络 systemctl reatart network
--> 设定DNS (domain name server //域名解析服务,解析就是把域名变成ip)
vim /etc/resolv.conf //DNS的指向文件
nameserver 114.114.114.114 //需要某个域名的ip地址,通过114.114.114.114转换
(或者可以本地解析: vim /etc/hosts //本地解析文件
ip地址 域名)
--> (设置网管时也可以 vim /etc/sysconfig/network-scripts/ifcfg-name
GATEWAY0=xxx.xxx.xxx.xxx
GATEWAY1=xxx.xxx.xxx.xxx //指定网关
GATEWAY=xxx.xxx.xxx.xxx //网卡中只有一个网关时)
##: Dns优先级设定:
默认 /etc/hosts > /etc/resolv.conf
vim /etc/nsswith.conf
39 hosts: dns files(files dns) // /etc/resolv.conf dns 优先( etc/hosts 优先)
5. 补充
刚刚了解在linux下可以用scp来进行数据的上传和下载,在windows10系统下也可以使用scp上传下载
--> windows10在设置-->应用中安装sshd服务
--> 运行dos或者windows PowerShell (以管理员运行,相当于root)
--> 然后 net start sshd 开启服务
--> scp xxx@xxx.xxx.xxx.xxx.:/x/x/x /x/x/x
(测试可以通过局域网进行上传下载)


 被折叠的 条评论
为什么被折叠?
被折叠的 条评论
为什么被折叠?
 到【灌水乐园】发言


