


 本文介绍了如何在Spring Boot中整合MyBatis,分别通过注解和XML两种方式进行操作。首先讲解了前期准备工作,包括application.yml配置、pom.xml依赖的添加,以及项目目录结构。在`Student`模块中,`StudentMapper`包含主要业务代码,返回类型为int。启动类`MybatisApplication`使用`@MapperScan`指定mapper路径。接着详细阐述了XML方式的使用,包括创建项目目录、YML配置及`StudentMapper.xml`的具体写法。通过调试验证,两种方法的实现均无误。
本文主要内容
1 . 通过注解的方式实现mybatis的使用
2. 通过xml的方式实现mybatis
下载路径 https://download.youkuaiyun.com/download/weixin_43055096/11639767
前期准备
application.yml的配置(把properties改为yml)
spring:
  datasource:
    driver-class-name: com.mysql.jdbc.Driver
    username: wcw
    password: 1234
    url: jdbc:mysql://localhost:3306/mybaits?serverTimezone=UTC
  jpa:
    show-sql: true
    database: mysql
pom.xml (主要用到的依赖)
  <dependency>
            <groupId>org.mybatis.spring.boot</groupId>
            <artifactId>mybatis-spring-boot-starter</artifactId>
            <version>1.2.0</version>
  </dependency>
   <dependency>
            <groupId>mysql</groupId>
            <artifactId>mysql-connector-java</artifactId>
            <scope>runtime</scope>
        </dependency>
                <dependency>
            <groupId>org.springframework.boot</groupId>
            <artifactId>spring-boot-starter-data-jpa</artifactId>
        </dependency>
项目主要目录!
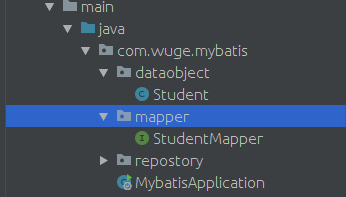
Student (这里可能需要大家引入lamble)
  package com.wuge.mybatis.dataobject;

import lombok.Data;

import javax.persistence.Entity;
import javax.persistence.Id;

@Entity
@Data
public class Student {
    @Id
    private String id;

    private String name;

    private String date;
}
StudentMapper(主要的业务代码)
package com.wuge.mybatis.mapper;

import com.wuge.mybatis.dataobject.Student;
import org.apache.ibatis.annotations.*;
import org.springframework.stereotype.Component;
import java.util.Map;

@Component
public interface StudentMapper {

//插入操作
    @Insert("insert into student(id,name,date) values(" +
            "#{id , jdbcType=VARCHAR},  " +
            "#{name , jdbcType=  VARCHAR} " +
            ",#{date , jdbcType= VARCHAR})")
    int insertByMap(Map<String,Object> map);


    @Insert("insert into student(id,name,date) values(" +
            "#{id , jdbcType=VARCHAR},  " +
            "#{name , jdbcType=  VARCHAR} " +
            ",#{date , jdbcType= VARCHAR})")
    int insertByObject(Student student);


    /**
     * column 对应数据库字段名称 而 property 对应对象名称
     */
    @Select("select * from student where id = #{id}")
    @Results({
            @Result(column = "id",property ="id"),
            @Result(column = "name",property ="name"),
            @Result(column = "date",property ="date")
    })
    Student findByStudentId(String id);

    @Update("update student set name = #{name} where id =#{id}")
    int updateById(@Param("name") String name,
                              @Param("id") String id);

    @Update("update student set name = #{name} where id =#{id}")
    int updateByObject(Student student);

    @Delete("delete from student where id = #{id}")
    int delectStudent(String id);
}
这里方法返回的都为int 因为结果都是返回成功的条数
MybatisApplication 启动类
  package com.wuge.mybatis;

import org.mybatis.spring.annotation.MapperScan;
import org.springframework.boot.SpringApplication;
import org.springframework.boot.autoconfigure.SpringBootApplication;

@SpringBootApplication
@MapperScan("com.wuge.mybatis.mapper")

public class MybatisApplication {

    public static void main(String[] args) {
        SpringApplication.run(MybatisApplication.class, args);
    }

}
这里的@MapperScan后写的是mapper的路径
这里我们可以开始我们的测试了(以下都为测试的方法)
package com.wuge.mybatis.mapper;

import com.wuge.mybatis.dataobject.Student;
import com.wuge.mybatis.repostory.StudentRepostory;
import com.wuge.mybatis.repostory.StudentRepostoryTest;
import org.junit.Assert;
import org.junit.Test;
import org.junit.runner.RunWith;
import org.springframework.beans.factory.annotation.Autowired;
import org.springframework.boot.test.context.SpringBootTest;
import org.springframework.test.context.junit4.SpringRunner;

import java.util.HashMap;
import java.util.List;
import java.util.Map;

@RunWith(SpringRunner.class)
@SpringBootTest
public class StudentMapperTest{

    @Autowired
    private StudentMapper studentMapper;
    @Autowired
    private StudentRepostory studentRepostory;

    @Test
    public void insertbymap() throws  Exception{
        Map<String,Object> map = new HashMap<>();
        map.put("id","2");
        map.put("name","Bob");
        map.put("date","2017-1-1");
        int result = studentMapper.insertByMap(map);
        Assert.assertEquals(1,result);
    }

    @Test
    public  void  insertByObject(){
        Student student = new Student();
        student.setId("3");
        student.setName("Linux");
        student.setDate("2019-9-7");
        int result = studentMapper.insertByObject(student);
        Assert.assertEquals(1,result);
    }

    @Test
    public void  findAll(){
       List<Student>  student = studentRepostory.findAll();
        Assert.assertNotEquals(0,student.size());
    }

    @Test
    public void  findById(){
        Student result = studentMapper.findByStudentId("3");
        Assert.assertNotEquals(null,result);
    }

    @Test
    public void  updateById(){
      int reslut =   studentMapper.updateById("boger","1");
      Assert.assertEquals(1,reslut);
    }

    @Test
    public void updateByObject(){
        Student student = new Student();
        student.setId("3");
        student.setName("zhoujielun");
        student.setDate("2019-9-7");
        int result = studentMapper.updateByObject(student);
        Assert.assertEquals(1,result);
    }

    @Test
    public void deleteFromstudent(){
        int result = studentMapper.delectStudent("1");
        Assert.assertEquals(1,result);
    }
    @Test
    public void  selectBystudentXml(){
        Student student = studentMapper.selectByStudent("2");
    Assert.assertNotEquals(null,student);
    }
}
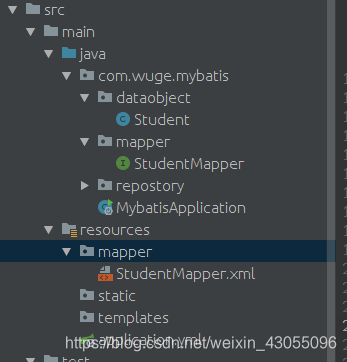
xml 的使用方法
建立项目目录(主要看mapper)
在yml添加配置
spring:
  datasource:
    driver-class-name: com.mysql.jdbc.Driver
    username: wcw
    password: 1234
    url: jdbc:mysql://localhost:3306/mybaits?serverTimezone=UTC
  jpa:
    show-sql: true
    database: mysql
logging:
  level:
    com.wuge.mybatis.mapper: trace

# 获取classpath下的所有xml文件
mybatis:
  mapper-locations: classpath:mapper/*.xml
StudentMapper.xml写法
<?xml version="1.0" encoding="UTF-8" ?>
<!DOCTYPE mapper
        PUBLIC "-//mybatis.org//DTD Mapper 3.0//EN"
        "http://mybatis.org/dtd/mybatis-3-mapper.dtd">
<mapper namespace="com.wuge.mybatis.mapper.StudentMapper">
// 返回的结果  column为数据库字段  而property为映射到实体类的字段
// type为返回的类型
    <resultMap id="BaseResultMap" type="com.wuge.mybatis.dataobject.Student">
        <id column="id" property="id"  jdbcType="VARCHAR"/>
        <id column="name" property="name"  jdbcType="VARCHAR"/>
        <id column="date" property="date"  jdbcType="VARCHAR"/>
    </resultMap>
 //parameterType 入参类型
    <select  id="selectByStudent"  resultMap="BaseResultMap" parameterType="java.lang.String">
       select * from student where
       id = #{id , jdbcType = VARCHAR}
    </select>
</mapper>
最后我们debug一下
 可以看出结果是没问题的


 被折叠的 条评论
为什么被折叠?
被折叠的 条评论
为什么被折叠?
 到【灌水乐园】发言


