


文章目录
五、C++ 设计模式
0. 设计模式需要遵循的基本原则:
① 单一职责原则: 一个类应该只负责解决一个问题。
② 开放-封闭原则:软件可以扩展,但是已经确定的接口和程序不能进行修改。面对新的需求,对程序的改动是通过增加新代码进行的,而不是更改现有代码。
③ 依赖颠倒原则:
(1). 高层不应该依赖底层模块,两个都应该依赖抽象类。
(2). 要针对接口编程,不要针对实现编程。
④ 里氏代换原则:子类型必须能够替换掉它们的父类型,子类型的可替换性使得使用父类类型的模块在无需修改的情况下就可以扩展。
⑤ 合成/聚合复用原则:尽量使用合成/聚合,尽量不要使用类继承。合成/聚合有助于保持每个类被封装,并被集中在单个任务上。这样类和类继承层次就会保持较小规模,并且不太可能增长为庞大不可控制的类。
合成:合成是一种强的“拥有”关系,体现了严格的部分和整体的关系,部分和整体的生命周期是一样的。
聚合:聚合是一弱的“拥有”关系,体现的是A对象可以包含B对象,但B对象不是A对象的一部分.

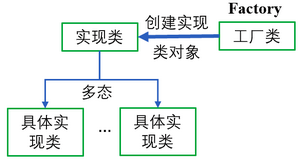
1. 简单工厂模式
简单工厂模式使设计模式中最基础的模式之一,简单工厂模式主要就是将用户创建对象实例交由工厂类进行对象实例的创建。
#include <iostream>
class Operation{
    private:
        double numA;
        double numB;
        double result;
    public:
        Operation(){}
        Operation(double dnum1,double dnum2):numA(dnum1),numB(dnum2){}
        virtual ~Operation(){}

        double getNumA(){
            return numA;
        }
        double getNumB(){
            return numB;
        }
        virtual double getResult(){
             return getNumA()+getNumB();
        }
};
class OperationAdd :public Operation{   //继承和多态可以使得不同的运算隔离开来,减少程序的耦合,防止出错
    private:
        Operation Op;
    public:
        OperationAdd(double dnum1,double dnum2):Op(dnum1,dnum2){}
        ~OperationAdd(){}
        double getResult(){
            return Op.getNumA()+Op.getNumB();
        }
};
class OperationSub :public Operation{
    private:
         Operation Op;
    public:
        OperationSub(double dnum1,double dnum2):Op(dnum1,dnum2){}
        double getResult(){
            return Op.getNumA()-Op.getNumB();
        }
};
class OperationFactory{   //工厂模式
    public:
        static Operation *creatrOperation(char Op,double a,double b){
            Operation *oper=NULL;
            switch(Op){
                case '+':
                    oper=new OperationAdd(a,b);
                    break;
                case '-':
                    oper=new OperationSub(a,b);
                    break;
                default:break;
            }
            return oper;
        }
};
int main(){
    Operation *o=(OperationFactory::creatrOperation('+',10,20));  //基类指向派生类->多态
    std::cout<<o->getResult()<<std::endl;
}
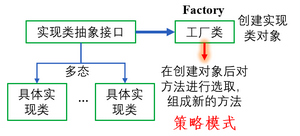
2. 策略模式
策略模式与工厂模式很相似,策略模式在解决对象创建问题同时,注重对方法的选取和拼接。这样可以减少算法变换对用户的影响和干扰。
#include <iostream>
using namespace std;
class Strategy_Person{
    public:
        virtual void eat()=0;
        virtual void run()=0;
        virtual void wear()=0;
};
class Person1 : public Strategy_Person{
    public:
        void eat(){
            cout<<"Person1 eat"<<endl;
        }
        void run(){
            cout<<"Person1 run"<<endl;
        }
        void wear(){
            cout<<"Person1 wear"<<endl;
        }
    private:
};
class Person2 : public Strategy_Person{
    public:
        void eat(){
            cout<<"Person2 eat"<<endl;
        }
        void run(){
            cout<<"Person2 run"<<endl;
        }
        void wear(){
            cout<<"Person2 wear"<<endl;
        }
    private:
};
class StrategyContext{
    private:
        Strategy_Person *stg=NULL;
    public:
         StrategyContext(char name){
            switch(name){
                case 'M':
                    stg=new Person1();
                    break;
                case 'H':
                    stg=new Person2();
                    break;
            }
        }
        void get(){   //对方法的拼接
            stg->run();
            stg->wear();
            stg->eat();
        }
};
//主函数为客户端
int main(){
    StrategyContext s('H');
    s.get();
}
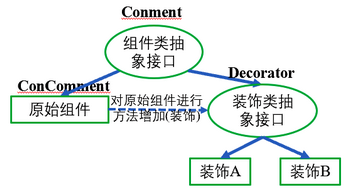
3.装饰模式
装饰模式指的是在不必改变原类文件和使用继承的情况下,动态地扩展一个对象的功能。它是通过创建一个包装对象,也就是装饰来包裹真实的对象。
装饰模式是为已有功能动态的添加更多的功能的一种方式,是对实例对象的包装。
装饰模式使得原始组件与装饰的方法分离开,装饰对象只需要关心的自己需要添加的功能即可,不需要考虑原始组件。
💗3.1 装饰模式特点:
(1) 装饰对象和真实对象有 相同的接口。这样客户端对象就能以和真实对象 相同的方式和装饰对象交互。
(2) 装饰对象包含一个 真实对象的引用(reference)
(3) 装饰对象接 受所有来自客户端的请求。它把这些请求转发给真实的对象。
(4) 装饰对象可以在转发这些请求以前或以后增加一些附加功能。这样就确保了在运行时,不用修改给定对象的结构就可以在外部增加附加的功能。在面向对象的设计中,通常是通过继承来实现对给定类的功能扩展。
💗3.2 何时使用装饰模式:
(1)需要扩展一个类的功能,或给一个类添加附加职责。
(2)需要动态的给一个对象添加功能,这些功能可以再动态的撤销。
(3)需要增加由一些基本功能的排列组合而产生的非常大量的功能,从而使继承关系变的不现实。
(4)当不能采用生成子类的方法进行扩充时。一种情况是,可能有大量独立的扩展,为支持每一种组合将产生大量的子类,使得子类数目呈爆炸性增长。另一种情况可能是因为类定义被隐藏,或类定义不能用于生成子类。
💗3.3 优缺点:
- 优点:
1.Decorator模式与继承关系的目的都是要扩展对象的功能,但是Decorator可以提供承更多的灵活性。
2.通过使用不同的具体装饰类以及这些装饰类的排列组合,设计师可以创造出很多不同行为的组合。 - 缺点:
1. 这种比继承更加灵活机动的特性,也同时意味着更加多的复杂性。
2. 装饰模式会导致设计中出现许多小类,如果过度使用,会使程序变得很复杂。
3. 装饰模式是针对抽象组件(Component)类型编程。但是,如果你要针对具体组件编程时,就应该重新思考你的应用架构,以及装饰者是否合适。当然也可以改变Component接口,增加新的公开的行为,实现“半透明”的装饰者模式。在实际项目中要做出最佳选择。
/*
*   装饰模式:利用setComponment方法对原始组件进行封装,并原始组件基础上添加新的功能和信息
*            对原组件进行装饰后,既包括原始组件的输出,也包括新增装饰的输出。
*        装饰模式使得原始组件与装饰的方法分离开,装饰对象只需要关心的自己需要添加的功能即可,不需要考虑原始组件。
*        装饰模式是为已有功能动态的添加更多的功能的一种方式,是对实例对象的包装
*        装饰模式很好的解决了开放-封闭原则
*/
#include <iostream>
using namespace std;
class Componment{   //抽象接口,只定义方法
    virtual void operation()=0;
};
class ConCreateComponment : public Componment{   //对象原始组件
    private:
    public:
        ConCreateComponment(){};
        ~ConCreateComponment(){};
        void operation(){
             cout<<"对象的操作"<<endl;
        }
};
//以上是原有的对象组件,及其包括的方法 | 以下是对原有对象的装饰,在原有对象基础上添加新的功能和信息
class Decorator : public Componment{
    protected:
        ConCreateComponment *componment;
    public:
        void setComponment(ConCreateComponment *comp){
            componment=comp;
        }
        virtual void operation()=0;
};
class DecoratorA : public Decorator{   //装饰A: 对原组件进行装饰,既包括原始组件的输出,也包括新增装饰的输出
    private:
         string newDecorate;
    public:
    void operation(){
        componment->operation();
        newDecorate="new state";
        cout<<newDecorate<<endl;
    }
};
class DecoratorB : public Decorator{   //装饰B: 对原组件进行装饰,既包括原始组件的输出,也包括新增装饰的输出
    private:
         string newDecorate;
    public:
    void operation(){
        componment->operation();
        newDecorate="new state";
        cout<<newDecorate<<endl;
    }
    void otherOperation(int a,int b){   //装饰B的其他操作
        cout<<a+b<<endl;
    }
};
int main(){
    ConCreateComponment *c=new ConCreateComponment();
   // c->operation();

    DecoratorA *da=new DecoratorA();
    da->setComponment(c);
    da->operation();

    DecoratorB *db=new DecoratorB();
    db->setComponment(c);
    db->otherOperation(5,15);
}
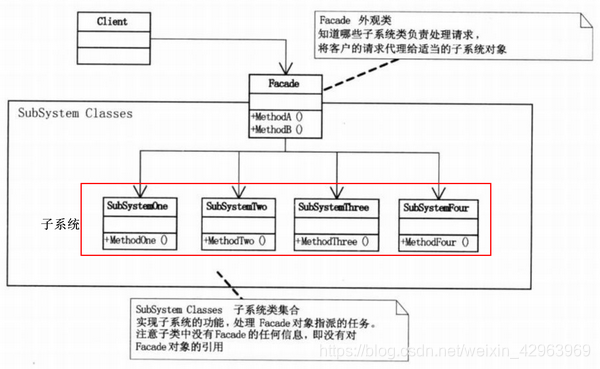
4.外观模式
外观模式(Facade): 为子系统中的一组接口提供一个一致的界面,此模式定义了一个高层接口,这一接口使子系统更加容易调用。
💗4.1 UML图 :
💗4.2 何时使用外观模式
① 设计初期时:将不同的两个层进行分离,层与层之间建立外观模式。
② 在开发阶段:子系统由于重构会变得很复杂,因此可以增加外观Facade提供简单的接口,减少子系统之间的依赖。
③ 在维护大型遗留系统时,系统无法扩展,可以为新系统开发一个外观Facade,提供遗留代码的简单接口,让新系统与Facade对象交互。
💗4.3 外观模式例程:
/**
*   外观模式(Facade): 为子系统中的一组接口提供一个一致的界面,此模式定义了一个高层接口,这一接口使子系统更加容易调用
*/
#include <iostream>
using namespace std;
class Operation{   //操作接口
    public:
        virtual void buy()=0;
        virtual void sell()=0;
};
class Stoke:public Operation{     //子系统
    public:
        void buy(){
            cout<<"Buy Stoke"<<endl;
        }
        void sell(){
            cout<<"Sell Stoke"<<endl;
        }
};
class Guozhai:public Operation{   //子系统
    public:
        void buy(){
            cout<<"Buy Guozhai"<<endl;
        }
        void sell(){
            cout<<"Sell Guozhai"<<endl;
        }
};
class Fund : public Operation{   //外观模式,调用子系统
    public:
        Fund(){
            s=new Stoke();
            g=new Guozhai();
        }
        void buy(){
            s->buy();   //调用子系统
            g->buy();   //调用子系统
        }
        void sell(){
            s->sell();  //调用子系统
            g->sell();  //调用子系统
        }
    private:
        Stoke *s;
        Guozhai *g;
};
int main(){
    Fund *f=new Fund();
    f->buy();
}
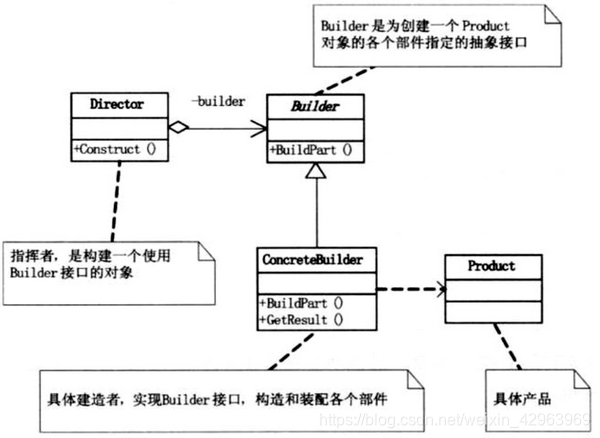
5. 建造者模式(Builder)
建造者模式使将一个复杂对象的构建与表示分离,使同样创建过程可以创建不同的表示。
建造者模式存在三大部分:
1. 建造者-定义建造的接口,确定建造的框架 Builder
2. 实现者-实现建造者定义的接口-实现定义的方法 ConcreteBuilder
3. 指挥者-创建对象,指挥实现者实现其方法。Director
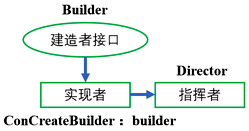
💗5.1 UML图:
💗5.2 何时使用建造者模式:
当创建复杂对象的算法应该独立于该对象的组成部分以及他们的装配方式时,使用建造者模式。
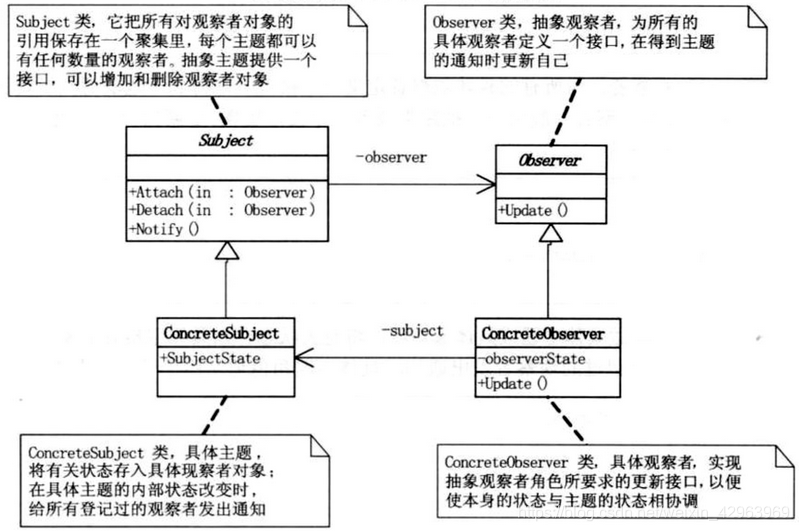
6. 观察者模式(Observer)
观察者模式(发布-订阅模式):观察者模式定义一种一对多的依赖关系,让多个观察者对象同时监听某个主题对象,这个主题对象在状态发生变化时 会通知所有观察者对象,使他们能够自动更新自己。
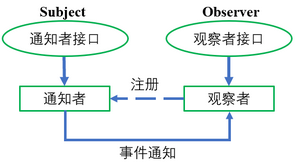
💗6.1 UML图:
💗 6.2 何时使用观察者模式:
① 当一个对象的改变需要同时改变其他对象,且它不知道具体有多少个对象有待改变时,应该考虑使用观察者模式。
② 观察者模式所做的工作就是在解除耦合,让耦合双方都依赖于抽象,而不是依赖于具体。
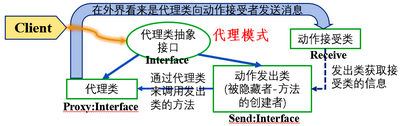
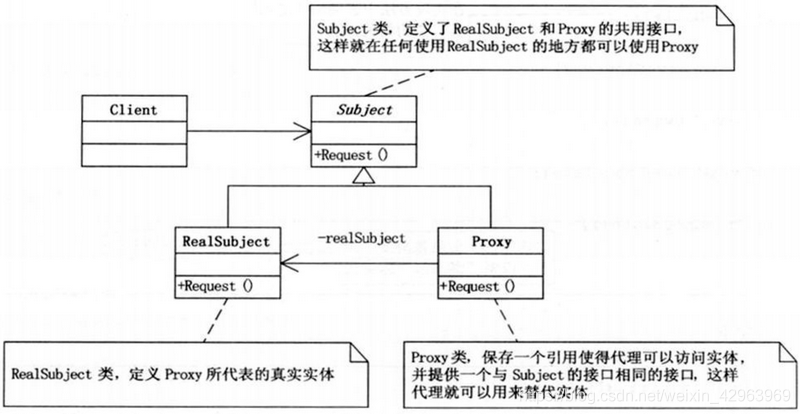
7. 代理模式(Proxy)
代理模式为实际的【动作发出者对象】提供一种【代理对象】来控制这个对象的访问,起到中介的作用,可以通过引入代理对象的方式来间接访问目标对象。【代理对象】和【动作发出者对象】共用同一个接口,这里代理对象就能代替动作发出者。
💗 7.1 代理模式的应用:
1.远程代理:为一个对象在不同地址空间(有可能是不同机器)提供局部代表,这样可以隐藏对象存在不同地址空间的事实。 WebServer
2.虚拟代理:根据需要创建开销很大的对象。通过它来存放实例化需要很长时间的真实对象。 浏览器
3.安全代理:用来控制真实对象访问时的权限
4.智能指引:当调用真实的对象时,代理处理另外一些事。
💗 7.2 UML图:
💗 7.3 代理模式例程 :
#include <iostream>
using namespace std;
class Gift{    //接口
    public:
        virtual void giveDolls()=0;
        virtual void giveFlowers()=0;
        virtual void giveChocolate()=0;
};

class Schoolgirl{       //动作接受者
    private:
        string name;
    public:
        Schoolgirl(string n):name(n){}
        string getGirlName(){
            return name;
        }
};
class Pursuit : public Gift{   //动作发出者,被隐藏者
    public:
        Pursuit(Schoolgirl *mm):Sg(mm){};
        void giveDolls(){
            cout<<" Give "<<Sg->getGirlName()<<" Dolls"<<endl;
        }
        void giveFlowers(){
             cout<<" Give "<<Sg->getGirlName()<<" Flowers"<<endl;
        }
        void giveChocolate(){
             cout<<" Give "<<Sg->getGirlName()<<" Chocolate"<<endl;
        }
    private:
        Schoolgirl *Sg;
};
class Proxy : public Gift{  //代理者,代理 动作发出者 执行其操作
    public:
        Proxy(Schoolgirl *mm){
            ps=new Pursuit(mm);
        }
        void giveDolls(){
            ps->giveDolls();  //调用动作发出者的动作
        }
        void giveFlowers(){
            ps->giveFlowers();
        }
        void giveChocolate(){
            ps->giveChocolate();
        }
    private:
        Pursuit *ps;
};
int main(){
    Schoolgirl *mm=new Schoolgirl("xiaoming");

    Proxy *pp=new Proxy(mm);
    pp->giveDolls();
}
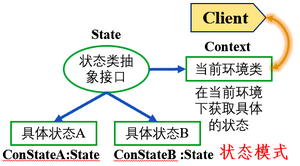
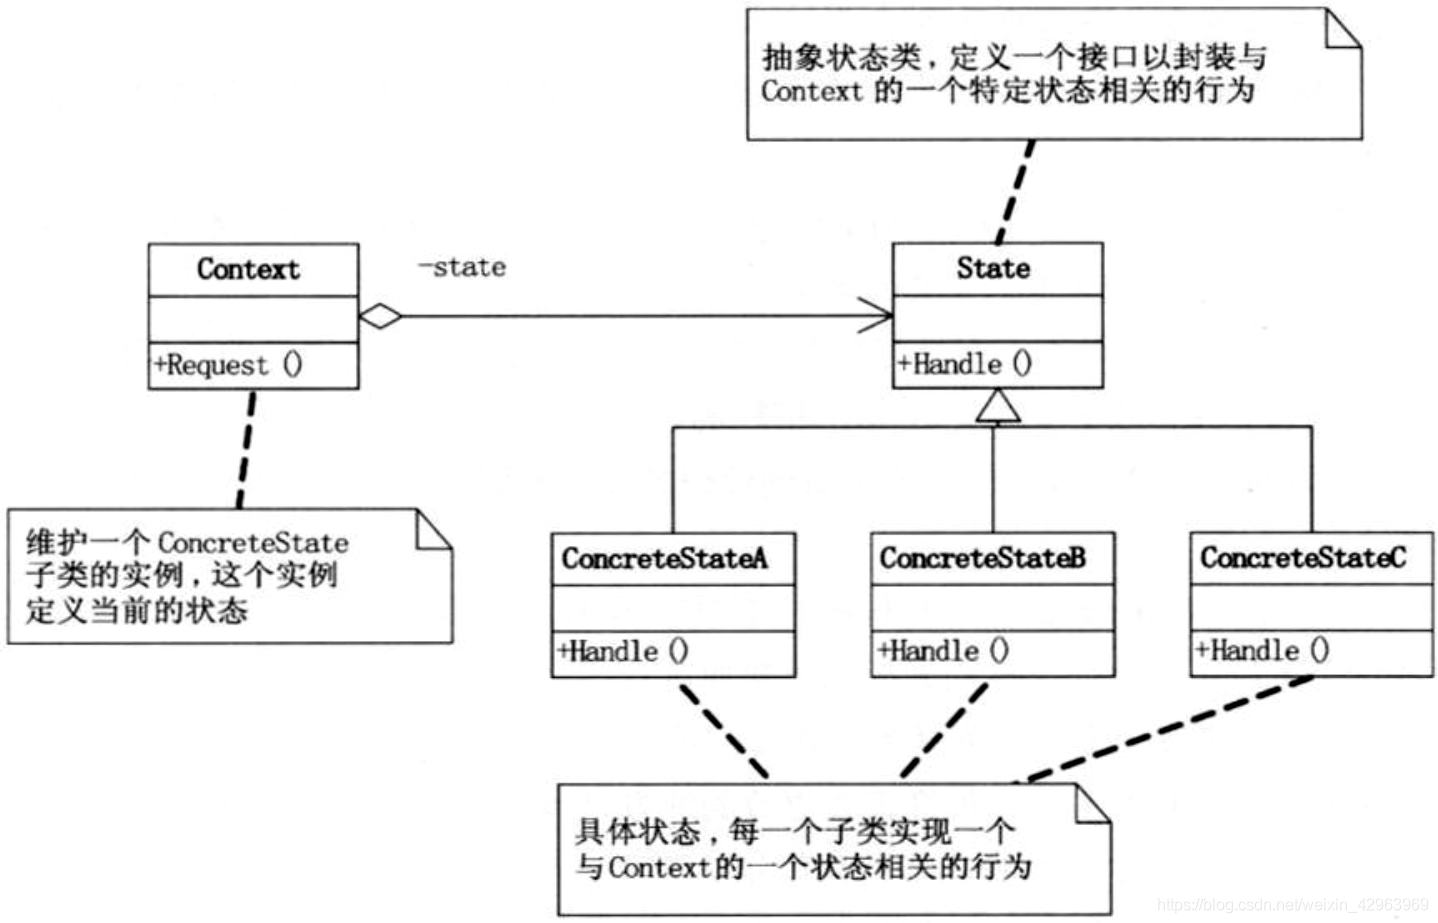
8. 状态模式(State)
当一个对象的内部状态改变时允许改变其行为,这个对象看起来像是改变了其类,状态模式主要解决的是当控制一个对象状态转换的条件表达式过于复杂时的情况, 把状态的判断逻辑转移到不同状态的一系列类当中,把复杂的判断逻辑简化。(用状态类来替代了其if-else判断条件)
💗 8.1 状态模式的优点 :
1.将与特定状态相关的行为局部化,并且将不同状态的行为分割开来。
2.使得状态更容易增加和转换,且不违背封闭-开放原则。
3.去除状态之间的相互依赖关系。
💗 8.2 UML图 :
💗 8.3 状态模式例程 :
#include <iostream>
using namespace std;
class Context;
class State{
    public:
        virtual ~State(){}
        virtual void Handle(Context *)=0;  //状态接口
};
class Context{    //当前环境
    public:
        Context(State *sta):state(sta){}
        void Ruquest(){                  //获取当前环境下的状态
            state->Handle(this);
        }
        void changeState(State *sta){       //改变当前环境下的状态
            state=sta;
        }
    private:
        State *state;
};

class ConStateB:public State{
    public:
        ConStateB(){}
        void Handle(Context *pContext){
            cout<<"ConState B"<<endl;
        }
};
class ConStateA: public State{
    public:
        ConStateA(){}
        void Handle(Context *pContext){
            cout<<"ConState A"<<endl;
            pContext->changeState(new ConStateB());
        }
};
int main(){
    Context *con=new Context(new ConStateA());   //当前环境下状态为A
    con->Ruquest();
    con->Ruquest();
    con->Ruquest();

}
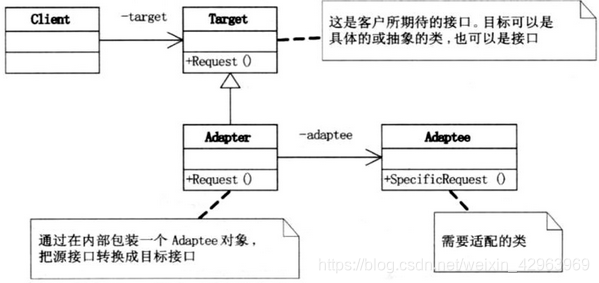
9. 适配器模式(Adapter)
当使用一个存在的类时,如果它的方法与你的要求不相同时,就可以考虑用适配器模式,可以将不同接口的方法通过适配器适配成统一接口供客户端调用,使客户端不必更改代码。 但在当遇到接口不相同时,应该首先考虑重构统一接口,不应该先考虑用适配器。
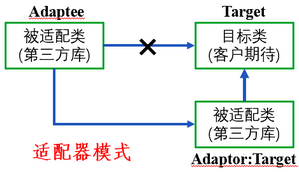
💗 9.1 适配器模式UML图 :
#include <iostream>
using namespace std;
class Adaptee{    //被适配的类
    public:
        void AdapteePrint(){
            cout<<"Adaptee Print"<<endl;
        }
};
class Target{           //目标类-客户期待接口,通过适配器类来调用被适配类的方法
    public:
        virtual void TargetPrint(){
             cout<<"Target Print"<<endl;
        }
};
class Adaptor :public Target{  //用适配器来封装 需要适配的类的方法
    private:
        Adaptee *adaptee;
    public:
        void TargetPrint(){
            adaptee=new Adaptee();
            adaptee->AdapteePrint();
        }
};
int main(){
    Target *tar=new Adaptor();
    tar->TargetPrint();
}
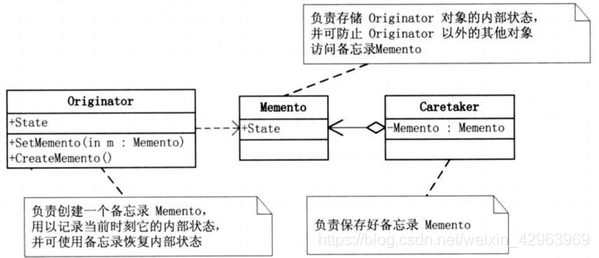
10. 备忘录模式(Memento)
Memento模式适用于功能比较复杂,但需要维护或记录属性历史的类,Originator可以根据保存的Memento信息还原到前一状态。
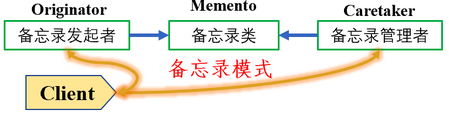
💗 10.1 备忘录模式UML图 :
#include <iostream>
using namespace std;

class Memento{  //存储备忘录
    private:
        std::string strstate;  //实际的备忘录
    public:
        Memento(string sta):strstate(sta){}
        string getState(){      //备忘录的接口
            return strstate;
        }
};

class Originator{    //备忘录发起者
    public:
        Memento *createMemento(){   //将当前数据存入备忘录
            return (new Memento(strstate));  //通过复制构造函数复制数据并保存到备忘录中
        }
        void setMemento(Memento *mem){      //从备忘录中恢复数据
            strstate=mem->getState();
        }

        void show(){
            cout<<"State: "<<strstate<<endl;
        }
        void setState(string str){
            strstate=str;
        }
    private:
        std::string strstate;
        int date;

};

class Caretaker{   //备忘录管理者
    private:
        Memento *memento;
    public:
        Memento* getMemento(){   //从备忘录中获取
            return memento;
        }
        void setMemento(Memento *m){    //设置备忘录
            memento=m;
        }
};

int main(){
    Originator *o=new Originator();
    o->setState("state");
    o->show();

    Caretaker *c=new Caretaker();
    c->setMemento(o->createMemento());

    o->setState("New State");
    o->show();

    o->setMemento(c->getMemento());
    o->show();
}
11. 组合模式(Composite)
组合模式:将对象组合成树形结构以表示‘部分-整体’的层次结构, 组合模式使得用户对单个对象和组合对象的使用具有一致性。
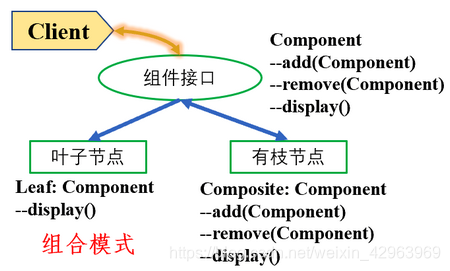
① 透明模式:如上图所示,在Component中声明所有用来管理子对象的方法,这样实现Component接口的所有子类都具备其方法。这种方式使得叶节点和枝节点没有区别,具备完全一致的行为接口。
② 安全模式:在
Component接口中不声明
Add()和
Remove()方法,则子类
Leaf不需要去实现它,而在Composite中声明所有用来管理子类对象的方法。这种方式使得叶节点和枝节点不具有相同的接口,客户端在调用时需要作出相应的判断。
💗 11.2 何时使用组合模式:
① 需求中体现 部分与整体层次的结构时
② 希望用户忽略组合对象与单个对象的不同,统一地使用组合结构中的所有对象。
💗 11.3 组合模式例程:
#include <iostream>
#include <vector>
using namespace std;
class Compoment{
    protected:
        string name;
    public:
        Compoment(string str):name(str){}
        virtual void add(Compoment *)=0;
        virtual void remove(Compoment *)=0;
        virtual void display()=0;
};
class Leaf : public Compoment{   //叶子节点本身不需要add方法和remove方法——透明模式
    public:
        Leaf(string str):Compoment(str){}
        void add(Compoment *p){
            cout<<"Leaf cannot add"<<endl;
        }
        void remove(Compoment *p){
            cout<<"Leaf cannot remove"<<endl;
        }
        void display(){
            cout<<name<<endl;
        }
};
class Composite : public Compoment{
    public:
        Composite(string str):Compoment(str){}

        void add(Compoment *p){
            this->p_Com.push_back(p);
        }
        void remove(Compoment *p){
            for(auto iter=p_Com.begin();iter!=p_Com.end();iter++){
                if((*iter)==p)
                    this->p_Com.erase(iter);
            }
        }
        void display(){
            for(auto iter=p_Com.begin();iter!=p_Com.end();iter++)
                (*iter)->display();
        }
    private:
        vector<Compoment*> p_Com;
};

int main(){
    Compoment *root=new Composite("Root");
    root->add(new Leaf("leaf A"));
    root->add(new Leaf("leaf B"));
    root->display();

    Compoment *comA=new Composite("ComA");
    comA->add(new Leaf("comA leaf A"));
    comA->add(new Leaf("comA leaf B"));

    root->add(comA);
    root->display();
}
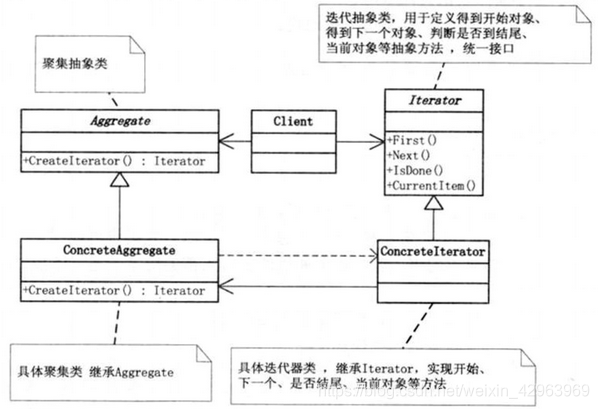
12. 迭代器模式(iterator)
迭代器模式:提供一种方法顺序访问一个聚合对象中各个元素,而不暴露该对象的内部表示。 当需要访问一个聚集对象,而且不管这些对象是什么都需要遍历的时候,就应该用迭代器模式.
迭代器模式就是分离了集合对象的遍历行为,抽象出一个迭代器类来负责,这样不会暴露集合的内部结构,又可以让外部代码透明的访问集合内部的数据。
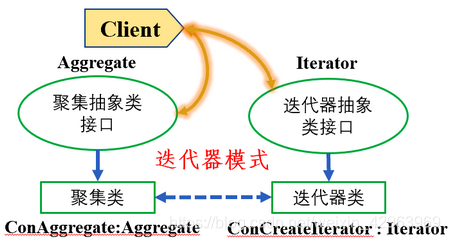
💗 12.1 迭代器模式UML图:
💗 12.2 迭代器模式例程:
#include <iostream>
#include <vector>
using namespace std;
class Iterator{
    public:
        Iterator(){}
        virtual ~Iterator(){}
        virtual string First()=0;
        virtual string Next()=0;
        virtual bool IsDone()=0;
        virtual string getCur()=0;
};
class Aggregate{
    public:
        virtual int getCount()=0;
        virtual void Push(const string &str)=0;
        virtual string Pop(const int nIndex)=0;
        virtual Iterator *CreateIterator()=0;
};

class ConCreateIterator : public Iterator{
    public:
        ConCreateIterator(Aggregate *agg):m_nCurrent(0),aggregate(agg),Iterator(){};
        string First(){
            return aggregate->Pop(0);
        }
        string Next(){
            string temp;
            m_nCurrent++;
            if(m_nCurrent<aggregate->getCount())
                temp=aggregate->Pop(m_nCurrent);
            return temp;
        }
        bool IsDone(){
            return ((m_nCurrent>=aggregate->getCount())? true : false);
        }
        string getCur(){
            return aggregate->Pop(m_nCurrent);
        }

    private:
        Aggregate *aggregate;
        int m_nCurrent;
};

class ConCreateAggregate :public Aggregate{
    public:
        ConCreateAggregate():m_iter(NULL){
            m_ItemList.clear();
        }
        Iterator *CreateIterator(){
            if(m_iter==NULL)
                m_iter=new ConCreateIterator(this);
            return m_iter;
        }
        void Push(const string &str){
            m_ItemList.push_back(str);
        }
        string Pop(const int nIndex){
            string temp;
            if(nIndex<getCount())
                temp=m_ItemList[nIndex];
            return temp;
        }
        int getCount(){
            return m_ItemList.size();
        }
    private:
        vector<string> m_ItemList;
        Iterator *m_iter;
};
int main(){
    ConCreateAggregate *conagg=new ConCreateAggregate();
    conagg->Push("A");
    conagg->Push("B");
    conagg->Push("C");
    conagg->Push("D");

    Iterator *conIter=conagg->CreateIterator();
    if(conIter!=NULL){
        string strItem=conIter->First();
        while(!conIter->IsDone()){
            cout<<conIter->getCur()<<" is ok "<<endl;
            conIter->Next();
        }
    }
}
13. 单例模式(Singleton)
单例模式:保证一个类仅有一个实例,并提供一个访问它的全局访问点。
单例模式分为饿汉式和懒汉式两种:
(1).饿汉式:通过静态初始化的方式,在自己被加载时将自己实例化。饿汉式由于通过静态初始化方式,所以要提前占用系统资源。
(2).懒汉式:在第一次被引用时,才会将自己实例化。懒汉式会面临多线程访问的安全性问题,需要做双重锁定保证安全。
💗 13.1 单例模式例程:
#include <iostream>
#include <pthread.h>
using namespace std;
/* 懒汉式单例模式 */
class Singleton_Lock{
    public:
        ~Singleton_Lock(){
             cout<<"desstructor lock called!"<<endl;
        }
        static Singleton_Lock* getInstance(){
            if(instance_lock==NULL){    //双重锁定
                pthread_mutex_lock(&mutex);   //锁的目的是为了防止多个进程同时创建实例,当第一个线程完成后,被阻塞的会继续进入
                if(instance_lock==NULL){    //第二个判断是为了当第一个通过锁的线程创建实例后,第二个线程不在创建实例,
                                        //如果没有这个判断,当第二个进程通过锁后还是会创建实例
                    Singleton_Lock *temp=new Singleton_Lock;
                    instance_lock=temp;
                    cout<<"constructor lock called!"<<endl;
                }
                pthread_mutex_unlock(&mutex);
            }
            return instance_lock;
        }
        static pthread_mutex_t mutex;
    private:
        static Singleton_Lock *instance_lock;
        Singleton_Lock(){
            pthread_mutex_init(&mutex,NULL);
        }
        Singleton_Lock(const Singleton_Lock&);
        Singleton_Lock &operator=(const Singleton_Lock&);
};
pthread_mutex_t  Singleton_Lock::mutex;
Singleton_Lock * Singleton_Lock::instance_lock=NULL;

/* 饿汉式单例模式 */
class Singleton{
    public:
        ~Singleton(){
             cout<<"desstructor called!"<<endl;
        }
        static Singleton &getInstance(){  //饿汉式单例模式,利用static的全局性和仅初始化一次的性质,会提前占用系统资源
            static Singleton instance;
            return instance;
        }
    private:
        Singleton(){    //将构造函数设置为private,防止外部创建类
            cout<<"constructor called!"<<endl;
        }
        Singleton(Singleton &){}    //将复制构造函数设置为private,防止外部创建类
        Singleton &operator=(const Singleton&){}    //将赋值运算符设置为private,防止类的复制
};


int main(){
    Singleton &instance=Singleton::getInstance();  //饿汉式 变量引用是系统唯一存在的实例
    Singleton &instance1=Singleton::getInstance(); //再次引用不会创建新的实例

    Singleton_Lock *instance_l=Singleton_Lock::getInstance();
    Singleton_Lock *instance_la=Singleton_Lock::getInstance();  //再次创建不会创建新的实例
    delete instance_l;
}
14. 桥接模式(Bridge)
当一个系统可能有多角度分类,每一种分类都有可能变化,那么就把这种多角度分离出来让它们独立变化,减少每个分类之间的耦合。每个分类之间通过桥接模式进行连接。
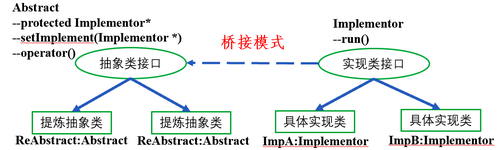
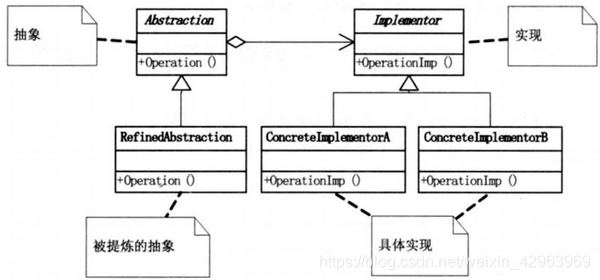
💗 14.2 桥接模式例程:
#include <iostream>
using namespace std;
class PhoneSort{   //实现类接口
    public:
        virtual void Run(string)=0;
};
class PhoneBland{   //抽象类接口,在抽象类接口中定义实现类指针
    public:
        PhoneBland(){}
        void setPhoneSort(PhoneSort *ps){
            phonesort=ps;
        }
        virtual void run()=0;
    protected:
        PhoneSort *phonesort;
};
class PhoneGame:public PhoneSort{
    public:
        void Run(string str){
            cout<<str<<" Run Phone Game"<<endl;
        }
};
class PhoneDaily :public PhoneSort{
    public:
        void Run(string str){
            cout<<str<<" Run Phone Daily"<<endl;
        }
};
class PhoneA:public PhoneBland{
    public:
        void run(){
            phonesort->Run("A");
        }
};
class PhoneB:public PhoneBland{
    public:
        void run(){
            phonesort->Run("B");
        }
};
int main(){
    PhoneSort *pG=new PhoneGame();
    PhoneSort *pD=new PhoneDaily();
    PhoneBland *pA=new PhoneA();
    PhoneBland *pB=new PhoneB();
    pA->setPhoneSort(pG);
    pA->run();
    pB->setPhoneSort(pD);
    pB->run();
}
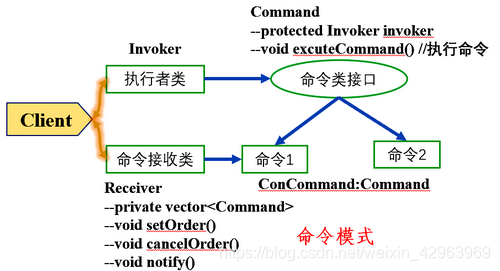
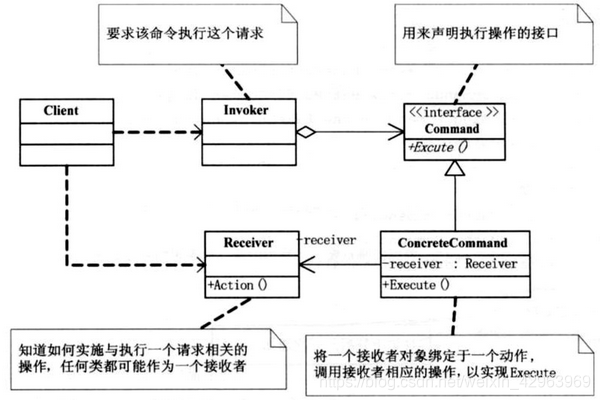
15. 命令模式(Command)
命令模式,将一个请求封装为一个对象,从而可用不同的请求对客户进行参数化,对请求排队或记录请求日志,并支持可撤销的操作。
命令模式优点:
(1) 较容易的设计一个命令队列
(2) 在需要的情况下,可以较容易的将命令记入日志
(3) 允许接收请求的一方决定是否要否决请求
(4) 容易实现对请求的撤销和重做
(5) 增加新的具体命令类很容易
(6) 命令模式把请求一个操作的对象与怎么执行一个操作的对象分割开。
💗 15.2 命令模式例程:
#include <iostream>
#include <vector>
using namespace std;
class Barbecuer{    //执行类
    public:
        void bakeMutton(){
            cout<<"烤羊肉"<<endl;
        }
        void bakeChickenWing(){
            cout<<"烤鸡翅"<<endl;
        }
};

class Commmand{   //命令接口
    protected:
        Barbecuer *barbecuer;
    public:
        Commmand(Barbecuer *b):barbecuer(b){}
        virtual void excuteCommand()=0;
};
class bakeMuttonCommand:public Commmand{
    public:
        bakeMuttonCommand(Barbecuer *b):Commmand(b){}
        void excuteCommand(){
            barbecuer->bakeMutton();
        }
};
class backChickenWingCommand:public Commmand{
    public:
        backChickenWingCommand(Barbecuer *b):Commmand(b){}
        void excuteCommand(){
            barbecuer->bakeChickenWing();
        }
};

class Waiter{     //命令接收者
    public:
        void setOrder(Commmand *com){
            ComList.push_back(com);
            cout<<"增加订单 "<<ComList.size()<<endl;
        }
        void cancelOrder(Commmand *com){
            for(auto iter=ComList.begin();iter!=ComList.end();iter++){
                if((*iter)==com){
                    iter=ComList.erase(iter);
                    cout<<"取消订单 "<<ComList.size()<<endl;
                    return;
                }
            }
            cout<<"未点此菜"<<endl;
        }
        void notify(){
            for(auto iter=ComList.begin();iter!=ComList.end();iter++){
                (*iter)->excuteCommand();
            }
        }
    private:
        vector<Commmand*> ComList;

};
int main(){
    Barbecuer *ba=new Barbecuer();
    Commmand *mutton=new bakeMuttonCommand(ba);
    Commmand *ChickenWing=new backChickenWingCommand(ba);

    Waiter *waiter=new Waiter();
    waiter->setOrder(mutton);
    waiter->setOrder(ChickenWing);
    waiter->cancelOrder(ChickenWing);
    waiter->notify();
}
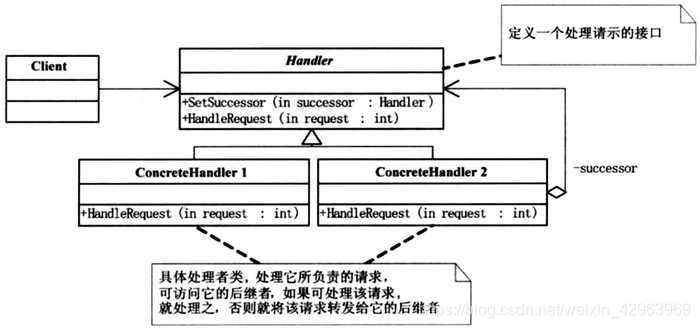
16. 职责链模式(Responsibility)
使多个对象都有机会处理请求,从而避免请求的发送者和接收者之间的耦合关系, 将这个对象连成一条链,并沿这条链传递请求,直到有一个对象处理为止。
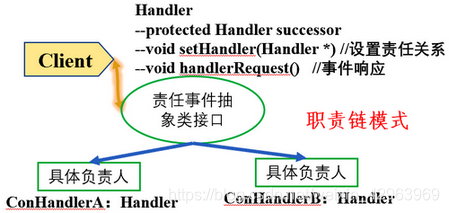
💗 16.2 职责链模式例程:
#include <iostream>
using namespace std;
class Handler{
    protected:
        Handler *successor;
    public:
        void setSuccessor(Handler *handle){  //设置责任关系
            this->successor=handle;
        }
        virtual void handlerRequest(int request)=0;
};
class ConHandler1 :public Handler{
    public:
        void handlerRequest(int request){
            if(request>=0 && request<=5){
                cout<<"ConHandler1 处理 "<<request<<endl;
            }else if(successor!=NULL){
                successor->handlerRequest(request);
            }
        }
};
class ConHandler2 :public Handler{
    public:
        void handlerRequest(int request){
            if(request>=6 && request<=10){
                cout<<"ConHandler2 处理 "<<request<<endl;
            }else if(successor!=NULL){
                successor->handlerRequest(request);
            }
        }
};
class ConHandler3 :public Handler{
    public:
        void handlerRequest(int request){
            if(request>=10 && request<=20){
                cout<<"ConHandler3 处理 "<<request<<endl;
            }else if(successor!=NULL){
                successor->handlerRequest(request);
            }
        }
};
int main(){
    Handler *h1=new ConHandler1();
    Handler *h2=new ConHandler2();
    Handler *h3=new ConHandler3();

    h1->setSuccessor(h2);
    h2->setSuccessor(h3);

    h1->handlerRequest(15);
}


 9万+
9万+

 被折叠的 条评论
为什么被折叠?
被折叠的 条评论
为什么被折叠?
 到【灌水乐园】发言


