


 本文介绍了如何在Spring Boot 2.x项目中配置Swagger2,生成并测试在线接口文档。内容包括项目技术构成、依赖引入、配置方法、控制器和实体类配置,以及Swagger2关键注解的使用。文章最后总结了配置的优点和存在的问题,如接口文档中多余参数的干扰和特定数据类型的限制。
spring boot 2.x项目配置swagger2步骤和问题总结
随着时代发展,前后端分离的开发的发展趋势越来越明显,对于后端人员来说,繁杂的接口文档,工作量非常复杂。经过小紫一段时间的尝试和总结,今天给大家分享一下关于spring boot 2.x配置swagger2过程中相关配置和需要注意的事项,同时提出几个小紫在开发过程中遇到的问题,欢迎小伙伴们下方留言斧正!
一项目技术构成
项目整体采用spring boot 2.1.3.RELEASE版本,通过集成swagger2,生成在线接口文档,并满足以下项目需求。
- 生成在线接口文档,可以在线测试。
- 自定义API分组,分为web端,移动端。
- 在head增加参数token非全局配置。
备注:项目采用前后端分离,通过head中加入token访问认证,后台自定义注解@RequiredToken和利用aop机制对接口进行token认证判断,标识@RequiredToken注解的方法访问需要先进行登录认证。
二pom.xml依赖关系
   <!--springfox-swagger2 -->
       <dependency>
           <groupId>io.springfox</groupId>
           <artifactId>springfox-swagger2</artifactId>
           <version>2.9.2</version>
       </dependency>
   <!-- springfox-swagger-ui -->
       <dependency>
         <groupId>io.springfox</groupId>
          <artifactId>springfox-swagger-ui</artifactId>
          <version>2.9.2</version>
       </dependency>
备注:springfox-swagger2 生成在线api文档核心包,springfox-swagger-ui生成在线文档的页面
三Swagger2配置
这个配置类,主要配置API文档需要扫描的Controller包的路径以及非全局token认证配置,配置成功后,项目启动自动加载配置,无需进行多次配置
package com.hxss.skhb.config;
import java.util.ArrayList;
import java.util.List;
import com.google.common.base.Predicate;
import com.hxss.skhb.annotation.RequiredToken;
import org.springframework.beans.factory.annotation.Value;
import org.springframework.context.annotation.Bean;
import org.springframework.context.annotation.Configuration;
import com.google.common.base.Predicates;
import springfox.documentation.RequestHandler;
import springfox.documentation.builders.ApiInfoBuilder;
import springfox.documentation.builders.RequestHandlerSelectors;
import springfox.documentation.service.ApiInfo;
import springfox.documentation.service.ApiKey;
import springfox.documentation.service.AuthorizationScope;
import springfox.documentation.service.Contact;
import springfox.documentation.service.SecurityReference;
import springfox.documentation.spi.DocumentationType;
import springfox.documentation.spi.service.contexts.SecurityContext;
import springfox.documentation.spring.web.paths.AbstractPathProvider;
import springfox.documentation.spring.web.plugins.Docket;
import springfox.documentation.swagger2.annotations.EnableSwagger2;
import static springfox.documentation.builders.PathSelectors.ant;
/**
* @ClassName: Swagger2Config
* @Description: TODO(swagger2配置文件)
* @author 小紫念沁
*/
@Configuration
@EnableSwagger2
public class Swagger2Config {
/**
* swagger2文档开关,在生产环境下关闭在线文档
*/
@Value("${springfox.documentation.swagger.enable}")
private boolean enableSwagger;
/**
* swagger2文档配置获取api docs json数据的请求路径
*/
@Value("${springfox.documentation.swagger.v2.path}")
private String path;
/**
* swagger2文档配置host路径
*/
@Value("${springfox.documentation.swagger.v2.host}")
private String host;
/**
* web端需要token验证接口
* @return
*/
@Bean
public Docket createRestWebApiRequiredToken() {
return new Docket(
//选择文档版本类型及文档类型
DocumentationType.SWAGGER_2)
//分组名称
.groupName("web端需要token验证接口")
//日期格式转换
.directModelSubstitute(org.joda.time.LocalDate.class, java.sql.Date.class)
.directModelSubstitute(org.joda.time.DateTime.class, java.util.Date.class)
//配置获取api docs json数据的请求路径
.pathProvider(new GtPaths())
//#请求的根路径
.host(host)
//自定义head参数名
.securitySchemes(securitySchemes())
//自定义head参数值
.securityContexts(securityContexts())
//开启或者禁止访问文档
.enable(enableSwagger)
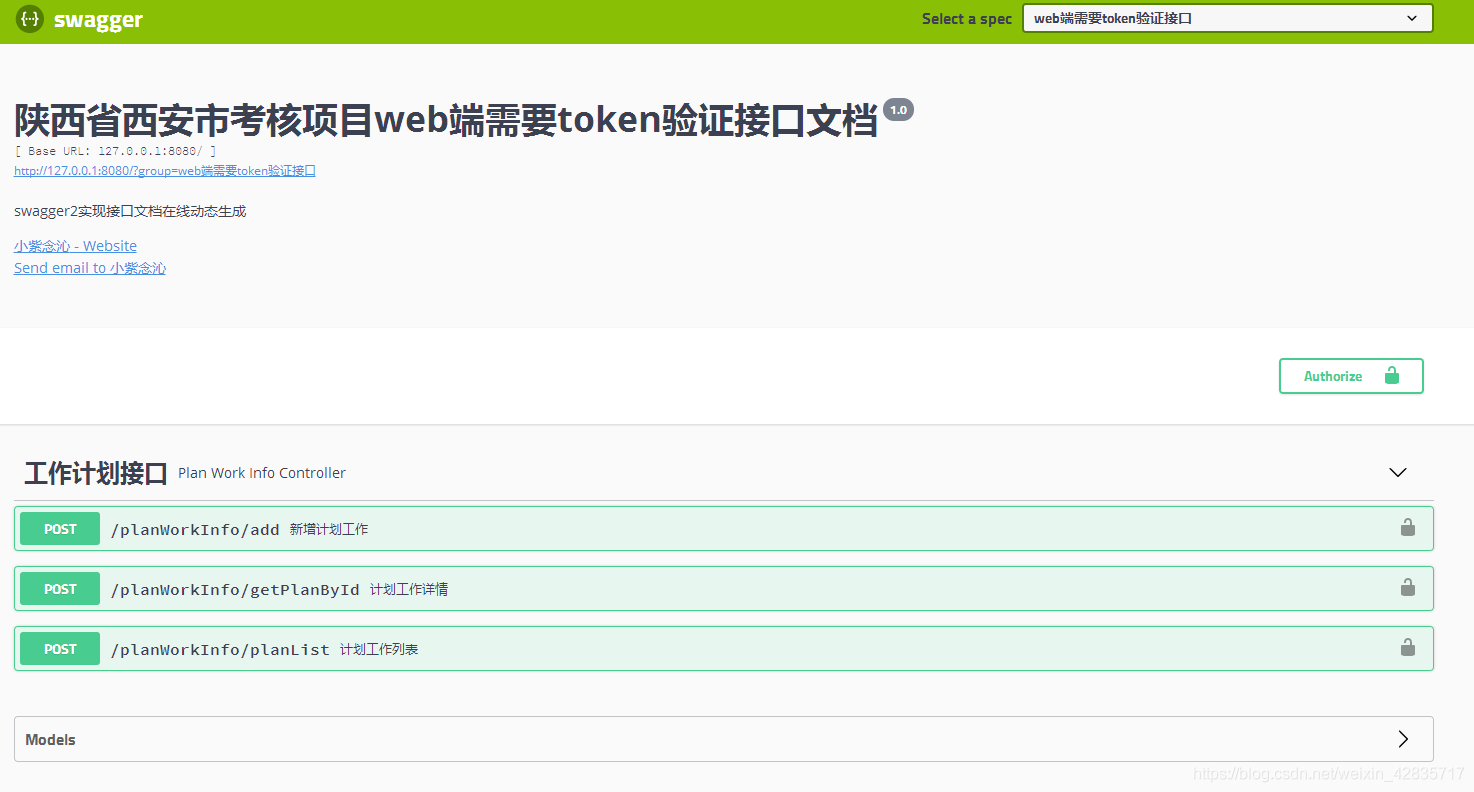
.apiInfo(apiInfo("陕西省西安市考核项目web端需要token验证接口文档"))
//选择那些路径和api会生成document
.select()
//对指定包api进行监控
.apis(RequestHandlerSelectors.basePackage("com.hxss.skhb.controller.website"))
.apis(new Predicate<RequestHandler>() {
public boolean apply(RequestHandler input) {
return input.isAnnotatedWith(RequiredToken.class);
}
})
//对所有路径进行监控
.paths(Predicates.and(ant("/**")))
.build();
}
/**
* web端不需要token验证接口
* @return
*/
@Bean
public Docket createRestWebApi() {
return new Docket(
//选择文档版本类型及文档类型
DocumentationType.SWAGGER_2)
//分组名称
.groupName("web端不需要token验证接口")
//日期格式转换
.directModelSubstitute(org.joda.time.LocalDate.class, java.sql.Date.class)
.directModelSubstitute(org.joda.time.DateTime.class, java.util.Date.class)
//配置获取api docs json数据的请求路径
.pathProvider(new GtPaths())
//#请求的根路径
.host(host)
//开启或者禁止访问文档
.enable(enableSwagger)
.apiInfo(apiInfo("陕西省西安市考核项目web端不需要token验证接口文档"))
//选择那些路径和api会生成document
.select()
//对指定包api进行监控
.apis(RequestHandlerSelectors.basePackage("com.hxss.skhb.controller.website"))
.apis(new Predicate<RequestHandler>() {
public boolean apply(RequestHandler input) {
return !input.isAnnotatedWith(RequiredToken.class);
}
})
//对所有路径进行监控
.paths(Predicates.and(ant("/**")))
.build();
}
private ApiInfo apiInfo(String title) {
return new ApiInfoBuilder()
.title(title)
.description("swagger2实现接口文档在线动态生成")
.contact(new Contact("小紫念沁","https://blog.youkuaiyun.com/weixin_42835717","874957743@qq.com"))
.version("1.0")
.build();
}
/**
* @ClassName: GtPaths
* @Description: TODO(定义内部类继承抽象类AbstractPathProvider)
* @author 小紫念沁
*/
class GtPaths extends AbstractPathProvider{
@Override
protected String applicationPath() {
return path;
}
@Override
protected String getDocumentationPath() {
return path;
}
}
/**
* @author:小紫念沁
* @Title: securitySchemes
* @Description: 配置全局参数,设置自定义head参数名称)
* @param @return 参数
* @return List<ApiKey> 返回类型
* @throws
*/
private List<ApiKey> securitySchemes() {
List<ApiKey> ArrayList=new ArrayList<ApiKey>();
ArrayList.add(new ApiKey("token", "token", "header"));
return ArrayList;
}
/**
* @author:小紫念沁
* @Title: securityContexts
* @Description: TODO(将参数名称加入到请求head)
* @param @return 参数
* @return List<SecurityContext> 返回类型
* @throws
*/
private List<SecurityContext> securityContexts() {
List<SecurityContext> ArrayList=new ArrayList<SecurityContext>();
ArrayList.add(SecurityContext.builder()
.securityReferences(defaultAuth())
.build());
return ArrayList;
}
public List<SecurityReference> defaultAuth() {
AuthorizationScope authorizationScope = new AuthorizationScope("global", "token参数值");
AuthorizationScope[] authorizationScopes = new AuthorizationScope[1];
authorizationScopes[0] = authorizationScope;
List<SecurityReference> ArrayList=new ArrayList<SecurityReference>();
ArrayList.add(new SecurityReference("token", authorizationScopes));
return ArrayList;
}
}
备注:
A:apis(RequestHandlerSelectors.basePackage(“com.hxss.skhb.controller.website”))配置需要生成接口文档扫描的包。
B:apis(new Predicate() {public boolean apply(RequestHandler input) {return !input.isAnnotatedWith(RequiredToken.class);}}) 配置没有注解RequiredToken的方法不进行配置token校验
C:因项目中采用自定义注解,无法采用方法中定义的原生正则对访问的请求进行扫描过滤,因此采用双重过滤,先过滤掉需要扫描的包,对其再进行有无@RequiredToken注解进行过滤分组,以此实现@RequiredToken的注解的方法在文档测试时需要登录认证,反之不需要
四控制器配置相关配置
/**
 *工作计划控制器
 */
@RestController
@RequestMapping("/planWorkInfo")
@Api(value = "工作计划接口",tags = "工作计划接口")
@Slf4j
public class PlanWorkInfoController {

    @Autowired
    private PlanWorkInfoService planWorkInfoService;

    /**
     * 新增计划工作
     * @param planWorkInfo
     * @param fileUrl
     * @return
     * @throws Exception
     */
    @PostMapping(value="/add",produces="application/json;charset=UTF-8")
    @ApiOperation(value="新增计划工作", notes="新增计划工作")
    @ApiImplicitParams({
            @ApiImplicitParam(name = "planWorkType", value = "计划工作类型", required = true, dataType = "long",paramType = "query"),
            @ApiImplicitParam(name = "planWorkTitle", value = "计划工作标题", required = true, dataType = "string",paramType = "query"),
            @ApiImplicitParam(name = "planWorkDate", value = "编写日期", required = true, dataType = "string",paramType = "query"),
            @ApiImplicitParam(name = "planWorkPerson", value = "编写人", required = true, dataType = "string",paramType = "query"),
            @ApiImplicitParam(name = "insertUser", value = "新增人员", required = true, dataType = "string",paramType = "query")
            })
    @RequiredToken
    public ResultEntity add(@Validated(value = {PlanWorkInfo.Default.class,PlanWorkInfo.Add.class}) PlanWorkInfo planWorkInfo, @RequestParam(value="fileUrl") MultipartFile fileUrl) throws Exception{
        Map<Object,Object> adminMap=new HashMap<>();
        if(null!=planWorkInfo){
            int cnt=planWorkInfoService.add(planWorkInfo,fileUrl);
            if(cnt>0){
                return ResultUtils.backInfoObject(ResultConstantUtils.SUCCESS,"操作成功!",adminMap);
            }else{
                return ResultUtils.backInfoObject(ResultConstantUtils.EMPTY,"操作失败!",adminMap);
            }
        }else{
            return ResultUtils.backInfoObject(ResultConstantUtils.EMPTY,"参数不正确!",adminMap);
        }

    }
五实体类相关配置
此步骤针对实体类进行相关属性进行说明配置,用于文档测试时入参解释说明。
package com.hxss.skhb.pojo;
import java.util.Date;
import java.io.Serializable;
import com.baomidou.mybatisplus.annotation.TableField;
import com.baomidou.mybatisplus.annotation.TableId;
import io.swagger.annotations.ApiModel;
import io.swagger.annotations.ApiModelProperty;
import lombok.Data;
import lombok.experimental.Accessors;
import org.hibernate.validator.constraints.Length;
import org.hibernate.validator.constraints.Range;
import javax.validation.constraints.NotBlank;
import javax.validation.constraints.NotNull;

/**
 * 计划工作实体
 */
@Data
@Accessors(chain = true)
@ApiModel(description ="计划工作实体")
public class PlanWorkInfo implements Serializable {

    private static final long serialVersionUID = 1L;

    public interface Default{}

    public interface Update{}

    public interface Add{}

    public interface Search{}

    /**
     * 计划工作ID
     */
    @TableId("plan_work_id")
    @ApiModelProperty("计划工作ID")
    @NotBlank(message ="计划工作ID不能为空!",groups = PlanWorkInfo.Search.class)
    private String planWorkId;

    /**
     * 计划工作类型
     */
    @TableField("plan_work_type")
    @ApiModelProperty(value = "计划工作类型",example = "1")
    @Range(min = 1,max = 4,message ="计划工作类型取值范围{min}-{max}",groups =PlanWorkInfo.Default.class)
    @NotNull(message ="计划工作类型不能为空!",groups = PlanWorkInfo.Default.class)
    private Integer planWorkType;

    /**
     * 计划工作名称
     */
    @TableField("plan_work_title")
    @ApiModelProperty("计划工作名称")
    @Length(min =1, max = 30, message = "计划工作名称长度{min}-{max}字符。",groups =PlanWorkInfo.Default.class)
    @NotBlank(message ="计划工作名称不能为空!",groups = PlanWorkInfo.Default.class)
    private String planWorkTitle;

    /**
     * 计划工作日期
     */
    @TableField("plan_work_date")
    @ApiModelProperty(value = "计划工作日期",example = "1991-09-01")
    @NotNull(message ="计划工作日期不能为空!",groups =PlanWorkInfo.Default.class)
    private Date planWorkDate;

    /**
     * 计划工作发布人
     */
    @TableField("plan_work_person")
    @ApiModelProperty("计划工作发布人")
    @NotBlank(message ="计划工作发布人不能为空!",groups =PlanWorkInfo.Default.class)
    @Length(min =1, max = 30, message = "计划工作发布人长度{min}-{max}字符。",groups =PlanWorkInfo.Default.class)
    private String planWorkPerson;

    /**
     * 计划工作文档名称
     */
    @TableField("plan_work_name")
    @ApiModelProperty(value = "计划工作文档名称",hidden = true)
    private String planWorkName;

    /**
     * 计划工作文档路径
     */
    @TableField("plan_work_path")
    @ApiModelProperty(value = "计划工作文档路径",hidden = true)
    private String planWorkPath;

    /**
     * 新增时间
     */
    @TableField("insert_time")
    @ApiModelProperty(value = "新增时间",hidden = true)
    private Date insertTime;

    /**
     * 修改日期
     */
    @TableField("update_time")
    @ApiModelProperty(value = "修改日期",hidden = true)
    private Date updateTime;

    /**
     * 新增人员
     */
    @TableField("insert_user")
    @ApiModelProperty(value = "新增人员",example = "f95a636b-2066-11e9-b2d3-408d5c84c749",hidden = true)
    @NotBlank(message ="新增人员不能为空!",groups =PlanWorkInfo.Add.class)
    private String insertUser;

    /**
     * 修改人员
     */
    @TableField("update_user")
    @ApiModelProperty(value = "修改人员",example = "f95a636b-2066-11e9-b2d3-408d5c84c749",hidden = true)
    @NotBlank(message ="修改人员不能为空!",groups =PlanWorkInfo.Update.class)
    private String updateUser;


}
六运行项目,浏览器输入地址:http://127.0.0.1:8080/swagger-ui.html
七Swagger2配置参数说明
@Api:用于类上,说明该类的作用。可以标记一个Controller类做为swagger 文档资源
示例:@Api(value = “xxx”, description = “xxx”)
value	url的路径值
tags	如果设置这个值、value的值会被覆盖
description	对api资源的描述
basePath	基本路径可以不配置
position	如果配置多个Api 想改变显示的顺序位置
produces	For example, "application/json, application/xml"
consumes	For example, "application/json, application/xml"
protocols	Possible values: http, https, ws, wss.
authorizations	高级特性认证时配置
hidden	配置为true 将在文档中隐藏
@ApiOperation:用于方法上,说明方法的作用,每一个url资源的定义
示例:@ApiOperation(value = “xxx”,httpMethod=“POST”, notes= “xxx”,response=String.class)
value	url的路径值
tags	如果设置这个值、value的值会被覆盖
notes	对api资源的描述
position	如果配置多个Api 想改变显示的顺序位置
produces	For example, "application/json, application/xml"
consumes	For example, "application/json, application/xml"
protocols	Possible values: http, https, ws, wss.
authorizations	高级特性认证时配置
hidden	配置为true 将在文档中隐藏
response	返回的对象
responseContainer	这些对象是有效的 "List", "Set" or "Map".,其他无效
httpMethod	"GET", "HEAD", "POST", "PUT", "DELETE", "OPTIONS" and "PATCH"
code	http的状态码 默认 200
extensions	扩展属性
@ApiParam:用于方法、参数、字段上,请求属性
示例:public ResponseEntity createUser(@RequestBody @ApiParam(value = “Created user object”, required = true) User user)
name	属性名称
value	属性值
defaultValue	默认属性值
allowableValues	可以不配置
required	是否属性必填
access
allowMultiple	默认为false
hidden	隐藏该属性
example	示例
@ApiResponse:用于方法上,响应配置
示例:@ApiResponse(code = 400, message = “Invalid user supplied”)
code	http的状态码
message	描述
response	默认响应类 Void
reference	参考ApiOperation中配置
responseHeaders	参考 ResponseHeader 属性配置说明
responseContainer	参考ApiOperation中配置
@ApiResponses:用于方法上,响应集配置
示例: @ApiResponses({ @ApiResponse(code = 400, message = “Invalid Order”) })
value 多个ApiResponse配置
@ResponseHeader:用于方法上,响应头设置
示例:@ResponseHeader(name=“head1”,description=“response head conf”)
name	响应头名称
description	头描述
response	默认响应类 Void
responseContainer	参考ApiOperation中配置
@ApiImplicitParams 用于方法上,包含一组参数说明
@ApiImplicitParam 用于方法上,用在@ApiImplicitParams注解中,指定一个请求参数的各个方面
paramType	参数放在哪个地方
name	参数代表的含义
value	参数名称
dataType	参数类型,有String/int,无用
required 	是否必要
defaultValue	参数的默认值
@ApiModel 用于类上,描述一个Model的信息(这种一般用在post创建的时候,使用@RequestBody这样的场景,请求参数无法使用@ApiImplicitParam注解进行描述的时候
@ApiModelProperty 用于方法、字段上,描述一个model的属性
@ApiIgnore 用于类,属性,方法上,忽略某项api,使用@ApiIgnore
八总结和问题概括
优点:
①利用swagger2构建在线API文档,减轻程序员编写接口压力,同时便于测试人员进行测试。
②文档简单,可以加入非全局token访问认证。
缺点:
①文档测试满足了大部分需求,但是还存在一部分不足:
A:对于方法中需要用@Validated(value = {PlanWorkInfo.Default.class,PlanWorkInfo.Add.class}) 进行分组校验的对象,必须用具体对象接收,当paramType = "query"时,接口文档中会出现实体对象中除了方法中必须的参数外的额外多余属性,对于在线文档测试造成额外参数干扰,当paramType = "body"时,接口文档中无法具体显示测试必须要的参数,效果不好!
C :对于实体属性类型为Integer的, @ApiModelProperty(value = “计划工作类型”,example = “1”) 属性中必须显示给example属性赋予默认值,同时控制器中 dataType =“long”,不能为Integer和int型,更不能为具体对象的实例,否则报错,亲测dataType ="long"可行,具体例子如下:
  /**
     * 计划工作列表
     * @param pageInfo
     * @return
     * @throws Exception
     */
    @PostMapping(value="/planList",produces="application/json;charset=UTF-8")
    @ApiOperation(value="计划工作列表", notes="计划工作列表")
    @RequiredToken
    @ApiImplicitParams({
            @ApiImplicitParam(name = "page", value = "页码", required = true, dataType ="long"),
            @ApiImplicitParam(name = "pageSize", value = "每页大小", required = true, dataType ="long")
    })
    //@ApiImplicitParam(name = "page", value = "页码", required = true, dataType ="long") 此处必须为long
    public ResultEntity  planList(@Validated PageInfo pageInfo) throws Exception{
        Map<Object,Object> adminMap=new HashMap<>();
        IPage<PlanWorkInfo> pageList=planWorkInfoService.page(new Page<PlanWorkInfo>(pageInfo.getPage(),pageInfo.getPageSize()));
        adminMap.put("total",pageList.getTotal());
        adminMap.put("page",pageList.getPages());
        adminMap.put("pageSize",pageList.getSize());
        adminMap.put("pageList",pageList.getRecords());
        return ResultUtils.backInfoObject(ResultConstantUtils.SUCCESS,"操作成功!",adminMap);
    }


 1729
1729

 被折叠的 条评论
为什么被折叠?
被折叠的 条评论
为什么被折叠?
 到【灌水乐园】发言


