


QGraphicsEffect给图像元素添加模糊Blur,阴影DropShadow,着色Colorize,透明QPacity等效果。
QGraphicsEffect是所有效果类的父类。连接原图和最后输出图像的设置[比如QGraphicsView的视口]之间的渲染通道,然后实现效果。
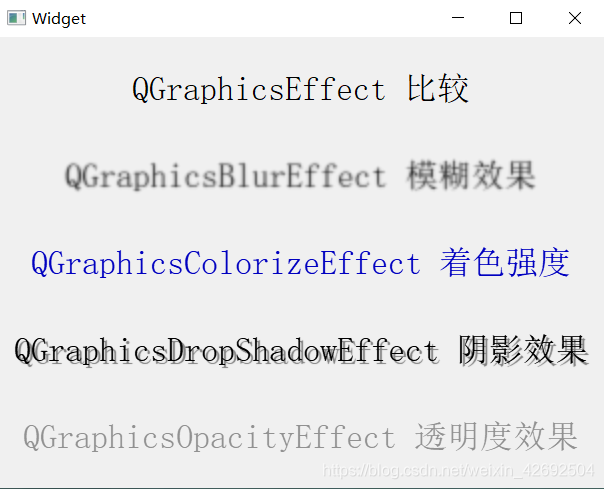
这个都比较简单就用几个对比的看一下吧
QString st1 ="QGraphicsBlurEffect 模糊效果";
QString st2 ="QGraphicsColorizeEffect 着色强度";
QString st3 ="QGraphicsDropShadowEffect 阴影效果";
QString st4 ="QGraphicsOpacityEffect 透明度效果";
ui->label->setText("QGraphicsEffect 比较");
ui->label_2->setText(st1);
ui->label_3->setText(st2);
ui->label_4->setText(st3);
ui->label_5->setText(st4);

//QGraphicsBlurEffect
//该类用应产生模糊效果,主要函数setBlurRadius(qreal blurRadius),用于控制图形元素的模糊度,数值越大越模糊
QGraphicsBlurEffect *e0 = new QGraphicsBlurEffect(this);
e0->setBlurRadius(2);
ui->label_2->setGraphicsEffect(e0);

//QGraphicsColorizeEffect
//该类提供了使用另外一种颜色对当前图形的一种着色功能。主要函数是setColor(QColor)和setStrength (qreal strength),指定了着色和着色强度。
QGraphicsColorizeEffect *e1 = new QGraphicsColorizeEffect(this);
e1->setColor(QColor(0,0,192));
ui->label_3->setGraphicsEffect(e1);

//QGraphicsDropShadowEffect
//该类提供了图形元素的阴影效果,用于增加立体感。主要设置函数有3个,
//setColor()用于设定阴影的颜色,
//setBlurRadius()用于设定阴影的模糊度,
//setOffset (qreal dx,qreal dy)用于设定在哪个方向产生阴影效果,如果dx为负数,则阴影在图形元素的左边。
QGraphicsDropShadowEffect *e2 = new QGraphicsDropShadowEffect(this);
e2->setColor(QColor(125,125,125));
e2->setBlurRadius(2);
e2->setOffset(3,3);
ui->label_4->setGraphicsEffect(e2);

//QGraphicsOpacityEffect
//该类用于图形元素的透明效果,主要函数是setOpacity(qreal opacity),
//用于设置透明度,参数值在0和1.0之间。也可以设置部分透明效果,需要调用的函数是setOpacityMask (QBrush mask)。使用该类例子如下
QGraphicsOpacityEffect *e3 = new QGraphicsOpacityEffect(this);
e3->setOpacity(0.4);
ui->label_5->setGraphicsEffect(e3);
实现的界面如下
这个QGraphicsEffect 针对是一个Item或者一个widget 。同时也可以结合QPropertyAnimation(动画效果)做相关widget的QGraphicsEffec变化


 被折叠的 条评论
为什么被折叠?
被折叠的 条评论
为什么被折叠?
 到【灌水乐园】发言


