


 本文介绍Android中ViewSwitcher组件的使用方法,包括如何通过按钮触发视图切换动画,以及如何设置ViewSwitcher的工厂来动态创建视图。
本文实例讲述了Android开发之ViewSwitcher用法。分享给大家供大家参考,具体如下:
android.widget.ViewSwitcher是ViewAnimator的子类,用于在两个View之间切换,但每次只能显示一个View。
ViewSwitcher的addView函数的代码如下:
/**
* {@inheritDoc}
*
* @throws IllegalStateException if this switcher already contains two children
*/
@Override
public void addView(View child, int index, ViewGroup.LayoutParams params) {
if (getChildCount() >= 2) {
throw new IllegalStateException("Can't add more than 2 views to a ViewSwitcher");
}
super.addView(child, index, params);
}
可以看出,若View的数量超过两个,会抛出异常:java.lang.IllegalStateException,打印 "Can't add more than 2 views to a ViewSwitcher" 。你可以使用ViewSwitcher的factory创建View或添加自己创建的View。
下面用一个例子介绍一下ViewSwitcher的用法。
布局文件:activity_main.xml
xmlns:tools="http://schemas.android.com/tools"
android:layout_width="match_parent"
android:layout_height="match_parent"
android:orientation="vertical"
tools:context=".MainActivity" >
android:layout_width="match_parent"
android:layout_height="wrap_content"
android:orientation="horizontal" >
android:id="@+id/prev"
android:layout_width="0dp"
android:layout_height="wrap_content"
android:layout_weight="1"
android:text="previous" />
android:id="@+id/next"
android:layout_width="0dp"
android:layout_height="wrap_content"
android:layout_weight="1"
android:text="next" />
android:id="@+id/viewswitcher"
android:layout_width="match_parent"
android:layout_height="wrap_content" >
android:layout_width="wrap_content"
android:layout_height="wrap_content"
android:src="@drawable/ic_launcher" />
android:layout_width="match_parent"
android:layout_height="wrap_content"
android:gravity="center"
android:orientation="vertical" >
android:layout_width="wrap_content"
android:layout_height="wrap_content"
android:text="- Button 2 -" />
android:layout_width="wrap_content"
android:layout_height="wrap_content"
android:text="LinearLayout 2" />
Activity的代码:
package com.example.AndroidTest;
import android.app.Activity;
import android.os.Bundle;
import android.view.View;
import android.view.animation.Animation;
import android.view.animation.AnimationUtils;
import android.widget.Button;
import android.widget.ViewSwitcher;
public class MyActivity extends Activity {
Button buttonPrev, buttonNext;
ViewSwitcher viewSwitcher;
Animation slide_in_left, slide_out_right;
@Override
protected void onCreate(Bundle savedInstanceState) {
super.onCreate(savedInstanceState);
setContentView(R.layout.activity_main);
buttonPrev = (Button) findViewById(R.id.prev);
buttonNext = (Button) findViewById(R.id.next);
viewSwitcher = (ViewSwitcher) findViewById(R.id.viewswitcher);
slide_in_left = AnimationUtils.loadAnimation(this,
android.R.anim.slide_in_left);
slide_out_right = AnimationUtils.loadAnimation(this,
android.R.anim.slide_out_right);
viewSwitcher.setInAnimation(slide_in_left);
viewSwitcher.setOutAnimation(slide_out_right);
buttonPrev.setOnClickListener(new View.OnClickListener() {
@Override
public void onClick(View arg0) {
viewSwitcher.showPrevious();
}
});
buttonNext.setOnClickListener(new View.OnClickListener() {
@Override
public void onClick(View arg0) {
viewSwitcher.showNext();
}
});
;
}
}
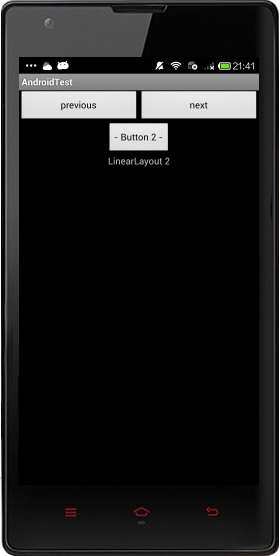
实现效果图:
使用ViewSwitcher的setFactory设置切换的View,分为两步。
第一步:获得ViewSwithcer的实例
switcher = (ViewSwitcher) findViewById(R.id.viewSwitcher);
第二部:实现接口ViewFactory
switcher.setFactory(new ViewFactory()
{
@Override
public View makeView()
{
return inflater.inflate(R.layout.slidelistview, null);
}
});
希望本文所述对大家Android程序设计有所帮助。


 被折叠的 条评论
为什么被折叠?
被折叠的 条评论
为什么被折叠?
 到【灌水乐园】发言


