


 本文详细介绍如何使用SSH(Spring+Struts2+Hibernate)框架搭建新闻系统,包括开发工具选择、环境搭建步骤、jar包配置及核心配置文件详解。
基于SSH(spring+struts2+hibernate)的新闻系统(一)
本系统是基于ssh框架进行开发的,将前后端分离逐步开发的,从零开始,一步步完成,第一步首先是搭建SSH环境。
1.开发工具
本系统主要使用的开发工具和一些其他整合工具有:
1.Eclipse (2018版);
2. JDK 1.8;
3. Tomcat 7.0;
4. Spring3;
5. Struts2;
6. Hibernate3;
7. UEditor;
2.搭建环境
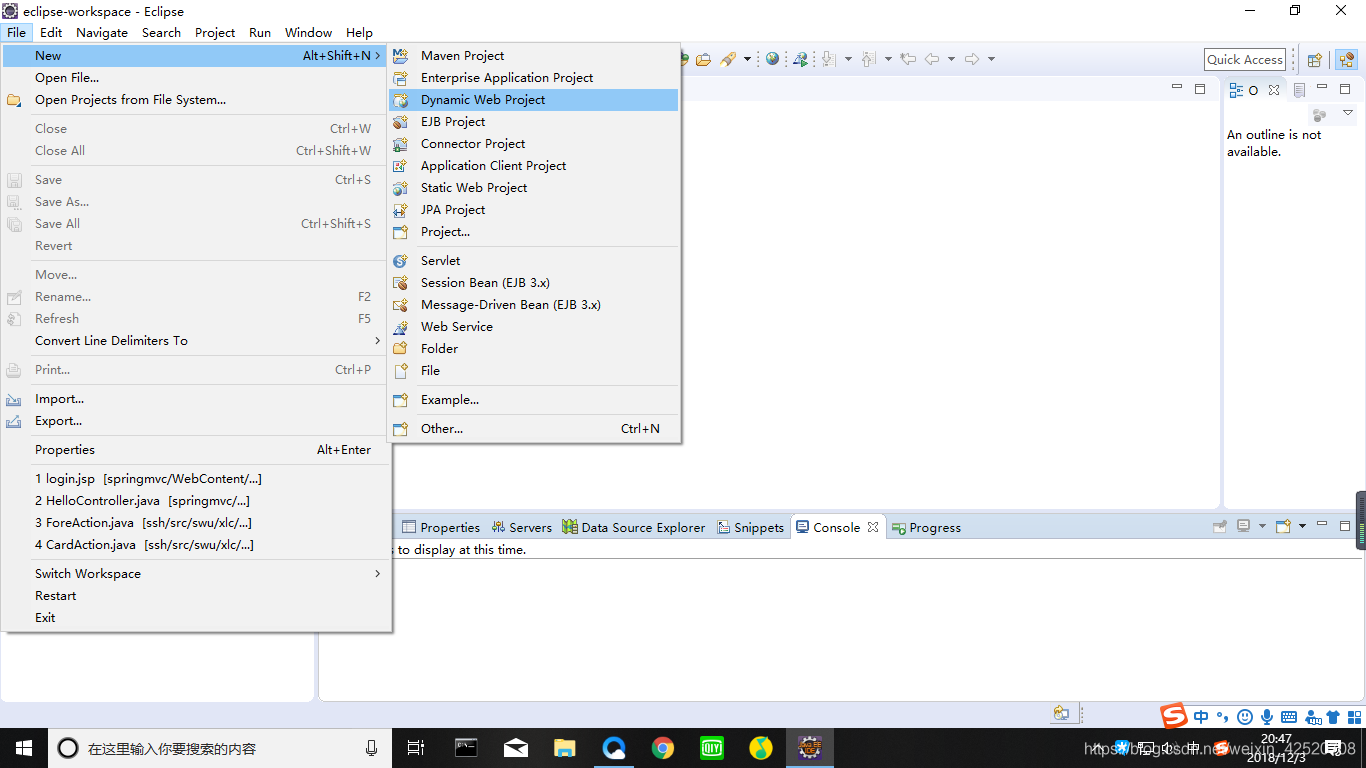
打开Eclipse,创建动态Web工程:
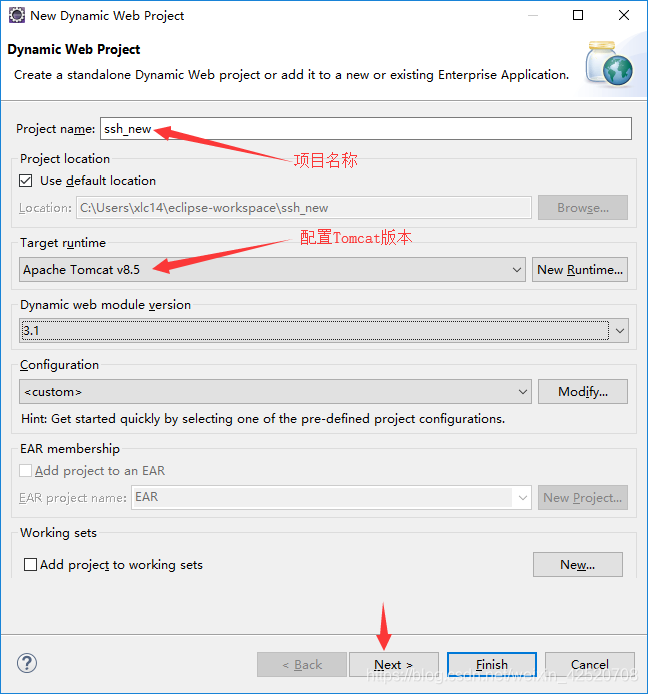
输入项目的名称同时配置好Tomcat,然后点击Next(不要Finish,不然没有生成web.xml)。
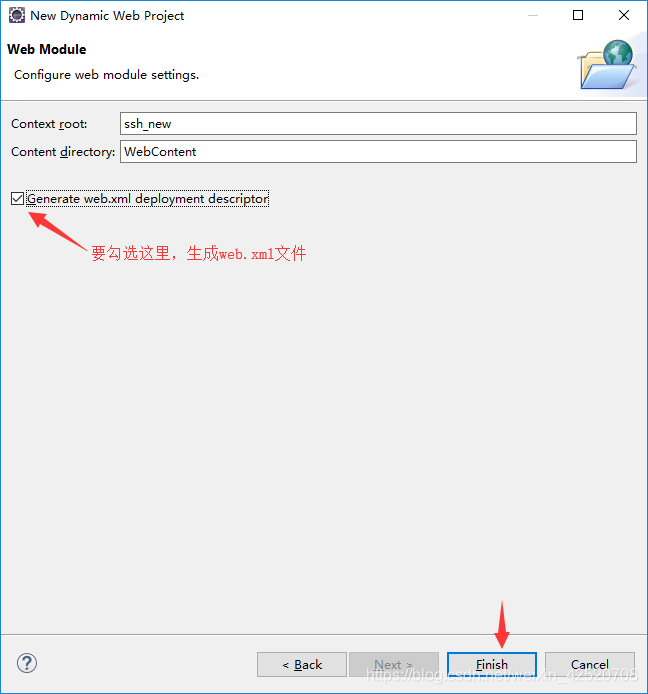
到下面的页面后,点击生成web.xml文件,然后点击Finish,就能完成项目的创建。
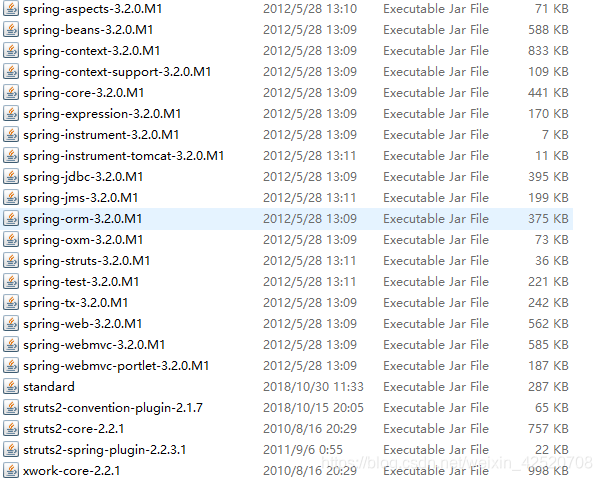
3.拷贝jar包到lib目录下
这些是在后面可能用到的jar,一次性全部拷贝到目录下,主要是spring,spingmvc,hibernate,commons,mysql等。

4.配置文件
有关的配置文件都是为了后面的写代码,主要是配置spring的核心文件、struts2的引入、数据库连接、编码方式等。
(1)打开WEB-INF目录下的web.xml进行配置:
<?xml version="1.0" encoding="UTF-8"?>
<web-app xmlns:xsi="http://www.w3.org/2001/XMLSchema-instance"
xmlns="http://java.sun.com/xml/ns/javaee"
xsi:schemaLocation="http://java.sun.com/xml/ns/javaee
http://java.sun.com/xml/ns/javaee/web-app_3_0.xsd"
 id="WebApp_ID" version="3.0">
  <display-name>ssh_new</display-name>

  <welcome-file-list>
    <welcome-file>index.jsp</welcome-file>
  </welcome-file-list>

  	<!-- 配置引入struts2 -->
	<filter>
		<filter-name>struts2</filter-name>
		<filter-class>
			org.apache.struts2.dispatcher.ng.filter.StrutsPrepareAndExecuteFilter
		</filter-class>
	</filter>

	<filter-mapping>
		<filter-name>struts2</filter-name>
		<url-pattern>/*</url-pattern>
	</filter-mapping>

	<!-- 编码方式 -->
	<filter>
        <filter-name>encodingFilter</filter-name>
        <filter-class>org.springframework.web.filter.CharacterEncodingFilter</filter-class>
        <init-param>
            <param-name>encoding</param-name>
            <param-value>UTF-8</param-value>
        </init-param>
    </filter>
    <filter-mapping>
        <filter-name>encodingFilter</filter-name>
        <url-pattern>/*</url-pattern>
    </filter-mapping>

 	<!-- 指定applicationContext.xml的位置 -->
    <context-param>
        <param-name>contextConfigLocation</param-name>
        <param-value>WEB-INF/applicationContext.xml</param-value>
    </context-param>

	<!-- 上下文监听器 -->
	<listener>
  		<listener-class>org.springframework.web.context.ContextLoaderListener</listener-class>
 	</listener>

</web-app>
(2)在WEB-INF目录下创建applicationContext.xml文件(上面我的配置是将applicationContext.xml放在WEB-INF下,放在src目录下也是可以,那样在web.xml的配置方式会发生变化):
<?xml version="1.0" encoding="UTF-8"?>
<beans xmlns="http://www.springframework.org/schema/beans"
    xmlns:xsi="http://www.w3.org/2001/XMLSchema-instance"
    xmlns:aop="http://www.springframework.org/schema/aop"
    xmlns:tx="http://www.springframework.org/schema/tx"
    xmlns:context="http://www.springframework.org/schema/context"
    xsi:schemaLocation="
   http://www.springframework.org/schema/beans
   http://www.springframework.org/schema/beans/spring-beans-3.0.xsd
   http://www.springframework.org/schema/aop
   http://www.springframework.org/schema/aop/spring-aop-3.0.xsd
   http://www.springframework.org/schema/tx
   http://www.springframework.org/schema/tx/spring-tx-3.0.xsd
   http://www.springframework.org/schema/context
   http://www.springframework.org/schema/context/spring-context-3.0.xsd">

   	<!-- 对已注册Bean的进行操作的配置 -->
    <context:annotation-config />

    <!-- 扫描swu.xlc包下的所有文件 -->
    <context:component-scan base-package="swu.xlc.*" />

    <!-- 加载annotation注解方式事务管理 -->
    <tx:annotation-driven transaction-manager="transactionManager"/>

	<!-- 配置注解方式的hibernate -->
	<bean name="sf"
		class="org.springframework.orm.hibernate3.annotation.AnnotationSessionFactoryBean">
		<property name="dataSource" ref="ds" />

    	<!-- 注解扫描 -->
        <property name="packagesToScan">
            <list>
                <value>swu.xlc.*</value>
            </list>
        </property>
	    <property name="schemaUpdate">
	        <value>true</value>
	    </property>

	    <!-- 打印sql语句,设置方言 -->
		<property name="hibernateProperties">
			<value>
				hibernate.dialect=org.hibernate.dialect.MySQLDialect
				hibernate.show_sql=true
				hbm2ddl.auto=update
   			</value>
		</property>
	</bean>

	<!-- 配置数据库连接 -->
    <bean name="ds"
		class="org.springframework.jdbc.datasource.DriverManagerDataSource">
		<property name="driverClassName" value="com.mysql.jdbc.Driver" />
		<property name="url" value="jdbc:mysql://localhost:3306/new?characterEncoding=UTF-8" />
		<property name="username" value="******" />
		<property name="password" value="******" />
	</bean>

	<!-- 配置事务管理器(声明式的事务) -->
    <bean id="transactionManager" class="org.springframework.orm.hibernate3.HibernateTransactionManager">
        <property name="sessionFactory" ref="sf"></property>
    </bean>

    <tx:annotation-driven transaction-manager="transactionManager"/>

</beans>
(3)在src目录下创建struts.xml文件,进行配置:
<?xml version="1.0" encoding="UTF-8"?>
<!DOCTYPE struts PUBLIC
    "-//Apache Software Foundation//DTD Struts Configuration 2.0//EN"
    "http://struts.apache.org/dtds/struts-2.0.dtd">

<struts>
	<!-- 配置编码方式为UTF-8 -->
	<constant name="struts.i18n.encoding" value="UTF-8"></constant>

	<!-- 将事务都交给Spirng -->
	<constant name="struts.objectFactory" value="spring"/>

	<!-- 声名包名继承struts-default,在action中会用到 -->
	<package name="mystruts" extends="struts-default">

	</package>

</struts>
配置完这些就可以将ssh环境搭建好了,就可以开始编写代码了,有关代码的编写在下次介绍。
学习JAVA的地址(http://how2j.cn?p=58979)


 804
804

 被折叠的 条评论
为什么被折叠?
被折叠的 条评论
为什么被折叠?
 到【灌水乐园】发言


