


1.坐标描述groupId:artifactId:version
2.maven存储路径为groupid/artifactid/version/
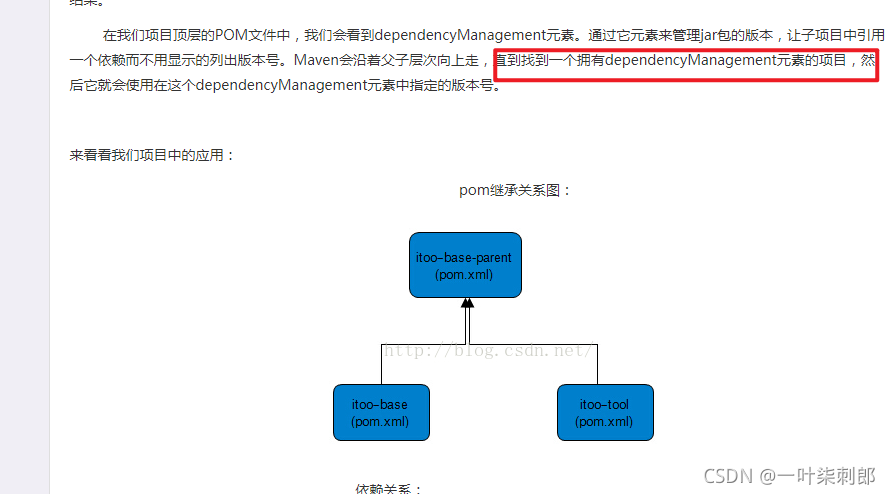
3maven支持传递性依赖,在maven install后不仅生成jar包,同时生成pom,该pom文件记录了当前jar的依赖,当该jar包被依赖后,pom中记录的也会被传递
4.各种scope范围的总结https://blog.youkuaiyun.com/cnweike/article/details/52221410,compile默认范围,发布war包会将还依赖加入,provided假定依赖会由运行还应用的容器或者jdk提供,正常部署可以跑,即能找到该依赖,但是打成war包时不会包括该依赖,比如servlet api,因为seevlet api在tomcat中有提供,打包进去会冲突,test则只有在单元测试才会对该包进行依赖,当为test时其他组件不能继承这个依赖 ;runtime表示运行时再生效,编译期报错;
import 只支持在dependencyManagement中使用,表示要导入被依赖应用的dependencyManagement,而不是依赖该依赖本身
eg:
springboot项目中经常会依赖spring-boot-dependencies,当然也可以直接让项目的parent为spring-boot-starter-parent,但在大型项目中一般都有自己顶级的parent,maven不支持多继承,则可通过management的方式import导入boot的依赖,parent这个模块本身其实啥都没做,直接依赖了dependencies而已
<dependencyManagement>
		<dependencies>

			<dependency>
				<groupId>org.springframework.boot</groupId>
				<artifactId>spring-boot-dependencies</artifactId>
				<version>1.5.16.RELEASE</version>
				<type>pom</type>
				<scope>import</scope>
			</dependency>
		</dependencies>
	</dependencyManagement>
	<dependencies></dependencies>
官网:http://maven.apache.org/guides/introduction/introduction-to-dependency-mechanism.html
5.打包类型为pom的项目才能被parent标签添加,打包为pom类型,即说明该包纯粹是为了被继承,实现依赖复用
6maven clean直接删除整个target下编译的文件,如果不勾选eclipse中project的自动build的话,就无法进行自动编译,得手动编译
7.Jar或者war包的生命周期中都包括compile,所以打包一定会编译
8.maven install 将maven package中的jar包复制到仓库中对应的文件位置,即也会在target文件夹下放jar包
9.effective pom是其中放置了全部的归并过来的pom信息,只读
10.Nexus私服搭建在window或者linux上都可,一般Windows上,有网页去控制部署包或者新建组等
11.nexus仓库分类 proxy代理仓库代理远程的仓库,hosted宿主仓库主要用于发布无法从公共仓库获得构件,比如oracle驱动和自己的组件,group仓库组,请求仓库组可以直接请求下面所有仓库
12.私服可以直接在pom中去请求获取
13.https://www.cnblogs.com/duojia/p/4565243.html
https://www.cnblogs.com/bingyeh/p/5913486.html 两个关于maven的参考地址
14.setting配置文件说明 merror配置本地到私服地址的镜像
15.在Maven中有两种类型的仓库,一种是存储工件的仓库,另一种就是存储plugin插件的仓库。pluginRepositories的定义和repositories的定义类似,
16.setting配置文件详解 https://blog.youkuaiyun.com/zhuxinhua/article/details/5802087
17.配置两套server的原因,一般仓库的下载和部署是在pom.xml文件中的repositories和distributionManagement元素中定义的。然而,一般类似用户名、密码(有些仓库访问是需要安全认证的)等信息不应该在pom.xml文件中配置,这些信息可以配置在settings.xml中。但是id要与repositories和distributionManagement分别对应
18.继承parent标签,为了复用,被继承的打包类型为pom
19.在父类pom中添加子类为module,则为聚合,为了快速创建项目https://www.cnblogs.com/xdp-gacl/p/4058008.html
20.jar中snapshot版本和release版本的区别:1.snapshot版本是非稳定版本,会不断更新,版本号不会变,私服会将将更新的时间添加到后面,另外第三方引入的时候会自动从私服上下载最新版本;2.release版本即不加snapshot的jar包,稳定版或者发布版,当版本更新时,第三方应用必须手动下载发布版,系统不会自动更新,参考
https://blog.youkuaiyun.com/weixin_34267123/article/details/86951479
Using a snapshot version during the development phase can prevent having multiple versions of the artifact
https://www.baeldung.com/maven-snapshot-release-repository
snaptshot works:
(1) deploy
(2) settings.xml:
 <snapshots>
             <enabled>true</enabled>
			  <updatePolicy>always</updatePolicy>
         </snapshots>

(3) pom.xml  reimport
21.Maven使用cmd命令行执行package和install打包
打jar包package命令参考:https://www.cnblogs.com/mingzhanghui/p/9412862.html
(1)先切换进要打包的项目跟路径
(2)再执行命令打package包,可以将打包日志输出到文件
mvn clean compile
mvn clean package >log.log
(3)一般会自动会读取pom.xml文件,打包到target下
(4)如果要将任何一个jar包打入本地仓库,则执行以下命令,该命令会将jar包放到本地仓库中
mvn install:install-file -Dfile=jar包的位置 -DgroupId=上面的groupId -DartifactId=上面的artifactId -Dversion=上面的version -Dpackaging=jar
mvn install:install-file -Dfile=F:\workspace\common\target\common-1.0-SNAPSHOT.jar -DgroupId=zsx.dubbo -DartifactId=common -Dversion=1.0-SNAPSHOT -Dpackaging=jar
22.mvn dependency:tree命令能够分析出项目中各个jar包依赖的其他jar包,该命令需要进入某一个项目根路径下执行,如图可看出dubbo2.5.2依赖的只有三个,一个是java字节码生成,另一个是网络传输的dubbo,还要spring

23.maven中 节点解决版本冲突问题,能够排除添加的依赖自身引用的其他依赖,如果这些依赖版本太低,会引起版本冲突,这是可用该节点排除, eg:上图中使用dubbo稳定版本2.5.2但是其依赖的spring 版本太低,这时候可以排除spring,手动添加高版本spring
<dependency>
        <groupId>com.alibaba</groupId>
        <artifactId>dubbo</artifactId>
        <version>2.5.2</version>
     <exclusions>
            <exclusion>
                <groupId>org.springframework</groupId>
                <artifactId>spring</artifactId>
            </exclusion>
        </exclusions>
    </dependency>
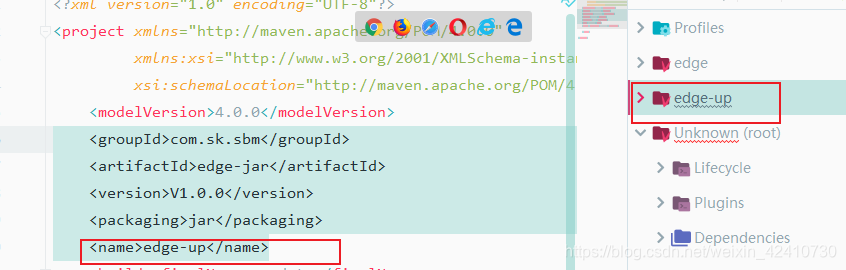
34.maven中修改打包的名字的两种方式:
(1)默认是以构建名+版本号.packaging命名的
    <groupId>com.sk.sbm</groupId>
    <artifactId>edge-jar</artifactId>
    <version>V1.0.0</version>
    <packaging>jar</packaging>
    <name>edge-up</name> 这个name是maven打包时显示的module名,跟打包后的名称没关系如下图
(2)可以单独在build中配置finalName
<project xmlns="http://maven.apache.org/POM/4.0.0"
         xmlns:xsi="http://www.w3.org/2001/XMLSchema-instance"
         xsi:schemaLocation="http://maven.apache.org/POM/4.0.0 http://maven.apache.org/xsd/maven-4.0.0.xsd">
    <modelVersion>4.0.0</modelVersion>
    <groupId>com.sk.sbm</groupId>
    <artifactId>edge-jar</artifactId>
    <version>V1.0.0</version>
    <packaging>jar</packaging>
    <name>edge-up</name>
    <build>
    最终会以这个为包的名称
    <finalName>uppdate</finalName>
    </build>
</project>
35.maven中打jar包指定main方法类以及将依赖的jar打进去的配置
参考:https://blog.youkuaiyun.com/q258523454/article/details/81945464
    <build>
    指定文件名
        <finalName>edge-updater</finalName>

        <plugins>
            <plugin>
                <artifactId>maven-assembly-plugin</artifactId>
                <configuration>
                将依赖打进去
                    <descriptorRefs>
                        <descriptorRef>jar-with-dependencies</descriptorRef>
                    </descriptorRefs>
                    jar不带 with-dependencies后缀,否则会带上
                          <appendAssemblyId>false</appendAssemblyId>
                    <archive>
                    配置主方法类
                        <manifest>
                            <mainClass>com.sf.update.AutoUpdate</mainClass>
                        </manifest>
                    </archive>
                </configuration>
                <executions>
                    <execution>
                    打包插件
                        <id>make-assembly</id>
                        <phase>package</phase>
                        <goals>
                            <goal>single</goal>
                        </goals>
                    </execution>
                </executions>
            </plugin>
        </plugins>
    </build>
36.maven配置官网
(1)pom文件官网配置:http://maven.apache.org/pom.html
(2)基础配置学习
<profiles>
<!-- 开发环境 -->
<profile>
    <id>dev</id>
    <activation>
        <activeByDefault>true</activeByDefault>
    </activation>
    <properties>
        <environment>dev</environment>
    </properties>
    //配置某些依赖包只在开发环境引入,而生产不引入,一般配合boot-starter使用
     <dependencies>
                <dependency>
                    <groupId>com.bestpay.newkefu</groupId>
                    <artifactId>swagger-starter</artifactId>
                    <version>${swagger-starter.version}</version>
                    <exclusions>
                        <exclusion>
                            <artifactId>guava</artifactId>
                            <groupId>com.google.guava</groupId>
                        </exclusion>
                        <exclusion>
                            <groupId>org.springframework.boot</groupId>
                            <artifactId>spring-boot-autoconfigure</artifactId>
                        </exclusion>
                    </exclusions>
                </dependency>
            </dependencies>
</profile>
<!-- 测试环境 -->
<profile>
    <id>sit</id>
    <activation>
        <activeByDefault>false</activeByDefault>
    </activation>
    <properties>
        <environment>sit</environment>
    </properties>
</profile>
</profiles>
(3)build元素中的元素
eg:
<build>

<!--默认的执行目标,如果给出了执行目标,则应该将其定义为命令行中的目标-->
<defaultGoal>clean package</defaultGoal>
<!--设置maven编译的路径,默认是${basedir}/target-->
<directory>
    ${basedir}/target1
</directory>
<!--设置打包jar或者war包的项目名称,不写的话默认名称是artifactId-version.jar,通过 可以添加jar后缀-->
<artifactId>maven-jar-plugin</artifactId>

<finalName>sbux1</finalName>
指定资源文件
 <resource>
     <!--资源放置的源目录。默认会是${basedir}/src/main/resources-->
        <directory>src/main/resources</directory>
             <!--官网解释:是否对resources文件进行筛选,以使用pom中参数化的值替代资源文件中的符号值,如@env表示的值,默认是false,如果不设置true,则多环境设置时,主配置文件无法智能设置对应环境文件-->
        <filtering>true</filtering>
     <!--设置资源打包路径,默认是跟路径即class中-->
     <targetPath>META-INF/source</targetPath>
     <!--指定哪些文件打包 *统配-->
        <includes>
            <include>application.yml</include>
                     <include>*.txt</include>
        </includes>
     <!--排除哪些文件-->
     <excludes>
         <exclude></exclude>
     </excludes>
    </resource>
    <!--第二个source目录-->
    <resource>
        <directory>src/r1</directory>
    </resource>
</resources>
<!--plugins中的plugin配置只针对当前pom起作用-->
<plugins>
    <plugin>
        <groupId>org.apache.maven.plugins</groupId>
        <artifactId>maven-jar-plugin</artifactId>
        <version>3.1.1</version>
        <configuration>
            <classifier>zsx</classifier>
        </configuration>
    </plugin>
 </plugins>
<!--pluginManagement中配置了一个plugin后的各种configuration或者excution后,子项目如果也配置同一个plugin的话,
这些configuration会继承-->
<pluginManagement>
    <plugins>
        <plugin>
            <groupId>org.apache.maven.plugins</groupId>
            <artifactId>maven-jar-plugin</artifactId>
            <version>3.1.1</version>
            <configuration>
                <classifier>zsx</classifier>
            </configuration>
        </plugin>
    </plugins>
</pluginManagement>
</build>


**⦁	上面是The BaseBuild Element Set
⦁	下面是build  element Set 主要是用来继承的,设置在parent pom中**
⦁	<build>
⦁	    <sourceDirectory>${basedir}/src/main/java</sourceDirectory>
⦁	     <outputDirectory>${basedir}/target/classes</outputDirectory>
⦁	  </build>
filters
(1)官网 reference https://maven.apache.org/guides/getting-started/index.html#How_do_I_filter_resource_files
(2)element filter is used to dynamically replace some values defined as ${property name} in resource files(*.property, *.xml and so on ) at build time
filtering resource can get values from :
(1)system properties (System.getProperty(), defined by the command -D parameter),
(2)pom properties section
(3) external filter property files(explicitly located by the element filter)
if the same key is defined in both pom property section and external filter files,the pom file is given the priority
(3)config
<build>
  <filters>
  // external  custom filter file
            <filter>src/main/filters/${active}.properties</filter>
        </filters>
        <resources>
            <resource>
                <directory>src/main/resources</directory>
                <filtering>true</filtering> // default is false
            </resource>
        </resources>
        </build>
(4) ${} might be changed using resources-plugin
<plugin>
  <groupId>org.apache.maven.plugins</groupId>
  <artifactId>maven-resources-plugin</artifactId>
  <configuration>
    <delimiters>
<delimiter>@*&</delimiter>// customer delimiter   begin*end

     // <delimiter>@</delimiter> // customer delimiter   begin*end  begin=end , we don't need to specify @*@
    </delimiters>
 // if we use defaultDelimiter  for filtering   addition to  custom delimiter above,default is true  and defaultDelimiters are ${*}  @
    <useDefaultDelimiters>false</useDefaultDelimiters>
  </configuration>
</plugin>
(5) if subModule extends boot-parent, filter delimiter will change from ${} to @ because of using maven-resources-plugin and configing delimiter

ps:maven使用的及格核心插件默认版本号是由maven控制的,如果报错的话可在pom文件中重新指定插 件版本
(3)maven插件学习
i.maven本质上就是一个插件执行框架,所有工作都是通过插件来做的
ii.插件分两种:build plugins 和report plugins,前者是在构建时执行,后者是在站点生成时执行
iii. clean插件 :maven-clean-plugin goal只有一个就是clean掉默认output中的编译文件,通过clean插件中的configuration可以配置额外的删除路径,但是路径是项目中的相对路径
参考:http://maven.apache.org/plugins/maven-clean-plugin/examples/delete_additional_files.html
iv compiler 插件 :
当前默认编译源和目标是1.6,必须在compiler插件中改变;
编译的goal有两个 compile和testCompile,但都已经绑定到自己的生命周期阶段了,前者编译主资源,后者编译测试资源文件
设置编译版本:
<configuration>
    <compilerArgs>
        <arg>-verbose</arg>
        <arg>-Xlint:all,-options,-path</arg>
    </compilerArgs>
    <!--version是11,这里的作用:当使用了11的新特征时,则需要设置源为11,编译目标也要设置为11-->
    <source>${java.version}</source>
    <target>${java.version}</target>

<!--编译时传递一些额外的参数,比如在java13使用switch新特征,会报错switch是预览模式,默认禁止使用,则添加以下参数即可-->
<compilerArgs>
    <arg> --enable-preview</arg>
</compilerArgs>

 </configuration>
v surefire插件: 主要是执行单元测试时使用的,生成txt和xml测试报告 报告路径默认: ${basedir}/target/surefire-reports/TEST-*.xml.
使用参考:http://maven.apache.org/surefire/maven-surefire-plugin/examples/junit.html
设置skip=true跳过测试
  <plugins>
            <plugin>
                <groupId>org.apache.maven.plugins</groupId>
                <artifactId>maven-surefire-plugin</artifactId>

     	 <configuration>
                    <skip>true</skip>
                    <!--设置失败n个test后跳过单元测试-->
                    <skipAfterFailureCount>2</skipAfterFailureCount>
                    <!--设置哪些文件测试or not-->
                    <includes>
                        <includ>FileServerImplieTest.java</includ>
                    </includes>
                    <excludes>
                        <exclude>**/TestCircle.java</exclude>
                    </excludes>
                    <!--对于失败的方法一直测试n次,直到通过或者次数够-->
                    <rerunFailingTestsCount>3</rerunFailingTestsCount>
                </configuration>
                  </plugin>
⦁vi. jar 插件:
⦁ goals:jar 创建包括resource的jar包;test-jar创建单元测试jar包
jar包最重要的就是设置manifest文件内容,默认内容很少,其他都要在jar-plugin中设置,官网详细设置:http://maven.apache.org/shared/maven-archiver/index.html
部分配置eg:
<configuration>
 		  	  <includes>
                <include>**/service/*</include>
               </includes>
                    <!--排除哪些文件-->
          <excludes></excludes>
    <archive>
        <!--main方法-->
      <manifest>
          <!--添加打包环境,系统版本等-->
          <addBuildEnvironmentEntries>true</addBuildEnvironmentEntries>
          <mainClass>com.sf.express.scada</mainClass>
      </manifest>
    </archive>
</configuration>
vii.war plugin :
war和war:explored区别在于:war生产发布用的,而开发阶段使用explorered会在特殊目录下编译,加速测试
<configuration>
<!--war包默认的resources文件路径为:src/main/resource,可通过webResources来包括一些其他路径文件-->

    <!--打包排除文件 *通配符,%regex[正则表达式] 暂未测试成功-->
    <packagingExcludes>
        ./resources/app.*.yml
    </packagingExcludes>
    <webResources>
        <resource>
            <!-- 路径是相对于pom文件的-->
            <directory>./sql</directory>
        </resource>
    </webResources>
</configuration>
viii.assembly plugin : 装配插件 能够允许除了打war和ja外还能打zip
tar tar.gz (or tgz) tar.bz2 (or tbz2) tar.snappy tar.xz (or txz) jar dir war等压缩文件
assembly:是一组文件、目录和依赖项的集合,它们被组装成存档格式并分发。
assembly配置属性含义官网:
http://maven.apache.org/plugins/maven-assembly-plugin/assembly.html
eg: 一个打包整个项目为zip包的例子
pom插件配置
<configuration>
    <descriptors>
        <!--这里配置描述文件,如果配置两个descriptor文件则会打出两个包-->
        <descriptor>${project.basedir}/src/assembly/distribution.xml</descriptor>
    </descriptors>
</configuration>
distribution.xml文件配置:
<assembly xmlns="http://maven.apache.org/ASSEMBLY/2.1.0"
          xmlns:xsi="http://www.w3.org/2001/XMLSchema-instance"
          xsi:schemaLocation="http://maven.apache.org/ASSEMBLY/2.1.0 http://maven.apache.org/xsd/assembly-2.1.0.xsd">
    <id>WINDD</id> 这里是打包后的项目名后缀
    <formats>
这里配置要打包的格式,配几个打几个
<format>zip</format>
<format>rar</format>
    </formats>
    <fileSets>
        <fileSet>
            <!--要打包的目录-->
            <directory>${project.basedir}/sql</directory>
            <excludes>
			排除不用打包的目录
                <exclude>
                   target/
                </exclude>
            </excludes>
        </fileSet>
    </fileSets>

</assembly>
maven默认是打jar包的
37.maven将本地jar包打进去
由于本地包添加时scope只能指定为system,而默认maven是无法将system范围的包打入package的,因此要配置
 <plugin>
                <groupId>org.springframework.boot</groupId>
                <artifactId>spring-boot-maven-plugin</artifactId>
                <configuration>
                    <includeSystemScope>true</includeSystemScope>
                </configuration>
            </plugin>
- dependencyManagement 主要用于多项目模块中父项目中指定子项目共同依赖的版本号
dependencies和dependencyManageMent的区别
dependencies即使在子项目中不写该依赖项,那么子项目仍然会从父项目中继承该依赖项(全部继承); dependencyManagement里只是声明依赖,并不实现引入,因此子项目需要显示的声明需要用的依赖。如果不在子项目中声明依赖,是不会从父项目中继承下来的;只有在子项目中写了该依赖项,并且没有指定具体版本,才会从父项目中继承该项,并且version和scope都读取自父pom;另外如果子项目中指定了版本号,那么会使用子项目中指定的jar版本。
如果只有dependencyManageMent 则maven认为没有进行依赖,并不会下载依赖。
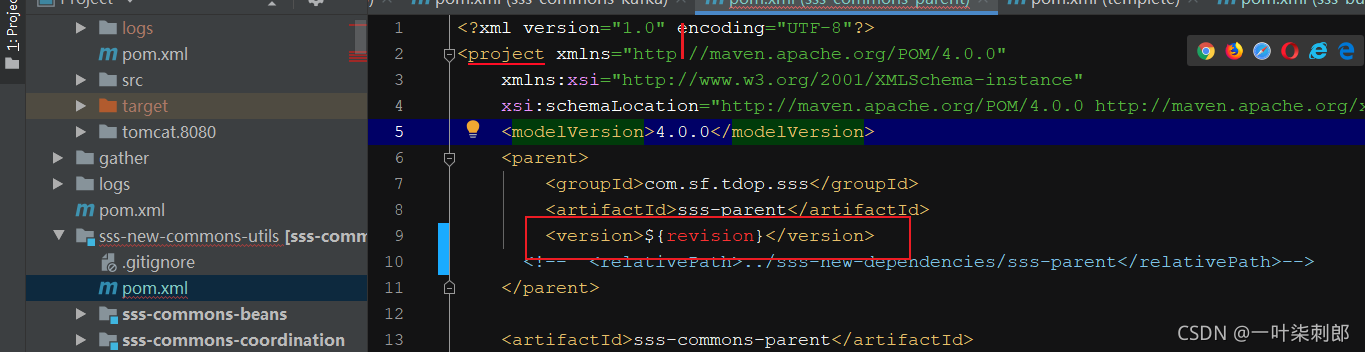
39.relativePath 定义寻找parent的的相对文件目录
目前看 relativePath 不加也行,但是使用到${}变量无法直接引用到,如果version是具体数值则不需要relativePath ,如果是变量 则需要
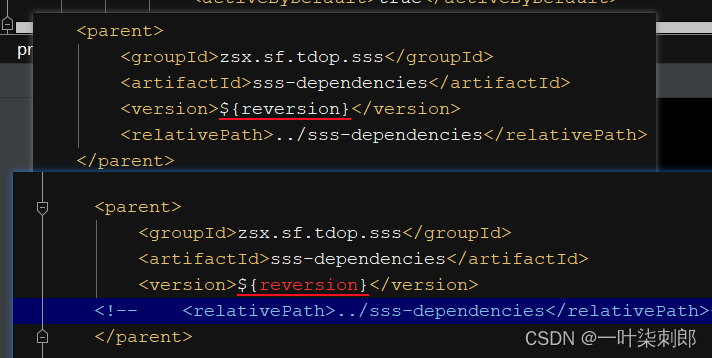
如果确定项目依赖关系没问题,但是变量引用就是不生效,则考虑可能是parent的pom文件路径不对,如图
40.几个maven直接可用的变量
官网
https://maven.apache.org/guides/introduction/introduction-to-the-pom.html
${project.version}
⦁	project.basedir
maven.build.timestamp
${project.groupId},
${project.version} 当前项目的版本号
${project.build.sourceDirectory}
eg:
 <dependency>
                <groupId>com.sf.dwss.core</groupId>
                <artifactId>eos-dwss-core-container-dao</artifactId>
                <version>${project.version}</version>
            </dependency>
41 三种maven多项目依赖关系图参考


42.给项目下所有模块统一换版本号
versions:set -DgenerateBackupPoms=false -DnewVersion=1.17.0-SNAPSHOT
- maven 发布到私服(提前升级版本号)
-U -Dmaven.test.skip -Dautconfig.skip clean deploy -pl  bigdata-process-sev-service-api  -DupdateReleaseInfo=true -am -DaltDeploymentRepository=snapshots::default::http://mavenrepository.bestpay.com.cn/content/repositories/snapshots/

D:\Program\maven\apache-maven-3.8.5\bin\mvn  -U(update--snapshots) -Dmaven.test.skip=true -Dautconfig.skip clean deploy -pl (projects list  instead of  all projects) qts-core-service-api   -am(also make projects that the target projects need) -DaltDeploymentRepository=snapshots::default::http://mavenrepository.bestpay.com.cn/content/repositories/snapshots/
- 安装本地jar到本地仓库
"D:\Program Files (x86)\maven\apache-maven-3.8.5\bin\mvn"  install:install-file -Dfile="D:\Program Files\Java\jdk1.8.0_201\lib\tools.jar" -Dgro
upId=com.sun -DartifactId=tools -Dversion=1.8 -Dpackaging=jar
45 excute bat/exe /sh in maven
when compiling the module the following cmd will be excueted
  <plugins>
            <plugin>
                <groupId>org.codehaus.mojo</groupId>
                <artifactId>exec-maven-plugin</artifactId>
                <version>1.2</version>

                <executions>
                    <execution>
                        <id>compile</id>
                        <phase>compile</phase>
                        <goals>
                            <goal>exec</goal>
                        </goals>

                        <configuration>
                            <executable>D:\Program Files\Java\jdk-11.0.2\bin\javac.exe</executable>
                            <arguments>
                                <argument>-d </argument>
                                <argument>${build.path}\mods</argument>
                                <argument>E:\code\consumer\jrebase\src\main\java\module-info.java</argument>
                            </arguments>
                        </configuration>
                    </execution>
                    <execution>
                        <id>jlink</id>
                        <phase>compile</phase>
                        <goals>
                            <goal>exec</goal>
                        </goals>

                        <configuration>
                            <executable>D:\Program Files\Java\jdk-11.0.2\bin\jlink.exe</executable>
                            <arguments>
                                <argument>--module-path</argument>
                                <argument>${build.path}\mods</argument>
                                <argument>--add-modules</argument>
                                <argument>jrebase</argument>
                                <argument>--output</argument>
                                <argument>${build.path}\jreout</argument>
                            </arguments>
                        </configuration>
                    </execution>
                </executions>
            </plugin>
        </plugins>


 712
712

 被折叠的 条评论
为什么被折叠?
被折叠的 条评论
为什么被折叠?
 到【灌水乐园】发言


