


一,搭建一个简单服务器:
npm istall koa
起一个简单服务器
// 导入koa,和koa 1.x不同,在koa2中,我们导入的是一个class,因此用大写的Koa表示:
const Koa = require('koa');

// 创建一个Koa对象表示web app本身:
const app = new Koa();

// 对于任何请求,app将调用该异步函数处理请求:
//对于每一个http请求,koa将调用我们传入的异步函数来处理:
app.use(async (ctx, next) => {
	//其中,参数ctx是由koa传入的封装了request和response的变量,我们可以通过它访问request和response,next是koa传入的将要处理的下一个异步函数。
	//上面的异步函数中,我们首先用await next();处理下一个异步函数,然后,设置response的Content-Type和内容。
    await next();
	 // 设置response的Content-Type:
    ctx.response.type = 'text/html';
	// 设置response的内容:
    ctx.response.body = '<h1>Hello, koa2!</h1>';
});

// 在端口3000监听:
app.listen(3000);
console.log('服务器创建储成功,启动的端口是3000');
二,实现跨域
有一个好用的插件:koa2-cors
npm install koa2-cors
然后设置跨域
var Koa = require('koa');
var cors = require('koa2-cors');


var app = new Koa();
app.use(cors());
就可以实现跨域了。
三,接收处理不同的请求路径
可以这样写:但是这样写好麻烦且好丑啊。
//当请求的路径是/,的时候,就在请求体中设置index page
app.use(async (ctx, next) => {
    if (ctx.request.path === '/') {
        ctx.response.body = 'index page';
    } else {
        await next();
    }
});

app.use(async (ctx, next) => {
    if (ctx.request.path === '/test') {
        ctx.response.body = 'TEST page';
    } else {
        await next();
    }
});

app.use(async (ctx, next) => {
    if (ctx.request.path === '/error') {
        ctx.response.body = 'ERROR page';
    } else {
        await next();
    }
});
为了处理URL,我们需要引入koa-router这个middleware,让它负责处理URL映射。
npm install koa-router
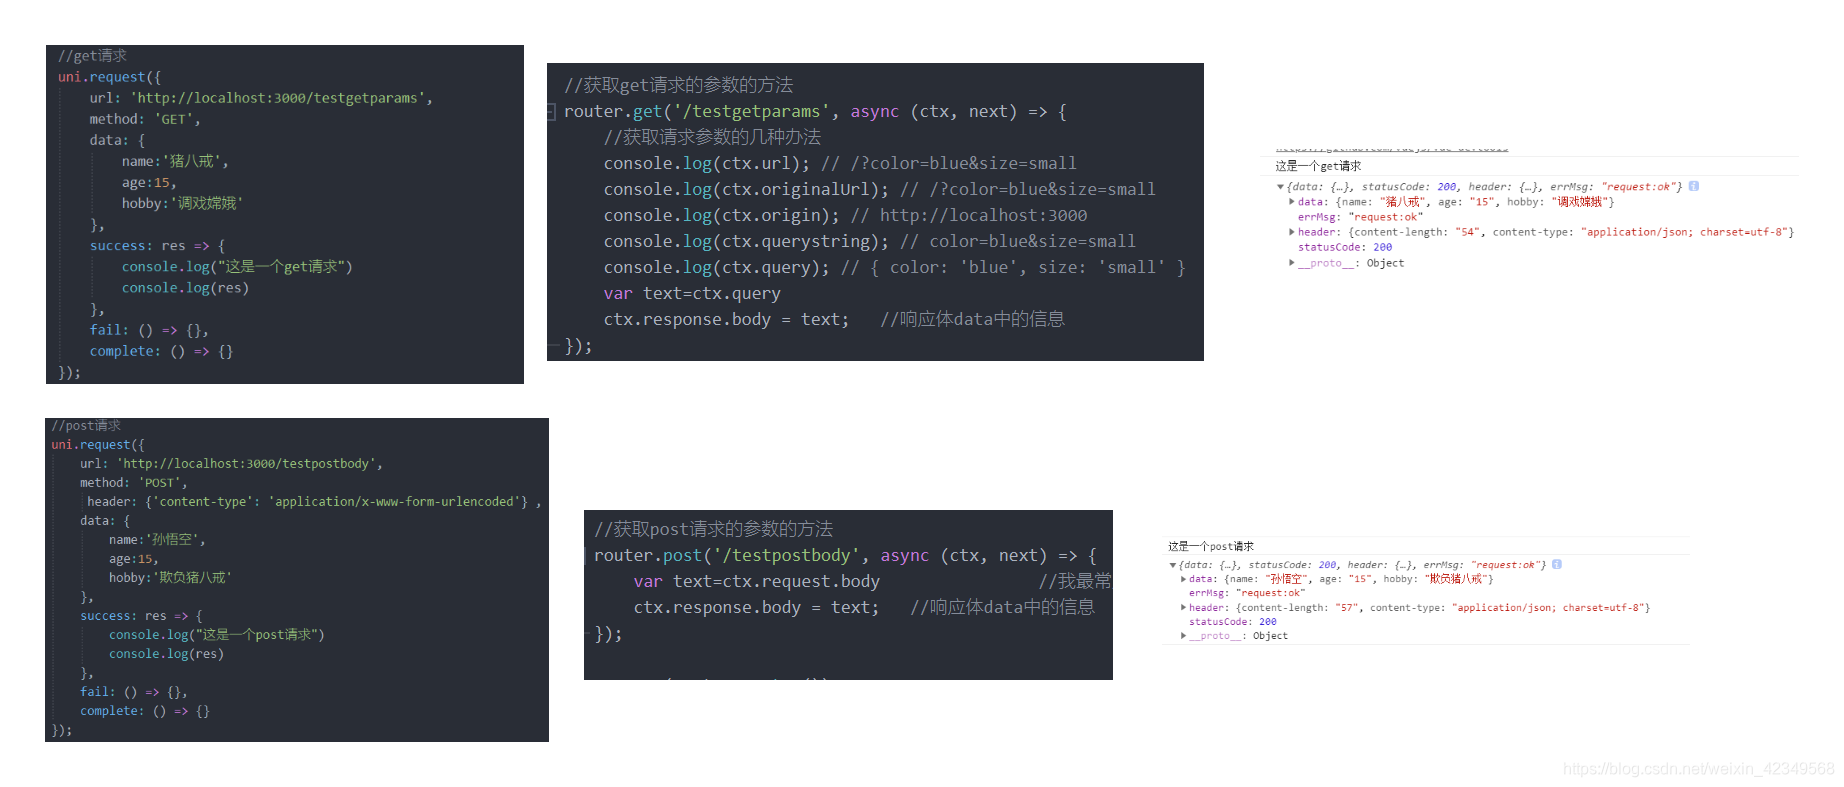
1,处理get请求
//获取get请求的参数的方法
router.get('/testgetparams', async (ctx, next) => {
    //获取请求参数的几种办法
	console.log(ctx.url); // /?color=blue&size=small
	console.log(ctx.originalUrl); // /?color=blue&size=small
	console.log(ctx.origin); // http://localhost:3000
	console.log(ctx.querystring); // color=blue&size=small
	console.log(ctx.query); // { color: 'blue', size: 'small' }  //我最常用的肯定是这个,也就是get请求参数放在:ctx.query之中
	var text=ctx.query
    ctx.response.body = text;   //响应体data中的信息
});
2,处理post请求
用router.get(’/path’, async fn)处理的是get请求。如果要处理post请求,可以用router.post(’/path’, async fn)
值得注意的是,post请求通常会发送一个表单,或者JSON,它作为request的body发送,但无论是Node.js提供的原始request对象,还是koa提供的request对象,都不提供解析request的body的功能!
所以处理post请求,还需要引入:koa-bodyparser
npm install koa-bodyparser
然后引入和挂载:
const bodyParser = require('koa-bodyparser');
app.use(bodyParser());
由于middleware的顺序很重要,这个koa-bodyparser必须在router之前被注册到app对象上。然后就可以使用了:
//获取post请求的参数的方法
router.post('/testpostbody', async (ctx, next) => {
	var text=ctx.request.body                //我最常用的肯定是这个,也就是get请求参数放在:ctx.request.body之中
    ctx.response.body = text;   //响应体data中的信息
});
总的代码如下:
// 导入koa,和koa 1.x不同,在koa2中,我们导入的是一个class,因此用大写的Koa表示:
const Koa = require('koa');
//注意require('koa-router')返回的是函数:
const router = require('koa-router')();
//设置跨域
const cors = require('koa2-cors'); //跨域处理
//导入post请求参数处理的插件
const bodyParser = require('koa-bodyparser');
// 创建一个Koa对象表示web app本身:
const app = new Koa();
app.use(cors());
// add router middleware:
app.use(bodyParser());


// 对于任何请求,app将调用该异步函数处理请求:
//对于每一个http请求,koa将调用我们传入的异步函数来处理:
// app.use(async (ctx, next) => {
// 	//其中,参数ctx是由koa传入的封装了request和response的变量,我们可以通过它访问request和response,next是koa传入的将要处理的下一个异步函数。
// 	//上面的异步函数中,我们首先用await next();处理下一个异步函数,然后,设置response的Content-Type和内容。
//     await next();
// 	 // 设置response的Content-Type:
//     ctx.response.type = 'text/html';
// 	// 设置response的内容:
//     ctx.response.body = '<h1>Hello, koa2!</h1>';
// });

// get请求是动态路由时获取参数的方法
router.get('/hello/:name', async (ctx, next) => {
    var name = ctx.params.name;
    ctx.response.body = `<h1>Hello, ${name}!</h1>`;
});

//获取get请求的参数的方法
router.get('/testgetparams', async (ctx, next) => {
    //获取请求参数的几种办法
	console.log(ctx.url); // /?color=blue&size=small
	console.log(ctx.originalUrl); // /?color=blue&size=small
	console.log(ctx.origin); // http://localhost:3000
	console.log(ctx.querystring); // color=blue&size=small
	console.log(ctx.query); // { color: 'blue', size: 'small' }  //我最常用的肯定是这个,也就是get请求参数放在:ctx.query之中
	var text=ctx.query
    ctx.response.body = text;   //响应体data中的信息
});

//获取post请求的参数的方法
router.post('/testpostbody', async (ctx, next) => {
	var text=ctx.request.body                //我最常用的肯定是这个,也就是get请求参数放在:ctx.request.body之中
    ctx.response.body = text;   //响应体data中的信息
});

app.use(router.routes());
// 在端口3000监听:
app.listen(3000);
console.log('服务器创建储成功,启动的端口是3000');


 1109
1109

 被折叠的 条评论
为什么被折叠?
被折叠的 条评论
为什么被折叠?
 到【灌水乐园】发言


