


 博客介绍了如何在前端使用yxg-xlsx-style库实现带样式的xlsx文件导出,包括设置列宽、附加表头、加粗字体和自定义颜色等,并提供了详细的代码示例和使用方法。此外,还讨论了兼容性问题,指出该方法可能不适用于Office,但能顺利在WPS中使用。
因为xlsx-style有bug,看了一位大佬用yxg-xlsx-style做前端导出,并将其算法进行了优化后,我实现了前端带样式的导出,并且是导出的是真xlsx文件,可支持再次导入后端!
不多说,直接上封装好的方法(可以直接直接copy使用)。
下面有使用方法和导出xlsx的截图
import XLSX from 'yxg-xlsx-style'
export function exportExcel(headers, columns, datasource, options, type, fileName = '未命名') {
  // 处理列宽
  const cloWidth = columns.map((item) => ({ wpx: item.width || 120 }))

  // 处理附加表头
  const _options = options
    .map((item, i) =>
      Object.assign(
        {},
        {
          title: item.title,
          position: String.fromCharCode(65) + (i + 1),
        }
      )
    )
    .reduce(
      (prev, next) =>
        Object.assign({}, prev, {
          [next.position]: { v: next.title },
        }),
      {}
    )
  //拿到需要加粗的option的key数组
  const boldKeyArr = options
    .map((item, i) => {
      if (item.bold) {
        if (item.bold === true) return String.fromCharCode(65) + (i + 1)
      }
    })
    .filter((item, i) => {
      return item !== undefined
    })
//拿到需要自定义字体颜色的option [{'A1':'fffff'}]
  const colorKeyArr = options
    .map((item, i) => {
      if (item.color) return { [String.fromCharCode(65) + (i + 1)]: item.color }
    })
    .filter((item, i) => {
      return item !== undefined
    })

  // 处理表头
  const _headers = [
    {
      title: headers,
      position: String.fromCharCode(65 + 0) + (options.length + (headers ? 1 : 0)),
    },
  ].reduce(
    (prev, next) =>
      Object.assign({}, prev, {
        [next.position]: { v: next.title },
      }),
    {}
  )

  const _columns = columns
    .map((item, i) =>
      Object.assign(
        {},
        {
          key: item.dataIndex,
          title: item.title,
          position: String.fromCharCode(65 + i) + (options.length + 2 - (headers ? 0 : 1)),
        }
      )
    )
    .reduce(
      (prev, next) =>
        Object.assign({}, prev, {
          [next.position]: { v: next.title, key: next.key },
        }),
      {}
    )
let _data = {}
  for (let i = 0; i < datasource.length; i++) {
    for (let j = 0; j < columns.length; j++) {
      _data[String.fromCharCode(65 + j) + (options.length + i + 3 - (headers ? 0 : 1))] = {
        v: datasource[i][columns[j].dataIndex],
      }
    }
  }
//设置加粗和字体颜色
  for (let i in _options) {
    if (boldKeyArr.indexOf(i) !== -1) {
      _options[i].s = {
        font: { sz: 11, bold: true, vertAlign: true },
        alignment: { vertical: 'center', horizontal: 'bottom' },
      }
    } else {
      _options[i].s = {
        font: { sz: 11, vertAlign: true },
        alignment: { vertical: 'center', horizontal: 'bottom' },
      }
    }
  }

  //设置附加表头_options字体颜色
  for (let i = 0; i < colorKeyArr.length; i++) {
    _options[Object.keys(colorKeyArr[i])[0]].s.font.color = { rgb: Object.values(colorKeyArr[i])[0] }
  }

  for (let i in _headers) {
    _headers[i].s = {
      font: { sz: 16, bold: true, vertAlign: true },
      alignment: { vertical: 'center', horizontal: 'center' },
    }
  }
  for (let i in _columns) {
    _columns[i].s = {
      font: { sz: 11, bold: true, vertAlign: true },
      alignment: { vertical: 'center', horizontal: 'center' },
      fill: { bgColor: { rgb: 'c4d2f4' }, fgColor: { rgb: 'c4d2f4' } },
    }
  }
const output = Object.assign({}, _options, headers ? _headers : null, _columns, _data)
  console.log(output)
  const outputPos = Object.keys(output) // 设置表格渲染区域,如从A1到C8
// 合并单元格
  let merges = [...options, headers].map((item, i) => ({
    s: { c: 0, r: i },
    e: { c: columns.length - 1, r: i },
  }))
  if (!headers) {
    merges = [...options].map((item, i) => ({
      s: { c: 0, r: i },
      e: { c: columns.length - 1, r: i },
    }))
  }

  const wb = {
    SheetNames: ['sheet1'], // 保存的表标题
    Sheets: {
      sheet1: Object.assign(
        {},
        output, // 导出的内容
        {
          '!ref': `${outputPos[0]}:${outputPos[outputPos.length - 1]}`, // 设置填充区域(表格渲染区域)
          '!cols': [...cloWidth],
          '!merges': [...merges],
        }
      ),
    },
  }
// 这种导出方法只适用于js-xlsx,且设置的单元格样式不生效,
  // 直接打开下面这两行就行了,后面的可以省略
  // XLSX.writeFile(wb,`${fileName}.xlsx`);
  // return;

  /**
   * 以下这种导出方法对于js-xlsx/xlsx-style都适用
   * 区别在于import XLSX from 'xlsx-style';可以设置单元格样式
   * import XLSX from 'xlsx';不支持设置单元格样式
   *
   * new Blob转换成二进制类型的对象
   */
const tmpDown = new Blob(
    [
      s2ab(
        XLSX.write(
          wb,
          { bookType: type == undefined ? 'xlsx' : type.bookType, bookSST: false, type: 'binary' } // 这里的数据是用来定义导出的格式类型
        )
      ),
    ],
    {
      type: '',
    }
  )
  // 数据都准备完成,可以开始下载excel了
  downExcel(tmpDown, `${fileName + '.'}${type.bookType == 'biff2' ? 'xls' : type.bookType}`)
}
**
 * <a>标签下载excel
 * @param { Blob对象:二进制的数据 } obj
 * @param { 文件名+文件类型后缀 } fileName
 */
function downExcel(obj, fileName) {
  const a_node = document.createElement('a')
  a_node.download = fileName

  // 兼容ie
  if ('msSaveOrOpenBlob' in navigator) {
    window.navigator.msSaveOrOpenBlob(obj, fileName)
  } else {
    // URL.createObjectURL根据传入的参数创建一个指向该参数对象的URL. 这个URL的生命仅存在于它被创建的这个文档里.
    // 新的对象URL指向执行的File对象或者是Blob对象.
    a_node.href = URL.createObjectURL(obj)
  }
  a_node.click()

  // 每次调用createObjectURL的时候,一个新的URL对象就被创建了.即使你已经为同一个文件创建过一个URL.
  // 如果你不再需要这个对象,要释放它,需要使用URL.revokeObjectURL()方法.
  //  当页面被关闭,浏览器会自动释放它,但是为了最佳性能和内存使用,当确保不再用得到它的时候,就应该释放它.
  setTimeout(() => {
    URL.revokeObjectURL(obj)
  }, 100)
}
// 字符串转字符流---转化为二进制的数据流
function s2ab(s): any {
  if (typeof ArrayBuffer !== 'undefined') {
    const buf = new ArrayBuffer(s.length)
    const view = new Uint8Array(buf)
    for (let i = 0; i != s.length; ++i) view[i] = s.charCodeAt(i) & 0xff
    return buf
  } else {
    const buf = new Array(s.length)
    for (let i = 0; i != s.length; ++i) buf[i] = s.charCodeAt(i) & 0xff
    return buf
  }
}
使用方法
const stuffColumns = [
{
title: '*参与方姓名',
dataIndex: 'staffName',
width: 120,
},
{
title: '*参与方编号',
dataIndex: 'staffNo',
width: 120,
},
{
title: '*企业名称',
dataIndex: 'companyName',
width: 120,
},
{
title: '*年度',
dataIndex: 'year',
width: 120,
},
{
title: '*年度薪金',
dataIndex: 'salary',
width: 120,
required: true,
},
{
title: '*薪金已纳税额',
dataIndex: 'payTax',
width: 120,
required: true,
},
{
title: '*扣除数合计',
dataIndex: 'specialDeduction',
width: 120,
required: true,
},
]
const result = await exportStaff(params)
const staffInfo = result.data.list
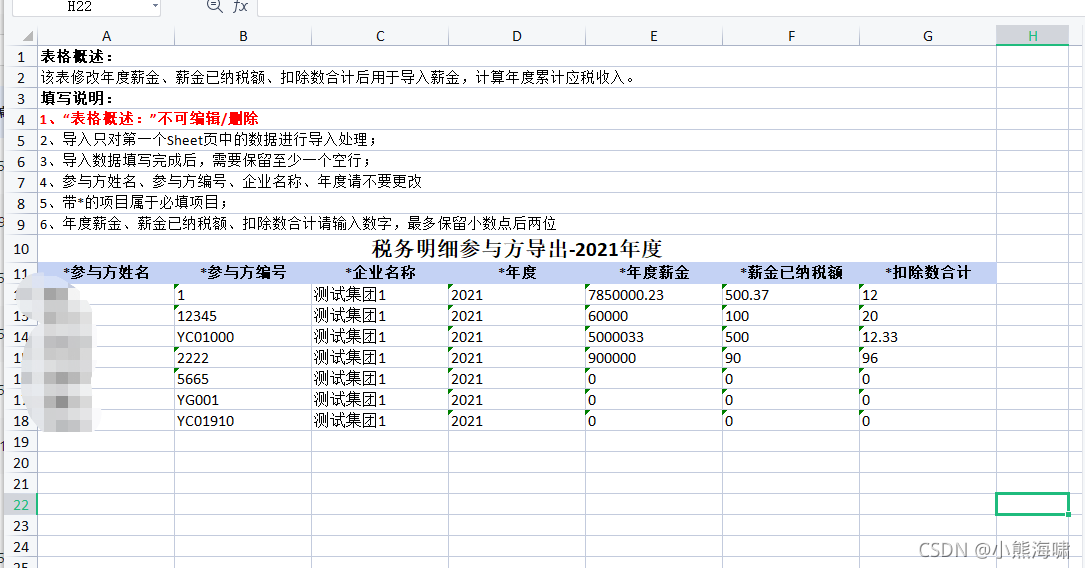
const title = `税务明细参与方导出-${labelInfo.year || '全部'}年度`
const fileName = `税务明细参与方导出-${labelInfo.year || '全部'}年度`
const options = [
{ title: '表格概述:', bold: true },
{ title: '该表修改年度薪金、薪金已纳税额、扣除数合计后用于导入薪金,计算年度累计应税收入。' },
{ title: '填写说明:', bold: true },
{ title: '1、“表格概述:”不可编辑/删除', bold: true, color: 'FF0000' },
{ title: '2、导入只对第一个Sheet页中的数据进行导入处理;' },
{ title: '3、导入数据填写完成后,需要保留至少一个空行;' },
{ title: '4、参与方姓名、参与方编号、企业名称、年度请不要更改' },
{ title: '5、带*的项目属于必填项目;' },
{ title: '6、年度薪金、薪金已纳税额、扣除数合计请输入数字,最多保留小数点后两位' },
]
const type = { bookType: 'xlsx', bookSST: true, type: 'binary', cellStyles: true }
exportExcel(title, stuffColumns, staffInfo, options, type, fileName)导出效果


 1106
1106

 被折叠的 条评论
为什么被折叠?
被折叠的 条评论
为什么被折叠?
 到【灌水乐园】发言


