


网络管理模块主要提供以下功能:
HTTP数据请求:通过HTTP发起一个数据请求。
WebSocket连接:使用WebSocket建立服务器与客户端的双向连接。
Socket连接:通过Socket进行数据传输。
1.Http 数据请求
开发步骤
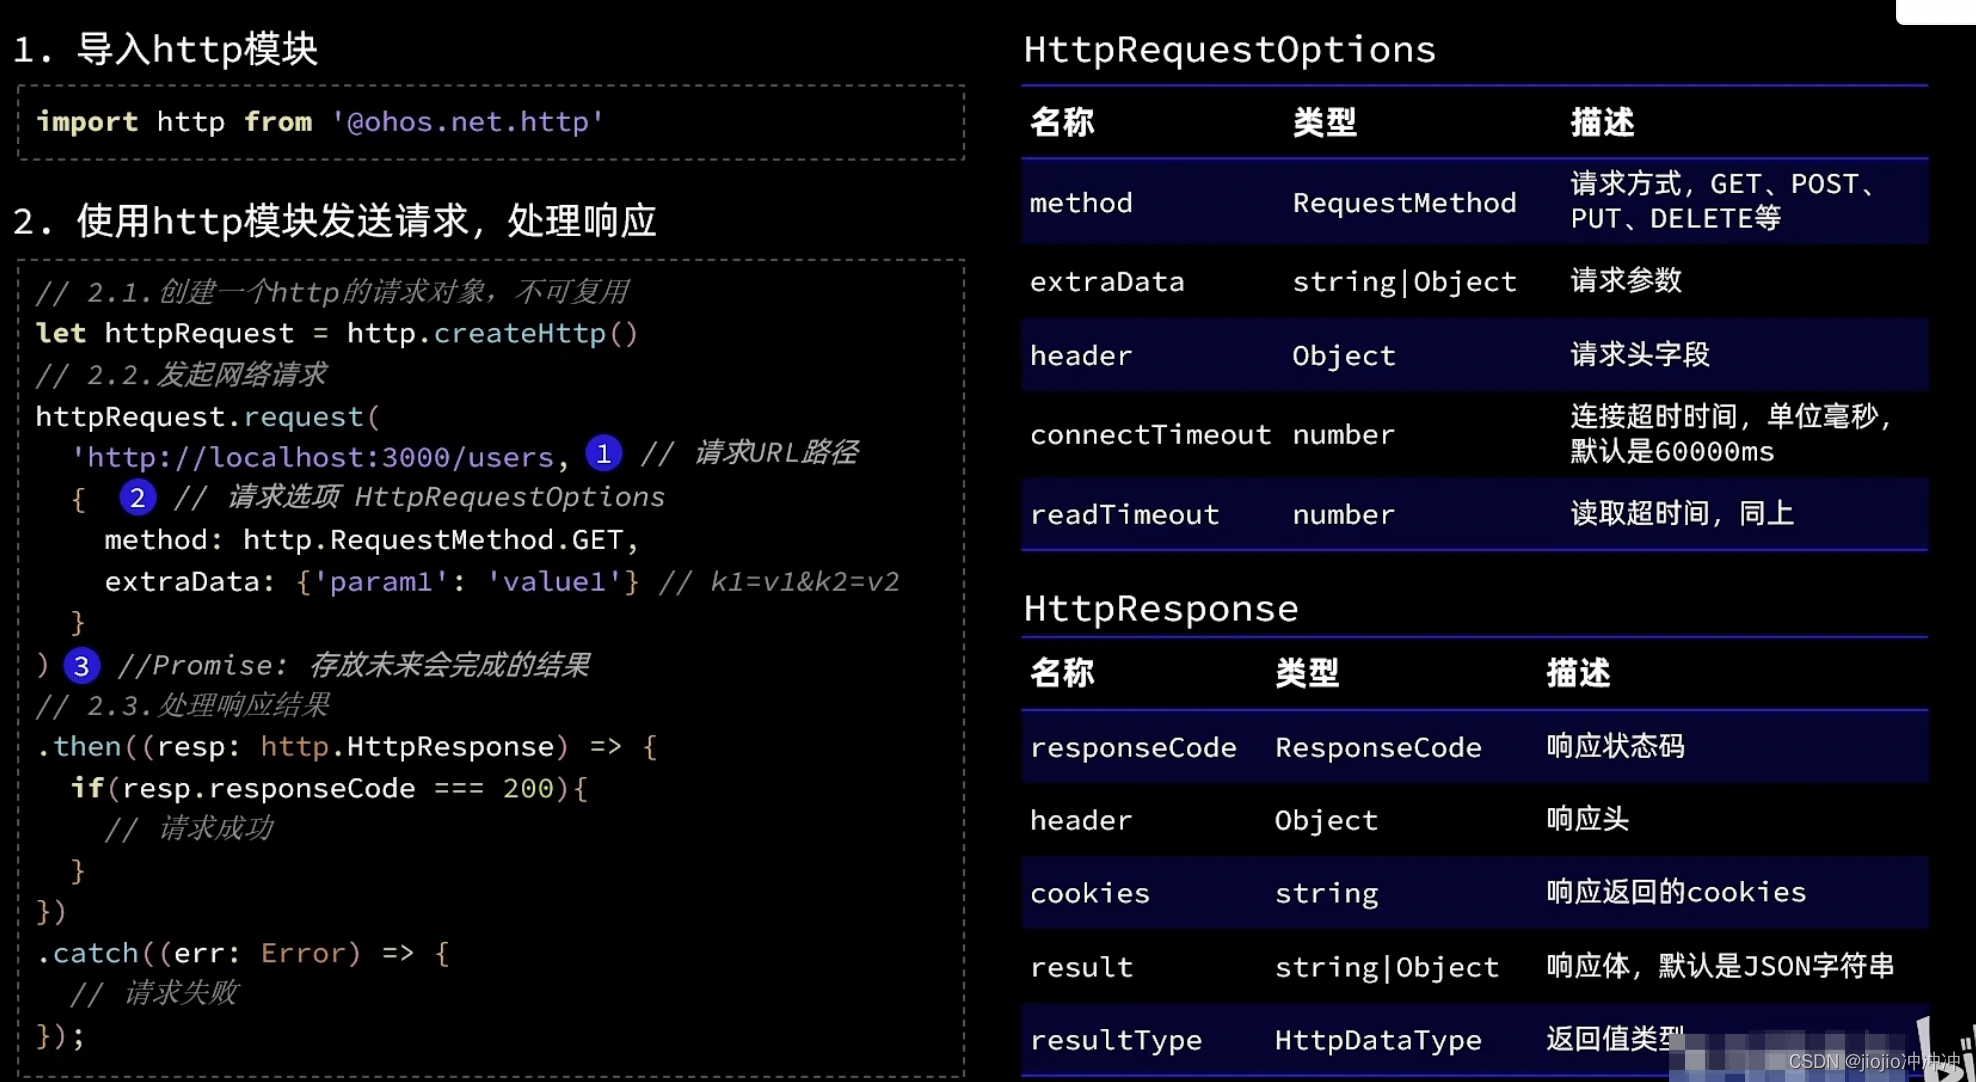
import需要的http模块。
创建一个HTTP请求,返回一个HttpRequest对象。
(可选)订阅HTTP响应头。
根据URL地址,发起HTTP网络请求。
(可选)处理HTTP响应头和HTTP网络请求的返回结果。
import http from '@ohos.net.http';

// 每一个httpRequest对应一个http请求任务,不可复用
let httpRequest = http.createHttp();

// 用于订阅http响应头,此接口会比request请求先返回。可以根据业务需要订阅此消息
// 从API 8开始,使用on('headersReceive', Callback)替代on('headerReceive', AsyncCallback)。 8+
httpRequest.on('headersReceive', (header) => {
    console.info('header: ' + JSON.stringify(header));
});

httpRequest.request(
    // 填写http请求的url地址,可以带参数也可以不带参数。URL地址需要开发者自定义。请求的参数可以在extraData中指定
    "EXAMPLE_URL",
    {
        method: http.RequestMethod.POST, // 可选,默认为http.RequestMethod.GET
        // 开发者根据自身业务需要添加header字段
        header: {
            'Content-Type': 'application/json'
        },
        // 当使用POST请求时此字段用于传递内容
        extraData: {
            "data": "data to send",
        },
        connectTimeout: 60000, // 可选,默认为60s
        readTimeout: 60000, // 可选,默认为60s
    }, (err, data) => {
        if (!err) {
            // data.result为http响应内容,可根据业务需要进行解析
            console.info('Result:' + data.result);
            console.info('code:' + data.responseCode);
            // data.header为http响应头,可根据业务需要进行解析
            console.info('header:' + JSON.stringify(data.header));
            console.info('cookies:' + data.cookies); // 8+
        } else {
            console.info('error:' + JSON.stringify(err));
            // 该请求不再使用,调用destroy方法主动销毁。
            httpRequest.destroy();
        }
    }
);
import http from '@ohos.net.http';
import ShopInfo from '../viewmodel/ShopInfo';
class ShopModel {
  baseURL: string = 'http://localhost:3000'
  pageNo: number = 1
  getShopList(): Promise<ShopInfo[]>{
    return new Promise((resolve, reject) => {
      // 1.创建http的请求对象
      let httpRequest = http.createHttp()
      // 2.发送请求
      httpRequest.request(
        `${this.baseURL}/shops?pageNo=${this.pageNo}&pageSize=3`,
        {
          method: http.RequestMethod.GET
        }
      )
        .then(resp => {
          if(resp.responseCode === 200){
            // 查询成功
            console.log('查询商铺成功!', resp.result)
            resolve(JSON.parse(resp.result.toString()))
          }else{
            console.log('查询商铺信息失败!error:', JSON.stringify(resp))
            reject('查询商铺失败')
          }
        })
        .catch(error => {
          console.log('查询商铺信息失败!error:', JSON.stringify(error))
          reject('查询商铺失败')
        })
    })
  }
}

const shopModel = new ShopModel();

export default shopModel as ShopModel;
2.axios请求
步骤流程:

2.1下载和安装ohpm
1️⃣.下载ohpm工具包,下载链接。
2️⃣.解压文件,进入“ohpm/bin”目录,打开命令行工具,执行如下指令初始化ohpm。
3️⃣.Windows环境下执行:init.bat
Linux/macOS环境下执行:./init
4️⃣.将ohpm配置到环境变量中。
Windows环境变量设置方法:
在此电脑 > 属性 > 高级系统设置 > 高级 > 环境变量中,将ohpm命令行工具的bin目录配置到系统或者用户的PATH变量中。
macOS环境变量设置方法:
打开终端工具,执行以下命令。
export OHPM_HOME=/home/xx/Downloads/ohpm #本处路径请替换为ohpm的安装路径
export PATH=$ {OHPM_HOME}/bin:${PATH}
5️⃣.安装完成之后,执行如下命令:
ohpm -v
2.2下载和安装axios
鸿蒙三方库中心仓
ohpm install @ohos/axios
三方库axios配置信息
安装完成之后在oh-packge.json5文件可以看到

2.3使用axios
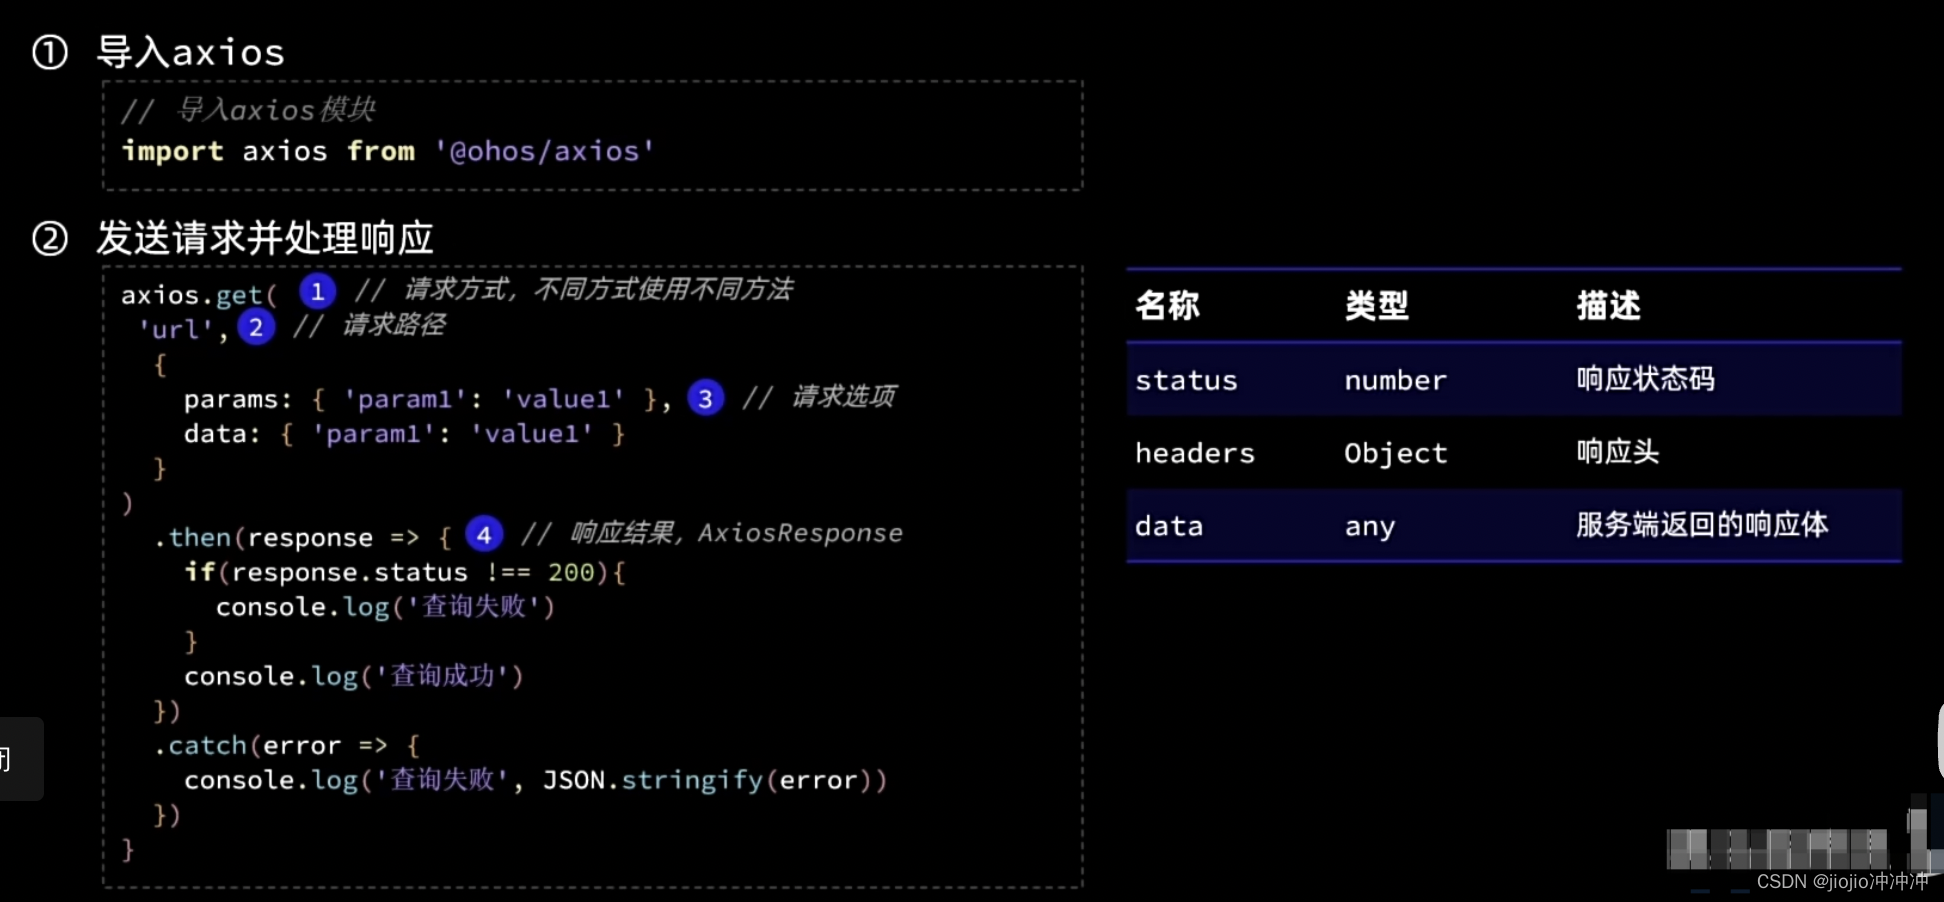
import ShopInfo from '../viewmodel/ShopInfo';
import axios from '@ohos/axios'
class ShopModel {
  baseURL: string = 'http://localhost:3000'
  pageNo: number = 1

  getShopList(): Promise<ShopInfo[]> {
    return new Promise((resolve, reject) => {
      axios.get(
        `${this.baseURL}/shops`,
        {
          params: { pageNo: this.pageNo, pageSize: 1 }
        }
      )
        .then(resp => {
          if (resp.status === 200) {
            // 查询成功
            console.log('查询商铺成功!', JSON.stringify(resp.data))
            resolve(resp.data)
          } else {
            console.log('查询商铺信息失败!error:', JSON.stringify(resp))
            reject('查询商铺失败')
          }
        })
        .catch(error => {
          console.log('查询商铺信息失败!error:', JSON.stringify(error))
          reject('查询商铺失败')
        })
    })
  }
}

const shopModel = new ShopModel();

export default shopModel as ShopModel;


 被折叠的 条评论
为什么被折叠?
被折叠的 条评论
为什么被折叠?
 到【灌水乐园】发言


