


基于SSH框架实现树形结构页面还原以及简单的登录功能(没有注册功能),基于数据库设计表存储结构,该存储结构能够通用,改变树形的内容(如换成公司人员组成树)也可以存储
前言
在前面找工作面试时,一家公司给出的机试题.由于没有用过SSH,只好查找各种资料搭建了一个SSH框架按照要求实现了一非常简单的登录功能,以及题目要求的树形结构的还原.
----由于经验缺乏,技术不足. 有不对的地方还请大家多多指点,谢谢!
一、什么是SSH框架
SSH是 (struts+spring+hibernate) 的一个集成框架,是一种Web应用程序开源框架。
SSH有SSH1和SSH2两种,本文使用的是SSH2。
二、Struts+Spring+Hibernate 各个作用
Strtus: 基于MVC设计模式,可以使我们的逻辑变得清晰
Spring: IOC和AOP可以使我们的程序最大限度上解耦合
Hibernate: 持久层框架,操作数据库
三、开发环境
Eclipse + PowerDesigner + Navicat + MySql + JDK 1.8 + Tomcat 8.5
四、数据库设计
(根据要求使用PowerDesigner简单设计两张表)
1. 用户表:
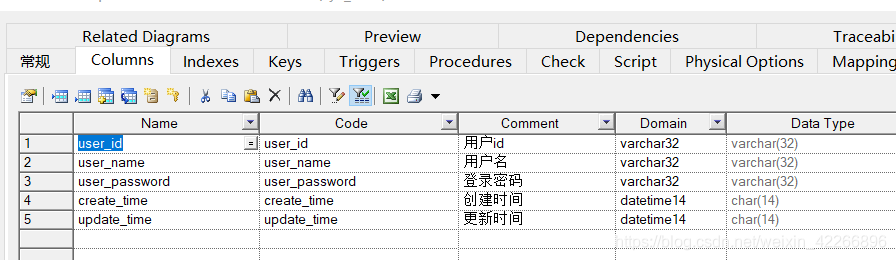
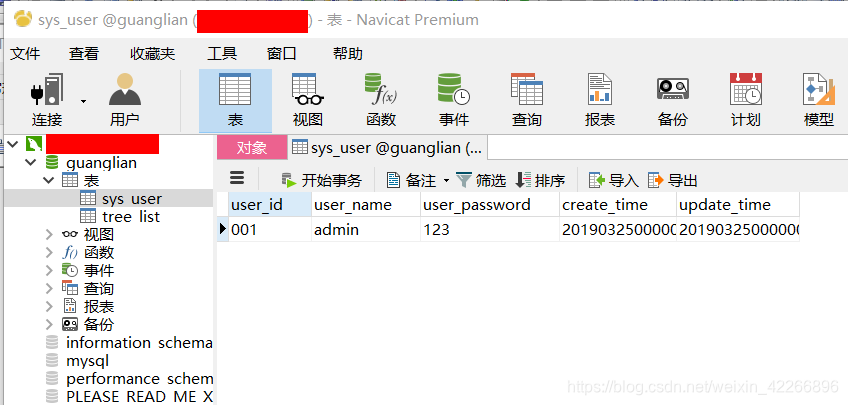
建表语句:
drop table if exists sys_user;

/*==============================================================*/
/* Table: sys_user                                              */
/*==============================================================*/
create table sys_user
(
   user_id              varchar(32) not null comment '用户id',
   user_name            varchar(32) not null comment '用户名',
   user_password        varchar(32) not null comment '登录密码',
   create_time          char(14) comment '创建时间',
   update_time          char(14) comment '更新时间',
   primary key (user_id)
)
ENGINE = InnoDB
DEFAULT CHARACTER SET = utf8;

alter table sys_user comment '用户表';
插入数据:
-- ----------------------------
-- Records of sys_user
-- ----------------------------
INSERT INTO `sys_user` VALUES ('001', 'admin', '123', '20190325000000', '20190325000000');
*用户表密码应当加密存储
2. 树形结构表:
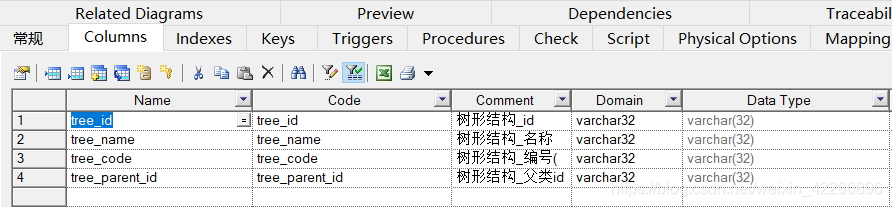
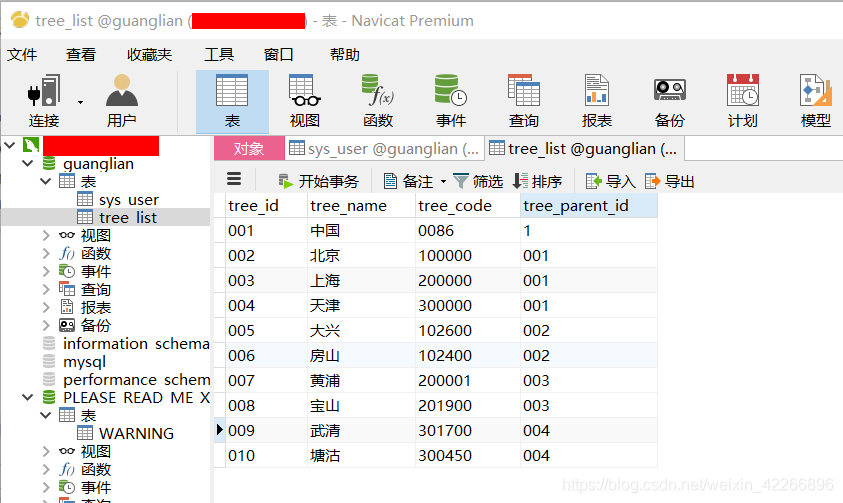
建表语句:
drop table if exists tree_list;

/*==============================================================*/
/* Table: tree_list                                             */
/*==============================================================*/
create table tree_list
(
   tree_id              varchar(32) not null comment '树形结构_id',
   tree_name            varchar(32) not null comment '树形结构_名称',
   tree_code            varchar(32) not null comment '树形结构_编号(根据实际业务,比如保存城市信息,这个此段可以存储城市的邮编或者地区号)',
   tree_parent_id       varchar(32) not null comment '树形结构_父类id',
   primary key (tree_id)
)
ENGINE = InnoDB
DEFAULT CHARACTER SET = utf8;

alter table tree_list comment '树形结构表';
插入数据:
-- ----------------------------
-- Records of tree_list
-- ----------------------------
INSERT INTO `tree_list` VALUES ('001', '中国', '0086', '1');
INSERT INTO `tree_list` VALUES ('002', '北京', '100000', '001');
INSERT INTO `tree_list` VALUES ('003', '上海', '200000', '001');
INSERT INTO `tree_list` VALUES ('004', '天津', '300000', '001');
INSERT INTO `tree_list` VALUES ('005', '大兴', '102600', '002');
INSERT INTO `tree_list` VALUES ('006', '房山', '102400', '002');
INSERT INTO `tree_list` VALUES ('007', '黄浦', '200001', '003');
INSERT INTO `tree_list` VALUES ('008', '宝山', '201900', '003');
INSERT INTO `tree_list` VALUES ('009', '武清', '301700', '004');
INSERT INTO `tree_list` VALUES ('010', '塘沽', '300450', '004');
本Demo存储的是城市信息:
1:tree_id 当前节点城市id
2:tree_name 当前节点城市名称
3:tree_code 当前节点城市邮编
4.tree_parent_id 当前节点城市上级地市 id
*该树形结构表,根据实际业务添加更多字段.
五、搭建SSH框架
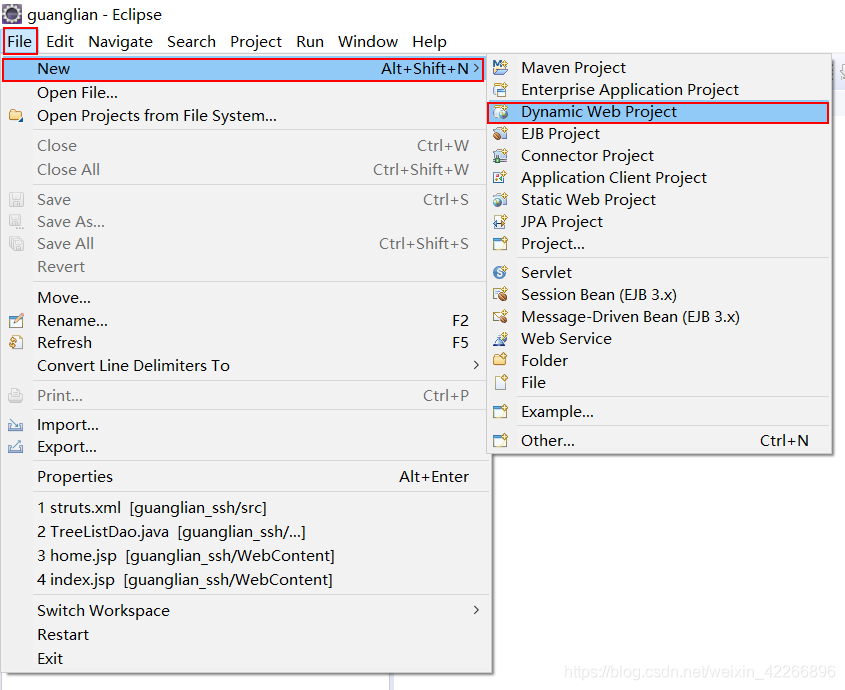
1.创建一个Web项目,首先打开Eclipse软件,打开后在工具栏依次点击【File】>【New】>【Dynamic Web Project】,这个就代表新建的项目是WEB项目
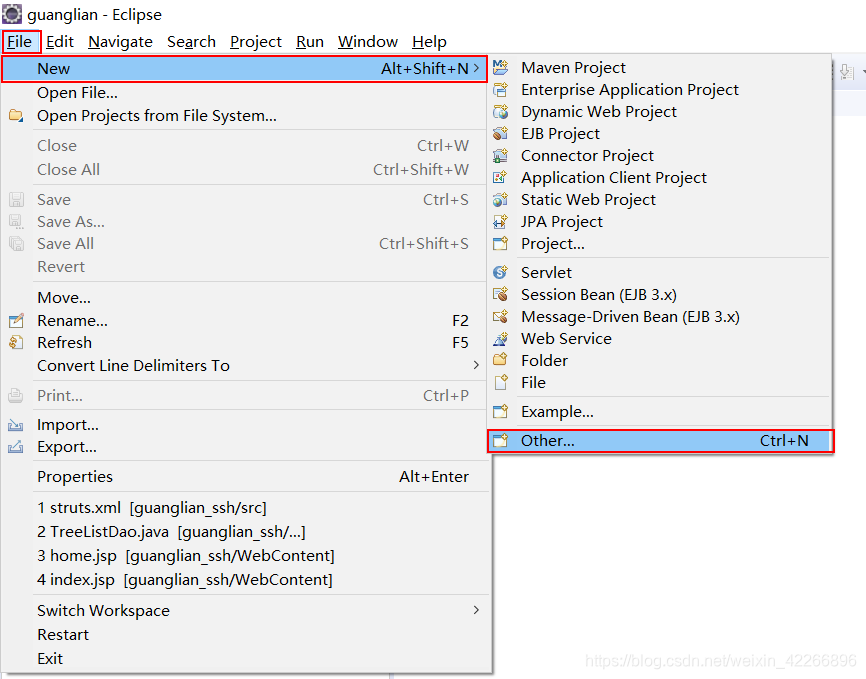
2.如果找不到【Dynamic Web Project】这个选项,说明以前没有建立过WEB项目,所以不在快捷导航里,这时点击【Other】这个选项
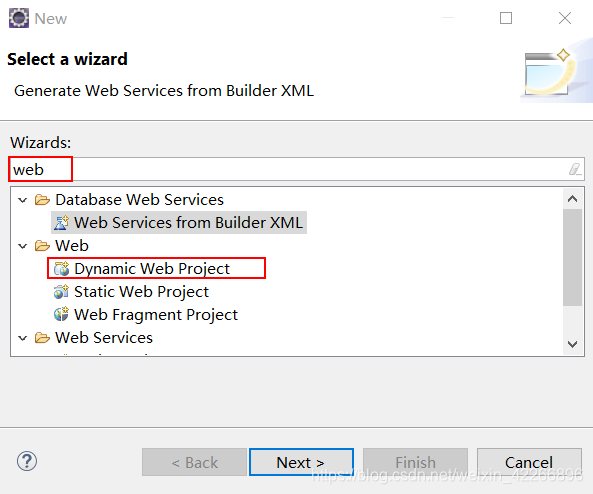
3. 这个界面弹出的是查询窗口,查询的内容是所有我们可以建立的项目类型,比如JAVA项目、WEB项目等,都可以再找个窗口查询得到
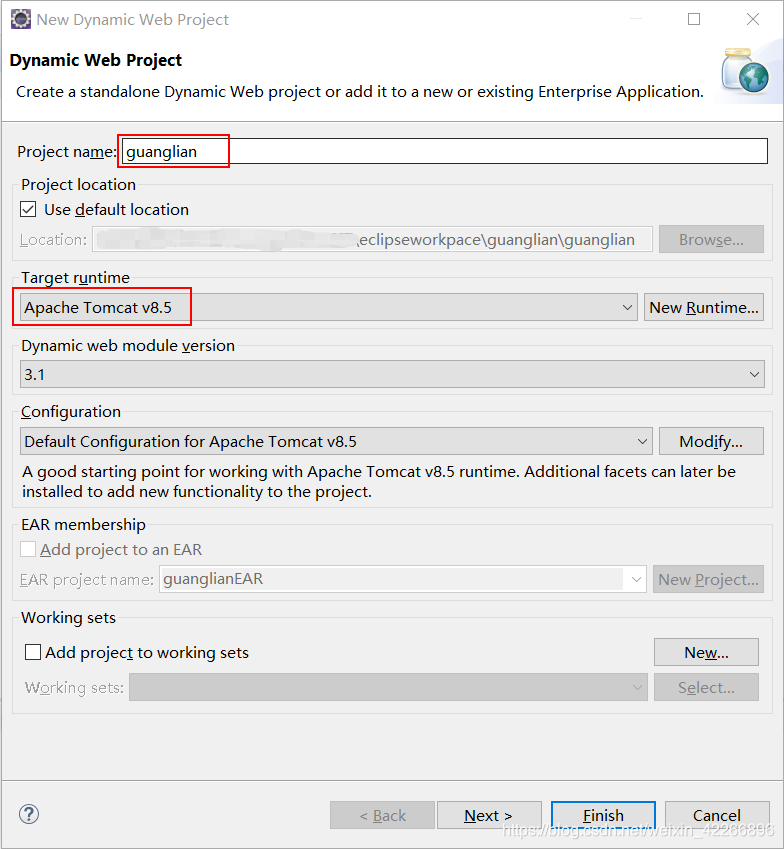
4. 填写项目基本信息, 包括(项目名称, tomcat版本等) *名称自定义
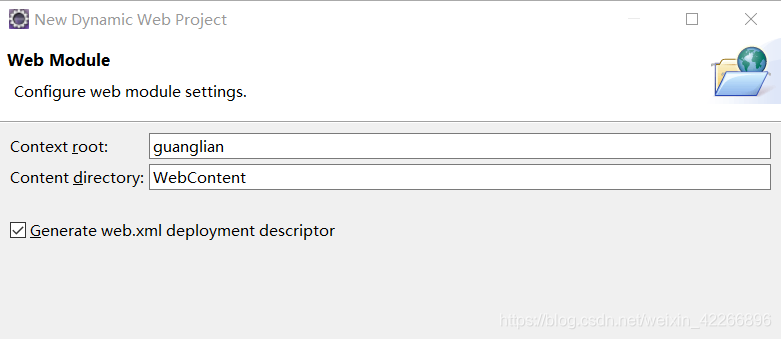
5.Next到此页面时, 勾选: Generate web.xml deployment descriptor 将自动创建web.xml文件
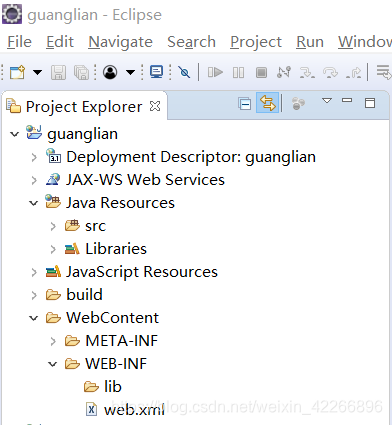
6.刚创建好的Web工程目录
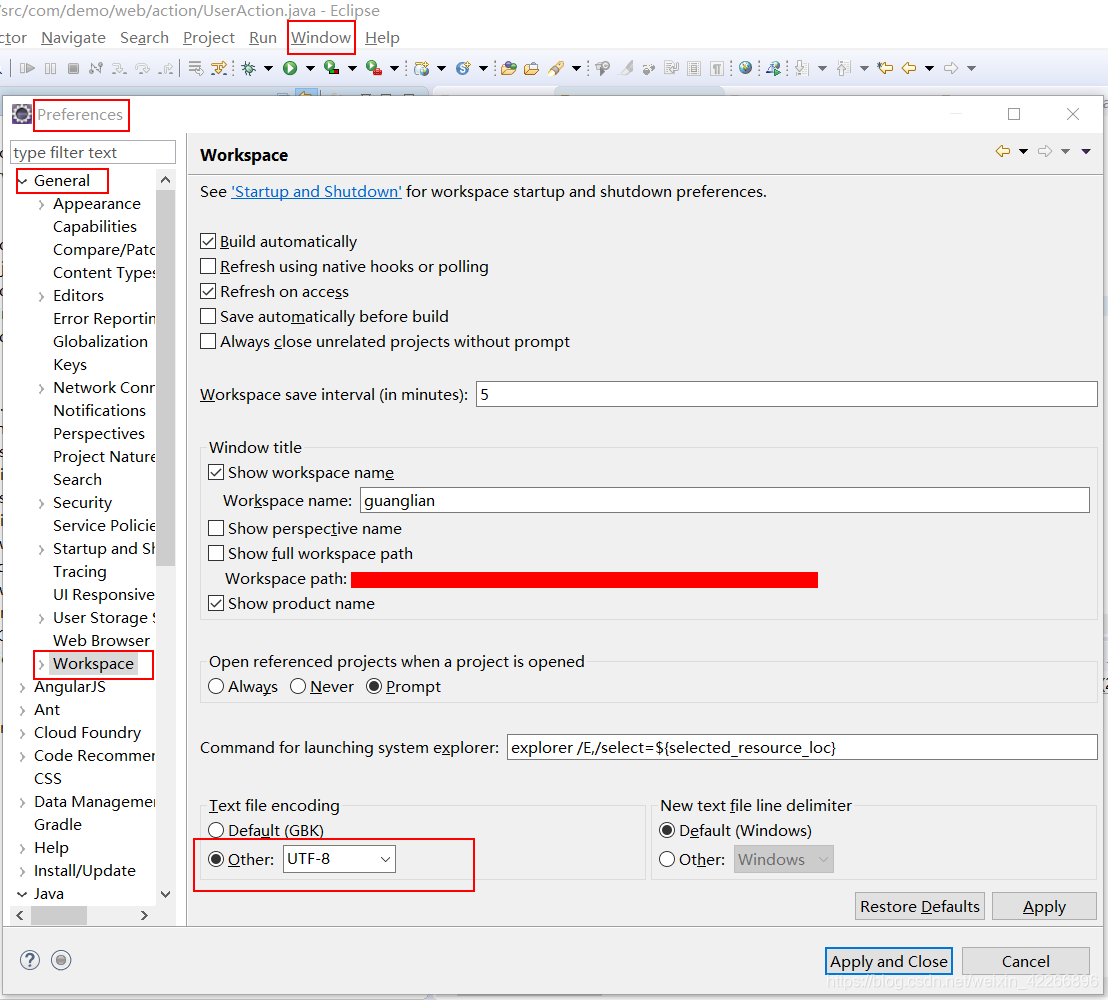
7.修改工作空间字符编码 UTF-8
8.设置JSP编码格式 UTF-8

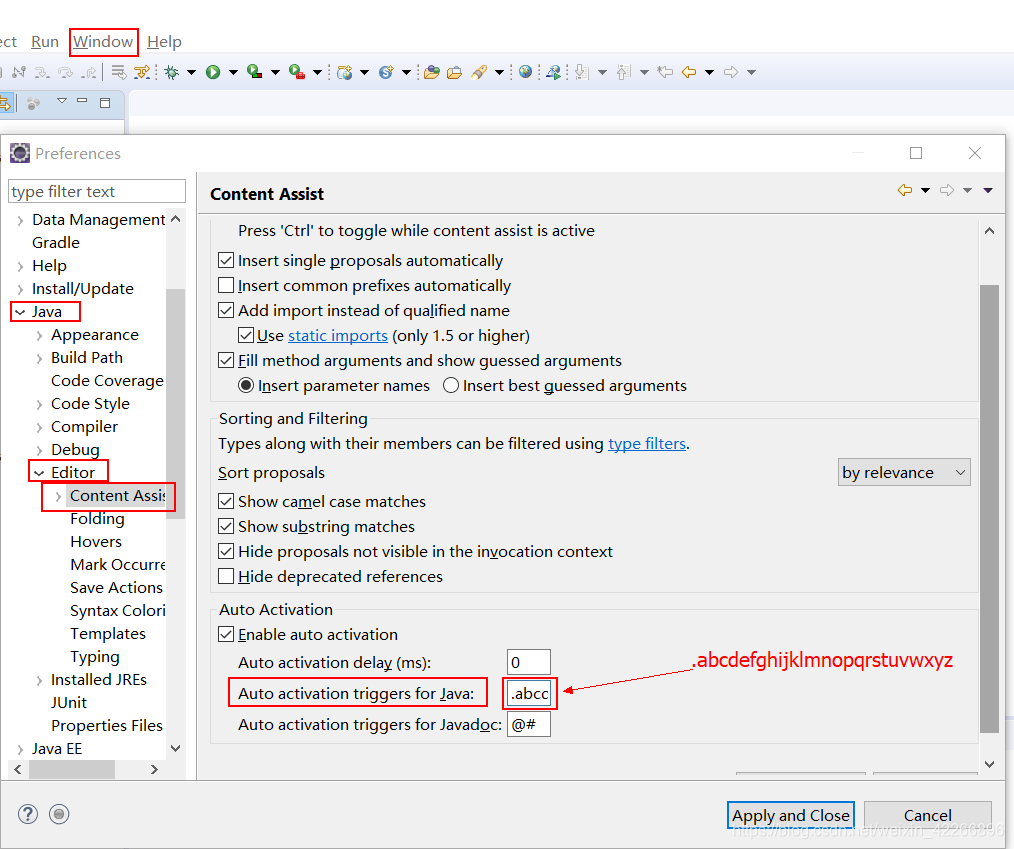
9.修改Java代码提示,在下边红色框内输入:.abcdefghijklmnopqrstuvwxyz
10.控制台->Servers 空白处右键新建一个 Server
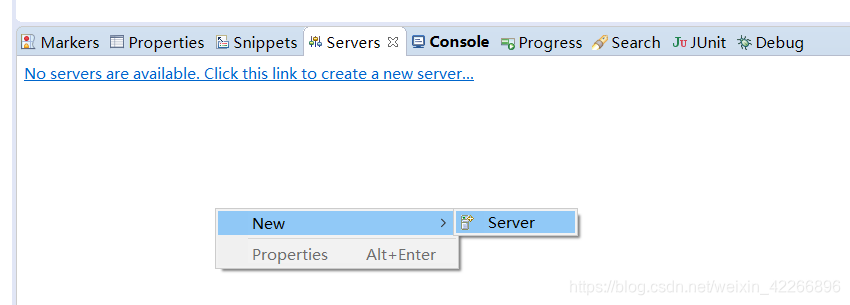
11.如果控制台没有Servers窗口, 选择 Window->Show View->Servers
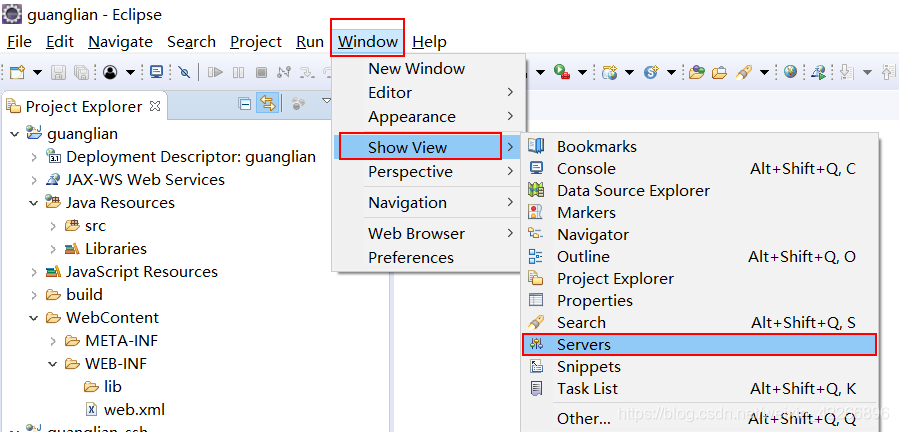
如果还没有,就点击下面的 Other… ,里面搜索添加即可
12.选择对应的tomcat版本, 服务名称随意
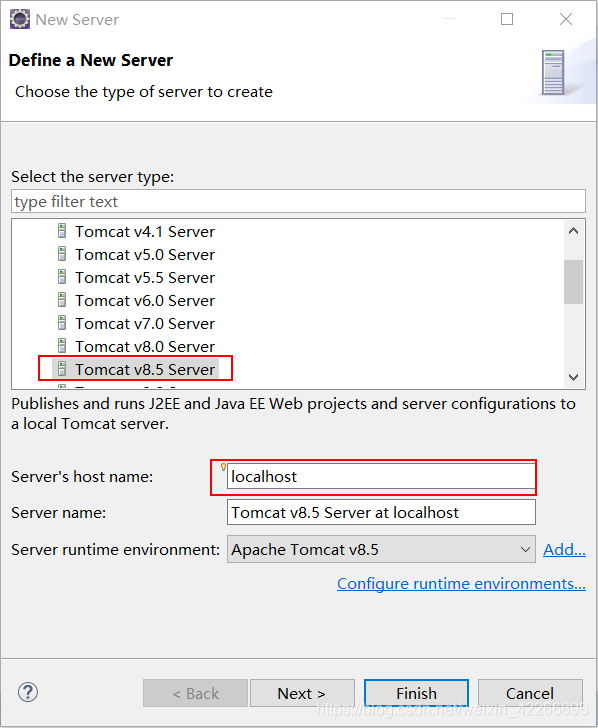
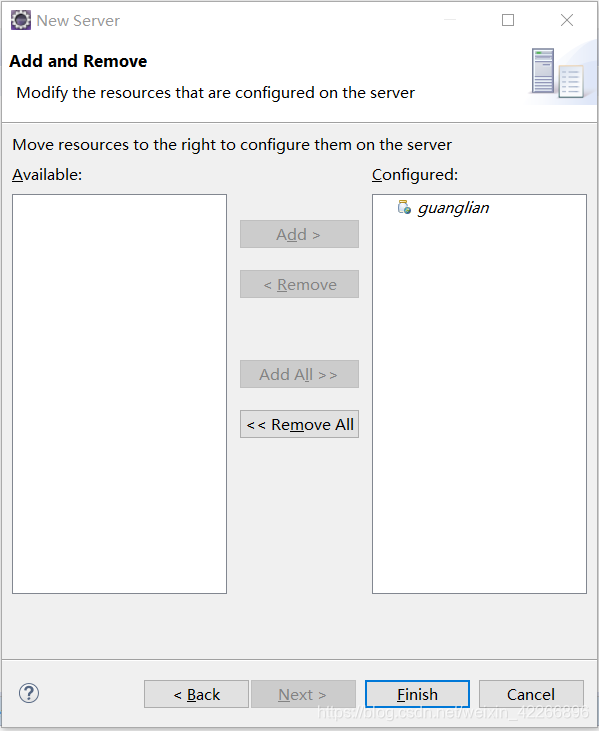
13. 选择刚刚新建的Web工程名称,点击add,添加到右侧
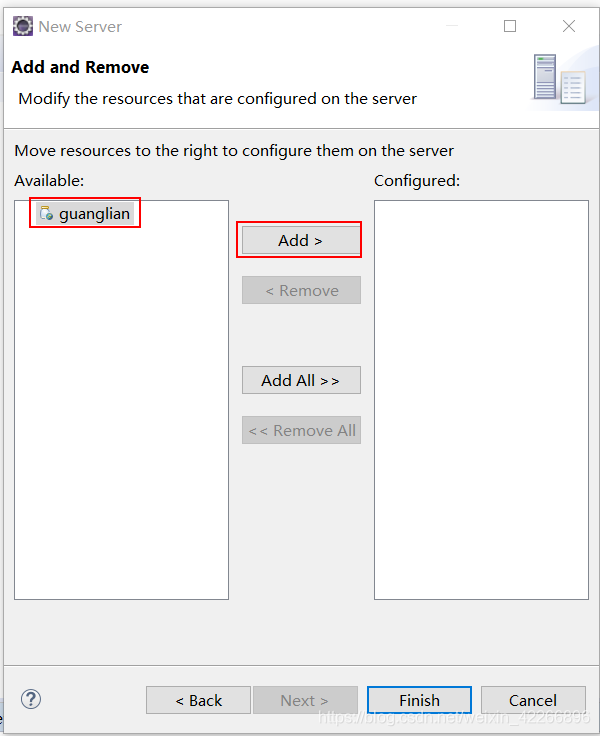
14. 如图,点击 Finish
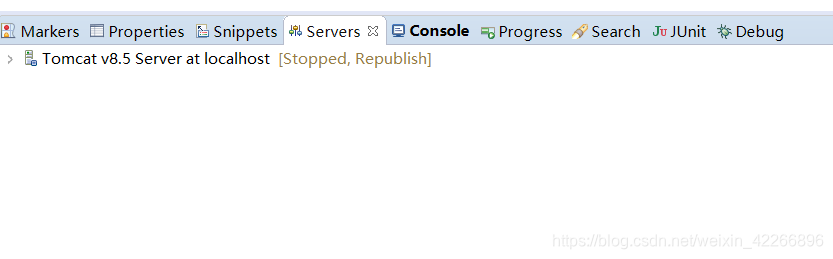
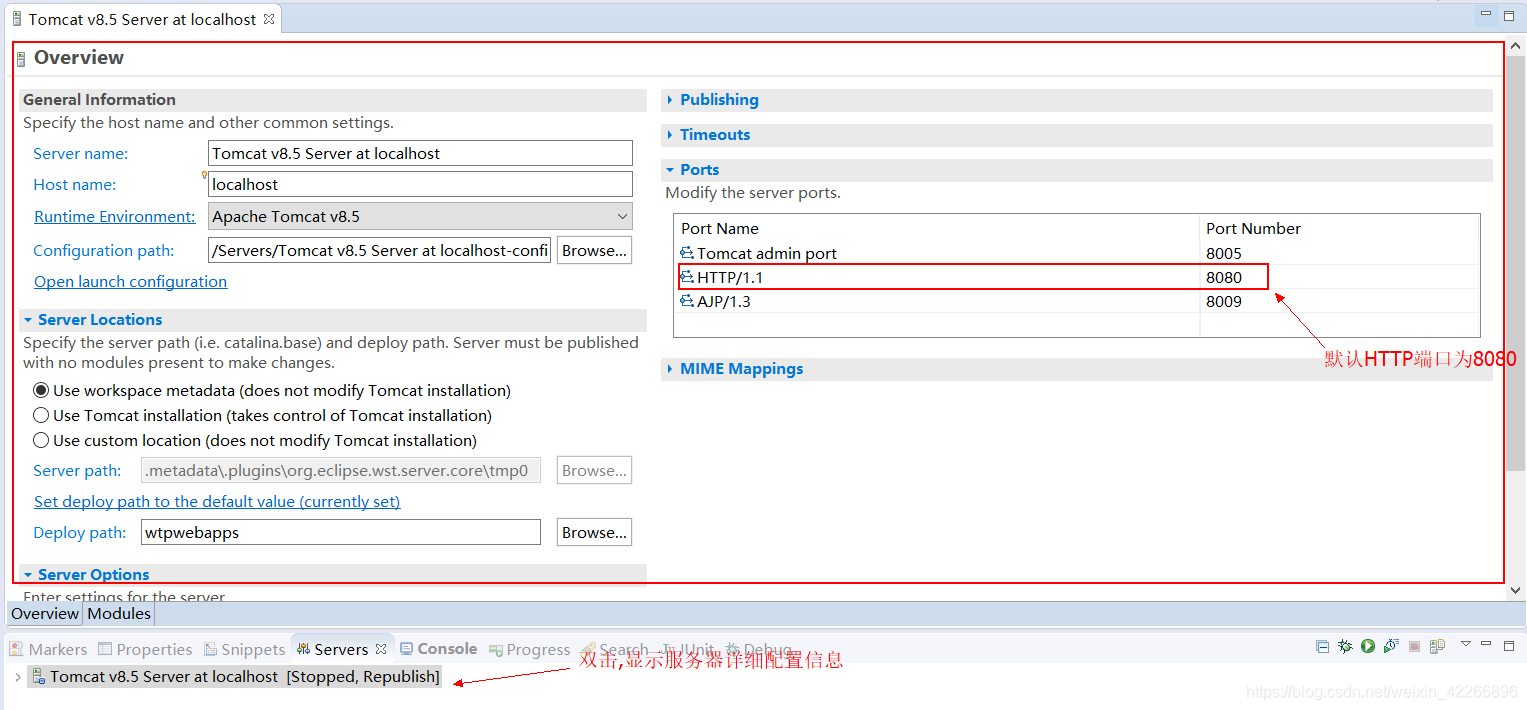
15. 此时,服务已经添加完成. 双击新添加的服务,将显示该服务的详细配置信息. http默认端口为:8080
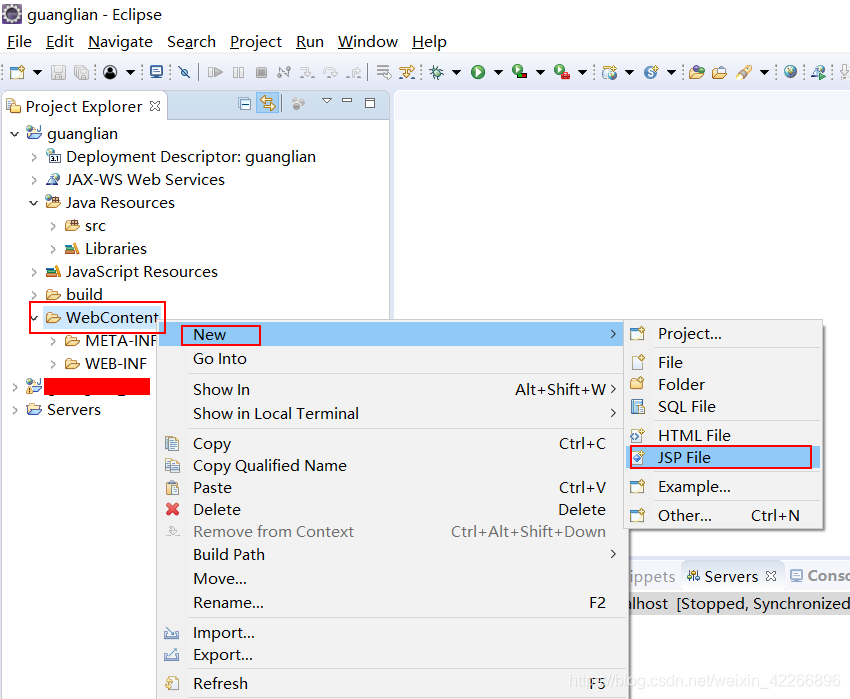
16. 在WebContent目录右键,创建一个JSP页面
17. 命名为 index.jsp , jsp页面输出一段文字,测试服务是否正常启动
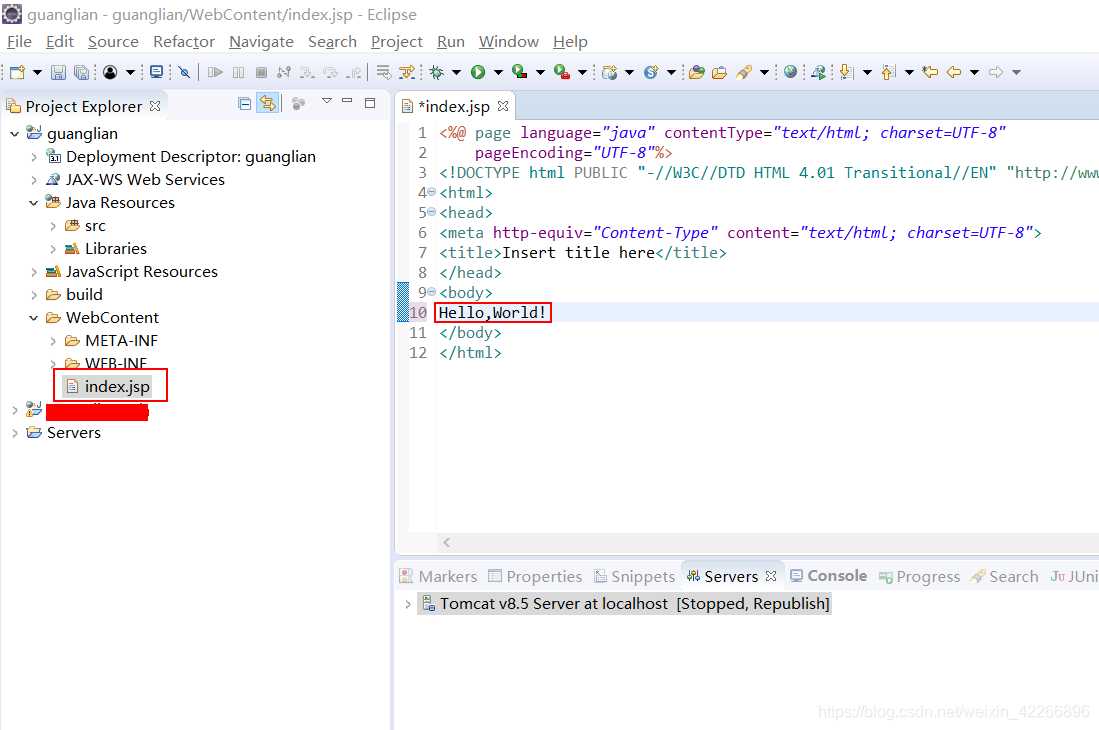
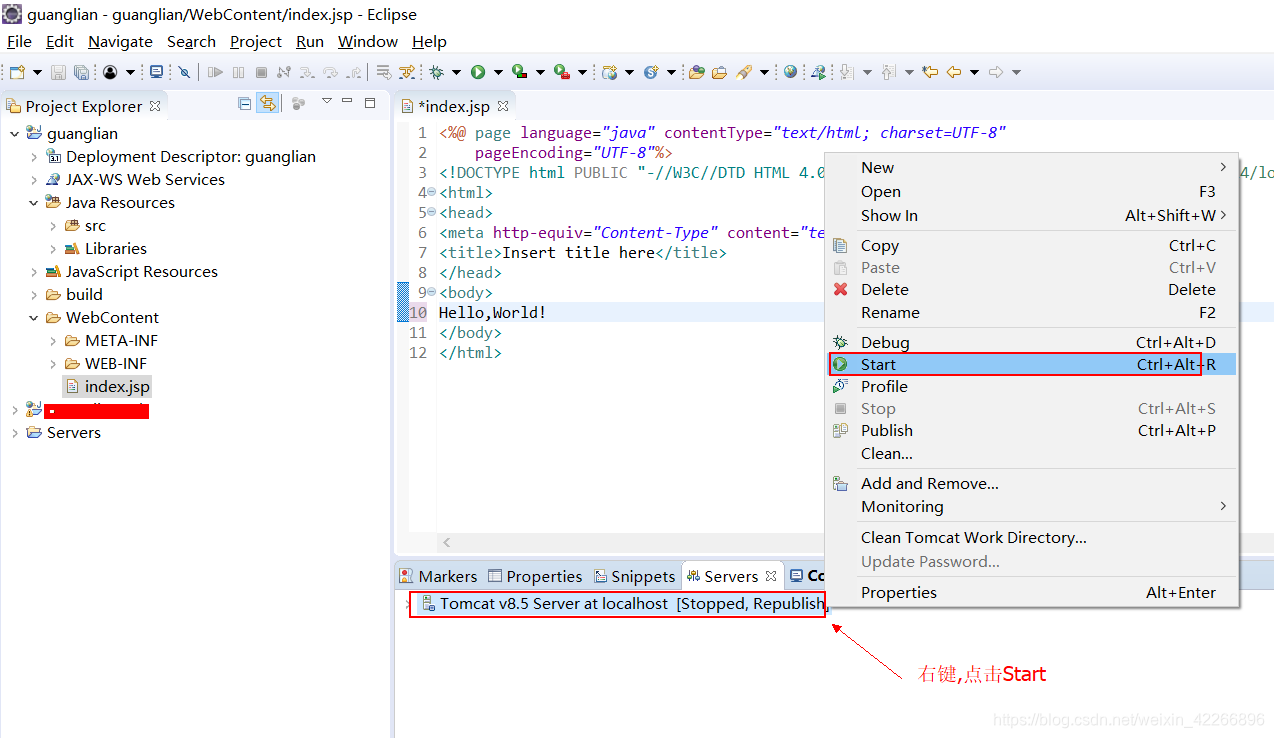
18.选择刚刚新建的Tomcat服务, 右键选择 Start启动服务
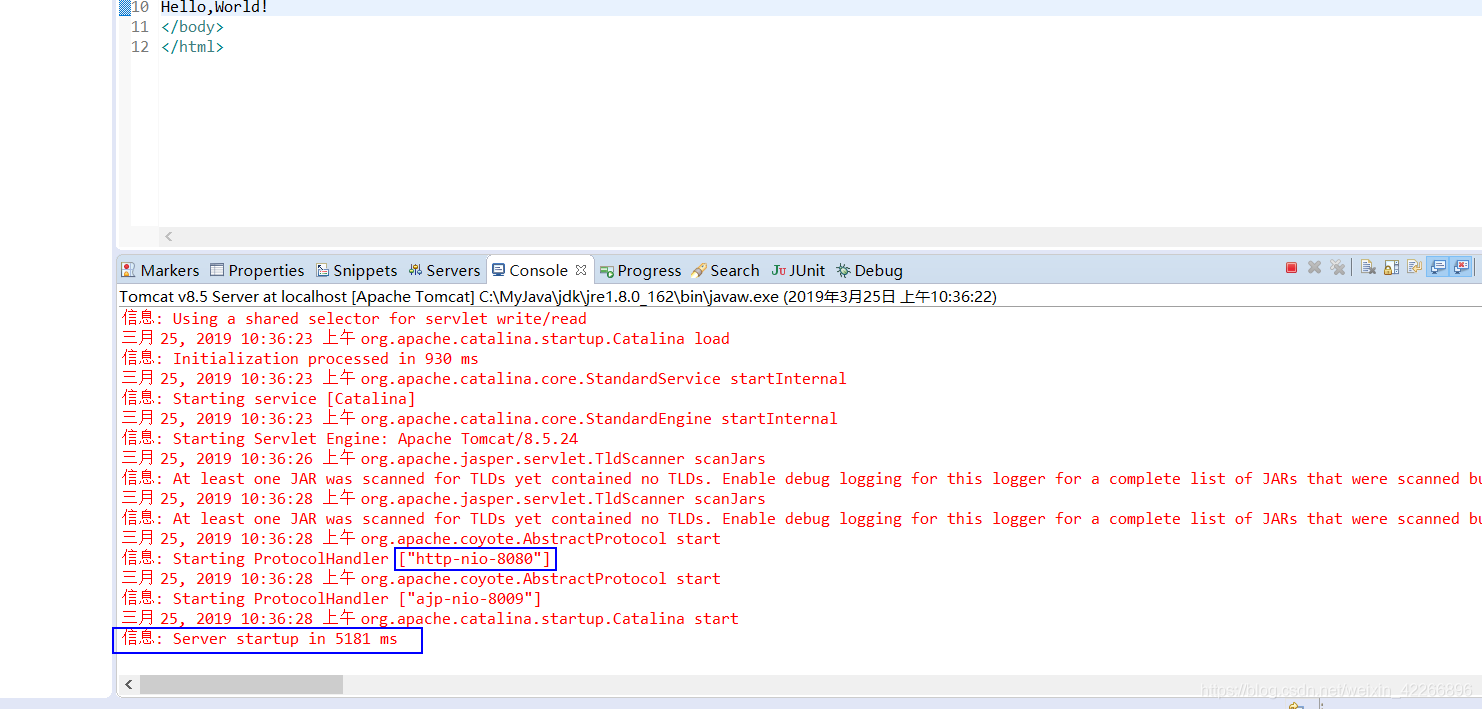
18. 显示一下信息表示服务启动成功, HTTP端口为:8080
19. 打开浏览器, 地址栏输入: http://localhost:8080/guanglian/ , 正常则会显示刚刚创建的页
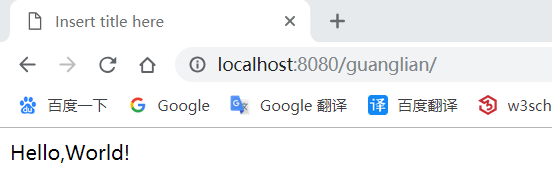
–以上步骤 Web工程以及Tomcat服务已经成功创建–
–以下步骤是SSH框架搭建以及简单的用户登录功能–
20.添加工程所用的jar包到: WebContent->WEB-INF->lib 目录下
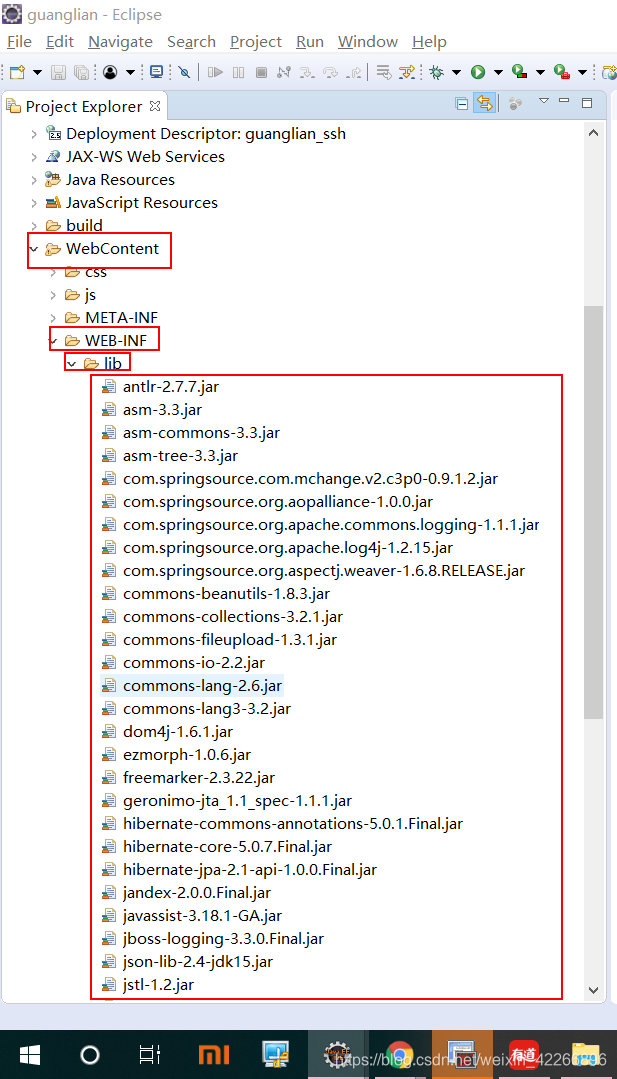
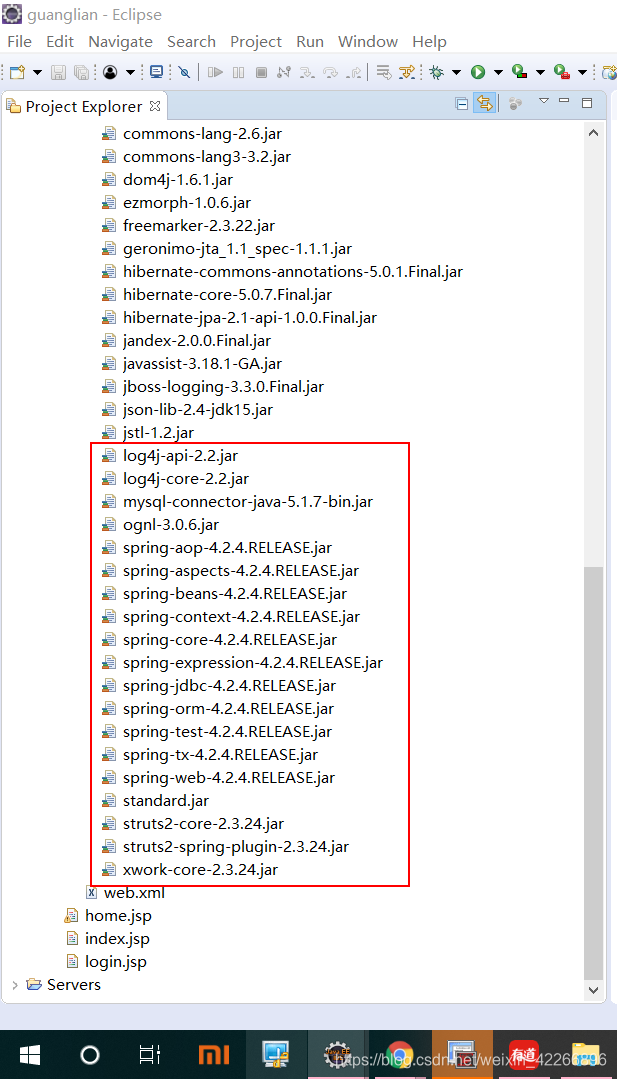
21. 配置Web.xml文件
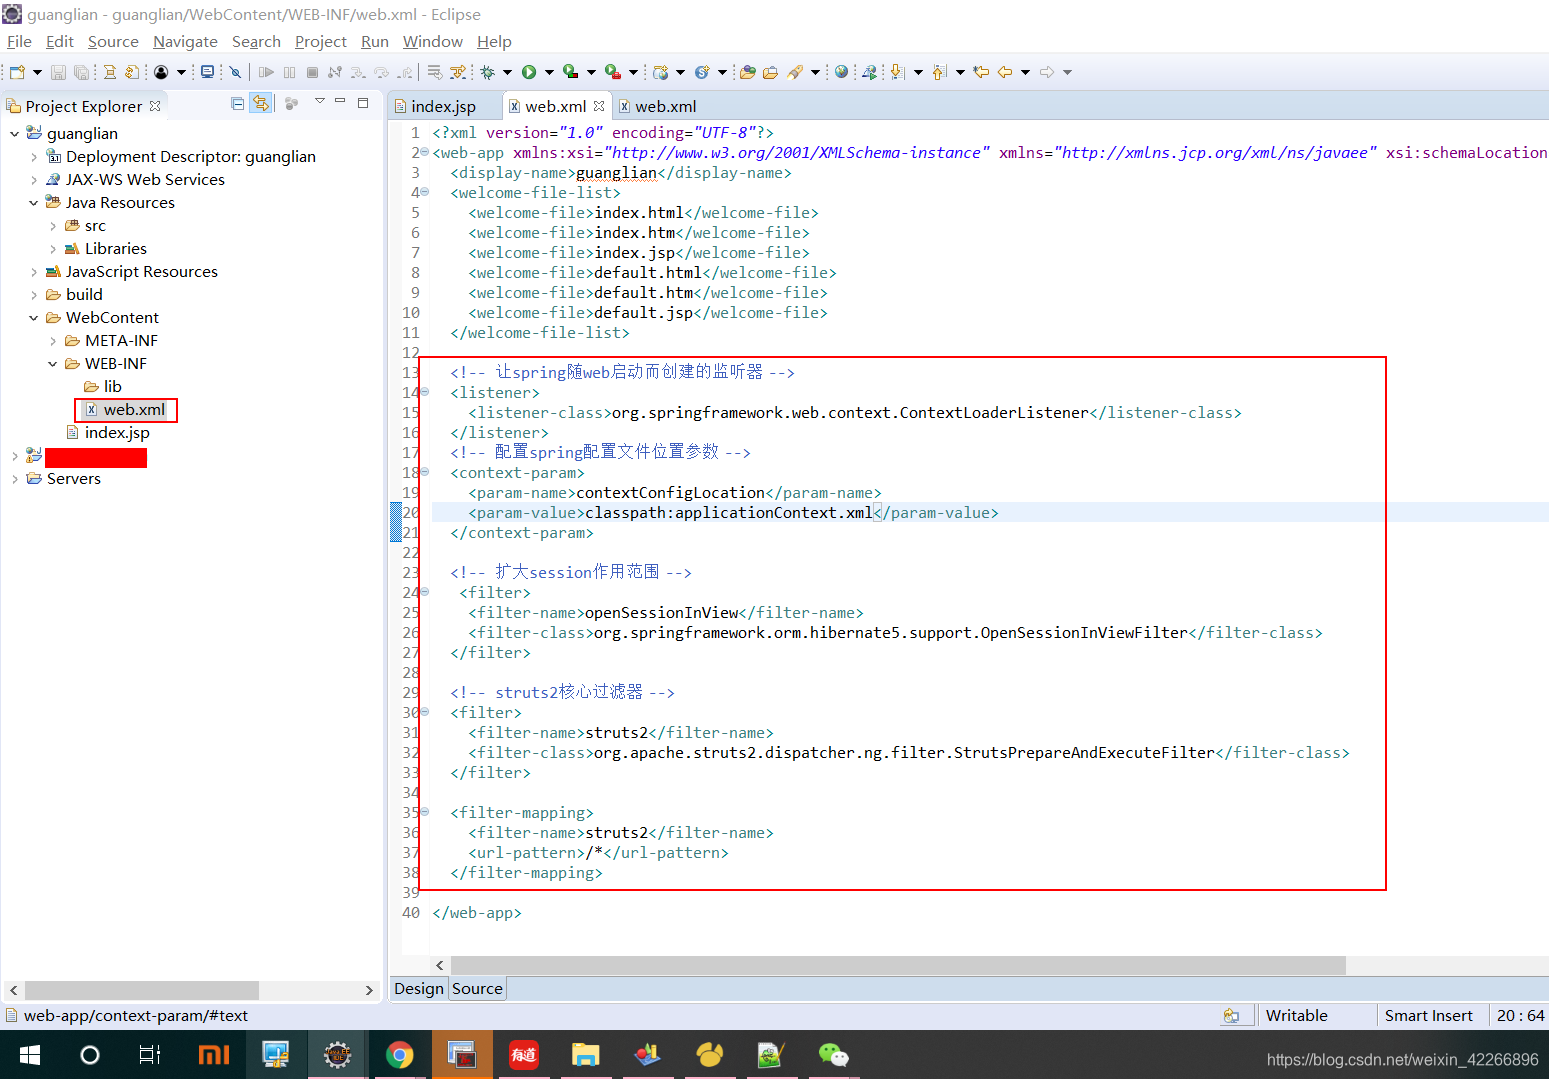
<?xml version="1.0" encoding="UTF-8"?>
<web-app xmlns:xsi="http://www.w3.org/2001/XMLSchema-instance" xmlns="http://xmlns.jcp.org/xml/ns/javaee" xsi:schemaLocation="http://xmlns.jcp.org/xml/ns/javaee http://xmlns.jcp.org/xml/ns/javaee/web-app_3_1.xsd" id="WebApp_ID" version="3.1">
  <display-name>guanglian</display-name>
  <welcome-file-list>
    <welcome-file>index.html</welcome-file>
    <welcome-file>index.htm</welcome-file>
    <welcome-file>index.jsp</welcome-file>
    <welcome-file>default.html</welcome-file>
    <welcome-file>default.htm</welcome-file>
    <welcome-file>default.jsp</welcome-file>
  </welcome-file-list>

  <!-- 让spring随web启动而创建的监听器 -->
  <listener>
  	<listener-class>org.springframework.web.context.ContextLoaderListener</listener-class>
  </listener>
  <!-- 配置spring配置文件位置参数 -->
  <context-param>
  	<param-name>contextConfigLocation</param-name>
  	<param-value>classpath:applicationContext.xml</param-value>
  </context-param>

  <!-- 扩大session作用范围 -->
   <filter>
  	<filter-name>openSessionInView</filter-name>
  	<filter-class>org.springframework.orm.hibernate5.support.OpenSessionInViewFilter</filter-class>
  </filter>

  <!-- struts2核心过滤器 -->
  <filter>
  	<filter-name>struts2</filter-name>
  	<filter-class>org.apache.struts2.dispatcher.ng.filter.StrutsPrepareAndExecuteFilter</filter-class>
  </filter>

  <filter-mapping>
  	<filter-name>struts2</filter-name>
  	<url-pattern>/*</url-pattern>
  </filter-mapping>

</web-app>
22.配置applicationContext.xml文件
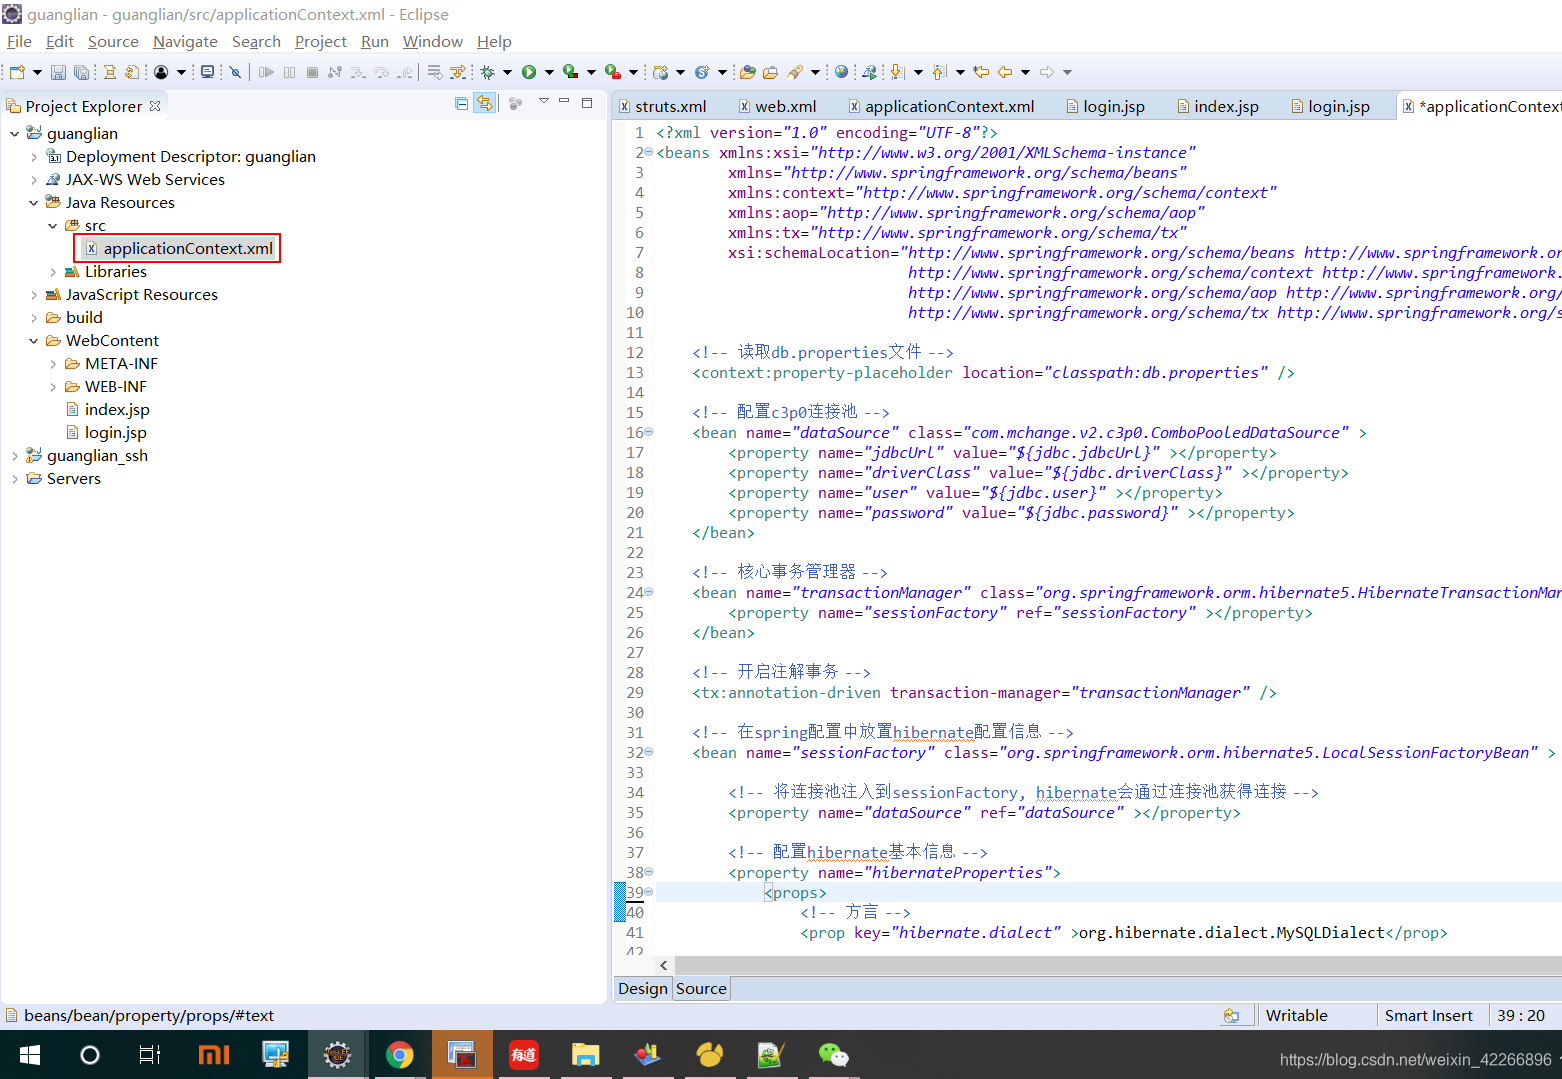
<?xml version="1.0" encoding="UTF-8"?>
<beans xmlns:xsi="http://www.w3.org/2001/XMLSchema-instance"
		xmlns="http://www.springframework.org/schema/beans"
		xmlns:context="http://www.springframework.org/schema/context"
		xmlns:aop="http://www.springframework.org/schema/aop"
		xmlns:tx="http://www.springframework.org/schema/tx"
		xsi:schemaLocation="http://www.springframework.org/schema/beans http://www.springframework.org/schema/beans/spring-beans-4.2.xsd
							http://www.springframework.org/schema/context http://www.springframework.org/schema/context/spring-context-4.2.xsd
							http://www.springframework.org/schema/aop http://www.springframework.org/schema/aop/spring-aop-4.2.xsd
							http://www.springframework.org/schema/tx http://www.springframework.org/schema/tx/spring-tx-4.2.xsd ">

	<!-- 读取db.properties文件 -->
	<context:property-placeholder location="classpath:db.properties" />

	<!-- 配置c3p0连接池 -->
	<bean name="dataSource" class="com.mchange.v2.c3p0.ComboPooledDataSource" >
		<property name="jdbcUrl" value="${jdbc.jdbcUrl}" ></property>
		<property name="driverClass" value="${jdbc.driverClass}" ></property>
		<property name="user" value="${jdbc.user}" ></property>
		<property name="password" value="${jdbc.password}" ></property>
	</bean>

	<!-- 核心事务管理器 -->
	<bean name="transactionManager" class="org.springframework.orm.hibernate5.HibernateTransactionManager" >
		<property name="sessionFactory" ref="sessionFactory" ></property>
	</bean>

	<!-- 开启注解事务 -->
	<tx:annotation-driven transaction-manager="transactionManager" />

	<!-- 在spring配置中放置hibernate配置信息 -->
	<bean name="sessionFactory" class="org.springframework.orm.hibernate5.LocalSessionFactoryBean" >

		<!-- 将连接池注入到sessionFactory, hibernate会通过连接池获得连接 -->
		<property name="dataSource" ref="dataSource" ></property>

		<!-- 配置hibernate基本信息 -->
		<property name="hibernateProperties">
			<props>
				<!-- 方言 -->
				<prop key="hibernate.dialect" >org.hibernate.dialect.MySQLDialect</prop>

				<!-- 可选配置 -->
				<prop key="hibernate.show_sql" >true</prop>
				<prop key="hibernate.format_sql" >true</prop>
				<prop key="hibernate.hbm2ddl.auto" >update</prop>
			</props>
		</property>
		<!-- 指定domian数据所在的包路径,spring会自动读取包中的所有配置 -->
		<property name="mappingDirectoryLocations" value="classpath:com/demo/domain" ></property>

	</bean>

</beans>
23.添加 配置文件: db.properties , applicationContext.xml需要引用的数据库连接配置文件
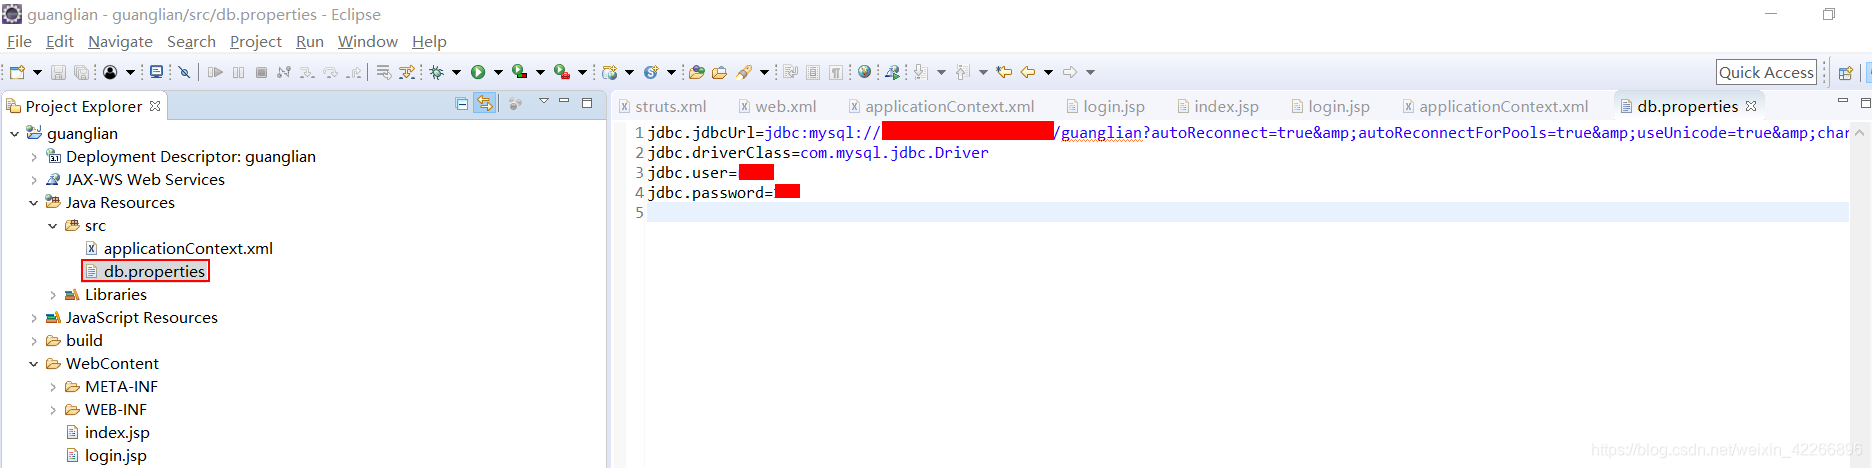
jdbc.jdbcUrl=jdbc:mysql://IP地址:端口/数据库?autoReconnect=true&autoReconnectForPools=true&useUnicode=true&characterEncoding=UTF-8
jdbc.driverClass=com.mysql.jdbc.Driver
jdbc.user=用户名
jdbc.password=密码
24.配置struts.xml文件

<?xml version="1.0" encoding="UTF-8"?>
  <!DOCTYPE struts PUBLIC
	"-//Apache Software Foundation//DTD Struts Configuration 2.3//EN"
	"http://struts.apache.org/dtds/struts-2.3.dtd">

<struts>

	<!-- 将action的创建交给spring容器 -->
	<constant name="struts.objectFactory" value="spring"></constant>

	<package name="guanglian" namespace="/" extends="struts-default" >

		<interceptors>
			<!-- 注册拦截器 -->
			<interceptor name="loginInterceptor" class="com.demo.web.interceptor.loginInterceptor"></interceptor>

			<!-- 配置拦截器栈 -->
			<interceptor-stack name="myStack">
				<interceptor-ref name="loginInterceptor">
					<!-- 放行的方法 -->
					<param name="excludeMethods">login</param>
				</interceptor-ref>
				<interceptor-ref name="defaultStack"></interceptor-ref>
			</interceptor-stack>
		</interceptors>
		<!-- 指定默认拦截器栈 -->
		<default-interceptor-ref name="myStack"></default-interceptor-ref>

		<!-- 全局结果集配置 -->
		<global-results>
			<result name="toLogin" type="redirect" >/login.jsp</result>
		</global-results>

		<!-- 异常处理的配置 -->
		<global-exception-mappings>
			<exception-mapping result="error" exception="java.lang.RuntimeException"></exception-mapping>
		</global-exception-mappings>
	</package>

</struts>
25.分层创建包路径,并且创建数据表对应的实体类

实体类: City.java
package com.demo.domain;

/**
 * @Description 城市信息实体类
 * @author TianHB
 */
public class City {

	private String tree_id; //树形结构_id
    private String tree_name; //树形结构_名称
    private String tree_code; //树形结构_编号
    private String tree_parent_id; //树形结构_父类id

	public String getTree_id() {
		return tree_id;
	}
	public void setTree_id(String tree_id) {
		this.tree_id = tree_id;
	}
	public String getTree_name() {
		return tree_name;
	}
	public void setTree_name(String tree_name) {
		this.tree_name = tree_name;
	}
	public String getTree_code() {
		return tree_code;
	}
	public void setTree_code(String tree_code) {
		this.tree_code = tree_code;
	}
	public String getTree_parent_id() {
		return tree_parent_id;
	}
	public void setTree_parent_id(String tree_parent_id) {
		this.tree_parent_id = tree_parent_id;
	}
}
实体类: User.java
package com.demo.domain;

/**
 * @Description 用户信息实体类
 * @author TianHB
 */
public class User {

	private String user_id; //用户id
	private String user_name; //用户名
	private String user_password; //用户登录密码
	private String create_time; //该用户创建时间
	private String update_time; //该用户信息更新时间(例如修改密码)

	public String getUser_id() {
		return user_id;
	}
	public void setUser_id(String user_id) {
		this.user_id = user_id;
	}
	public String getUser_name() {
		return user_name;
	}
	public void setUser_name(String user_name) {
		this.user_name = user_name;
	}
	public String getUser_password() {
		return user_password;
	}
	public void setUser_password(String user_password) {
		this.user_password = user_password;
	}
	public String getCreate_time() {
		return create_time;
	}
	public void setCreate_time(String create_time) {
		this.create_time = create_time;
	}
	public String getUpdate_time() {
		return update_time;
	}
	public void setUpdate_time(String update_time) {
		this.update_time = update_time;
	}
}
26.创建实体类对应的Hibernate映射文件,在domain包下

User.hbm.xml
<?xml version="1.0" encoding="UTF-8"?>
<!DOCTYPE hibernate-mapping PUBLIC
    "-//Hibernate/Hibernate Mapping DTD 3.0//EN"
    "http://www.hibernate.org/dtd/hibernate-mapping-3.0.dtd">
<hibernate-mapping package="com.demo.domain" >
	<!-- User 用户实体类对象映射文件 -->
	<class name="User" table="sys_user" >
		<id name="user_id">
           <column name="user_id"/>
        </id>
		<property name="user_name"  ></property>
		<property name="user_password"  ></property>
		<property name="create_time"  ></property>
		<property name="update_time"  ></property>

	</class>
</hibernate-mapping>
City.hbm.xml
<?xml version="1.0" encoding="UTF-8"?>
<!DOCTYPE hibernate-mapping PUBLIC
    "-//Hibernate/Hibernate Mapping DTD 3.0//EN"
    "http://www.hibernate.org/dtd/hibernate-mapping-3.0.dtd">
<hibernate-mapping package="com.demo.domain" >
	<!-- City 城市信息实体类对象映射文件 -->
	<class name="City" table="tree_list" >
		<!-- 主键id -->
		<id name="tree_id">
           <column name="tree_id"/>
        </id>
		<property name="tree_name"  ></property>
		<property name="tree_code"  ></property>
		<property name="tree_parent_id"  ></property>
	</class>
</hibernate-mapping>
27.在WebContent目录下创建一个登陆页面: login.jsp

<%@ page language="java" contentType="text/html; charset=UTF-8"
    pageEncoding="UTF-8"%>
<%@ taglib prefix="s" uri="/struts-tags" %>
<!DOCTYPE html PUBLIC "-//W3C//DTD HTML 4.01 Transitional//EN" "http://www.w3.org/TR/html4/loose.dtd">
<html>
<head>
<meta http-equiv="Content-Type" content="text/html; charset=UTF-8">
<title>用户登录</title>
</head>
<body>

	<form action="${pageContext.request.contextPath}/UserAction_login" method="post">

		用户名:<input type="text" name="user_name">

	 	   密码:<input type="password" name="user_password">

			   <input type="submit" value="登录">

			   <!-- 错误提示 -->
			   <font color="red" ><s:property value="exception.message" /> </font>
	</form>

	<s:debug></s:debug>

</body>

</html>
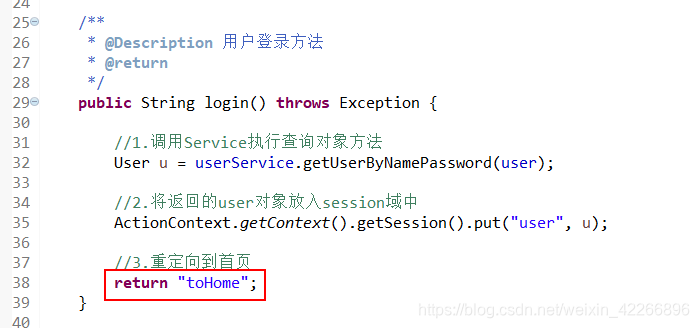
28.创建登录的 UserAction.java , login.jsp登录请求的: UserAction_login 方法

UserAction.java
package com.demo.web.action;

import com.demo.domain.User;
import com.opensymphony.xwork2.ActionContext;
import com.opensymphony.xwork2.ActionSupport;
import com.opensymphony.xwork2.ModelDriven;

/**
 * @Description 用户Action
 * @author TianHB
 */
public class UserAction extends ActionSupport implements ModelDriven<User>{

	//用户接收前端请求页面传来的参数对象
	private User user = new User();

	private UserService userService;

	//注入UserService对象
	public void setUserService(UserService userService) {
		this.userService = userService;
	}

	/**
	 * @Description 用户登录方法
	 * @return
	 */
	public String login() throws Exception {

		//1.调用Service执行查询对象方法
		User u = userService.getUserByNamePassword(user);

		//2.将返回的user对象放入session域中
		ActionContext.getContext().getSession().put("user", u);

		//3.重定向到首页
		return "toHome";
	}

	@Override
	public User getModel() {
		return user;
	}

}
29.创建登录的 UserService.java , 并编写获取用户对象方法

package com.demo.service;

import com.demo.domain.User;

/**
 * @Description 用户Service
 * @author TianHB
 */
public interface UserService {

	/**
	 * @Description 获取用户对象
	 * @return
	 */
	User getUserByNamePassword(User user);

}
30.创建UserService.java的实现类: UserServiceImpl.java

package com.demo.service.impl;

import org.springframework.transaction.annotation.Isolation;
import org.springframework.transaction.annotation.Propagation;
import org.springframework.transaction.annotation.Transactional;

import com.demo.dao.UserDao;
import com.demo.domain.User;
import com.demo.service.UserService;

/**
 * @Description 用户Service实现类
 * @author TianHB
 */
@Transactional(isolation=Isolation.REPEATABLE_READ, propagation=Propagation.REQUIRED, readOnly=true)
public class UserServiceImpl implements UserService{

	private UserDao userDao;

	//注入UserDao
	public void setUserDao(UserDao userDao) {
		this.userDao = userDao;
	}

	/**
	 * @Description 调用dao层获,获取User对象
	 * @return
	 */
	@Override
	public User getUserByNamePassword(User user) {

		System.out.println(userDao);

		//调用Dao层获取用户对象
		User u = userDao.getUserByUserName(user.getUser_name());

		//判断用户是否存在,不存在抛出异常:提示用户名不存在
		if(u == null) {
			throw new RuntimeException("用户名不存在");
		}

		//判断用户输入的密码和数据库中的密码是否一致,如何不一致抛出异常:用户名或密码错误
		if(!u.getUser_password().equals(user.getUser_password())) {
			throw new RuntimeException("用户名或密码错误");
		}

		//返回查询到的用户对象
		return u;
	}
}
31.创建用户登录的Dao层, UserDao.java

package com.demo.dao;

import com.demo.domain.User;

/**
 * @Description 用户Dao接口
 * @author TianHB
 */
public interface UserDao {

	/**
	 * @Description 根据用户名查询用户对象信息
	 * @return
	 */
	User getUserByUserName(String userName);

}
32.创建UserDao.java的实现类:UserDaoImpl.java

package com.demo.dao.impl;

import java.util.List;

import org.hibernate.criterion.DetachedCriteria;
import org.hibernate.criterion.Restrictions;
import org.springframework.orm.hibernate5.support.HibernateDaoSupport;

import com.demo.dao.UserDao;
import com.demo.domain.User;

/**
 * @Description 用户Dao实现类
 * @author TianHB
 */
public class UserDaoImpl extends HibernateDaoSupport implements UserDao{

	/**
	 * @Description 根据用户名获取用户对象
	 * @return
	 */
	@Override
	public User getUserByUserName(String userName) {

		//创建Criteria查询
		DetachedCriteria criteria = DetachedCriteria.forClass(User.class);

		//添加查询条件
		criteria.add(Restrictions.eq("user_name", userName));

		//查询返回的对象集合
		List<User> userList = (List<User>) getHibernateTemplate().findByCriteria(criteria);

		//如果集合不为null,并且长度大于一说明查询到了用户对象,获取第一个并返回
		if(userList != null && userList.size() > 0) {
			return userList.get(0);
		}else {
			return null;
		}

	}

}
33.将用户登录的三层: Action,Service,Dao添加到Spring容器中

<?xml version="1.0" encoding="UTF-8"?>
<beans xmlns:xsi="http://www.w3.org/2001/XMLSchema-instance"
		xmlns="http://www.springframework.org/schema/beans"
		xmlns:context="http://www.springframework.org/schema/context"
		xmlns:aop="http://www.springframework.org/schema/aop"
		xmlns:tx="http://www.springframework.org/schema/tx"
		xsi:schemaLocation="http://www.springframework.org/schema/beans http://www.springframework.org/schema/beans/spring-beans-4.2.xsd
							http://www.springframework.org/schema/context http://www.springframework.org/schema/context/spring-context-4.2.xsd
							http://www.springframework.org/schema/aop http://www.springframework.org/schema/aop/spring-aop-4.2.xsd
							http://www.springframework.org/schema/tx http://www.springframework.org/schema/tx/spring-tx-4.2.xsd ">

	<!-- 读取db.properties文件 -->
	<context:property-placeholder location="classpath:db.properties" />

	<!-- 配置c3p0连接池 -->
	<bean name="dataSource" class="com.mchange.v2.c3p0.ComboPooledDataSource" >
		<property name="jdbcUrl" value="${jdbc.jdbcUrl}" ></property>
		<property name="driverClass" value="${jdbc.driverClass}" ></property>
		<property name="user" value="${jdbc.user}" ></property>
		<property name="password" value="${jdbc.password}" ></property>
	</bean>

	<!-- 核心事务管理器 -->
	<bean name="transactionManager" class="org.springframework.orm.hibernate5.HibernateTransactionManager" >
		<property name="sessionFactory" ref="sessionFactory" ></property>
	</bean>

	<!-- 开启注解事务 -->
	<tx:annotation-driven transaction-manager="transactionManager" />

	<!-- 在spring配置中放置hibernate配置信息 -->
	<bean name="sessionFactory" class="org.springframework.orm.hibernate5.LocalSessionFactoryBean" >

		<!-- 将连接池注入到sessionFactory, hibernate会通过连接池获得连接 -->
		<property name="dataSource" ref="dataSource" ></property>

		<!-- 配置hibernate基本信息 -->
		<property name="hibernateProperties">
			<props>
				<!-- 方言 -->
				<prop key="hibernate.dialect" >org.hibernate.dialect.MySQLDialect</prop>

				<!-- 可选配置 -->
				<prop key="hibernate.show_sql" >true</prop>
				<prop key="hibernate.format_sql" >true</prop>
				<prop key="hibernate.hbm2ddl.auto" >update</prop>
			</props>
		</property>
		<!-- 指定domian数据所在的包路径,spring会自动读取包中的所有配置 -->
		<property name="mappingDirectoryLocations" value="classpath:com/demo/domain" ></property>

	</bean>

	<!-- UserAction -->
	<bean name="userAction" class="com.demo.web.action.UserAction" scope="prototype">
		<property name="userService" ref="userService"></property>
	</bean>

	<!-- UserService -->
	<bean name="userService" class="com.demo.service.impl.UserServiceImpl">
		<property name="userDao" ref="userDao"></property>
	</bean>

	<!-- UserDao -->
	<bean name="userDao" class="com.demo.dao.impl.UserDaoImpl">
		<!-- 注入sessionFactory -->
		<property name="sessionFactory" ref="sessionFactory"></property>
	</bean>

</beans>
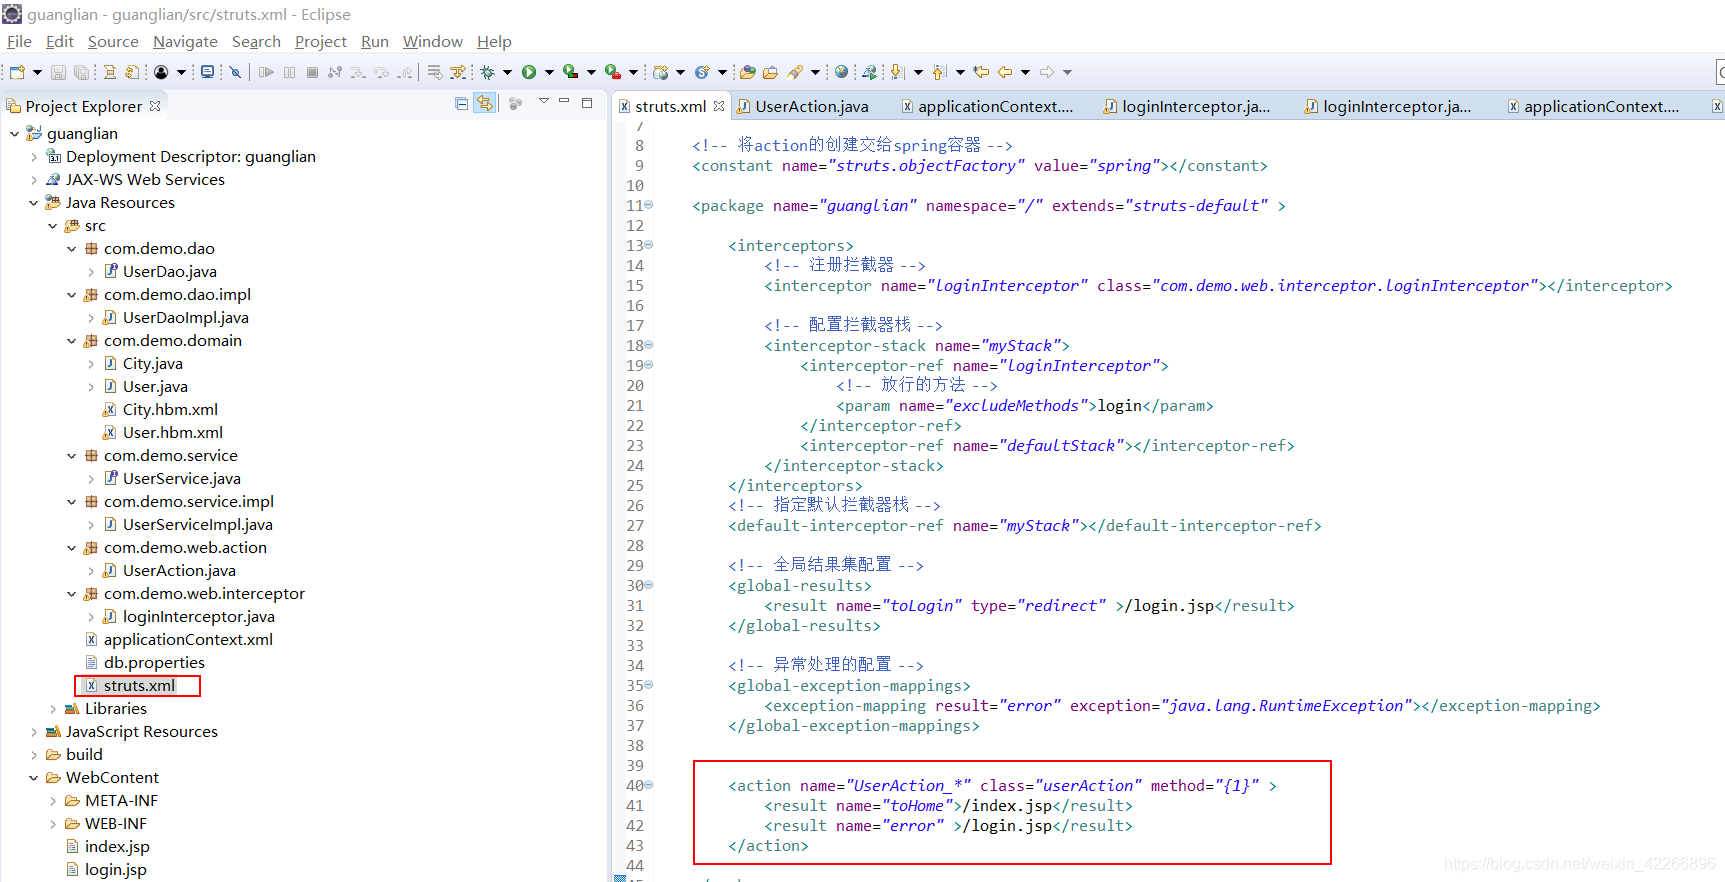
34.在struts.xml文件中配置login请求转发的jsp
<?xml version="1.0" encoding="UTF-8"?>
  <!DOCTYPE struts PUBLIC
	"-//Apache Software Foundation//DTD Struts Configuration 2.3//EN"
	"http://struts.apache.org/dtds/struts-2.3.dtd">

<struts>

	<!-- 将action的创建交给spring容器 -->
	<constant name="struts.objectFactory" value="spring"></constant>

	<package name="guanglian" namespace="/" extends="struts-default" >

		<interceptors>
			<!-- 注册拦截器 -->
			<interceptor name="loginInterceptor" class="com.demo.web.interceptor.loginInterceptor"></interceptor>

			<!-- 配置拦截器栈 -->
			<interceptor-stack name="myStack">
				<interceptor-ref name="loginInterceptor">
					<!-- 放行的方法 -->
					<param name="excludeMethods">login</param>
				</interceptor-ref>
				<interceptor-ref name="defaultStack"></interceptor-ref>
			</interceptor-stack>
		</interceptors>
		<!-- 指定默认拦截器栈 -->
		<default-interceptor-ref name="myStack"></default-interceptor-ref>

		<!-- 全局结果集配置 -->
		<global-results>
			<result name="toLogin" type="redirect" >/login.jsp</result>
		</global-results>

		<!-- 异常处理的配置 -->
		<global-exception-mappings>
			<exception-mapping result="error" exception="java.lang.RuntimeException"></exception-mapping>
		</global-exception-mappings>


		<action name="UserAction_*" class="userAction" method="{1}" >
			<result name="toHome">/index.jsp</result>
			<result name="error" >/login.jsp</result>
		</action>

	</package>

</struts>
登录成功之后将跳转到index.jsp中,如果登录失败将跳转到本页面
35.浏览器地址栏输入: http://localhost:8080/guanglian/login.jsp ,测试功能效果
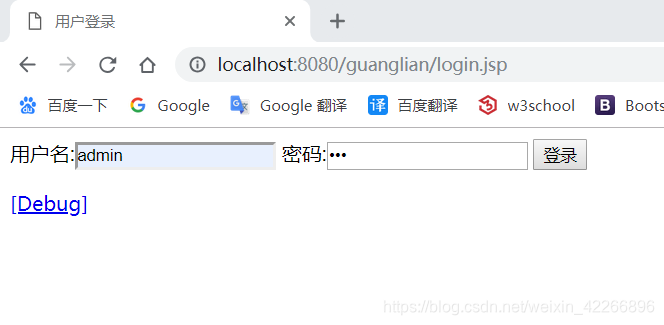
36.输入数据库中存储的用户名密码, 账号: admin 密码: 123 , 登录测试
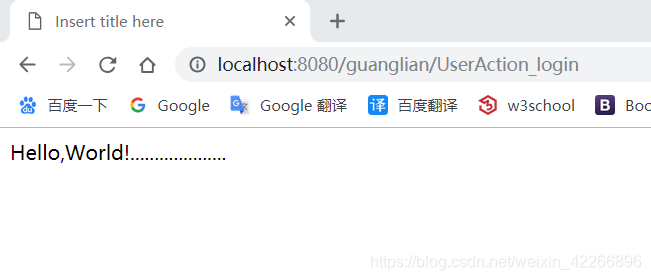
登录成功跳转页面: 跳转到 index.jsp
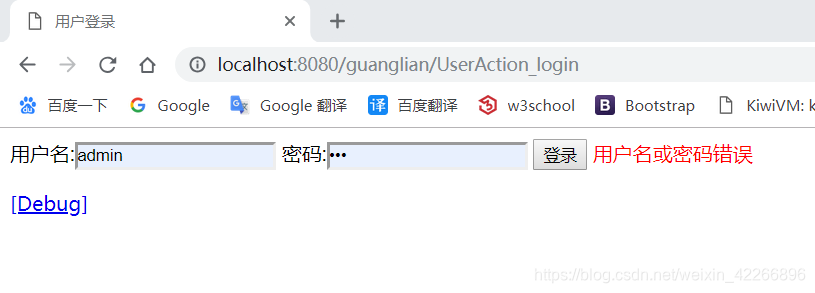
密码错误,登录失败还是本页,并提示: 用户名或密码错误
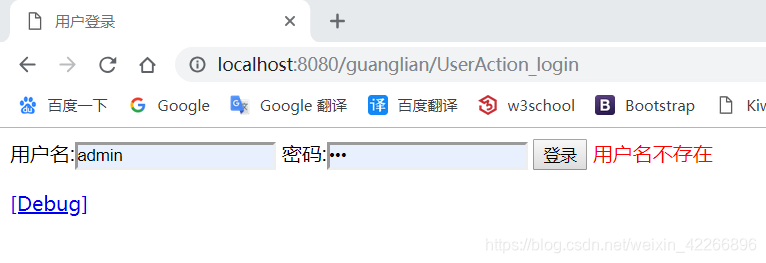
用户错误,登录失败还是本页,并提示: 用户名不存在
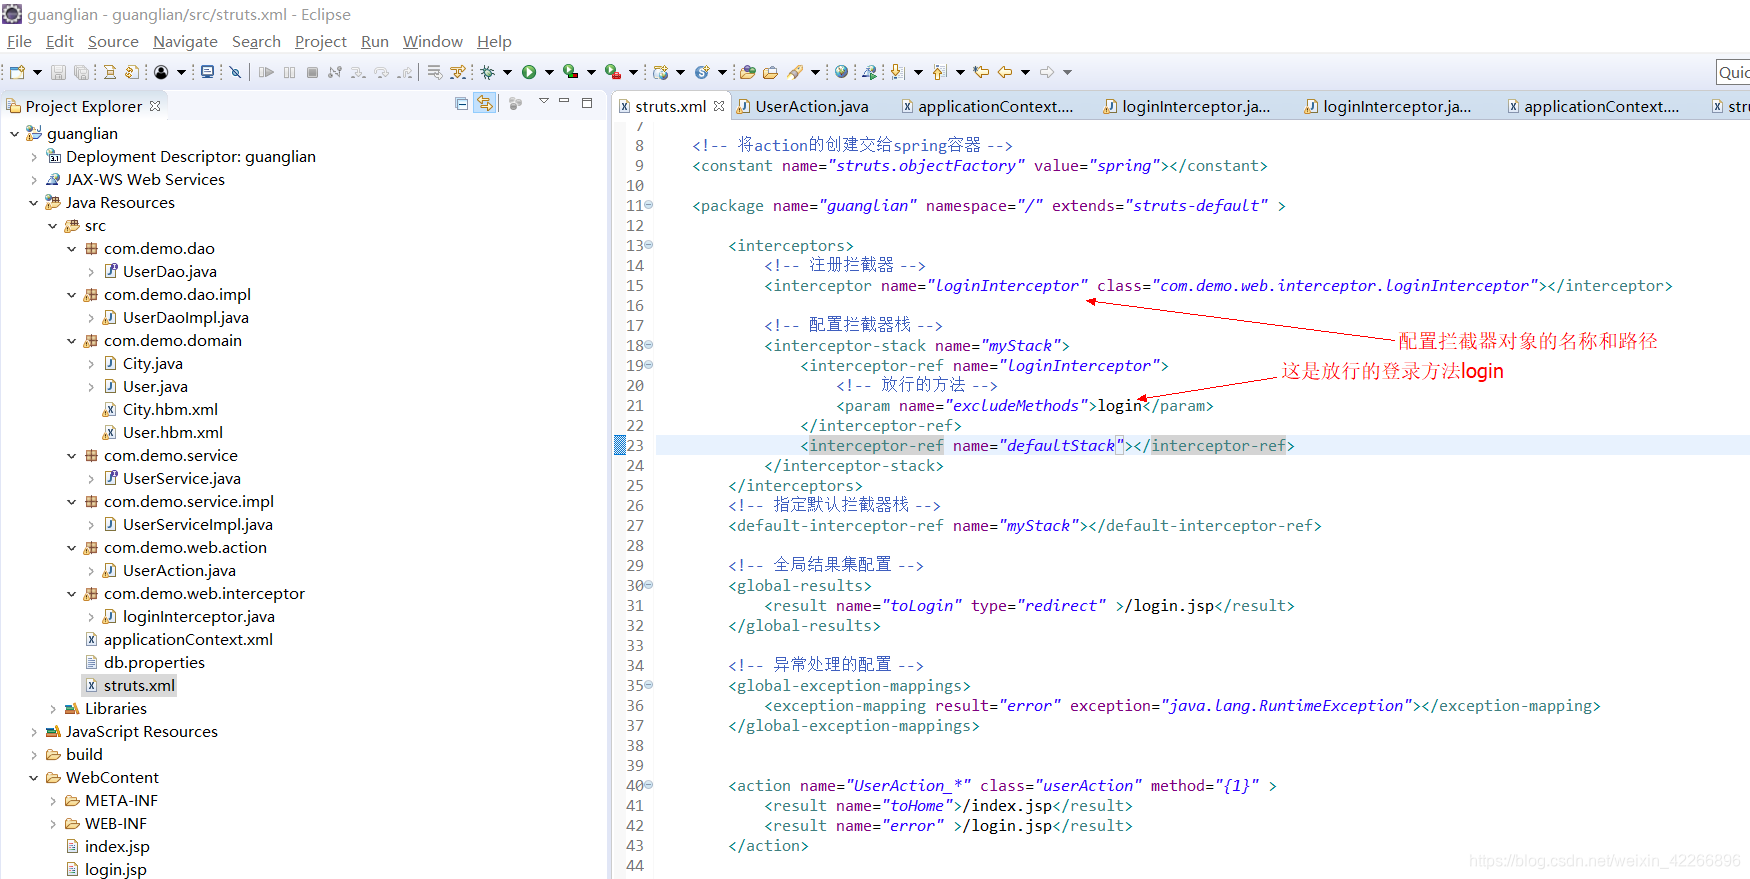
37.创建拦截器对象,除了login请求不拦截,其余请求全拦截(如果有注册功能,注册请求需放行)
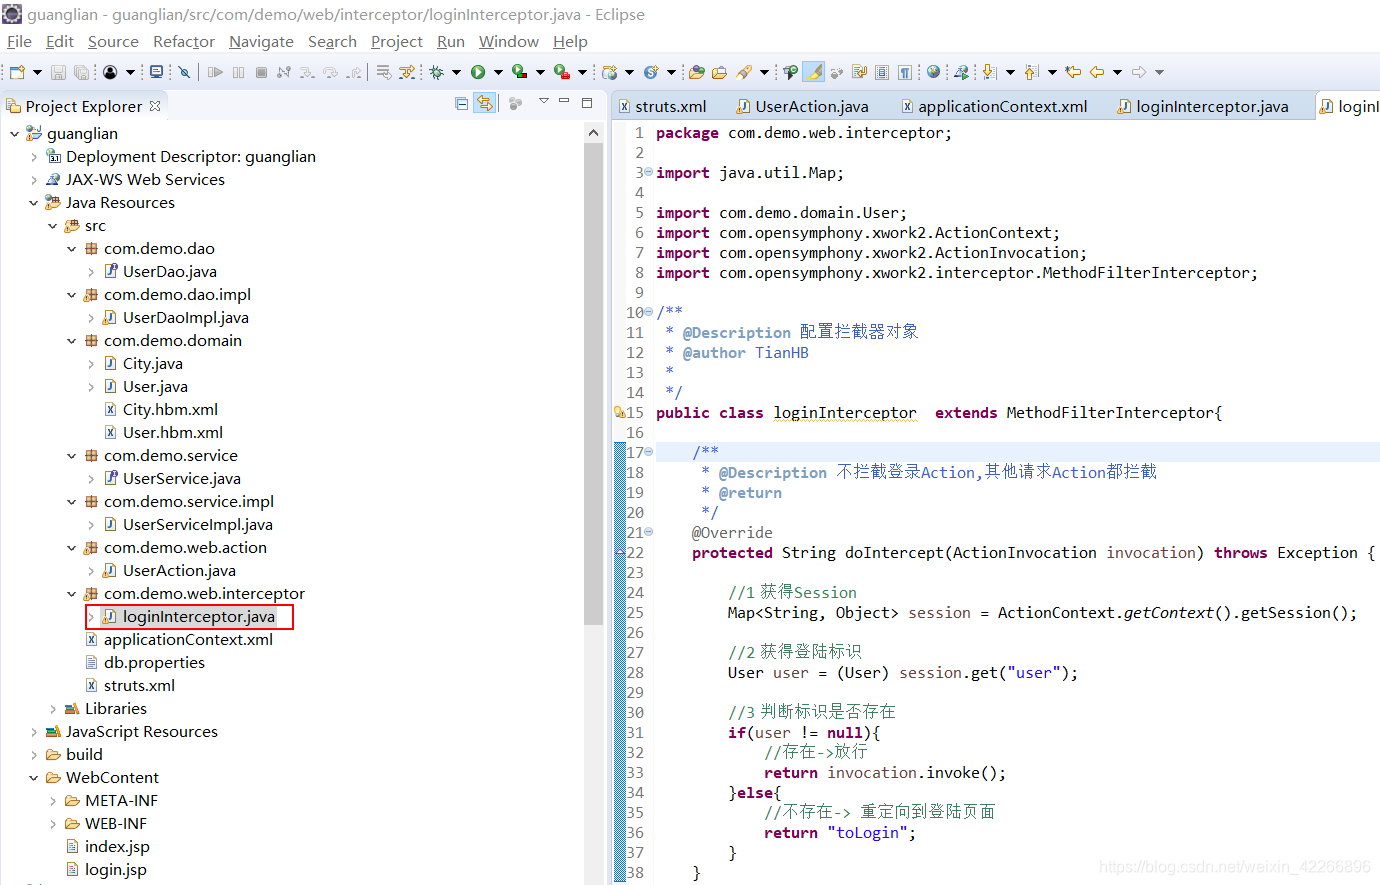
package com.demo.web.interceptor;

import java.util.Map;

import com.demo.domain.User;
import com.opensymphony.xwork2.ActionContext;
import com.opensymphony.xwork2.ActionInvocation;
import com.opensymphony.xwork2.interceptor.MethodFilterInterceptor;

/**
 * @Description 配置拦截器对象
 * @author TianHB
 *
 */
public class loginInterceptor  extends MethodFilterInterceptor{

	/**
	 * @Description 不拦截登录Action,其他请求Action都拦截
	 * @return
	 */
	@Override
	protected String doIntercept(ActionInvocation invocation) throws Exception {

		//1 获得Session
		Map<String, Object> session = ActionContext.getContext().getSession();

		//2 获得登陆标识
		User user = (User) session.get("user");

		//3 判断标识是否存在
		if(user != null){
			//存在->放行
			return invocation.invoke();
		}else{
			//不存在-> 重定向到登陆页面
			return "toLogin";
		}
	}

}
38.struts.xml中配置该拦截器对象的拦截规则
<?xml version="1.0" encoding="UTF-8"?>
  <!DOCTYPE struts PUBLIC
	"-//Apache Software Foundation//DTD Struts Configuration 2.3//EN"
	"http://struts.apache.org/dtds/struts-2.3.dtd">

<struts>

	<!-- 将action的创建交给spring容器 -->
	<constant name="struts.objectFactory" value="spring"></constant>

	<package name="guanglian" namespace="/" extends="struts-default" >

		<interceptors>
			<!-- 注册拦截器 -->
			<interceptor name="loginInterceptor" class="com.demo.web.interceptor.loginInterceptor"></interceptor>

			<!-- 配置拦截器栈 -->
			<interceptor-stack name="myStack">
				<interceptor-ref name="loginInterceptor">
					<!-- 放行的方法 -->
					<param name="excludeMethods">login</param>
				</interceptor-ref>
				<interceptor-ref name="defaultStack"></interceptor-ref>
			</interceptor-stack>
		</interceptors>
		<!-- 指定默认拦截器栈 -->
		<default-interceptor-ref name="myStack"></default-interceptor-ref>

		<!-- 全局结果集配置 -->
		<global-results>
			<result name="toLogin" type="redirect" >/login.jsp</result>
		</global-results>

		<!-- 异常处理的配置 -->
		<global-exception-mappings>
			<exception-mapping result="error" exception="java.lang.RuntimeException"></exception-mapping>
		</global-exception-mappings>


		<action name="UserAction_*" class="userAction" method="{1}" >
			<result name="toHome">/index.jsp</result>
			<result name="error" >/login.jsp</result>
		</action>

	</package>

</struts>
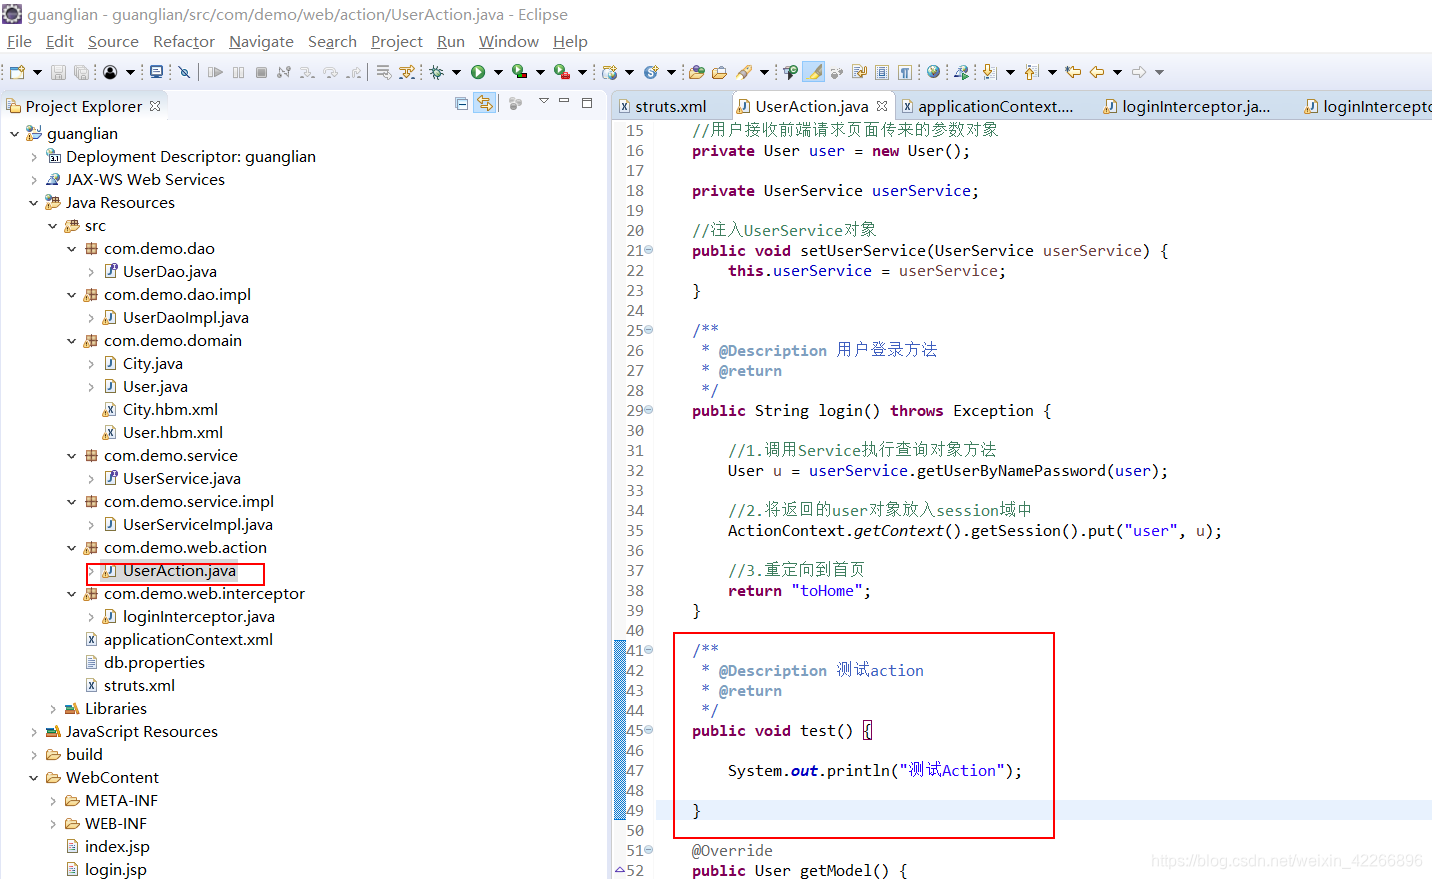
39.测试拦截器是否好用, 在UserAction.java中创建一个 test方法,进行访问测试
40.访问 http://localhost:8080/guanglian/UserAction_test 测试拦截器
当前用户为未登录状态:
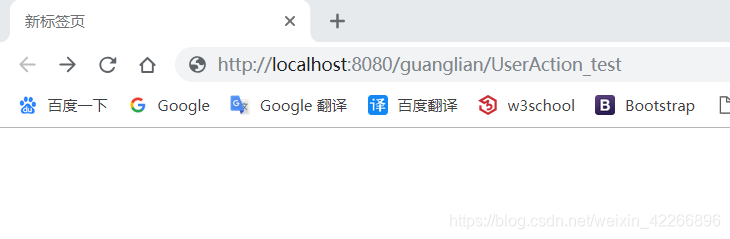
测试拦截器成功跳转到: http://localhost:8080/guanglian/login.jsp 登录页面
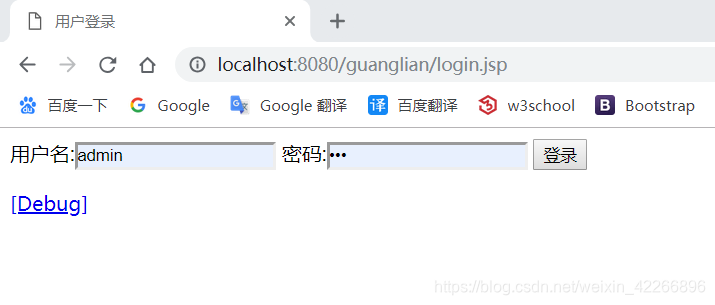
现在进行登录:
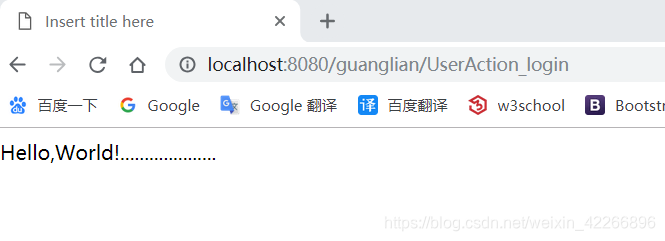
再次测试访问: http://localhost:8080/guanglian/UserAction_test
查看后台输出语句:
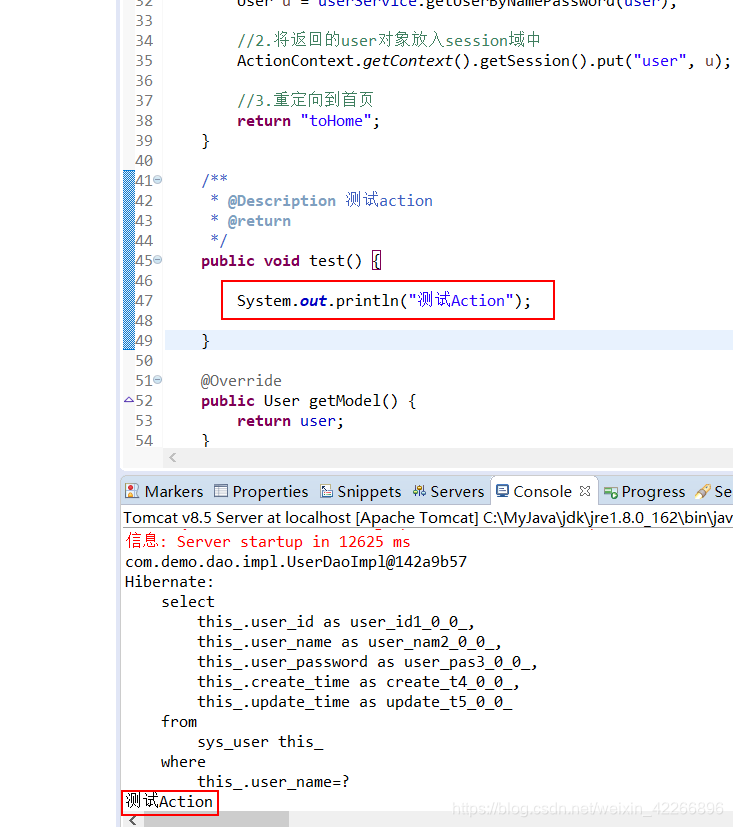
拦截器测试通过.
–以上步骤是SSH框架搭建以及简单的用户登录功能–
–以下步骤是树形结构的后台代码以及前台页面功能–
树形结构还原功能预览:
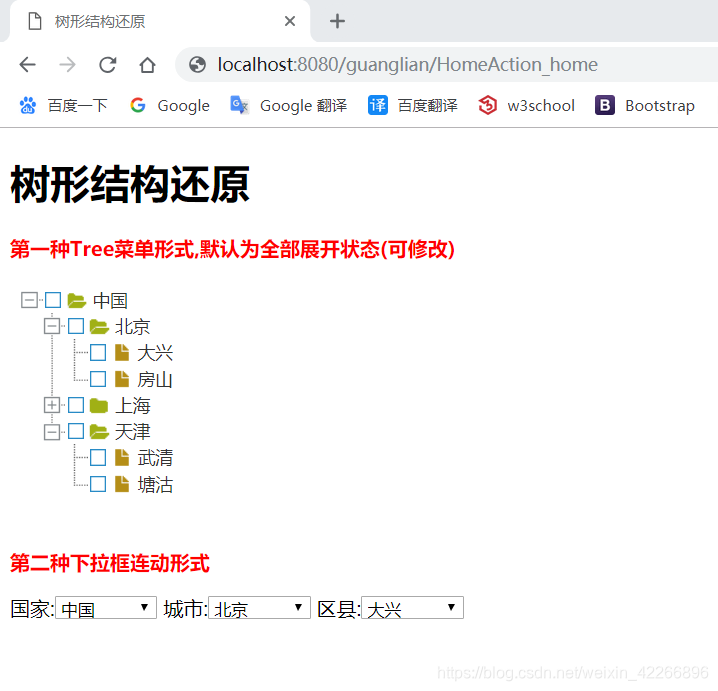
*因时间原因,后续完善树形结构的后台代码以及前台页面功能,抱歉…
*多有不足,有问题的地方还请多多指教,谢谢…

 468


 扫一扫


 被折叠的 条评论
为什么被折叠?
 到【灌水乐园】发言


