


 本文深入讲解LNMP(Linux+Nginx+MySQL+PHP)架构,包括各组件的安装配置、Nginx与Apache对比、FastCGI工作原理及Nginx高效特性。详细介绍了LNMP环境下的PHP-FPM管理、MySQL安装配置流程,以及Nginx的安装与配置细节。
12.1 LNMP架构介绍
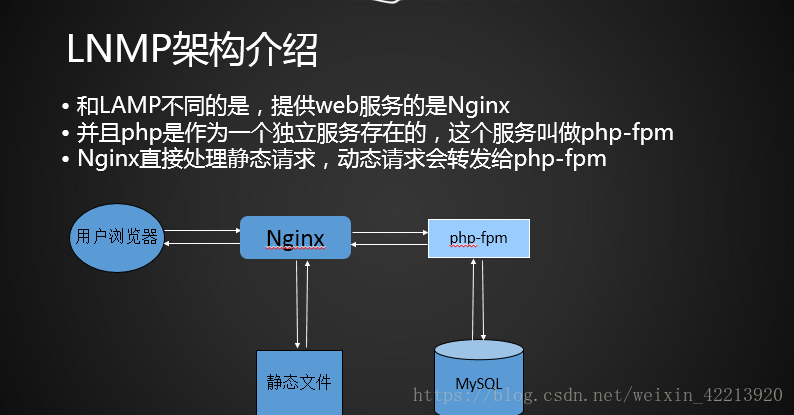
LNMP就是Linux+Nginx+MySQL+PHP,Linux作为服务器的操作系统,MySQL即为数据库。是一组搭建动态网站的开源软件架构,本身是各自独立的软件服务,放在一起使用拥有很高的兼容性,共同组成了一个强大的WEB应用程序平台。
Nginx为一款高性能Web服务器,本身是不能处理PHP的,当接收到请求时,判断如果是PHP请求就会将请求交给PHP解释器处理,然后将结果返回给Client。Nginx一般把请求转发给fast-cgi管理进程处理,fast-cgi管理进程再选择cgi子进程处理请求,然后把结果返给Nginx。
LNMP就是Linux+Nginx+MySQL+PHP,Linux作为服务器的操作系统,MySQL即为数据库。
区别(lamp和lnmp)
Apache一般是把PHP当做自己的一个模块来启动;而Ngnix则是把http请求变量转发给PHP进程,即PHP独立进程,与Ngnix通信,这种方式叫做Fast-CGI运行方式。所以Apache所编译的PHP不能用于Nginx。
Linux、MySQL、PHP这些框架的优点之前已经介绍过,LNMP和LAMP不同的一点就是Web服务器Nginx,那么Nginx相比Apache有什么优点呢?
Nginx是一个小巧而高效的Linux下的Web服务器软件,已在一些大型网站上运行多年,很多国内外的门户网站、行业网站也都在是使用Nginx,相当的稳定。
Nginx的主要特点是稳定、功能丰富、安装配置简单、低系统资源。Nginx对于反向代理和负载均衡有不错的支持。Nginx不仅仅可以做为Web服务器,还可以做负载均衡服务器、代理服务器和邮件服务器。
作为Web服务器来说,相比 Apache,Nginx 使用更少的资源,支持更多的并发连接,Nginx处理静态文件、索引文件,自动索引的效率非常高,体现更高的效率。
作为代理服务器,Nginx可以实现无缓存的反向代理加速,提高网站的运行速度。
作为负载均衡服务器,Nginx既可以在内部直接支持Rails和PHP,也可以支持HTTP代理服务器对外进行服务,同时还支持简单的容错和利用算法进行负载均衡;Nginx 用 C 编写, 不论是系统资源开销还是 CPU 使用效率都比 Perlbal 要好的多。
作为邮件代理服务器来说, Nginx是一个非常优秀的邮件代理服务器(最早开发这个产品的目的之一也是作为邮件代理服务器)。
安装配置上,Nginx安装简单、配置灵活、配置文件非常简洁(还能够支持perl语法);性能方面,Nginx是专门为性能优化而开发的,非常注重效率。它采用Poll模型,可以支持更多的并发连接,最大可以支持对50000个并发连接数的形影,而且只占用很低的内存资源;可用性方面,Nginx支持热部署,启动速度特别迅速,可以在不间断服务的情况下,对软件版本或者配置进行升级,及时运行数月也无需重新启动,几乎可以做到7*24显示不间断运行。
可见,LNMP(Linux-Nginx-MySQL-PHP)这四种软件的组合,可以成为一个免费、高效、扩展性强的网站服务系统。
Nginx为一款高性能Web服务器,本身是不能处理PHP的,当接收到请求时,判断如果是PHP请求就会将请求交给PHP解释器处理,然后将结果返回给Client。Nginx一般把请求转发给fast-cgi管理进程处理,fast-cgi管理进程再选择cgi子进程处理请求,然后把结果返给Nginx。
初步认识Fast-CGI和Nginx+Fast-CGI
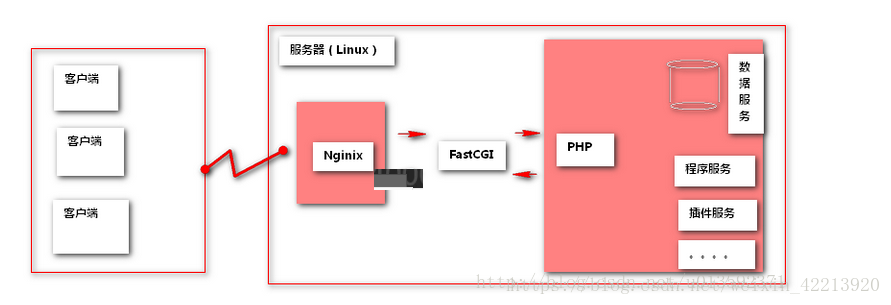
1.Apache+PHP 和 Nginx+PHP的区别
Apache一般是把PHP当做自己的一个模块来启动;而Ngnix则是把http请求变量转发给PHP进程,即PHP独立进程,与Ngnix通信,这种方式叫做Fast-CGI运行方式。所以Apache所编译的PHP不能用于Nginx。
Nginx+PHP的基本结构图如下:

2.什么是Fast-CGI
Fast-CGI是一个可伸缩的、高速的在HTTP server和动态脚本语言间通信的接口。多数流行的HTTP server都支持Fast-CGI,包括Apache、Nginx和lighttpd等。同时,Fast-CGI也被许多脚本语言支持,其中就有PHP。
Fast-CGI是从CGI发展改进而来的。传统CGI接口方式的主要缺点是性能很差,因为每次HTTP服务器遇到动态程序时都需要重新启动脚本解析器来执行解析,然后将结果返回给HTTP服务器。这在处理高并发访问时几乎是不可用的。另外传统的CGI接口方式安全性也很差,现在已经很少使用了。
FastCGI接口方式采用C/S结构,可以将HTTP服务器和脚本解析服务器分开,同时在脚本解析服务器上启动一个或者多个脚本解析守护进程。当HTTP服务器每次遇到动态程序时,可以将其直接交付给Fast-CGI进程来执行,然后将得到的结果返回给浏览器。这种方式可以让HTTP服务器专一地处理静态请求或者将动态脚本服务器的结果返回给客户端,这在很大程度上提高了整个应用系统的性能。
后续还将会有php-fpm和fast-cgi之间的关系的解释。
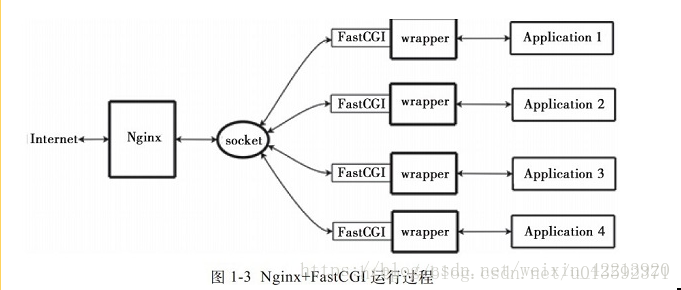
3.Nginx+Fast-CGI运行原理
Nginx不支持对外部程序的直接调用或者解析,所有的外部程序(包括PHP)必须通过Fast-CGI接口来调用。Fast-CGI接口在Linux下是socket(这个socket可以是文件socket,也可以是ip socket)。
wrapper:为了调用CGI程序,还需要一个Fast-CGI的wrapper(wrapper可以理解为用于启动另一个程序的程序),这个wrapper绑定在某个固定socket上,如端口或者文件socket。当Nginx将CGI请求发送给这个socket的时候,通过Fast-CGI接口,wrapper接收到请求,然后Fork(派生)出一个新的线程,这个线程调用解释器或者外部程序处理脚本并读取返回数据;接着,wrapper再将返回的数据通过Fast-CGI接口,沿着固定的socket传递给Nginx;最后,Nginx将返回的数据(html页面或者图片)发送给客户端。这就是Nginx+Fast-CGI的整个运作过程。

所以,我们首先需要一个wrapper,这个wrapper需要完成的工作:
1>通过调用fast-cgi(库)的函数通过socket和Nginx通信(读写socket是fast-cgi内部实现的功能,对wrapper是非透明的)
2>调度thread,进行fork和kill
3>和application(php)进行通信
4.简述php-fpm
PHP-FPM是一个PHP FastCGI管理器,是只用于PHP的,它其实是PHP源代码的一个补丁,旨在将Fast-CGI进程管理整合进PHP包中。必须将它patch到你的PHP源代码中,在编译安装PHP后才可以使用。新版的PHP已经集成了php-fpm,在./configure的时候带 –enable-fpm参数即可开启PHP-FPM。
扩展
Nginx为什么比Apache Httpd高效:原理篇 http://www.toxingwang.com/linux-unix/linux-basic/1712.html
https://coding.net/u/aminglinux/p/nginx/git/blob/master/4z/IO.md?public=true
https://www.zhihu.com/question/64727674
apache和nginx工作原理比较 http://www.server110.com/nginx/201402/6543.html
概念了解:CGI,FastCGI,PHP-CGI与PHP-FPM https://www.awaimai.com/371.html
12.2 MYSQL安装
yum -y install make gcc-c++ cmake bison-devel ncurses-devel yum install -y autoconf
wget https://cdn.mysql.com//Downloads/MySQL-5.6/mysql-5.6.35.tar.gz
tar zxvf mysql-5.6.35.tar.gz
cd mysql-5.6.35
mkdir -p /usr/local/mysql/data
cmake -DCMAKE_INSTALL_PREFIX=/usr/local/mysql -DMYSQL_DATADIR=/usr/local/mysql/data -DSYSCONFDIR=/etc -DWITH_MYISAM_STORAGE_ENGINE=1 -DWITH_INNOBASE_STORAGE_ENGINE=1 -DWITH_MEMORY_STORAGE_ENGINE=1 -DWITH_READLINE=1 -DMYSQL_UNIX_ADDR=/usr/local/mysql/mysql.sock -DMYSQL_TCP_PORT=3306 -DENABLED_LOCAL_INFILE=1 -DWITH_PARTITION_STORAGE_ENGINE=1 -DEXTRA_CHARSETS=all -DDEFAULT_CHARSET=utf8 -DDEFAULT_COLLATION=utf8_general_ci
make && make install make -j 2 && make install -j 2
make clean
复制代码
三、配置MySQL
复制代码
8、设置权限
查看是否有mysql用户及用户组
[root@localhost mysql-5.6.35]# cat /etc/passwd
[root@localhost mysql-5.6.35]# cat /etc/group
如果没有就添加mysql用户和组
[root@localhost mysql-5.6.35]# groupadd mysql
[root@localhost mysql-5.6.35]# useradd -g mysql mysql
修改/usr/local/mysql权限
[root@localhost mysql-5.6.35]# chown -R mysql:mysql /usr/local/mysql
9、初始化配置
进入安装路径
[root@localhost mysql-5.6.35]# cd /usr/local/mysql
执行初始化配置脚本,创建系统自带的数据库和表
[root@localhost mysql]# scripts/mysql_install_db --basedir=/usr/local/mysql --datadir=/usr/local/mysql/data --user=mysql
10、启动MySQL
添加服务,拷贝服务脚本到init.d目录
如果/etc目录有之前存在的my.cnf文件,将其重命名。启动MySQL服务时,会优先在/etc目录下查找
[root@localhost mysql]# mv /etc/my.cnf /etc/my.cnf.bak
[root@localhost mysql]# cp support-files/mysql.server /etc/init.d/mysql
[root@localhost mysql]# chkconfig mysql on
[root@localhost mysql]# service mysql start --启动MySQL
11、配置用户
设置PATH
[root@localhost mysql]# echo "export PATH=$PATH:/usr/local/mysql/bin" >> /etc/profile
[root@localhost mysql]# source /etc/profile
[root@localhost mysql]# echo $PATH
修改root密码
[root@localhost mysql]# mysql -uroot
mysql> SET PASSWORD = PASSWORD('mysql5635');
设置mydba用户可以远程访问
mysql> GRANT ALL PRIVILEGES ON *.* TO 'mydba'@'%' IDENTIFIED BY 'mysql5635' WITH GRANT OPTION;
防火墙设置可参考 http://www.cnblogs.com/ShanFish/p/6519950.html
12.3 PHP5安装
• 和LAMP安装PHP方法有差别,需要开启php-fpm服务
yum install expat-devel yum -y install pcre-devel yum install -y epel-release yum install -y libmcrypt-devel
• cd /usr/local/src/
• wget http://cn2.php.net/distributions/php-5.6.30.tar.gz
• tar zxf php-5.6.30.tar.gz
• useradd -s /sbin/nologin php-fpm
• cd php-5.6.30
• ./configure --prefix=/usr/local/php-fpm --with-config-file-path=/usr/local/php-fpm/etc --enable-fpm --with-fpm-user=php-fpm --with-fpm-group=php-fpm --with-mysql=/usr/local/mysql --with-mysqli=/usr/local/mysql/bin/mysql_config --with-pdo-mysql=/usr/local/mysql --with-mysql-sock=/tmp/mysql.sock --with-libxml-dir --with-gd --with-jpeg-dir --with-png-dir --with-freetype-dir --with-iconv-dir --with-zlib-dir --with-mcrypt --enable-soap --enable-gd-native-ttf --enable-ftp --enable-mbstring --enable-exif --with-pear --with-curl --with-openssl
./configure --prefix=/usr/local/php-fpm #指定安装路径php-fpm
--with-config-file-path=/usr/local/php-fpm/etc #配置文件所在路径
--enable-fpm #开启fpm 不加就不能启动这个服务
--with-fpm-user=php-fpm --with-fpm-group=php-fpm #指定用户和组
--with-mysql=/usr/local/mysql #指定mysql路径
--with-mysqli=/usr/local/mysql/bin/mysql_config --with-pdo-mysql=/usr/local/mysql --with-mysql-sock=/tmp/mysql.sock #指定mysqli 指定mysql sock
• make && make install
• cp php.ini-production /usr/local/php-fpm/etc/php.ini 生产环境
cp php.ini-development /usr/local/php-fpm/etc/php.ini 测试环境
cd /usr/local/php-fpm/etc/ vim php-fpm.conf
• vi /usr/local/php/etc/php-fpm.conf //写入如下内容(参考https://coding.net/u/aminglinux/p/aminglinux-book/git/blob/master/D15Z/php-fpm.conf)
[global]
pid = /usr/local/php-fpm/var/run/php-fpm.pid
error_log = /usr/local/php-fpm/var/log/php-fpm.log
[www]
listen = /tmp/php-fcgi.sock
listen.mode = 666
user = php-fpm
group = php-fpm
pm = dynamic
pm.max_children = 50
pm.start_servers = 20
pm.min_spare_servers = 5
pm.max_spare_servers = 35
pm.max_requests = 500
rlimit_files = 1024
3456
cd /usr/local/src/php-5.6.30/
• cp sapi/fpm/init.d.php-fpm /etc/init.d/php-fpm #这个是启动脚本
• chmod 755 /etc/init.d/php-fpm
• chkconfig --add php-fpm
• chkconfig php-fpm on
/usr/local/php-fpm/sbin/php-fpm -t # 检测下有没有错误
• service php-fpm start
• ps aux |grep php-fpm

12.5 nginx介绍
• Nginx官网 nginx.org,最新版1.13,最新稳定版1.12
• Nginx应用场景:web服务、反向代理、负载均衡
• Nginx著名分支,淘宝基于Nginx开发的Tengine,使用上和Nginx一致,服务名,配置文件名都一样,和Nginx的最大区别在于Tenging增加了一些定制化模块,在安全限速方面表现突出,另外它支持对js,css合并
• Nginx核心+lua相关的组件和模块组成了一个支持lua的高性能web容器openresty,参考http://jinnianshilongnian.iteye.com/blog/2280928
12.6nginx安装
•cd /usr/local/src
• wget http://nginx.org/download/nginx-1.12.1.tar.gz
• tar zxf nginx-1.12.1.tar.gz
• ./configure --prefix=/usr/local/nginx #故意不做复杂
• make && make install
/usr/local/nginx/sbin/nginx -t #检查配置文件
• vim /etc/init.d/nginx //复制如下内容(参考https://coding.net/u/aminglinux/p/aminglinux-book/git/blob/master/D15Z/etc_init.d_nginx )
#!/bin/bash
# chkconfig: - 30 21
# description: http service.
# Source Function Library
. /etc/init.d/functions
# Nginx Settings
NGINX_SBIN="/usr/local/nginx/sbin/nginx"
NGINX_CONF="/usr/local/nginx/conf/nginx.conf"
NGINX_PID="/usr/local/nginx/logs/nginx.pid"
RETVAL=0
prog="Nginx"
start()
{
echo -n $"Starting $prog: "
mkdir -p /dev/shm/nginx_temp
daemon $NGINX_SBIN -c $NGINX_CONF
RETVAL=$?
echo
return $RETVAL
}
stop()
{
echo -n $"Stopping $prog: "
killproc -p $NGINX_PID $NGINX_SBIN -TERM
rm -rf /dev/shm/nginx_temp
RETVAL=$?
echo
return $RETVAL
}
reload()
{
echo -n $"Reloading $prog: "
killproc -p $NGINX_PID $NGINX_SBIN -HUP
RETVAL=$?
echo
return $RETVAL
}
restart()
{
stop
start
}
configtest()
{
$NGINX_SBIN -c $NGINX_CONF -t
return 0
}
case "$1" in
start)
start
;;
stop)
stop
;;
reload)
reload
;;
restart)
restart
;;
configtest)
configtest
;;
*)
echo $"Usage: $0 {start|stop|reload|restart|configtest}"
RETVAL=1
esac
exit $RETVAL
• chmod 755 /etc/init.d/nginx
• chkconfig --add nginx
• chkconfig nginx on
• cd /usr/local/nginx/conf/; mv nginx.conf nginx.conf.bak
• vim nginx.conf //写入如下内容(参考https://coding.net/u/aminglinux/p/aminglinux-book/git/blob/master/D15Z/nginx.conf)
user nobody nobody;
worker_processes 2;
error_log /usr/local/nginx/logs/nginx_error.log crit;
pid /usr/local/nginx/logs/nginx.pid;
worker_rlimit_nofile 51200;
events
{
use epoll;
worker_connections 6000;
}
http
{
include mime.types;
default_type application/octet-stream;
server_names_hash_bucket_size 3526;
server_names_hash_max_size 4096;
log_format combined_realip '$remote_addr $http_x_forwarded_for [$time_local]'
' $host "$request_uri" $status'
' "$http_referer" "$http_user_agent"';
sendfile on;
tcp_nopush on;
keepalive_timeout 30;
client_header_timeout 3m;
client_body_timeout 3m;
send_timeout 3m;
connection_pool_size 256;
client_header_buffer_size 1k;
large_client_header_buffers 8 4k;
request_pool_size 4k;
output_buffers 4 32k;
postpone_output 1460;
client_max_body_size 10m;
client_body_buffer_size 256k;
client_body_temp_path /usr/local/nginx/client_body_temp;
proxy_temp_path /usr/local/nginx/proxy_temp;
fastcgi_temp_path /usr/local/nginx/fastcgi_temp;
fastcgi_intercept_errors on;
tcp_nodelay on;
gzip on;
gzip_min_length 1k;
gzip_buffers 4 8k;
gzip_comp_level 5;
gzip_http_version 1.1;
gzip_types text/plain application/x-javascript text/css text/htm
application/xml;
server
{
listen 80;
server_name localhost;
index index.html index.htm index.php;
root /usr/local/nginx/html;
location ~ \.php$
{
include fastcgi_params;
fastcgi_pass unix:/tmp/php-fcgi.sock;
fastcgi_index index.php;
fastcgi_param SCRIPT_FILENAME /usr/local/nginx/html$fastcgi_script_name;
}
}
}
• /usr/local/nginx/sbin/nginx -t
• /etc/init.d/nginx start
• netstat -lntp |grep 80

conf # 配置文件目录
html #样例文件
logs #存放日志
sbin #进程核心文件
https://coding.net/u/aminglinux/p/nginx/git/tree/master/3z 配置介绍
nginx.conf 文件详解
user nobody nobody; #启动nginx是那个用户 ningx组上传图片的那个用户 那个用户用户读
worker_processes 2; #子进程有几个
error_log /usr/local/nginx/logs/nginx_error.log crit; #错误日志
pid /usr/local/nginx/logs/nginx.pid; #PID
worker_rlimit_nofile 51200; # nginx最多可以打开多少个文件
events
{
use epoll; #使用epoll模式
worker_connections 6000; #进程最多多少个连接最大连接
}
http
{
include mime.types;
default_type application/octet-stream;
server_names_hash_bucket_size 3526;
server_names_hash_max_size 4096;
log_format combined_realip '$remote_addr $http_x_forwarded_for [$time_local]'
' $host "$request_uri" $status'
' "$http_referer" "$http_user_agent"';
sendfile on;
tcp_nopush on;
keepalive_timeout 30;
client_header_timeout 3m;
client_body_timeout 3m;
send_timeout 3m;
connection_pool_size 256;
client_header_buffer_size 1k;
large_client_header_buffers 8 4k;
request_pool_size 4k;
output_buffers 4 32k;
postpone_output 1460;
client_max_body_size 10m;
client_body_buffer_size 256k;
client_body_temp_path /usr/local/nginx/client_body_temp;
proxy_temp_path /usr/local/nginx/proxy_temp;
fastcgi_temp_path /usr/local/nginx/fastcgi_temp;
fastcgi_intercept_errors on;
tcp_nodelay on;
gzip on;
gzip_min_length 1k;
gzip_buffers 4 8k;
gzip_comp_level 5;
gzip_http_version 1.1;
gzip_types text/plain application/x-javascript text/css text/htm
application/xml;
server
{
listen 80;
server_name localhost;
index index.html index.htm index.php;
root /usr/local/nginx/html;
location ~ \.php$ #解析PHP部分
{
include fastcgi_params;
fastcgi_pass unix:/tmp/php-fcgi.sock; #nginx调用PHP部分 指定PHP监听的PHP端口或者是监听的sock
fastcgi_pass 127.0.0.1:9000; #2种不同的方式
fastcgi_index index.php;
fastcgi_param SCRIPT_FILENAME /usr/local/nginx/html$fastcgi_script_name;
}
}
}


 被折叠的 条评论
为什么被折叠?
被折叠的 条评论
为什么被折叠?
 到【灌水乐园】发言


