


回顾mybatis:
创建mybatis的全局配置文件,配置数据源信息,配置映射
通过读取mybatis的全局配置文件创建sqlSessionFactory实例(会话工厂是需要创建一份就可以了)
通过会话工厂创建会话,SQLSession。
整合思想
Spring通过单例方式管理SQLSessionFactory
spring和mybatis整合生成代理对象,使用SQLSessionFactory创建SQLSession,整合自动完成
持久侧的Mapper都需要交给Spring管理
在mybatis中,SQLSessionFactory由SQLSessionFactoryBuilder来创建
在mybatis和spring整合过程中,使用SQLSessionFactoryBean来替代,SQLSessionFactoryBean有一个必须的属性DataSource,另外还需要一个通用的属性configLocation(用来指定mybatis的xml配置文件)
整合步骤
引入spring-mybatis的整合jar
引入spring的依赖(四个核心的以及你要用到的都要引入),JDBC Templete的也需要,还有mybatis的依赖
还需要mybatis提供的一个专门整合spring的jar:mybatis-spring
全部放到你项目的全局配置pom.xml中
<!--mybatis和spring整合jar-->
<dependency>
    <groupId>org.mybatis</groupId>
    <artifactId>mybatis-spring</artifactId>
    <version>1.3.0</version>
</dependency>
在spring配置文件中配置原本需要在mybatis中做的配置
mybatis的全局配置文件中的数据源以及mapper映射放入到spring中,另外还要整合SQLSessionFactory和为mapper映射设置代理模式
<?xml version="1.0" encoding="UTF-8"?>
<beans  xmlns="http://www.springframework.org/schema/beans"
        xmlns:xsi="http://www.w3.org/2001/XMLSchema-instance"
        xmlns:p="http://www.springframework.org/schema/p"
        xmlns:aop="http://www.springframework.org/schema/aop"
        xmlns:context="http://www.springframework.org/schema/context"
        xmlns:tx="http://www.springframework.org/schema/tx"
        xsi:schemaLocation="http://www.springframework.org/schema/beans
        http://www.springframework.org/schema/beans/spring-beans.xsd
       http://www.springframework.org/schema/context
       http://www.springframework.org/schema/context/spring-context-4.2.xsd
        http://www.springframework.org/schema/aop
        http://www.springframework.org/schema/aop/spring-aop-4.3.xsd
        http://www.springframework.org/schema/tx
        http://www.springframework.org/schema/tx/spring-tx-4.3.xsd">


    <!--数据库连接池-->
    <bean id="dataSource" class="com.mchange.v2.c3p0.ComboPooledDataSource">
        <property name="driverClass" value="${jdbc.driver}"/>
        <property name="jdbcUrl" value="${jdbc.url}"/>
        <property name="user" value="${jdbc.uid}"/>
        <property name="password" value="${jdbc.password}"/>
        <!-- 初始连接池大小 -->
        <property name="initialPoolSize" value="10"/>
        <!-- 连接池中连接最小个数 -->
        <property name="minPoolSize" value="5"/>
        <property name="maxPoolSize" value="20"/>
     </bean>

 <!--配置SQLSessionFactory-->
    <bean id="sqlSessionFactory"  class="org.mybatis.spring.SqlSessionFactoryBean">
        <!--配置数据源-->
        <property name="dataSource" ref="dataSource"/>

        <!--加载mybatis的配置-->
        <property name="configLocation" value="mybatis/mybatis.xml"/>

        <!--配置xml文件的映射,在mybatis的中,在<mapper>标签下添加的-->
        <property name="mapperLocations">
            <list>
                <value>mapper/User7Mapper.xml</value>
            </list>
        </property>
    </bean>
 <!--
    通过代理对象进行mapper的映射
    class即mybatis-spring包提供的MapperFactoryBean
    -->
    <bean id="userMapper"  class="org.mybatis.spring.mapper.MapperFactoryBean">
        <!--mapperInterface指定mapperjie接口-->
        <property name="mapperInterface" value="com.tulun.dao.User7Mapper"/>

        <!--指定SQLSessionFactory-->
        <property name="sqlSessionFactory" ref="sqlSessionFactory"/>
    </bean>

</beans>

SSM整合
SSM(Spring+Spring MVC+Mybatis)整合以需求为导向来学习整合的思路和步骤。
需求:展示用户信息列表
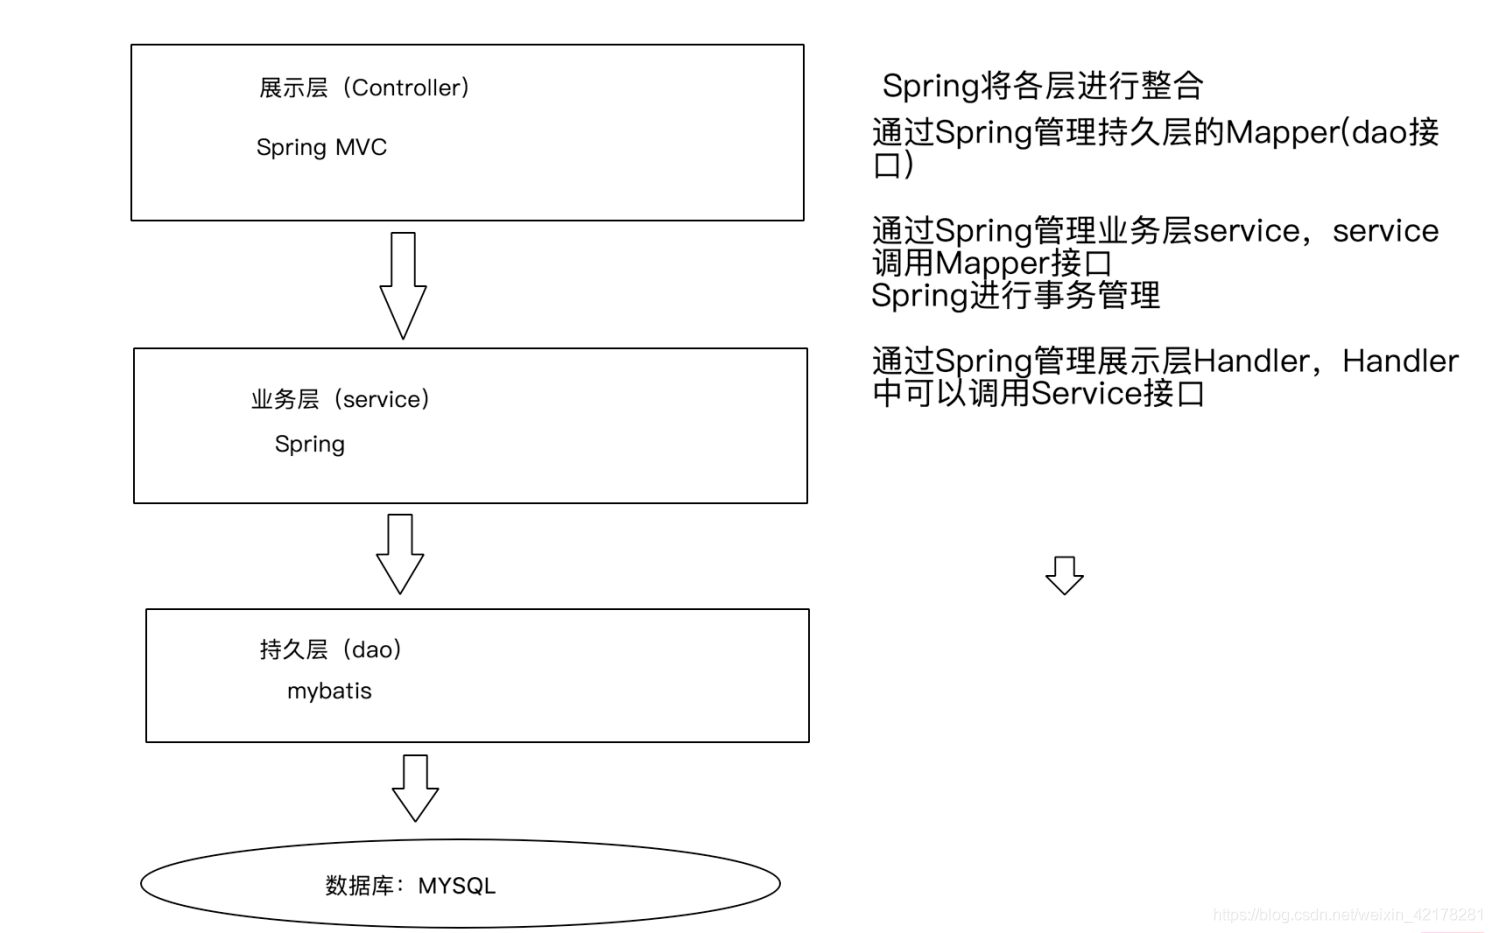
• 整合dao层:
mybatis和Spring整合,通过Spring管理Mapper接口
使用Mapper的扫描器自动的扫描mapper接口在Spring中进行注册
• 整合service层:
通过Spring管理Service接口
使用配置方式将service接口配置在spring配置文件中
实现事务管理
• 整合SpringMVC
Spring MVC是Spring的模块。不需要整合
数据准备
使用mybatis库中的user表
CREATE TABLE `user` (
  `id` int(11) NOT NULL AUTO_INCREMENT,
  `username` varchar(32) NOT NULL COMMENT '用户名称',
  `sex` char(1) DEFAULT NULL COMMENT '性别',
  `address` varchar(256) DEFAULT NULL COMMENT '地址',
  PRIMARY KEY (`id`)
) ENGINE=InnoDB AUTO_INCREMENT=33 DEFAULT CHARSET=utf8
//数据省略
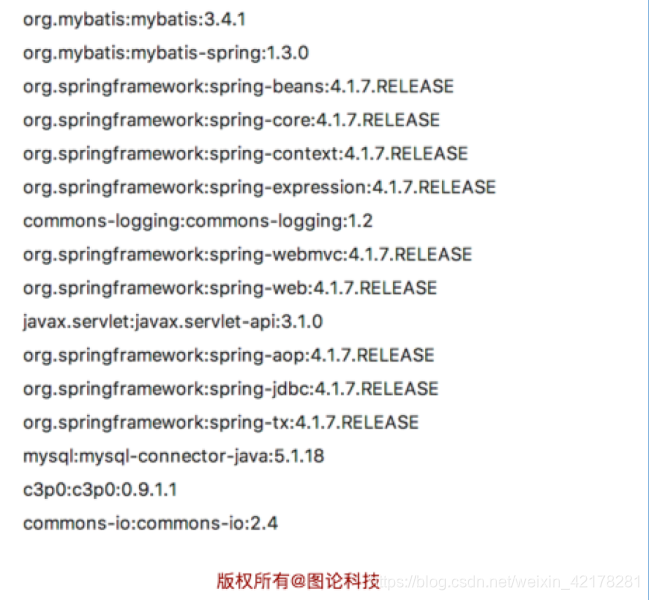
依赖jar包
spring和mybatis的整合需要一个mybatis提供的jar包
<!--mybatis和spring的整合-->
<dependency>
    <groupId>org.mybatis</groupId>
    <artifactId>mybatis-spring</artifactId>
    <version>1.3.0</version>
</dependency>
开发dao层
spring-mybatis.xml
在resource下创建spring-mybatis.xml文件作为mybatis的配置文件
<?xml version="1.0" encoding="UTF-8" ?>
<!DOCTYPE configuration
        PUBLIC "-//mybatis.org//DTD Config 3.0//EN"
        "http://mybatis.org/dtd/mybatis-3-config.dtd">
<configuration>
    <!--配置懒加载、二级缓存 Setting配置需要该文件-->
    <!--配置数据源,在Spring整合过程中,数据源交给Spring管理-->
    <!--配置Mapper ,也是交给Spring管理-->
</configuration>
Mapper.java接口文件
public interface User9Mapper {
    //查询所有的用户信息
    public List<User9> getAllUser();
}
Mapper.xml文件
在resource的配置文件目录下创建xml文件,专门来存储SQL配置文件
<?xml version="1.0" encoding="UTF-8" ?>
<!DOCTYPE mapper
        PUBLIC "-//mybatis.org//DTD Mapper 3.0//EN"
        "http://mybatis.org/dtd/mybatis-3-mapper.dtd">
<mapper namespace="com.tulun.dao.User9Mapper">
    <select id="getAllUser" resultType="com.tulun.bean.User9">
        select * from user
    </select>
</mapper>
实体类(User.java)
省略
Spring的核心配置文件(Spring-core.xml)
<?xml version="1.0" encoding="UTF-8"?>
<beans xmlns="http://www.springframework.org/schema/beans"
       xmlns:xsi="http://www.w3.org/2001/XMLSchema-instance"
       xmlns:context="http://www.springframework.org/schema/context"
       xsi:schemaLocation="http://www.springframework.org/schema/beans
    http://www.springframework.org/schema/beans/spring-beans-3.0.xsd
    http://www.springframework.org/schema/context
    http://www.springframework.org/schema/context/spring-context-3.0.xsd">

    <!--开启注解,通过扫描com.tulun路径下的所有注解-->
    <context:component-scan base-package="com.tulun"/>
    <!--配置数据源:c3p0的配置-->
    <bean id="dataSource1" class="com.mchange.v2.c3p0.DriverManagerDataSource">
        <!--配置数据连接的核心配置-->
        <property name="driverClass" value="com.mysql.jdbc.Driver"/>
        <property name="jdbcUrl" value="jdbc:mysql://localhost:3306/mybatis"/>
        <property name="user" value="root"/>
        <property name="password" value="123456"/>
    </bean>
    <!--配置sqlSessionFactory-->
    <bean id="sqlSessionFactory" class="org.mybatis.spring.SqlSessionFactoryBean">
        <!--注入数据源-->
        <property name="dataSource" ref="dataSource1"/>
        <!--读取mybatis的配置文件-->
        <property name="configLocation" value="classpath:SSM/spring-mybatis.xml"/>
        <!--读取mapper.xml文件-->
        <property name="mapperLocations" value="classpath:Mapper/*.xml"/>
    </bean>
    <!--动态代理对象-->
    <bean class="org.mybatis.spring.mapper.MapperFactoryBean">
        <!--接口-->
        <property name="mapperInterface" value="com.tulun.dao.User9Mapper"/>
        <property name="sqlSessionFactory" ref="sqlSessionFactory"/>
    </bean>

</beans>
Service 层(UserService.java)
Service层调用Dao层获取数据
@Service
public class UserService {
    //通过注解将dao层对象注入
    @Resource
    private User9Mapper user9Mapper;

    public List<User9> getAllUser(){
        return user9Mapper.getAllUser();
    }
}
Controller层(UserController)
controller通过调用service获取响应的业务处理数据
@Controller
public class ControllerDemo {
    @Autowired
    private UserService userService;
    @RequestMapping("userList")
    public ModelAndView userList() {
        //这个是需要Service获取数据结果
        List<User9> list = userService.getAllUser();
        //返回ModelAndView结果
        ModelAndView modelAndView = new ModelAndView();
        //填充数据
        modelAndView.addObject("users",list);
        //指定视图
        modelAndView.setViewName("userList");
        return modelAndView;
    }
前端页面
<%@ page language="java" contentType="text/html; charset=UTF-8" pageEncoding="UTF-8" %>
    <%@ taglib uri="http://java.sun.com/jsp/jstl/core" prefix="c" %>
    <%@ taglib uri="http://java.sun.com/jsp/jstl/fmt" prefix="fmt" %>
    <!DOCTYPE html PUBLIC "-//W3C//DTD HTML 4.01 Transitional//EN" "http://www.w3.org/TR/html4/loose.dtd">
    <html>
    <head>
    <meta http-equiv="Content-Type" content="text/html; charset=UTF-8">
    <title>用户列表</title>
    </head>
    <body>
    <table width="80%" border="1" align="center">
    <h1 align="center">用户列表</h1>
    <tr>
    <td>用户ID</td>
    <td>用户名</td>
    <td>性别</td>
    <td>住址</td>
    </tr>
    <c:forEach items="${users }" var="user">
        <tr>
        <td>${user.id }</td>
        <td>${user.userName }</td>
        <td>${user.sex}" </td>
        <td>${user.address }</td>
        </tr>
    </c:forEach>
    </table>
    </form>
    </body>
    </html>
Spring-mvc.xml配置
<?xml version="1.0" encoding="UTF-8"?>
<beans xmlns="http://www.springframework.org/schema/beans"
       xmlns:xsi="http://www.w3.org/2001/XMLSchema-instance"
       xmlns:context="http://www.springframework.org/schema/context"
       xmlns:mvc="http://www.springframework.org/schema/mvc"
       xsi:schemaLocation="http://www.springframework.org/schema/beans http://www.springframework.org/schema/beans/spring-beans.xsd
        http://www.springframework.org/schema/context http://www.springframework.org/schema/context/spring-context-4.1.xsd
        http://www.springframework.org/schema/mvc http://www.springframework.org/schema/mvc/spring-mvc-4.1.xsd">
    <!--配置Spring MVC的需要扫描注解的包路径-->
     <context:component-scan base-package="com.tulun.contrller"/>
    <mvc:annotation-driven/>
    <!--配置视图解析器-->
    <bean class="org.springframework.web.servlet.view.InternalResourceViewResolver">
        <!--配置前缀-->
        <property name="prefix" value="/WEB-INF/jsp/"/>
        <!--配置后缀-->
        <property name="suffix" value=".jsp"/>
    </bean>
</beans>
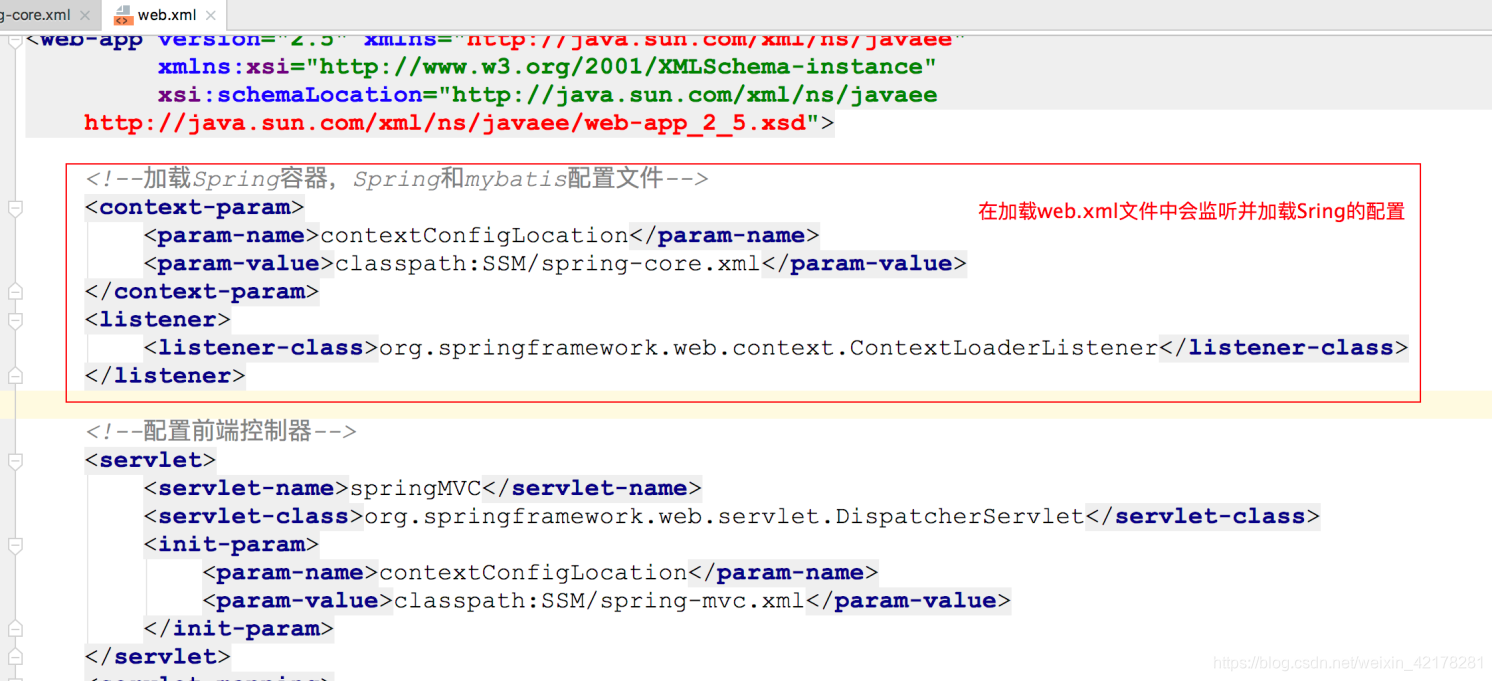
配置web.xml文件
<?xml version="1.0" encoding="UTF-8"?>
<web-app version="2.5" xmlns="http://java.sun.com/xml/ns/javaee"
         xmlns:xsi="http://www.w3.org/2001/XMLSchema-instance"
         xsi:schemaLocation="http://java.sun.com/xml/ns/javaee
    http://java.sun.com/xml/ns/javaee/web-app_2_5.xsd">
    <!--加载Spring容器,Spring和mybatis配置文件-->
    <context-param>
        <param-name>contextConfigLocation</param-name>
        <param-value>classpath:SSM/spring-core.xml</param-value>
    </context-param>
    <listener>
        <listener-class>org.springframework.web.context.ContextLoaderListener</listener-class>
    </listener>
    <!--配置前端控制器-->
    <servlet>
        <servlet-name>springMVC</servlet-name>
        <servlet-class>org.springframework.web.servlet.DispatcherServlet</servlet-class>
        <init-param>
            <param-name>contextConfigLocation</param-name>
            <param-value>classpath:SSM/spring-mvc.xml</param-value>
        </init-param>
    </servlet>
    <servlet-mapping>
        <servlet-name>springMVC</servlet-name>
        <url-pattern>/</url-pattern>
    </servlet-mapping>
</web-app>
整合的项目结构
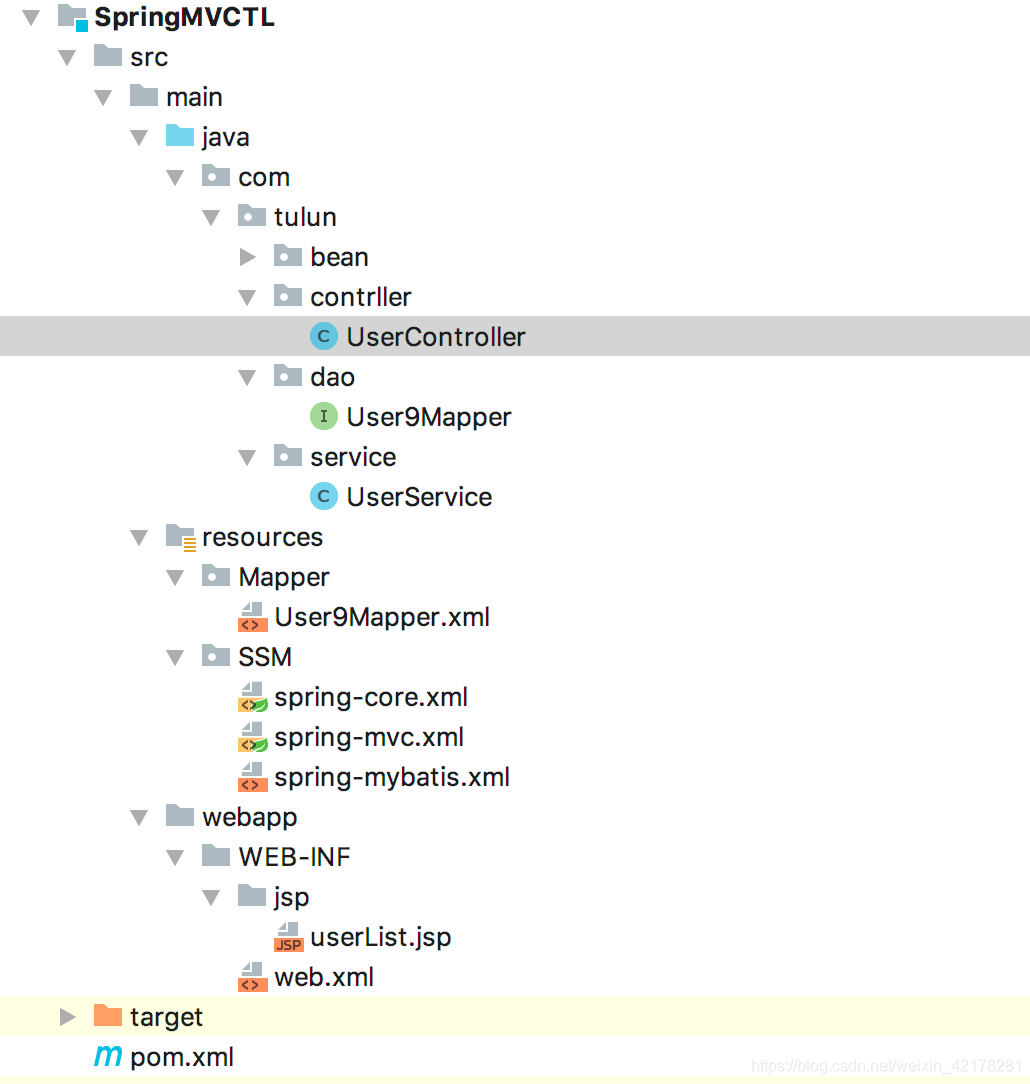
整合文件说明:
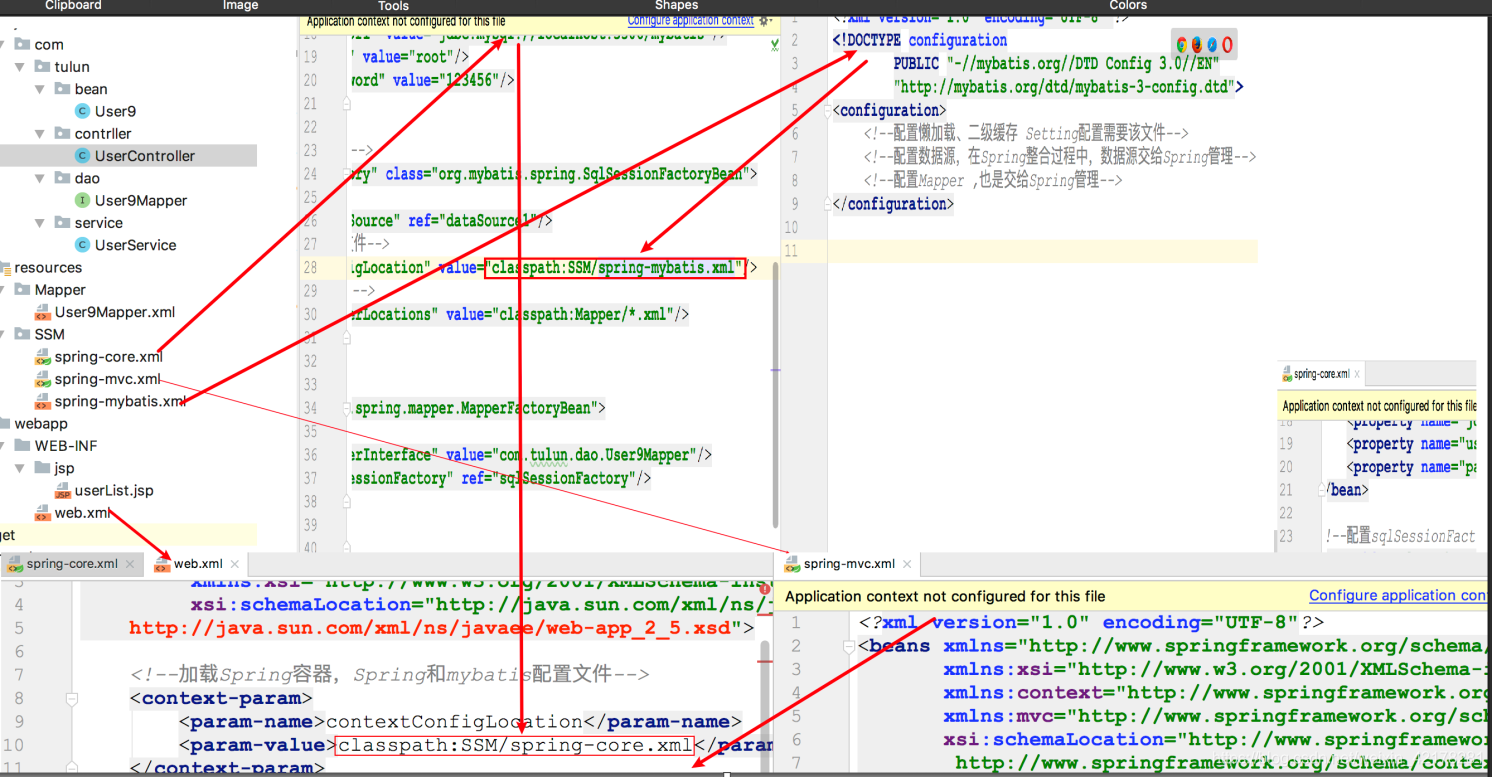
在SSM的整合过程中各个框架的配置文件(spring-mybatis.xml、spring-core.xml、spring-mvc.xml)都是通过web.xml文件来进行识别加载的,
在spring和spring mvc的整合上,主要体现在web.xml文件中,来监听spring的配置信息


 6245
6245

 被折叠的 条评论
为什么被折叠?
被折叠的 条评论
为什么被折叠?
 到【灌水乐园】发言


