


 本文介绍了StateListDrawable在Android中如何实现按钮状态下的背景切换,包括其关键属性的使用,以及Button的点击、长按和触摸事件的两种实现方式。同时提到了Button作为TextView特性的延伸和背景颜色设置的注意事项。
StateListDrawable简介
在Android中,我们经常通过按钮的状态去改变按钮的背景色和背景图片,这种就需要通过StateListDrawable实现。StateListDrawable关键节点是 <selector>,在StateListDrawable我们实现对应的特效后,我们只需要将Button的background属性设置为该drawable即可轻松实现切换Button的背景色和背景图等。
| 属性 | 描述 |
|---|---|
| drawable | 引用的Drawable位图,不能引用颜色,无效果 |
| state_focused | 是否获得焦点 |
| state_window_focused | 是否获得窗口焦点 |
| state_enabled | 控件是否可用 |
| state_checkable | 控件可否被勾选 |
| state_checked | 控件是否被勾选 |
| state_selected | 控件是否已被选择 |
| state_pressed | 控件是否被按下 |
| state_active | 控件是否处于活动状态 |
| state_single | 控件包含多个子控件时,确定是否只显示一个子控件 |
| state_first | 控件包含多个子控件时,确定第一个子控件是否处于显示状态 |
| state_middle | 控件包含多个子控件时,确定中间一个子控件是否处于显示状态 |
| state_last | 控件包含多个子控件时,确定最后一个子控件是否处于显示状态 |
注意:上述参数都是写在drawable文件里。
<!-- ic_baseline_arrow_forward_12.xml -->
<vector android:height="12dp" android:tint="?attr/colorControlNormal"
    android:viewportHeight="24" android:viewportWidth="24"
    android:width="12dp" xmlns:android="http://schemas.android.com/apk/res/android">
    <path android:fillColor="@android:color/white" android:pathData="M12,4l-1.41,1.41L16.17,11H4v2h12.17l-5.58,5.59L12,20l8,-8z"/>
</vector>


<!-- ic_baseline_arrow_right_alt_12.xml -->
<vector android:height="12dp" android:tint="?attr/colorControlNormal"
    android:viewportHeight="24" android:viewportWidth="24"
    android:width="12dp" xmlns:android="http://schemas.android.com/apk/res/android">
    <path android:fillColor="@android:color/white" android:pathData="M16.01,11H4v2h12.01v3L20,12l-3.99,-4z"/>
</vector>


<!-- ic_btn_seletor.xml -->
<?xml version="1.0" encoding="utf-8"?>
<selector xmlns:android="http://schemas.android.com/apk/res/android">
    <item android:state_pressed="true" android:drawable="@drawable/ic_baseline_arrow_forward_12"></item>
    <item android:state_pressed="false" android:drawable="@drawable/ic_baseline_arrow_right_alt_12"></item>
</selector>
<!-- activity_main.xml -->
<?xml version="1.0" encoding="utf-8"?>
<LinearLayout xmlns:android="http://schemas.android.com/apk/res/android"
xmlns:tools="http://schemas.android.com/tools"
android:layout_width="match_parent"
android:layout_height="match_parent"
android:background="#FFFFFF"
android:gravity="center"
android:orientation="vertical"
tools:context=".MainActivity">

    <Button
        android:id="@+id/button_one"
        android:layout_width="200dp"
        android:layout_height="100dp"
        android:background="@drawable/ic_btn_seletor"
        android:text="按钮" />
    <Button
        android:layout_width="200dp"
        android:layout_height="100dp"
        android:id="@+id/button_two"
        android:text="按钮"/>
</LinearLayout>

Button事件
常见的时间有,点击事件,长按事件,触摸事件等,这里就不仔细介绍业务,只介绍两种实现方式:
- 获取按钮,使用按钮绑定事件:
<?xml version="1.0" encoding="utf-8"?>
<LinearLayout xmlns:android="http://schemas.android.com/apk/res/android"
xmlns:tools="http://schemas.android.com/tools"
android:layout_width="match_parent"
android:layout_height="match_parent"
android:background="#FFFFFF"
android:gravity="center"
android:orientation="vertical"
tools:context=".MainActivity">

    <Button
        android:id="@+id/button_one"
        android:layout_width="200dp"
        android:layout_height="100dp"
        android:text="按钮" />
</LinearLayout>
import androidx.appcompat.app.AppCompatActivity;
import android.os.Bundle;
import android.view.MotionEvent;
import android.view.View;
import android.view.ViewGroup;
import android.widget.Button;
import android.widget.LinearLayout;

public class MainActivity extends AppCompatActivity {

    @Override
    protected void onCreate(Bundle savedInstanceState) {
        super.onCreate(savedInstanceState);
        setContentView(R.layout.activity_main);

        Button btn = findViewById(R.id.button_one);

        /** 点击事件 */
        btn.setOnClickListener(new View.OnClickListener() {
            @Override
            public void onClick(View view) {
                // TODO 点击动作  触发事件后,会回调该方法
            }
        });

        /** 长按事件 */
        btn.setOnLongClickListener(new View.OnLongClickListener() {
            @Override
            public boolean onLongClick(View view) {
                // TODO 长按动作 触发事件后,会回调该方法
                return false; // 返回值为true,则会屏蔽点击事件(不再回调点击事件方法)。返回false,则会调用点击事件
            }
        });

        /** 触摸事件 */
        btn.setOnTouchListener(new View.OnTouchListener() {
            @Override
            public boolean onTouch(View view, MotionEvent motionEvent) {
                // TODO 触摸动作 触发事件后,会回调该方法
                // 触摸事件分为三种,
                return false; // 返回值为true,则会屏蔽点击事件和长按事件。返回false,则不会屏蔽
            }
        });
    }
}
- 在layout直接调用方法。
<?xml version="1.0" encoding="utf-8"?>
<LinearLayout xmlns:android="http://schemas.android.com/apk/res/android"
xmlns:tools="http://schemas.android.com/tools"
android:layout_width="match_parent"
android:layout_height="match_parent"
android:background="#FFFFFF"
android:gravity="center"
android:orientation="vertical"
tools:context=".MainActivity">

    <Button
        android:id="@+id/button_one"
        android:layout_width="200dp"
        android:layout_height="100dp"
        android:onClick="onClickListener"
        android:text="按钮" />

</LinearLayout>
import androidx.appcompat.app.AppCompatActivity;
import android.os.Bundle;
import android.view.MotionEvent;
import android.view.View;
import android.view.ViewGroup;
import android.widget.Button;
import android.widget.LinearLayout;

public class MainActivity extends AppCompatActivity {

    @Override
    protected void onCreate(Bundle savedInstanceState) {
        super.onCreate(savedInstanceState);
        setContentView(R.layout.activity_main);


    }

    public void onClickListener(View view) {
        // TODO 点击事件。这边就是相当于方法一中的public void onClick(View view);
    }
}
Button注意事项
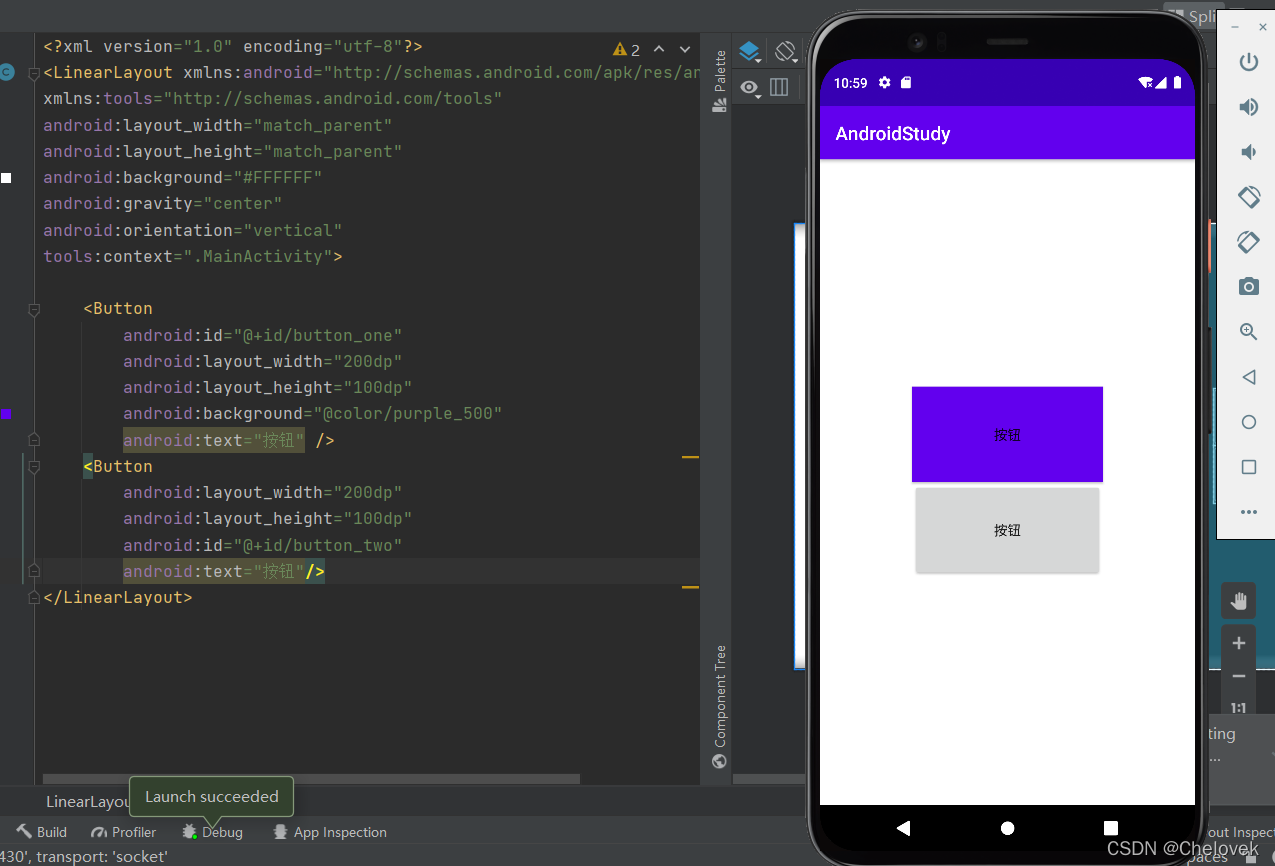
- Button其实是集成TextView的,所以TextView有的特性,Button也都有,比如设置圆角按钮等。
- Button里面的background不能直接设置颜色,默认无效果,可以修改style里面的parent,使之可用。
<resources xmlns:tools="http://schemas.android.com/tools">
    <!-- Base application theme. -->
    <!-- <style name="Theme.AndroidStudy" parent="Theme.MaterialComponents.DayNight.DarkActionBar"> -->
    <style name="Theme.AndroidStudy" parent="Theme.MaterialComponents.DayNight.DarkActionBar.Bridge">
        <!-- Primary brand color. -->
        <item name="colorPrimary">@color/purple_500</item>
        <item name="colorPrimaryVariant">@color/purple_700</item>
        <item name="colorOnPrimary">@color/white</item>
        <!-- Secondary brand color. -->
        <item name="colorSecondary">@color/teal_200</item>
        <item name="colorSecondaryVariant">@color/teal_700</item>
        <item name="colorOnSecondary">@color/black</item>
        <!-- Status bar color. -->
        <item name="android:statusBarColor" tools:targetApi="l">?attr/colorPrimaryVariant</item>
        <!-- Customize your theme here. -->
    </style>
</resources>


 3305
3305

 被折叠的 条评论
为什么被折叠?
被折叠的 条评论
为什么被折叠?
 到【灌水乐园】发言


