


 本文介绍了如何在IntelliJ IDEA中创建并配置Spring Boot项目,着重讲解了如何整合Spring MVC,包括切换到YAML配置、构建项目目录结构、编写Controller、Entity和Service,以及使用Postman进行测试。通过这个过程,读者将了解Spring Boot自动配置和简化Maven配置的优势。
介绍:这里虽然使用idea配置,但是eclipse也可以自行配置,内容相差无几,这里先整合spring MVC
特点:
①自动配置spring
②嵌入的Tomcat,无需部署WAR文件
③简化maven配置
④。。。
一、创建项目

二、编辑项目信息

三、选择依赖(我这什么都不选,自行添加)

四、引入mvc依赖
<dependency>
    <groupId>org.springframework.boot</groupId>
    <artifactId>spring-boot-starter</artifactId>
</dependency>

<dependency>
    <groupId>org.springframework.boot</groupId>
    <artifactId>spring-boot-starter-test</artifactId>
    <scope>test</scope>
    <exclusions>
        <exclusion>
            <groupId>org.junit.vintage</groupId>
            <artifactId>junit-vintage-engine</artifactId>
        </exclusion>
    </exclusions>
</dependency>
<!--web依赖-->
<dependency>
    <groupId>org.springframework.boot</groupId>
    <artifactId>spring-boot-starter-web</artifactId>
</dependency>
五、先整合mvc
1.把配置文件application.properties直接改成application.yml(语法比properties更简洁《与时俱进嘛~》)
server:
  port: 8080

spring:
  mvc:
    view:
      prefix: /WEB-INF/jsp/
      suffix: .jsp
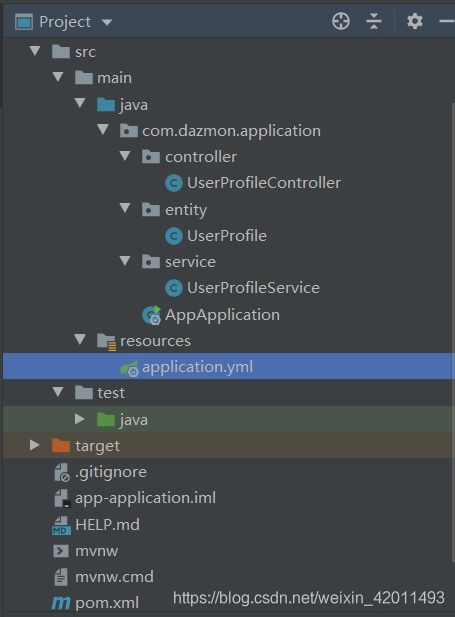
2.目录文件大概长这样
3.controller-UserProfileController
package com.dazmon.application.controller;

import com.dazmon.application.entity.UserProfile;
import com.dazmon.application.service.UserProfileService;
import org.springframework.beans.factory.annotation.Autowired;
import org.springframework.web.bind.annotation.RequestMapping;
import org.springframework.web.bind.annotation.RequestMethod;
import org.springframework.web.bind.annotation.RestController;

@RestController
@RequestMapping("/userProfile")
public class UserProfileController {

    @Autowired
    private UserProfileService userProfileService;

    @RequestMapping(value="/getDazmon",method= RequestMethod.POST)
    public UserProfile getDazmon(String name) {
        return userProfileService.getDazmon(name);
    }

    @RequestMapping(value="/testGet",method=RequestMethod.GET)
    public UserProfile testGet(Integer id) {
        return userProfileService.testGet(id);
    }
}
4.entity-UserProfile
package com.dazmon.application.entity;

public class UserProfile {
    private Integer id;
    private String username;
    private String password;
    private String realname;
    private String name;
    private Integer age;
    private Double balance;
    private String requestId;

    public Integer getId() {
        return id;
    }

    public void setId(Integer id) {
        this.id = id;
    }

    public String getUsername() {
        return username;
    }

    public void setUsername(String username) {
        this.username = username;
    }

    public String getPassword() {
        return password;
    }

    public void setPassword(String password) {
        this.password = password;
    }

    public String getRealname() {
        return realname;
    }

    public void setRealname(String realname) {
        this.realname = realname;
    }

    public String getName() {
        return name;
    }

    public void setName(String name) {
        this.name = name;
    }

    public Integer getAge() {
        return age;
    }

    public void setAge(Integer age) {
        this.age = age;
    }

    public Double getBalance() {
        return balance;
    }

    public void setBalance(Double balance) {
        this.balance = balance;
    }

    public String getRequestId() {
        return requestId;
    }

    public void setRequestId(String requestId) {
        this.requestId = requestId;
    }
}
5.service-UserProfileService
package com.dazmon.application.service;

import com.dazmon.application.entity.UserProfile;
import org.springframework.stereotype.Service;

@Service
public class UserProfileService {
    public UserProfile getDazmon(String name){
        UserProfile userProfile = new UserProfile();
        userProfile.setAge(20);
        userProfile.setName(name);
        userProfile.setRealname("RealDazmon");
        return userProfile;
    }

    public UserProfile testGet(Integer id) {
        UserProfile userProfile = new UserProfile();
        userProfile.setId(id);
        return userProfile;
    }
}
6.用postman测试测试整合第一阶段
导航栏上:http://localhost:8080/userProfile/getDazmon?name=dazmon
选用post方式
![[外链图片转存失败,源站可能有防盗链机制,建议将图片保存下来直接上传(img-2UmUBdTj-1577693507965)(C:\Users\91261\AppData\Roaming\Typora\typora-user-images\image-20191230150644702.png)]](https://i-blog.csdnimg.cn/blog_migrate/df6cc4104aaf26d035c2c715b6e65e34.png)
导航栏上:http://localhost:8080/userProfile/testGet?id=123
选用get方式
![[外链图片转存失败,源站可能有防盗链机制,建议将图片保存下来直接上传(img-TfqF4zJd-1577693507965)(C:\Users\91261\AppData\Roaming\Typora\typora-user-images\image-20191230152243448.png)]](https://i-blog.csdnimg.cn/blog_migrate/403ba79b6080450c2e2953332e28c622.png)
还有其他注解,类似@GetMapping("/userProfile/{id}")等等,喜欢的可以自行百度,我习惯了用@RequestMapping,看起来更加整洁。


 1142
1142

 被折叠的 条评论
为什么被折叠?
被折叠的 条评论
为什么被折叠?
 到【灌水乐园】发言


