


1.概述
ApplicationRunner 和 CommandLineRunner 是 Spring Boot 提供的两个接口,允许在 Spring 应用程序启动完成后执行特定的代码。它们的主要作用是在应用启动后执行一段初始化或任务逻辑,常见于一些启动任务,例如加载数据、验证配置、执行调度等。接下来我们就来详细看看它们在项目开发中的实际应用
2.实际应用
这两个扩展点在实际开发中的应用场景挺广泛的,下面就来看看几个常见的。
2.1 服务启动后数据初始化
在应用启动时加载初始化数据,如将初始数据加载到数据库、从文件读取数据、缓存热点数据等。可以在 CommandLineRunner 或 ApplicationRunner 中执行这些初始化逻辑,确保在应用服务正式对外提供服务之前,必要的数据已经准备好。
这个应用场景我深有感触,因为这种应用操作可以“去运维化”,尤其对于系统是新安装或部署而言,它确保应用程序所需的上下文数据无误,可以立即开始运行,而无需通过手动干预来插入基本数据(PS:环境基础数据靠运维部署时候去插入总是不可靠的…)。本着天助自助者的原则,我们可以通过CommandLineRunner来完成项目服务环境初始化的工作,这里以平时的后台管理系统来讲述一下,大部分的后台系统都是基于RBAC模型(Role-Based Access Control:基于角色的访问控制)进行授权和认证的,这就意味着我们一个全新系统部署之后,会默认插入一个超管账号,他可以登陆系统访问所有功能,比如说他可以新增员工,给新员工赋予权限等等,这样系统就可以用起来了。
@Component
public class DataInitializer implements CommandLineRunner {
    @Resource
    private EnvInitMapper envInitMapper;
    @Resource
    private UserService userService;
    @Resource
    private RoleService roleService;
    @Resource
    private UserRoleService userRoleService;

    @Override
    public void run(String... args) throws Exception {
        // 1/判断是不是第一次启动 若是,执行初始数据插入等操作 若不是,不执行
        // 这个可以读取数据库标志,初始化之后插入一个标志记录即可, 当然也可以读取缓存
        QueryWrapper<EnvInit>queryWrapper = new QueryWrapper<>();
        EnvInit init = envInitMapper.selectOne(queryWrapper);
        if (Objects.isNull(init)) {
            // 2.第一次初始化环境
            userService.firstInitData();
            // 3.插入已经初始化标志
            init = new EnvInit();
            init.setIsInit(1);
            envInitMapper.insert(init);
        }
    }

    /**
     * 初始化环境基础数据,可以插入环境所需的任何数据
     */
    @Transactional(rollbackFor = Exception.class)
    public void initData() {
        userService.firstInitData();
        roleService.firstInitData();
        userRoleService.firstInitData();
    }
}
这里我们只是举例插入了菜单权限所需的基础数据,你可以根据自身服务环境需求插入所需的任何基础数据,以保证系统能够顺利正常运行。我们还判断了是不是第一次初始化基础数据,防止每次系统服务重启之后重复插入。
2.2 应用启动时加载配置信息
在某些情况下,应用可能需要在启动时加载外部配置信息或数据库中的参数到内存中进行缓存。
@Component
public class ConfigInitializer implements CommandLineRunner {

    @Override
    public void run(String... args) {
        // 加载配置文件或数据库配置信息
        System.out.println("加载配置信息...");
        // 例如加载外部配置文件
        // Config config = configService.loadConfig();
    }
}
2.3 启动时加载数据到缓存
有时你可能希望在应用启动时将一些常用数据(如字典数据、热点数据)加载到内存中,以提高访问效率。
@Component
public class DataCacheInitializer implements ApplicationRunner {

    @Override
    public void run(ApplicationArguments args) {
        System.out.println("启动时加载字典数据到缓存...");
        // 假设从数据库加载数据到缓存
        // List<Dict> dicts = dictService.loadAll();
        // cacheService.cacheDicts(dicts);
    }
}
2.4 启动时验证环境配置
之前我们总结过:license版权证书生成与验证,对license不太熟悉的可自行跳转查看,简单概括来说就是,你是软件服务商,人家买了你的软件,要求你部署到他们的服务器上,即本地化部署,这时候你就需要打成JAR包去客户服务器上部署,如果就是简单的java -jar jar包服务就能启动跑起来了,那客户就可以拿着你的jar包去卖了…license就是为了堵住这个缺口,加了证书验证,让你换个环境跑不起来…
@Component
public class LicenseCheckApplicationRunner implements ApplicationRunner {
    @Resource
    private LicenseVerify licenseVerify;

    @Override
    public void run(ApplicationArguments args) throws Exception {
        LicenseContent content = licenseVerify.install();
    }
}
@Component
public class LicenseVerify {
    @Resource
    private LicenseProperties licenseProperties;

    private static Logger logger = LogManager.getLogger(LicenseVerify.class);
    private static final  DateFormat df = new SimpleDateFormat("yyyy-MM-dd HH:mm:ss");


    /**
     * 安装License证书
     * 项目服务启动时候安装证书,检验合法性
     * 此时根据开关验证服务器系统信息
     */
    public synchronized LicenseContent install() {
        LicenseContent result = null;
        try{
            LicenseManager licenseManager = new LicenseManager(initLicenseParam());
            licenseManager.uninstall();
            result = licenseManager.install(new File(licenseProperties.getLicensePath()));
            verifySystemInfo(result);
            logger.info("证书安装成功,证书有效期:{} - {}", df.format(result.getNotBefore()),
                    df.format(result.getNotAfter()));
        }catch (Exception e){
            logger.error("证书安装失败:", e);
            throw new BizException("证书安装失败");
        }
        return result;
    }

    /**
     * 校验License证书, 在接口使用{@link com.plasticene.boot.license.core.anno.License}
     * 时候进入license切面时候调用,此时无需再验证服务器系统信息,验证证书和有效期即可
     */
    public boolean verify() {
        try {
            LicenseManager licenseManager = new LicenseManager(initLicenseParam());
            LicenseContent licenseContent = licenseManager.verify();
            verifyExpiry(licenseContent);
            return true;
        }catch (Exception e){
            logger.error("证书校验失败:", e);
            throw new BizException("证书检验失败");
        }
    }

    /**
     * 初始化证书生成参数
     */
    private LicenseParam initLicenseParam(){
        Preferences preferences = Preferences.userNodeForPackage(LicenseVerify.class);

        CipherParam cipherParam = new DefaultCipherParam(licenseProperties.getStorePass());

        KeyStoreParam publicStoreParam = new CustomKeyStoreParam(LicenseVerify.class
                ,licenseProperties.getPublicKeysStorePath()
                ,licenseProperties.getPublicAlias()
                ,licenseProperties.getStorePass()
                ,null);

        return new DefaultLicenseParam(licenseProperties.getSubject()
                ,preferences
                ,publicStoreParam
                ,cipherParam);
    }

    // 验证证书有效期
    private void verifyExpiry(LicenseContent licenseContent) {
        Date expiry = licenseContent.getNotAfter();
        Date current = new Date();
        if (current.after(expiry)) {
            throw new BizException("证书已过期");
        }
    }

    private void verifySystemInfo(LicenseContent licenseContent) {
        if (licenseProperties.getVerifySystemSwitch()) {
            SystemInfo systemInfo = (SystemInfo) licenseContent.getExtra();
            VerifySystemType verifySystemType = licenseProperties.getVerifySystemType();
            switch (verifySystemType) {
                case CPU_ID:
                    checkCpuId(systemInfo.getCpuId());
                    break;
                case SYSTEM_UUID:
                    checkSystemUuid(systemInfo.getUuid());
                    break;
                default:
            }
        }
    }


    private void checkCpuId(String cpuId) {
        cpuId = cpuId.trim().toUpperCase();
        String systemCpuId = DmcUtils.getCpuId().trim().toUpperCase();
        logger.info("配置cpuId = {},  系统cpuId = {}", cpuId, systemCpuId);
        if (!Objects.equals(cpuId, systemCpuId)) {
            throw new BizException("license检验cpuId不一致");
        }
    }

    private void checkSystemUuid(String uuid) {
        uuid = uuid.trim().toUpperCase();
        String systemUuid = DmcUtils.getSystemUuid().trim().toUpperCase();
        logger.info("配置uuid = {},  系统uuid= {}", uuid, systemUuid);
        if (!Objects.equals(uuid, systemUuid)) {
            throw new BizException("license检验uuid不一致");
        }
    }

}
如果证书校验不通过,就会抛出异常,项目服务启动失败。
2.5 配合 @Order 使用
在同一个 Spring Boot 应用中,可能会有多个 CommandLineRunner 或 ApplicationRunner 实现类。如果你希望控制它们的执行顺序,可以使用 @Order 注解,指定多个 Runner 的执行顺序。
@Component
@Order(1) // 这个Runner会优先执行
public class FirstRunner implements CommandLineRunner {

    @Override
    public void run(String... args) throws Exception {
        System.out.println("FirstRunner running!");
    }
}

@Component
@Order(2) // 这个Runner会后执行
public class SecondRunner implements CommandLineRunner {

    @Override
    public void run(String... args) throws Exception {
        System.out.println("SecondRunner running!");
    }
}
当应用启动时,FirstRunner 会先执行,然后 SecondRunner 执行。
上面的示例都是使用CommandLineRunner,当然换成ApplicationRunner也是可以的。
项目推荐:基于SpringBoot2.x、SpringCloud和SpringCloudAlibaba企业级系统架构底层框架封装,解决业务开发时常见的非功能性需求,防止重复造轮子,方便业务快速开发和企业技术栈框架统一管理。引入组件化的思想实现高内聚低耦合并且高度可配置化,做到可插拔。严格控制包依赖和统一版本管理,做到最少化依赖。注重代码规范和注释,非常适合个人学习和企业使用
Github地址:https://github.com/plasticene/plasticene-boot-starter-parent
Gitee地址:https://gitee.com/plasticene3/plasticene-boot-starter-parent
微信公众号:Shepherd进阶笔记
交流探讨qun:Shepherd_126
3. CommandLineRunner和ApplicationRunner区别
直接看定义:
/**
 * Interface used to indicate that a bean should <em>run</em> when it is contained within
 * a {@link SpringApplication}. Multiple {@link CommandLineRunner} beans can be defined
 * within the same application context and can be ordered using the {@link Ordered}
 * interface or {@link Order @Order} annotation.
 * <p>
 * If you need access to {@link ApplicationArguments} instead of the raw String array
 * consider using {@link ApplicationRunner}.
 * 如果你需要访问ApplicationArguments去替换掉字符串数组,可以考虑使用ApplicationRunner类。
 * @author Dave Syer
 * @since 1.0.0
 * @see ApplicationRunner
 */
@FunctionalInterface
public interface CommandLineRunner {

	/**
	 * Callback used to run the bean.
	 * @param args incoming main method arguments
	 * @throws Exception on error
	 */
	void run(String... args) throws Exception;

}
ApplicationRunner 和 CommandLineRunner 类似,也是一个在应用启动后执行的接口。但它更加强大,因为它使用了 ApplicationArguments 对象,而不仅仅是简单的字符串数组。ApplicationArguments 允许更方便地处理传入的参数,例如获取无选项参数和带选项参数
@Component
public class MyCommandLineRunner implements CommandLineRunner {
    @Override
    public void run(String... args) throws Exception {
        System.out.println("CommandLineRunner running!");
        for (String arg : args) {
            System.out.println("CommandLineRunner Arg: " + arg);
        }
    }
}

@Component
public class MyApplicationRunner implements ApplicationRunner {
    @Override
    public void run(ApplicationArguments args) throws Exception {
        System.out.println("ApplicationRunner running!");
        for (String sourceArg : args.getSourceArgs()) {
            System.out.println("ApplicationRunner Arg: " + sourceArg);
        }
        for (String nonOptionArg : args.getNonOptionArgs()) {
            System.out.println("ApplicationRunner nonOptionArg: " + nonOptionArg);
        }
        for (String optionName : args.getOptionNames()) {
            System.out.println("ApplicationRunner optionArg: " + args.getOptionValues(optionName));
        }


    }
}
在IDEA中配置项目启动参数:
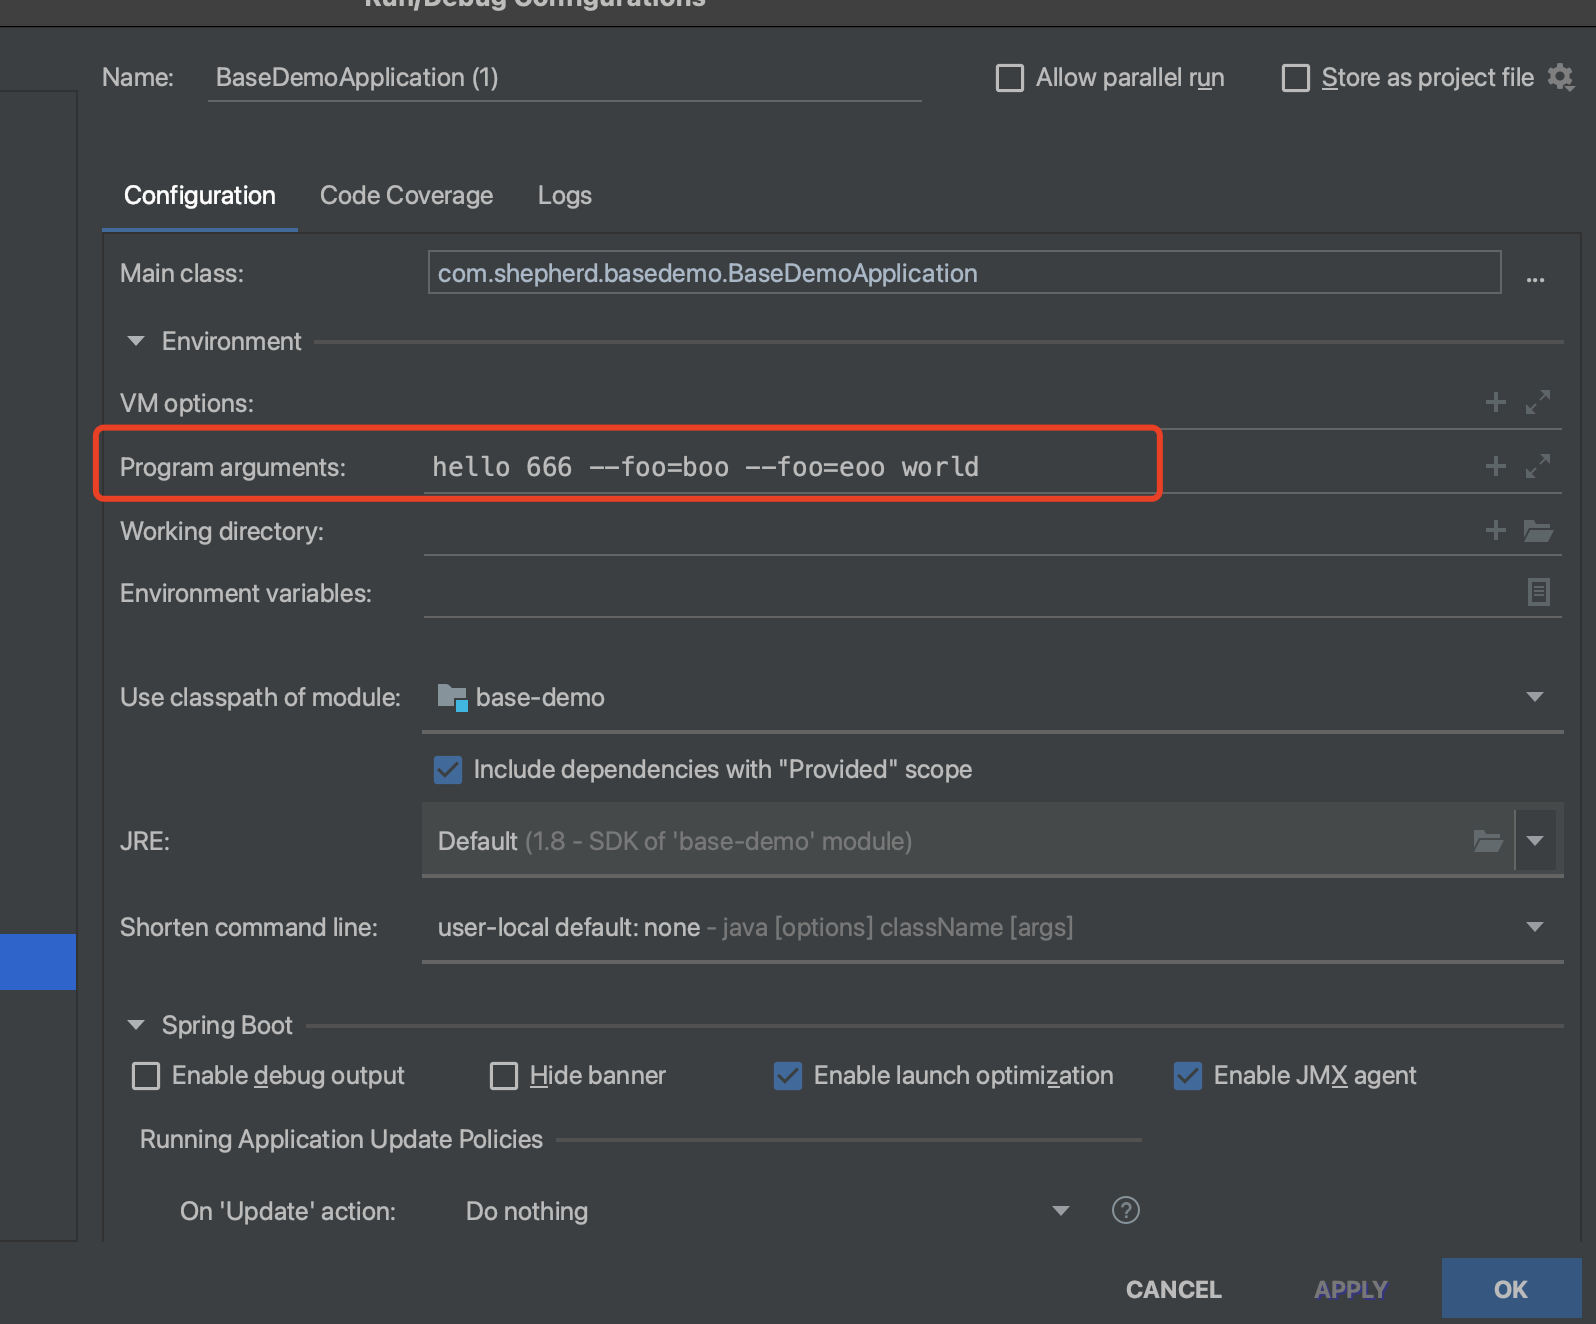
启动服务,控制台输出如下:
ApplicationRunner running!
ApplicationRunner Arg: hello
ApplicationRunner Arg: 666
ApplicationRunner Arg: --foo=boo
ApplicationRunner Arg: --foo=eoo
ApplicationRunner Arg: world
ApplicationRunner nonOptionArg: hello
ApplicationRunner nonOptionArg: 666
ApplicationRunner nonOptionArg: world
ApplicationRunner optionArg: [boo, eoo]
CommandLineRunner running!
CommandLineRunner Arg: hello
CommandLineRunner Arg: 666
CommandLineRunner Arg: --foo=boo
CommandLineRunner Arg: --foo=eoo
CommandLineRunner Arg: world
区别如下:
- 参数处理:
CommandLineRunner接收一个String... args,只是简单地传递命令行参数。ApplicationRunner使用ApplicationArguments对象,它提供了对选项和非选项参数的更强大支持。
- 用法场景:
- 如果只是简单地处理命令行参数或执行一些任务,
CommandLineRunner足够。 - 如果你需要更灵活的方式来处理命令行选项和参数,
ApplicationRunner更合适。
- 如果只是简单地处理命令行参数或执行一些任务,
- 参数管理:
CommandLineRunner只能获得原始的命令行参数。ApplicationRunner可以通过ApplicationArguments方便地获取命令行选项、非选项参数,并区分它们。
4.实现原理
既然ApplicationRunner和CommandLineRunner是Spring Boot提供的两个扩展点,我们就来看看项目启动时它们是怎么执行的。
SpringApplication的核心入口方法#run():
public ConfigurableApplicationContext run(String... args) {
		long startTime = System.nanoTime();
		DefaultBootstrapContext bootstrapContext = createBootstrapContext();
		ConfigurableApplicationContext context = null;
		configureHeadlessProperty();
		SpringApplicationRunListeners listeners = getRunListeners(args);
		listeners.starting(bootstrapContext, this.mainApplicationClass);
		try {
			ApplicationArguments applicationArguments = new DefaultApplicationArguments(args);
			ConfigurableEnvironment environment = prepareEnvironment(listeners, bootstrapContext, applicationArguments);
			configureIgnoreBeanInfo(environment);
			Banner printedBanner = printBanner(environment);
			context = createApplicationContext();
			context.setApplicationStartup(this.applicationStartup);
			prepareContext(bootstrapContext, context, environment, listeners, applicationArguments, printedBanner);
			refreshContext(context);
			afterRefresh(context, applicationArguments);
			Duration timeTakenToStartup = Duration.ofNanos(System.nanoTime() - startTime);
			if (this.logStartupInfo) {
				new StartupInfoLogger(this.mainApplicationClass).logStarted(getApplicationLog(), timeTakenToStartup);
			}
			listeners.started(context, timeTakenToStartup);
      // 执行`ApplicationRunner`和`CommandLineRunner`的方法入库
			callRunners(context, applicationArguments);
		}
		catch (Throwable ex) {
			handleRunFailure(context, ex, listeners);
			throw new IllegalStateException(ex);
		}
		try {
			Duration timeTakenToReady = Duration.ofNanos(System.nanoTime() - startTime);
			listeners.ready(context, timeTakenToReady);
		}
		catch (Throwable ex) {
			handleRunFailure(context, ex, null);
			throw new IllegalStateException(ex);
		}
		return context;
	}
#callRunners(context, applicationArguments),从方法名就知道实现ApplicationRunner和CommandLineRunner的核心所在咯。
	private void callRunners(ApplicationContext context, ApplicationArguments args) {
		List<Object> runners = new ArrayList<>();
    // 从spring容器中获取ApplicationRunner类型的bean放入到集合runners中
		runners.addAll(context.getBeansOfType(ApplicationRunner.class).values());
    // 从spring容器中获取CommandLineRunner类型的bean放入到集合runners中
		runners.addAll(context.getBeansOfType(CommandLineRunner.class).values());
    // 排序
		AnnotationAwareOrderComparator.sort(runners);
		for (Object runner : new LinkedHashSet<>(runners)) {
			if (runner instanceof ApplicationRunner) {
				callRunner((ApplicationRunner) runner, args);
			}
			if (runner instanceof CommandLineRunner) {
				callRunner((CommandLineRunner) runner, args);
			}
		}
	}
最后通过#callRunner()执行run方法
	private void callRunner(ApplicationRunner runner, ApplicationArguments args) {
		try {
			(runner).run(args);
		}
		catch (Exception ex) {
			throw new IllegalStateException("Failed to execute ApplicationRunner", ex);
		}
	}
5.总结
CommandLineRunner 和 ApplicationRunner 常用于应用启动后的初始化任务或一次性任务执行。它们允许你在 Spring 应用启动完成后立即执行一些逻辑。ApplicationRunner 更适合需要处理命令行参数的场景,而 CommandLineRunner 更简单直接。通过 @Order 注解可以控制多个 Runner 的执行顺序,确保初始化操作按特定顺序进行。


 被折叠的 条评论
为什么被折叠?
被折叠的 条评论
为什么被折叠?
 到【灌水乐园】发言


