


我这里是集成在springboot中使用
新建表单:
在forms文件夹下新建test.form文件
{
"key": "form1",
"name": "请假流程",
"fields": [
            {
            "id": "startTime",
            "name": "开始时间",
            "type": "date",
            "required": true,
            "placeholder": "empty"

            },
            {
            "id": "endTime",
            "name": "结束时间",
            "type": "date",
            "required": true,
            "placeholder": "empty"
            },
            {
            "id": "reason",
            "name": "请假原因",
            "type": "text",
            "required": true,
            "placeholder": "empty"
            }
    ]
}
建立流程图
在processes文件夹下新建流程NewProcess.bpmn
使用eclipse插件绘制
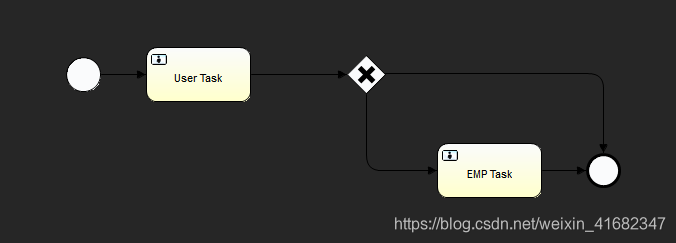
流程id为newProcess,设置每个节点的Form Key为form1 流程图如下:
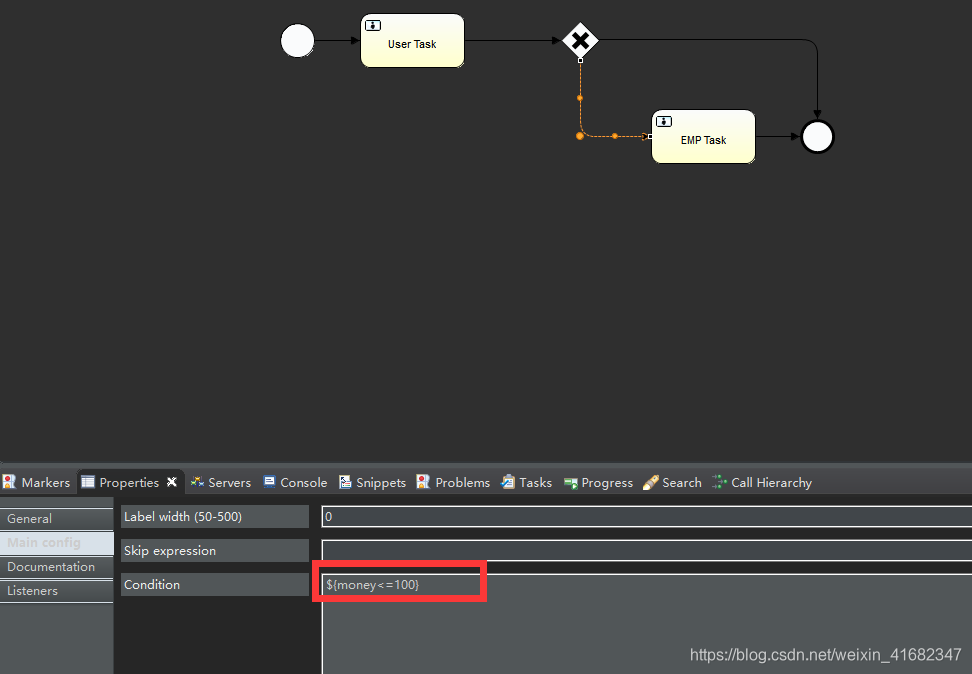
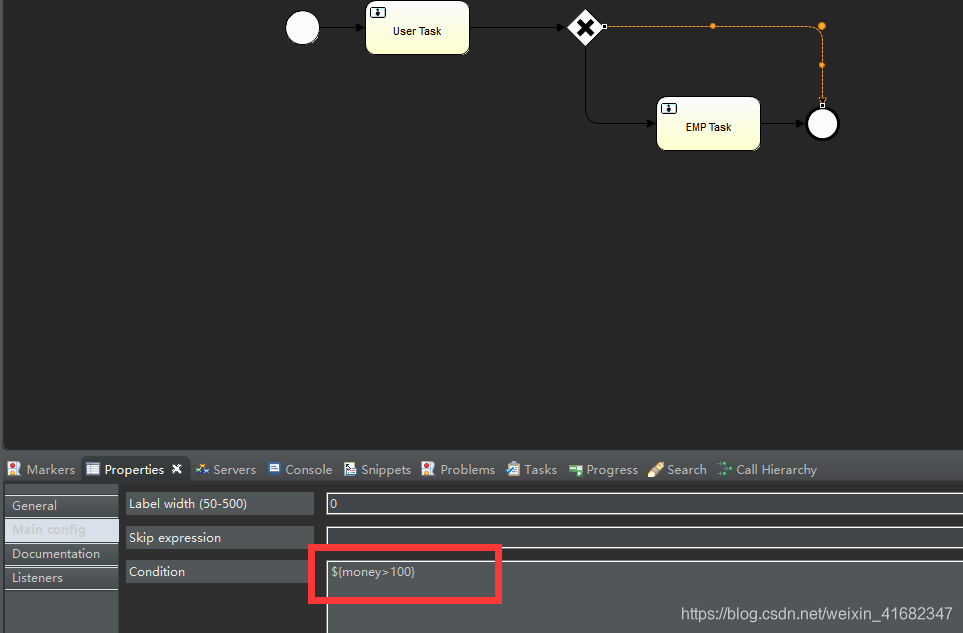
流程中排他网关后分支配置如下:
自动生成的XML代码如下
<?xml version="1.0" encoding="UTF-8"?>
<definitions xmlns="http://www.omg.org/spec/BPMN/20100524/MODEL" xmlns:xsi="http://www.w3.org/2001/XMLSchema-instance" xmlns:xsd="http://www.w3.org/2001/XMLSchema" xmlns:activiti="http://activiti.org/bpmn" xmlns:bpmndi="http://www.omg.org/spec/BPMN/20100524/DI" xmlns:omgdc="http://www.omg.org/spec/DD/20100524/DC" xmlns:omgdi="http://www.omg.org/spec/DD/20100524/DI" typeLanguage="http://www.w3.org/2001/XMLSchema" expressionLanguage="http://www.w3.org/1999/XPath" targetNamespace="http://www.activiti.org/test">
  <process id="newProcess" name="新流程-测试" isExecutable="true">
    <startEvent id="startevent2" name="Start"></startEvent>
    <userTask id="usertask1" name="User Task" activiti:assignee="fed56399-c419-4e8a-8c7b-664bc9d0144b" activiti:formKey="form1"></userTask>
    <sequenceFlow id="flow1" sourceRef="startevent2" targetRef="usertask1"></sequenceFlow>
    <userTask id="usertask2" name="EMP Task" activiti:formKey="form1"></userTask>
    <endEvent id="endevent1" name="End"></endEvent>
    <sequenceFlow id="flow3" sourceRef="usertask2" targetRef="endevent1"></sequenceFlow>
    <exclusiveGateway id="exclusivegateway1" name="Exclusive Gateway"></exclusiveGateway>
    <sequenceFlow id="flow4" sourceRef="usertask1" targetRef="exclusivegateway1"></sequenceFlow>
    <sequenceFlow id="flow5" sourceRef="exclusivegateway1" targetRef="usertask2">
      <conditionExpression xsi:type="tFormalExpression"><![CDATA[${money<=100}]]></conditionExpression>
    </sequenceFlow>
    <sequenceFlow id="flow6" sourceRef="exclusivegateway1" targetRef="endevent1">
      <conditionExpression xsi:type="tFormalExpression"><![CDATA[${money>100}]]></conditionExpression>
    </sequenceFlow>
  </process>
  <bpmndi:BPMNDiagram id="BPMNDiagram_newProcess">
    <bpmndi:BPMNPlane bpmnElement="newProcess" id="BPMNPlane_newProcess">
      <bpmndi:BPMNShape bpmnElement="startevent2" id="BPMNShape_startevent2">
        <omgdc:Bounds height="35.0" width="35.0" x="280.0" y="230.0"></omgdc:Bounds>
      </bpmndi:BPMNShape>
      <bpmndi:BPMNShape bpmnElement="usertask1" id="BPMNShape_usertask1">
        <omgdc:Bounds height="55.0" width="105.0" x="360.0" y="220.0"></omgdc:Bounds>
      </bpmndi:BPMNShape>
      <bpmndi:BPMNShape bpmnElement="usertask2" id="BPMNShape_usertask2">
        <omgdc:Bounds height="55.0" width="105.0" x="651.0" y="316.0"></omgdc:Bounds>
      </bpmndi:BPMNShape>
      <bpmndi:BPMNShape bpmnElement="endevent1" id="BPMNShape_endevent1">
        <omgdc:Bounds height="35.0" width="35.0" x="800.0" y="326.0"></omgdc:Bounds>
      </bpmndi:BPMNShape>
      <bpmndi:BPMNShape bpmnElement="exclusivegateway1" id="BPMNShape_exclusivegateway1">
        <omgdc:Bounds height="40.0" width="40.0" x="560.0" y="227.0"></omgdc:Bounds>
      </bpmndi:BPMNShape>
      <bpmndi:BPMNEdge bpmnElement="flow1" id="BPMNEdge_flow1">
        <omgdi:waypoint x="315.0" y="247.0"></omgdi:waypoint>
        <omgdi:waypoint x="360.0" y="247.0"></omgdi:waypoint>
      </bpmndi:BPMNEdge>
      <bpmndi:BPMNEdge bpmnElement="flow3" id="BPMNEdge_flow3">
        <omgdi:waypoint x="756.0" y="343.0"></omgdi:waypoint>
        <omgdi:waypoint x="800.0" y="343.0"></omgdi:waypoint>
      </bpmndi:BPMNEdge>
      <bpmndi:BPMNEdge bpmnElement="flow4" id="BPMNEdge_flow4">
        <omgdi:waypoint x="465.0" y="247.0"></omgdi:waypoint>
        <omgdi:waypoint x="560.0" y="247.0"></omgdi:waypoint>
      </bpmndi:BPMNEdge>
      <bpmndi:BPMNEdge bpmnElement="flow5" id="BPMNEdge_flow5">
        <omgdi:waypoint x="580.0" y="267.0"></omgdi:waypoint>
        <omgdi:waypoint x="580.0" y="343.0"></omgdi:waypoint>
        <omgdi:waypoint x="651.0" y="343.0"></omgdi:waypoint>
      </bpmndi:BPMNEdge>
      <bpmndi:BPMNEdge bpmnElement="flow6" id="BPMNEdge_flow6">
        <omgdi:waypoint x="600.0" y="247.0"></omgdi:waypoint>
        <omgdi:waypoint x="817.0" y="246.0"></omgdi:waypoint>
        <omgdi:waypoint x="817.0" y="326.0"></omgdi:waypoint>
      </bpmndi:BPMNEdge>
    </bpmndi:BPMNPlane>
  </bpmndi:BPMNDiagram>
</definitions>
带参数启动流程方法:
    @Transactional
    public void startProcessUser() {
    	//设置当前线程用户ID
    	String id = "fed56399-c419-4e8a-8c7b-664bc9d0144b";
    	//注意一点:这个方法最终使用一个ThreadLocal类型的变量进行存储,也就是与当前的线程绑定,所以流程实例启动完毕之后,需要设置为null,防止多线程的时候出问题。
    	Authentication.setAuthenticatedUserId(id);
    	//带参数开始流程
    	Map<String, Object> formProperties;
        formProperties = new HashMap<>();
        formProperties.put("reason", "家里有事");
        formProperties.put("startTime", "2018");
        formProperties.put("endTime", "2018");
        //启动流程
        ProcessInstance pi = runtimeService.startProcessInstanceByKey("newProcess", formProperties);
        log.info("id:" + pi.getId());
//    	Authentication.setAuthenticatedUserId(null);
        //查询第一个任务
        Task task = taskService.createTaskQuery().taskAssignee(Authentication.getAuthenticatedUserId()).singleResult();
        Map<String, Object> info = taskService.getVariables(task.getId());
        log.info("请假原因:" + info.get("reason"));
        taskService.complete(task.getId());
        //查询第二个任务(未指定人查询所有)
        task = taskService.createTaskQuery().singleResult();
        log.info("taskID:" + task.getName());
        //完成任务
        taskService.complete(task.getId());
    }
绑定表单启动流程方法:
    @Transactional
    public void startProcessFrom() {
    	String id = "fed56399-c419-4e8a-8c7b-664bc9d0144b";
    	Authentication.setAuthenticatedUserId(id);
    	ProcessInstance pi = runtimeService.startProcessInstanceByKey("newProcess");
    	log.info("id:" + pi.getId());
    	Task task = taskService.createTaskQuery().taskAssignee(Authentication.getAuthenticatedUserId()).singleResult();
    	log.info("流程中表单ID :" + task.getFormKey());
    	//获取个人任务表单
        FormInfo taskFM = taskService.getTaskFormModel(task.getId());
        SimpleFormModel fm = new SimpleFormModel();
        FormModel fmModel = taskFM.getFormModel();
        fm = (SimpleFormModel)fmModel;
        List<FormField> fields = fm.listAllFields();
        for(FormField ff:fields) {
        	log.info(ff.getId());
        	log.info(ff.getName());
        	log.info(ff.getValue() + "");
        }
    	//带表单流程
    	String outcome = "";
    	Map<String, Object> formProperties;
        formProperties = new HashMap<>();
        formProperties.put("reason", "家里有事");
        formProperties.put("startTime", "2018");
        formProperties.put("endTime", "2018");
        Map<String, Object> transientVariables = new HashMap<String, Object>(1);
        transientVariables.put("money", "190");
        taskService.completeTaskWithForm(task.getId(), taskFM.getId(), outcome, formProperties, transientVariables);
        //查询第二个任务(未指定人查询所有)
        task = taskService.createTaskQuery().singleResult();
        FormInfo fm2 = taskService.getTaskFormModel(task.getId());
        log.info(fm2.getKey());
        fmModel = fm2.getFormModel();
        fm = (SimpleFormModel)fmModel;
        fields = fm.listAllFields();
        for(FormField ff:fields) {
        	log.info(ff.getId());
        	log.info(ff.getName());
        	log.info(ff.getValue() + "");
        }
        //完成任务
        taskService.complete(task.getId());
    }
创建用户方法:
    /**
     * 创建用户
     * @param firstName
     * @param lastName
     * @param password
     * @param email
     * LianZheng-3130002311@qq.com
     * 2019年1月21日 下午5:35:27
     */
    @Transactional
    public void createUser(String firstName, String lastName, String password, String email) {
    	//生成ID
    	String id = UUID.randomUUID().toString();
    	User user = idmIdentityService.newUser(id);
    	user.setFirstName(firstName);
    	user.setLastName(lastName);
    	user.setPassword(password);
    	user.setEmail(email);
    	idmIdentityService.saveUser(user);
    	//根据id查询
    	user = idmIdentityService.createUserQuery().userId(id).singleResult();
    	log.info("创建成功 用户名:" + user.getLastName());
    	//设置当前线程用户ID
    	idmIdentityService.setAuthenticatedUserId(id);
    }
调用方法:createUser(姓,名,密码,邮箱)
附官方中文文档链接:Flowable官方中文文档
本人也是刚刚接触flowable,写的有什么不对的大神有什么指导请加我联系方式,我会回来修改,希望不会误导大家。
QQ:3130002311


 810
810

 被折叠的 条评论
为什么被折叠?
被折叠的 条评论
为什么被折叠?
 到【灌水乐园】发言


